post.
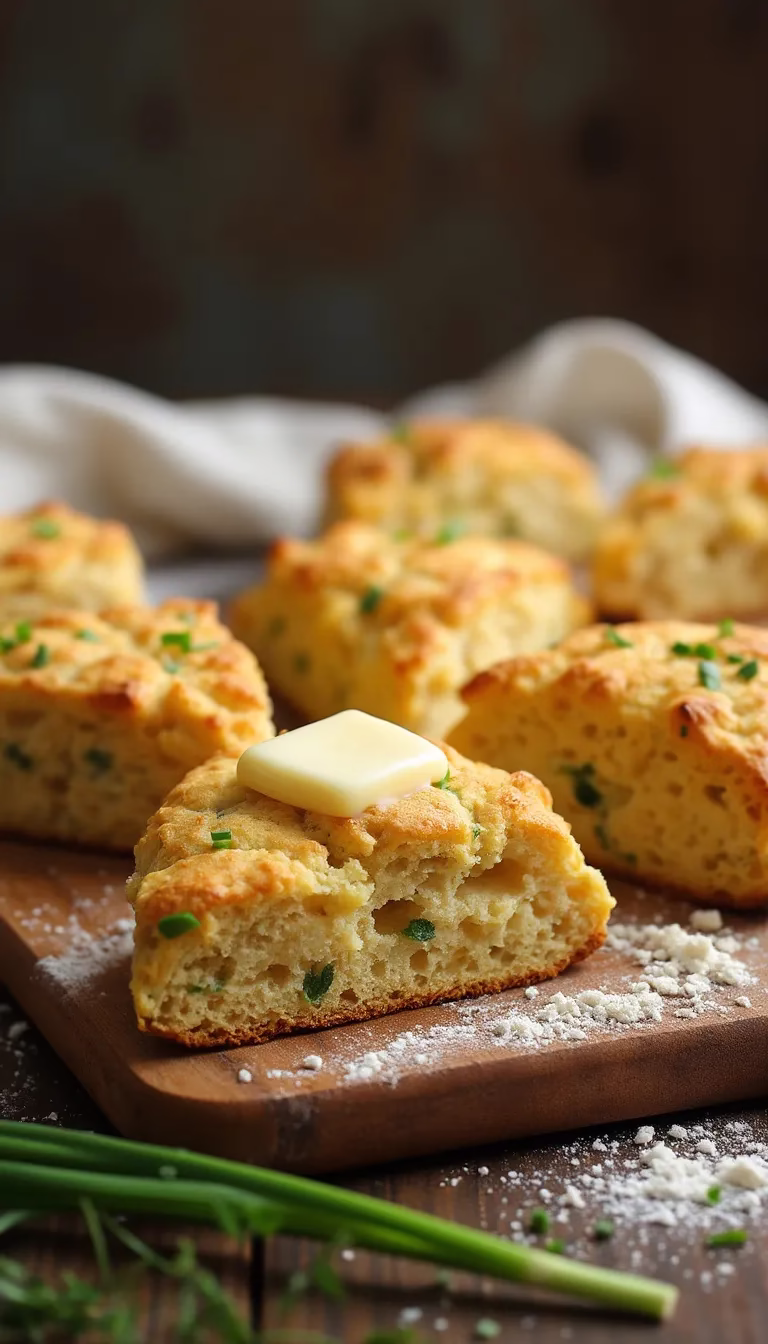
Okay, friends, let’s talk about something that’s become a real staple in my gluten-free world: Gluten-Free Cheddar and Chive Scones.
You see, baking had always been a love of mine, but when I discovered I had a gluten sensitivity, my heart kind of sunk. All those delightful breads and pastries… were they gone forever? Thankfully, the answer was a resounding NO! It just took some experimenting and, I admit, a few kitchen mishaps (remember that brick-hard attempt at gluten-free pizza dough? We try not to speak of it!).
But these scones? These are a total triumph. They’re savory, cheesy, fluffy… everything a good scone should be, just without the gluten. And honestly, even my gluten-loving friends can't get enough. It’s become my go-to recipe when I need something comforting and satisfying, especially for brunch or a light lunch, or even when I just fancy something savory to nibble on with a cup of tea.
And you know what? It's not just about dietary restrictions. These scones are delicious, period. So, dust off your baking sheets, and let’s get started! I promise you, you won’t regret it.
Ingredients You’ll Need (and a few sneaky substitutions!)
Alright, gather ‘round! Here’s the lineup for our star scones:
-
2 cups Gluten-Free All-Purpose Flour Blend: This is the base of our operation! I personally like a blend that already includes xanthan gum, which helps bind everything together, but double-check your blend. If it doesn't include xanthan gum, add ½ teaspoon to the recipe. I've found Bob's Red Mill 1-to-1 Baking Flour works beautifully, but King Arthur Measure for Measure is also a solid choice. If you are feeling adventurous you can use simple rice flour mix but I find the all propose works best.
-
2 teaspoons Baking Powder: For that beautiful rise! Make sure it’s fresh for best results (check the expiration date!).
-
½ teaspoon Baking Soda: A little baking soda helps with both leavening and browning.
-
½ teaspoon Salt: Don’t skimp on the salt! It balances the flavors and brings out the cheese.
-
¼ teaspoon Garlic Powder: A touch of savory magic! (Optional, but highly recommended).
-
6 tablespoons (3 oz) Cold Unsalted Butter: Cut into small cubes. This needs to be cold! I like to pop my butter in the freezer for about 15 minutes before I start. For a dairy-free version, use a good quality dairy-free butter alternative, also very cold.
-
¾ cup Grated Sharp Cheddar Cheese: The sharper, the better, in my opinion! Adds the perfect tang. A mild cheddar will work too if that's all you have on hand, but you might want to increase the amount slightly.
-
¼ cup Chopped Fresh Chives: These add a lovely fresh, oniony flavor. Dried chives can be used in a pinch (about 1 tablespoon), but fresh is definitely preferable. You could try using scallions or green onion.
-
¾ cup Buttermilk: This adds moisture and tang. If you don't have buttermilk on hand, you can make a quick substitute by adding 1 tablespoon of lemon juice or white vinegar to ¾ cup of milk (any kind!). Let it sit for 5 minutes to curdle slightly, then use as directed. For a dairy-free version, use plant-based milk (I recommend almond or soy) with the lemon juice/vinegar trick.
-
1 large Egg: For binding and richness.
-
1 tablespoon Milk (or plant-based milk) for brushing: For a beautiful golden-brown crust.
Let's Bake! Step-by-Step Instructions
Okay, time to put our aprons on and get baking! Follow these steps closely, and you'll be rewarded with the most amazing gluten-free scones.
-
Preheat and Prep: Preheat your oven to 400°F (200°C). Line a baking sheet with parchment paper. This will prevent sticking and make cleanup a breeze.
-
Dry Ingredients Unite!: In a large bowl, whisk together the gluten-free flour blend, baking powder, baking soda, salt, and garlic powder (if using). Whisking is important to evenly distribute the ingredients.
-
Butter Up! (The Fun Part): Add the cold, cubed butter to the dry ingredients. Use a pastry blender or your fingertips (working quickly so the butter doesn’t melt) to cut the butter into the flour until the mixture resembles coarse crumbs. You want to see small bits of butter still visible – this is what creates those flaky layers in the scones.
-
Cheese and Chives, Please: Stir in the grated cheddar cheese and chopped chives. Make sure they're evenly distributed throughout the flour mixture.
-
Wet Ingredients Join the Party: In a separate bowl, whisk together the buttermilk and egg.
-
Combine and Conquer: Pour the wet ingredients into the dry ingredients. Gently stir until just combined. Be careful not to overmix! Overmixing will develop the gluten (even though it's gluten-free flour!) and result in tough scones. The dough will be slightly sticky, and that's okay.
-
Shape Those Scones: Turn the dough out onto a lightly floured surface (use gluten-free flour!). Gently pat it into a ¾-inch thick disc. Use a sharp knife or a biscuit cutter (about 2-3 inches in diameter) to cut out scones. You can re-roll the scraps to cut out more scones, but they won’t be as tender.
-
Brush and Bake: Place the scones onto the prepared baking sheet, spacing them about 1 inch apart. Brush the tops with milk (or plant-based milk) for a golden crust.
-
Time to Bake!: Bake for 18-22 minutes, or until the scones are golden brown and a toothpick inserted into the center comes out clean.
- Cool (If You Can Wait!) Transfer the scones to a wire rack to cool slightly. They are best served warm or at room temperature. I personally love them straight from the oven with a pat of butter!
Tips & Tricks for Scone-tastic Success!
- Cold is Key: I cannot stress this enough! Cold butter is crucial for creating flaky scones. Freezing the butter for a few minutes before you start can really help.
- Don't Overmix: Overmixing is the enemy of tender scones. Mix until just combined. A few streaks of flour are okay.
- Get Creative with Flavors: Feel free to experiment with different cheeses and herbs. Parmesan and rosemary would be delicious! Sun-dried tomatoes are fun too.
- Make-Ahead Tip: You can prepare the dough ahead of time and refrigerate it for up to 24 hours. Just wrap it tightly in plastic wrap. When you're ready to bake, take it out of the refrigerator and let it warm up slightly before cutting and baking.
- Freezing for Later: These scones freeze beautifully! Let them cool completely, then wrap them individually in plastic wrap and place them in a freezer bag. To reheat, bake them in a preheated oven at 350°F (175°C) for about 10-15 minutes, or until warmed through.
- Serving Suggestions: Serve these scones with butter, cream cheese, or a dollop of Greek yogurt. They're also delicious with soup or salad.
The Scone Recipe Card – Quick & Easy!
Gluten-Free Cheddar and Chive Scones
Prep Time: 15 minutes
Cook Time: 18-22 minutes
Yield: 8-10 scones
Ingredients:
- 2 cups Gluten-Free All-Purpose Flour Blend (with xanthan gum already added, if not add ½ tsp.)
- 2 teaspoons Baking Powder
- ½ teaspoon Baking Soda
- ½ teaspoon Salt
- ¼ teaspoon Garlic Powder (optional)
- 6 tablespoons (3 oz) Cold Unsalted Butter, cubed
- ¾ cup Grated Sharp Cheddar Cheese
- ¼ cup Chopped Fresh Chives
- ¾ cup Buttermilk
- 1 large Egg
- 1 tablespoon Milk (or plant-based milk), for brushing
Instructions:
- Preheat oven to 400°F (200°C). Line a baking sheet with parchment paper.
- Whisk together flour, baking powder, baking soda, salt, and garlic powder (if using) in a large bowl.
- Cut in cold butter until mixture resembles coarse crumbs.
- Stir in cheddar cheese and chives.
- Whisk together buttermilk and egg in a separate bowl.
- Pour wet ingredients into dry ingredients and gently stir until just combined.
- Turn dough out onto a lightly floured surface and pat into a ¾-inch thick disc. Cut out scones with a knife or biscuit cutter.
- Place scones on the prepared baking sheet, spacing them 1 inch apart. Brush with milk.
- Bake for 18-22 minutes, or until golden brown.
- Cool slightly before serving.
Product Recommendations
To make your baking experience even smoother, here are a few of my favorite kitchen tools:
-
Pastry Blender: This pastry blender makes cutting the butter into the flour a breeze! It ensures even distribution and prevents your hands from warming the butter too much.
-
Non-Stick Baking Sheet: No-stick here makes clean up easy. Find yours here!
-
Gluten-Free Flour Blend: I always have Bob's Red Mill on-hand. Add it to your cart today
So there you have it, my friends! My go-to gluten-free cheddar and chive scone recipe, shared with love (and a sprinkle of gluten-free flour!). I sincerely hope you give these a try. They're perfect for sharing with friends and family, or simply enjoying all by yourself with a good book and a cup of tea. Let me know in the comments below if you make them and what variations you try! Happy baking!