Here's a blog post about a Gluten-Free Focaccia, designed to be engaging, helpful, and SEO-friendly:
Sunshine on a Plate: My Absolute Favorite Gluten-Free Focaccia Recipe
Okay, friends, let’s talk focaccia. Before going gluten-free, a warm, golden-brown slice of focaccia dripping with olive oil was my absolute weakness. I missed it terribly. Store-bought versions? Never quite hit the mark. They were either dense, dry, or suspiciously…oddly sweet. So, I did what any self-respecting gluten-free baker would do: I locked myself in the kitchen and declared Focaccia War. After many, many attempts (some hilarious, some disastrous), I finally cracked the code. This gluten-free focaccia recipe is now a staple in my house. It's fluffy, flavorful, and has that signature chewy-crisp crust that’s just irresistible. And believe me, no one will ever guess it's gluten-free!
This isn't your everyday, basic bread recipe. This is celebration bread. Think Sunday brunch, picnics in the park, or just a Tuesday afternoon when you need a little sunshine in your life. It's the kind of bread that makes people say, "Wow! Did you make this?" Get ready to bask in the compliments.
What You'll Need to Create Your Gluten-Free Masterpiece:
Here's the list of ingredients you'll need to create a fabulous focaccia:
- 1 ½ cups (360ml) Warm Water: Make sure it's warm, not hot. Think bathwater for a baby – we want to activate the yeast.
- 1 teaspoon Honey: This feeds the yeast and adds a subtle sweetness. You can substitute agave if you prefer.
- 2 teaspoons Active Dry Yeast: This is the magic that makes the bread rise. If using instant yeast, skip the initial proofing step.
- 2 cups (250g) Gluten-Free All-Purpose Flour Blend with Xanthan Gum: I highly recommend Bob's Red Mill Gluten-Free 1-to-1 Baking Flour. Different blends can yield different results, so sticking with a reliable one is key.
- ½ cup (60g) Tapioca Starch: This helps create that lovely chewiness.
- 1 teaspoon Salt: Enhances the flavors and controls the yeast. Don't skimp on the salt!
- ¼ cup (60ml) Olive Oil, plus more for drizzling: We're using olive oil in the dough, and on the dough. Good quality olive oil makes a huge difference in the final flavour.
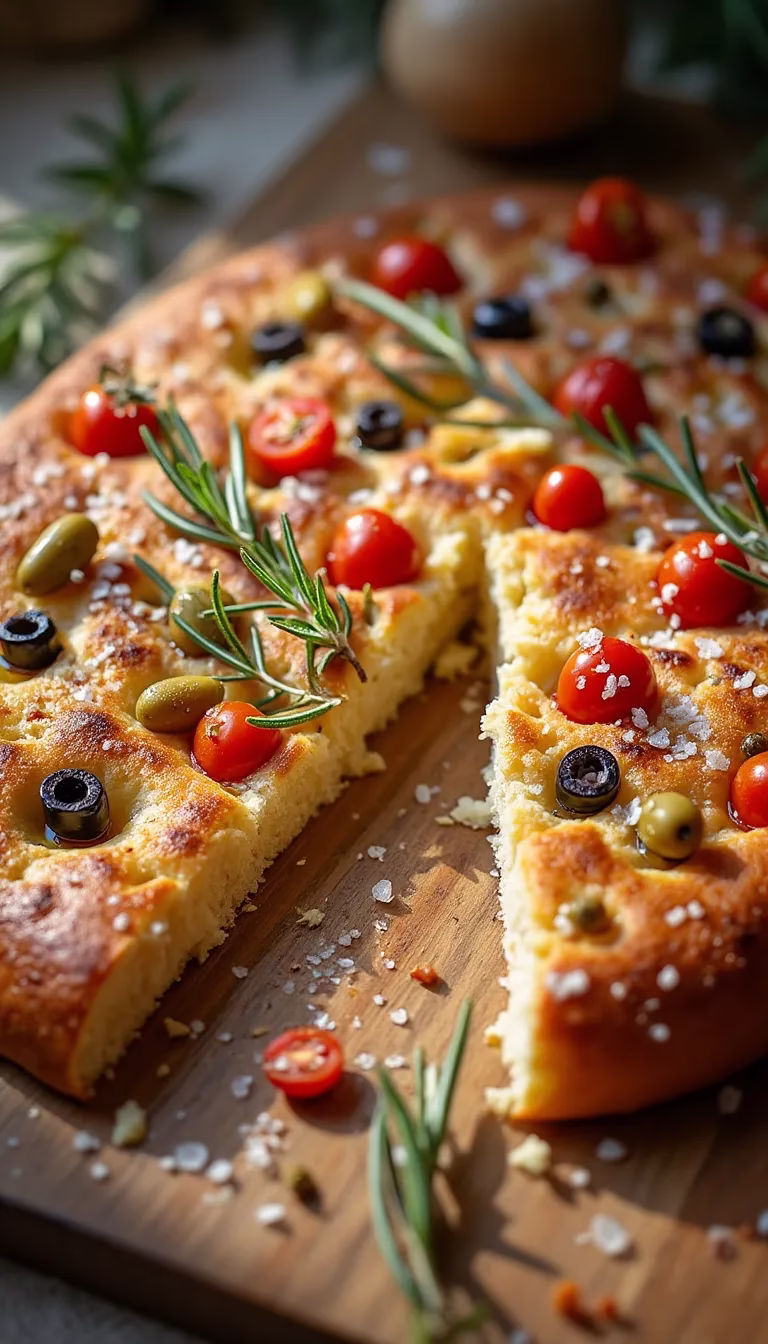
- Toppings of your choice: I love using fresh rosemary, flaky sea salt, cherry tomatoes, olives, and garlic. But hey, get creative!
Let's Get Baking: Step-by-Step Instructions
Alright, grab your apron, put on some music, and let's get started.
- Proof the Yeast: In a large bowl, combine the warm water, honey, and yeast. Stir gently and let it sit for 5-10 minutes, or until foamy. This tells us the yeast is alive and kicking. If nothing happens, your yeast might be expired – grab a fresh packet!
- Combine the Dry Ingredients: In a separate bowl, whisk together the gluten-free flour blend, tapioca starch, and salt. This ensures everything is evenly distributed.
- Bring it All Together: Add the dry ingredients and ¼ cup of olive oil to the yeast mixture. Use a [stand mixer with a dough hook](Amazon link) (this is where it really shines – makes things so much easier!) or a sturdy spoon to mix until a shaggy dough forms. It will be quite sticky – don't panic, that's normal!
- First Rise (Bulk Fermentation): Cover the bowl with plastic wrap or a damp towel and let it rise in a warm place for 1-1.5 hours, or until doubled in size. This is crucial for developing the flavor and texture. Don't rush this step! A warm oven (turned off, of course) is a happy place for dough to rise.
- Prepare the Baking Sheet: Generously grease a 9×13 inch baking sheet with olive oil. Really get in there and make sure every corner is coated. This prevents sticking and helps create a beautiful, crispy crust.
- Transfer and Shape: Gently transfer the dough to the prepared baking sheet. It will be sticky, so use oiled hands to spread it out evenly. Don't be afraid to push and stretch – that's part of the fun!
- Dimpling Time: This is my favorite part! Use your fingertips to create deep dimples all over the dough. Don't be shy; really press those dimples in. These little pockets will hold all that delicious olive oil and those amazing toppings.
- Drizzle with Olive Oil and Add Toppings: Generously drizzle the dough with more olive oil. Then, sprinkle with flaky sea salt and your desired toppings. I love the classic rosemary and cherry tomato combo, but feel free to get creative! Pitted olives, roasted garlic, or even a sprinkle of Parmesan cheese are all fantastic options.
- Final Proof: Cover the baking sheet loosely with plastic wrap and let it rise for another 30 minutes. This gives the dough one last chance to puff up.
- Bake!: Preheat your oven to 400°F (200°C). Bake the focaccia for 25-30 minutes, or until golden brown and the bottom sounds hollow when tapped. Keep an eye on it; ovens vary, so you might need to adjust the baking time. Using a [good oven thermometer](Amazon link) can help you ensure accurate temperatures.
- Cool and Enjoy: Let the focaccia cool on the baking sheet for a few minutes before slicing and serving. It's best enjoyed warm, with a drizzle of extra olive oil or a side of balsamic vinegar for dipping.
Tips & Tricks for Gluten-Free Focaccia Perfection
- Don't Overmix the Dough: Overmixing can lead to a tough, dense focaccia. Mix just until the ingredients are combined.
- Use a Reliable Gluten-Free Flour Blend: As mentioned earlier, Bob's Red Mill Gluten-Free 1-to-1 Baking Flour is a good starting point. Experiment with other blends, but be prepared for variations in texture and taste.
- Embrace the Stickiness: Gluten-free dough is naturally stickier than traditional dough. Don't be afraid to use oiled hands or a dough scraper to work with it.
- Get Creative with Toppings: The possibilities are endless! Try adding roasted vegetables, herbs, cheeses, or even a sprinkle of chili flakes for a spicy kick.
- Make it Ahead: You can prepare the dough ahead of time and store it in the refrigerator for up to 24 hours. Just bring it to room temperature before baking.
- Adjust the Rising Time: Rising times will vary depending on the temperature and humidity in your kitchen. Don't rely solely on the clock; instead, look for the dough to double in size.
Gluten-Free Focaccia Recipe Card
Yields: 8-10 servings
Prep Time: 20 minutes (plus rising time)
Cook Time: 25-30 minutes
Ingredients:
- 1 ½ cups (360ml) Warm Water
- 1 teaspoon Honey
- 2 teaspoons Active Dry Yeast
- 2 cups (250g) Gluten-Free All-Purpose Flour Blend with Xanthan Gum
- ½ cup (60g) Tapioca Starch
- 1 teaspoon Salt
- ¼ cup (60ml) Olive Oil, plus more for drizzling
- Toppings of your choice (rosemary, flaky sea salt, cherry tomatoes, olives, garlic)
Instructions:
- In a large bowl, combine warm water, honey, and yeast. Let sit for 5-10 minutes, or until foamy.
- In a separate bowl, whisk together gluten-free flour blend, tapioca starch, and salt.
- Add the dry ingredients and ¼ cup of olive oil to the yeast mixture. Mix until a shaggy dough forms.
- Cover and let rise in a warm place for 1-1.5 hours, or until doubled in size.
- Grease a 9×13 inch baking sheet with olive oil.
- Transfer dough to the baking sheet and spread out evenly.
- Use your fingertips to create deep dimples all over the dough.
- Drizzle with more olive oil, sprinkle with flaky sea salt, and add your desired toppings.
- Cover loosely and let rise for another 30 minutes.
- Preheat oven to 400°F (200°C). Bake for 25-30 minutes, or until golden brown.
- Cool slightly before slicing and serving.
There you have it! Your very own, incredibly delicious, gluten-free focaccia. I hope you love it as much as I do! Let me know in the comments how it turns out, and what toppings you used. Happy baking!