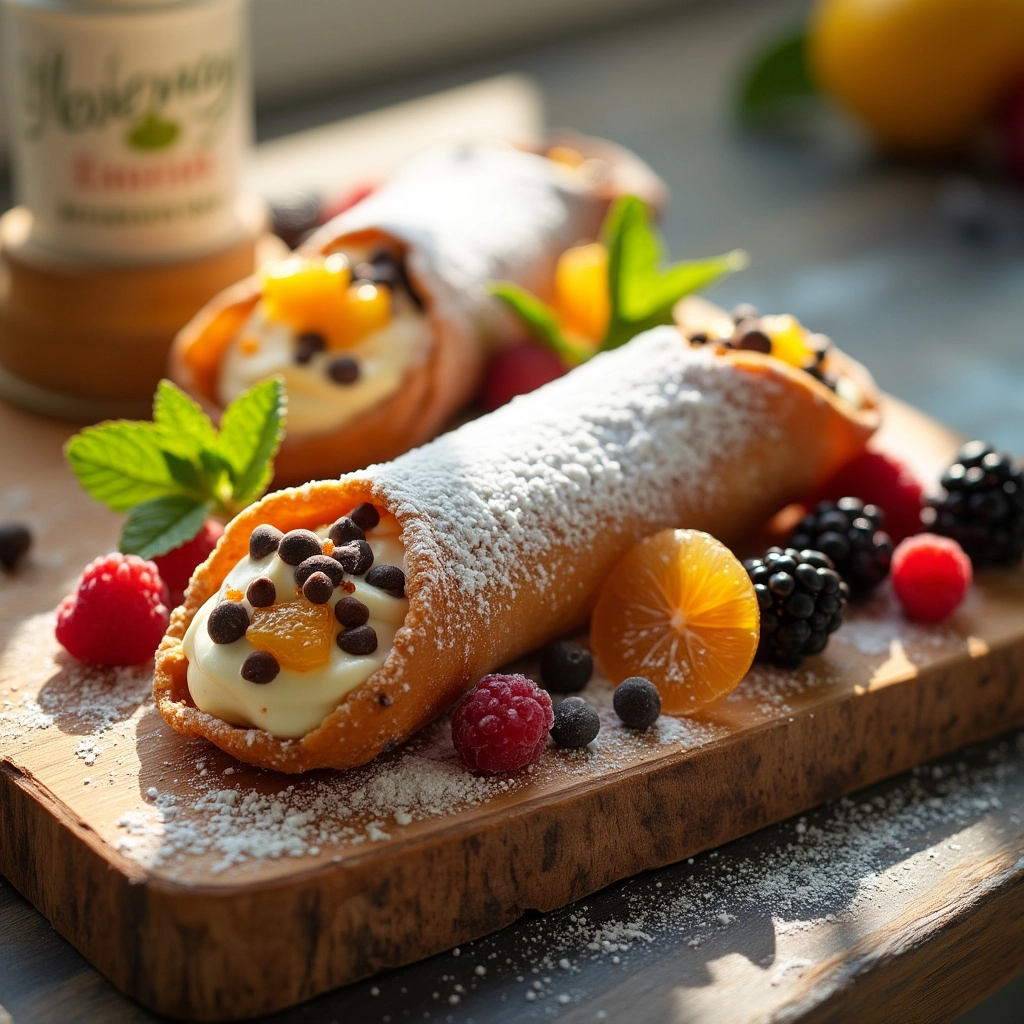
Gluten-Free Cannoli: A Dream Dessert Come True
Crispy, creamy, and utterly irresistible, these gluten-free cannoli bring the joy of classic Italian pastry back into your life. If you’ve been missing out on this iconic treat, prepare to be amazed by how easily you can recreate it at home, without the gluten! For more Italian-inspired gluten-free delights, be sure to check out our recipe for Gluten-Free Tiramisu – another beloved classic made accessible.
This recipe delivers that signature shatteringly crisp shell and a smooth, sweet ricotta filling that will transport you straight to dessert heaven. Whether you prefer classic flavors or enjoy experimenting with chocolate chips, candied citrus, or chopped nuts, these cannoli are a blank canvas for your culinary creativity. If you’re in the mood for other gluten-free desserts, why not try our Classic Gluten-Free Eclairs?
Understanding Gluten-Free Cannoli
Creating gluten-free cannoli involves a few key considerations to ensure the perfect texture and flavor. The dough requires a carefully selected gluten-free flour blend to achieve that essential crispness. Also, if you’re looking for other recipes, consider trying our 10 Easy Gluten-Free Recipes for Beginners.
Gluten-Free Cannoli Recipe
Follow these step-by-step instructions to create delightful gluten-free cannoli. Enjoy the satisfying crunch of the shell and the sweet, creamy filling!
Step-by-Step Instructions for Gluten-Free Cannoli
Making the Gluten-Free Cannoli Shells:
- Combine Dry Ingredients: In the bowl of a stand mixer, whisk together 4 cups (560g) of Kim’s gluten-free flour blend (or your preferred high-quality gluten-free blend), 2 tablespoons of brown sugar, ¼ teaspoon of kosher salt, ½ teaspoon of nutmeg, and 2 teaspoons of cinnamon using the paddle attachment.
- Add Wet Ingredients: Add 3 tablespoons of softened butter and 2 large egg yolks to the dry ingredients. Mix until the mixture becomes crumbly.
- Incorporate Marsala Wine: Slowly add 1¼ cups (300ml) of sweet Marsala wine while mixing on low speed. Continue until the dough comes together and pulls away from the sides of the bowl. Note that you might need slightly more or less Marsala wine depending on your local humidity. The dough should be quite stiff.
- Rest the Dough: Form the dough into a ball, wrap it tightly in plastic wrap, and let it rest at room temperature for about 30 minutes. This allows the flours to hydrate fully.
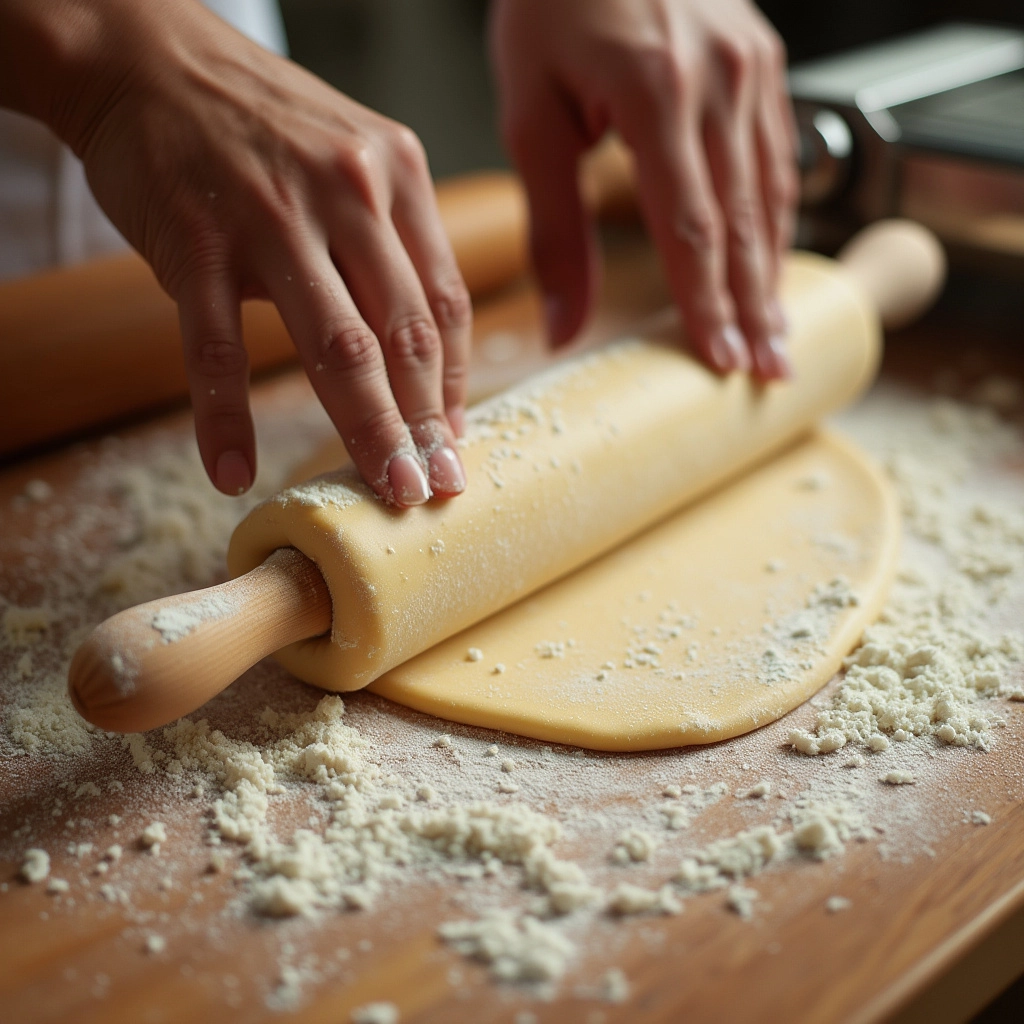
- Roll Out the Dough: Divide the dough in half. On a lightly floured surface, roll out one half at a time until it’s almost paper-thin. Alternatively, use a pasta roller to achieve a very thin consistency.
- Cut the Circles: Use a large (6-inch) round cutter for larger cannoli, or a 4-inch cutter for smaller ones, and cut circles from the dough.
- Wrap and Seal: Place a cannoli tube on one circle and spray the tube lightly with gluten-free cooking spray. Loosely wrap the dough circle around the cannoli form and seal the seam with a brush of leftover egg white. Press firmly to ensure it adheres well.
Air Frying the Cannoli Shells (Gluten-Free):
- Preheat: Preheat your air fryer to 400°F (200°C).
- Prepare for Air Frying: Spray the air fryer basket with gluten-free cooking spray and place the cannoli shells in the basket. Lightly spray the tops of the cannoli shells with cooking spray as well.
- Air Fry: Air fry for about 6 minutes. Air fryers vary, so you may need to adjust the time to find what works best for your model. Start by frying one at a time to dial in the perfect timing.
Deep Frying the Cannoli Shells (Gluten-Free):
- Heat the Oil: In a large, heavy-duty pot, heat your choice of oil (canola, vegetable, shortening, or lard) over medium heat until it reaches 350°F (175°C).
- Fry: Carefully lower about 3-4 cannoli forms into the hot oil using tongs. Fry until golden brown, about 2-4 minutes.
- Drain: Remove the fried cannoli and place them on paper towels to drain excess oil. Carefully slide the cannoli shell off the form once it’s cool enough to handle. Allow the forms to cool before reusing.
Making the Ricotta Cream Filling:
- Drain the Ricotta: Whether using homemade or store-bought ricotta, ensure it is well-drained. Place it in a cheesecloth-lined sieve over a bowl and refrigerate overnight.
- Whip Ricotta: Add the drained ricotta to the bowl of a stand mixer fitted with the whisk attachment. Whip until loosened and creamy.
- Add Sweeteners and Flavor: Gradually add 1 cup (200g) of granulated sugar, followed by ½ teaspoon of cinnamon and 1 tablespoon of vanilla extract. Increase the mixer speed to medium-high and whip until the mixture is creamy and smooth, resembling a thick buttercream frosting.
Assembling the Cannoli:
- Prepare Pastry Bag: Fill a pastry bag fitted with a large plain tip, or use a gallon-size zip-top bag, with the ricotta cream.
- Fill Shells: Pipe the ricotta cream into the cooled cannoli shells.
- Garnish: Dip the ends of the filled cannoli in your desired toppings, such as mini chocolate chips, chopped maraschino cherries, or chopped pistachios.
- Dust and Serve: Dust the cannoli with powdered sugar and serve immediately. Enjoy!
Tip: Only fill the cannoli shells when you are ready to serve them to prevent the shells from becoming soggy. For best results, store the cannoli cream in the refrigerator (in a pastry bag or zip-top bag) until you’re ready to use it. The cannoli shells can be stored at room temperature for up to one week.
Dough Storage: You don’t have to use all of the dough at once. You can wrap any remaining dough in plastic wrap and store it in the refrigerator for up to 4 days, or freeze it (well wrapped) for up to 3 months. Thaw the dough in the refrigerator overnight before using.
Gluten-Free Cannoli: A Taste of Italy, Reimagined
Enjoy the authentic flavors of Italy with our gluten-free cannoli recipe! Crispy shells filled with a sweet, creamy ricotta filling—perfect for any occasion. This recipe brings a classic dessert into the gluten-free world without compromising on taste or texture.
Ingredients
For the Shells:
- 4 cups (560g) Kim’s gluten free flour blend (or another high-quality gf flour blend)
- 2 tablespoon brown sugar
- ¼ teaspoon kosher salt
- 3 tablespoon softened butter
- 2 large egg yolks
- ½ teaspoon nutmeg
- 2 teaspoon cinnamon
- 1¼ cups (300ml) sweet Marsala wine (or 1 tablespoon white vinegar and enough grape juice to make 1¼ cups)
- gluten free canola oil spray (if air frying)
- canola oil, vegetable oil, shortening, or lard (if deep frying)
For the Filling:
- 3 cups homemade ricotta cheese (or well drained store bought)
- 1 cup (200g) granulated sugar
- 1 tablespoon vanilla extract
- ½ teaspoon cinnamon
- mini chocolate chips, chopped maraschino cherries, and/or chopped pistachios, if desired
For Garnish:
- powdered sugar for dusting
- additional cherries, chocolate chips, and/or pistachios for ends
Nutritional Information & Gluten-Free Benefits
These gluten-free cannoli are a delightful treat that caters to those with gluten sensitivities, without sacrificing the traditional taste and texture. Here’s a closer look at the nutritional benefits:
- Gluten-Free Flour Blend: Using a high-quality gluten-free flour blend ensures that the shells are safe for those with celiac disease or gluten intolerance. These blends often include a mix of rice flour, tapioca starch, and potato starch, providing a texture similar to traditional wheat flour.
- Ricotta Cheese: A good source of protein and calcium, ricotta cheese adds a creamy texture and essential nutrients to the filling.
- Lower Sugar Options: Adjust the amount of sugar to your liking, or use natural sweeteners like stevia or monk fruit to reduce the overall sugar content while maintaining sweetness.
- Healthy Fats: The butter in the shell recipe provides healthy fats, contributing to the crispy texture. For a healthier option, consider using coconut oil.
Tips, Substitutions, and Variations
Make these gluten-free cannoli your own with these helpful tips and delicious variations:
- Dairy-Free Option: Substitute the ricotta cheese with a dairy-free alternative made from cashews or almonds to cater to those with lactose intolerance or dairy allergies.
- Vegan Option: Use a vegan ricotta alternative and replace the egg yolks with flax eggs (1 tablespoon flaxseed meal mixed with 3 tablespoons water per egg) for a completely vegan version.
- Flavor Variations:
- Citrus Zest: Add orange or lemon zest to the ricotta filling for a burst of citrus flavor.
- Coffee Infusion: Mix a teaspoon of instant coffee into the ricotta filling for a coffee-flavored twist.
- Nutty Delight: Incorporate chopped almonds, hazelnuts, or walnuts into the filling or as a garnish.
- Air Fryer Tips:
- Even Cooking: Ensure even cooking by preheating your air fryer and spraying the shells lightly with gluten-free canola oil spray.
- Adjust Time: Air fryer models vary, so keep a close eye on the cannoli while they cook to achieve the perfect golden-brown color.
- Make Ahead: Prepare the shells and filling separately and assemble just before serving to prevent the shells from becoming soggy. Store the shells in an airtight container at room temperature and the filling in the refrigerator.
Enjoy creating these delightful gluten-free cannoli, perfect for sharing with friends and family. Buon appetito!
Essential Equipment for This Recipe
To prepare this delicious recipe, you’ll need the following kitchen tools:
- Mixing Bowls – A set of good mixing bowls is essential for combining ingredients.
Find Mixing Bowls on Amazon - Measuring Cups and Spoons – Accuracy is key for baking!
Find Measuring Cups and Spoons on Amazon - Baking Sheets – For evenly baked goods.
Find Baking Sheets on Amazon - Whisks – Great for whipping air into ingredients.
Find Whisks on Amazon - Spatulas – Perfect for scraping bowls clean and folding ingredients.
Find Spatulas on Amazon - Food Processors – Helpful for quickly chopping or pureeing ingredients.
Find Food Processors on Amazon - Saucepans – Needed for heating sauces and liquids.
Find Saucepans on Amazon - Chef’s Knives – A good knife is essential for any kitchen.
Find Chef’s Knives on Amazon - Cutting Boards – To protect your countertops while you prep.
Find Cutting Boards on Amazon