Homemade Goodness: Your New Favorite Gluten-Free Fig Bars!
Hello, fellow food lovers and gluten-free adventurers! Are you ready to bake up a batch of pure joy that will transport you straight to snack heaven? Today, we’re diving into a recipe that’s incredibly close to our hearts here at Be Gluten Free: unbelievably delicious, soft, and chewy gluten free fig bars. If you’ve ever longed for that nostalgic, comforting taste of a classic fig bar but needed a fantastic gluten-free version that truly delivers, then you’ve absolutely come to the right place. These aren’t just any fig bars; they’re a healthier, homemade delight that will have everyone, gluten-free or not, reaching for just one more!
We truly understand that navigating the world of gluten-free snacks can sometimes feel like a quest for hidden treasure. So many store-bought options can be a letdown – perhaps the texture isn’t quite right, the ingredient list is a mile long, or they’re packed with more sugar than you’d like. That’s precisely why we’re so utterly thrilled to share this cherished recipe for homemade gluten free fig bars. Picture this: a tender, yet satisfyingly substantial cookie exterior crafted with wholesome almond flour (giving them a wonderful nutritional boost and keeping you fuller for longer!), encasing a sweet, rich, and luscious fig filling bursting with natural flavor. Making these incredibly satisfying gluten free fig bars from scratch means you are the master of your ingredients, ensuring they fit perfectly into your healthy, gluten-free lifestyle. And trust us, the divine aroma that will fill your kitchen as these bake is a delightful reward in itself! It’s all about bringing simple, wholesome joy back to your baking, similar to the comfort you’d find in our Warm Gluten-Free Apple Crisp.
These homemade gluten free fig bars are so much more than just a treat; they represent the freedom and deliciousness possible on a gluten-free diet. They are wonderfully versatile – perfect for popping into lunchboxes, enjoying as an energizing afternoon pick-me-up with a warm cup of tea, or even grabbing as a quick, wholesome breakfast bite on busy mornings. They stand as delicious proof that eating gluten-free doesn’t mean you have to compromise on flavor, texture, or those comforting classic bakes. In fact, many of us here think these homemade versions are even better than their traditional, gluten-filled counterparts! Plus, you’ll be amazed at how simple they are to whip up. If you’re inspired to explore more easy gluten-free baking, why not try these zesty Gluten-Free Lemon Poppyseed Muffins, or for another fantastic grab-and-go option, our Homemade Trail Mix is always a winner. Get ready to discover the pure satisfaction and ease of creating your very own, utterly irresistible gluten free fig bars!
“`
Why This Gluten-Free Fig Bar Recipe Works Wonders
Creating truly delightful baked goods without gluten can feel like a culinary puzzle, but this recipe for gluten free fig bars solves it beautifully! It delivers on that classic soft, chewy interior and tender crust we all crave, proving that going gluten-free doesn’t mean sacrificing taste or texture. Let’s dive into the secrets behind why these homemade gluten free fig bars are so exceptionally good.
The Power Duo: Almond Flour and Coconut Flour
The foundation of any successful gluten-free bake is the flour blend, and this recipe hits the sweet spot with a combination of almond flour and coconut flour. Gluten, the protein network in wheat, provides structure and elasticity. Without it, gluten-free doughs can be crumbly or dense. This recipe cleverly uses the strengths of two distinct flours to compensate:
* Almond Flour: Made from ground almonds, almond flour is higher in fat and protein than traditional wheat flour. This translates to a wonderfully tender, moist crumb and contributes to structure without the need for gluten’s elasticity. The fat adds richness and helps keep the bars from drying out. It provides a foundational structure that is less prone to crumbling compared to some other gluten-free options.
* Coconut Flour: This flour is incredibly absorbent. While you only need a small amount, it plays a crucial role. It helps to soak up excess moisture, preventing the dough from becoming too sticky or greasy (a common issue with higher-fat flours like almond flour). Its binding properties help hold the ingredients together, providing necessary cohesion alongside the almond flour and egg. The specific ratio here is key – just enough coconut flour for moisture control and binding without making the bars dry or gritty.
Essential Binders and Moisturizers
Beyond the flours, other ingredients step up to perform gluten’s binding job and ensure a pleasant texture.
* Egg: The egg acts as a primary binder, helping to connect the fats and flours into a cohesive dough. It also adds richness and contributes to the final structure and tenderness of the crust on these gluten-free fig bars.
* Melted Butter (or Ghee/Oil): Fat is vital for tenderness in gluten-free baking. Melted butter coats the flour particles, inhibiting excessive binding (which can happen even with alternative flours) and creating a soft, melt-in-your-mouth texture. It also carries flavor beautifully.
* Maple Syrup: As a liquid sweetener, maple syrup adds moisture and contributes to the bar’s soft chewiness. Sugar, in solution, helps keep baked goods tender by interfering with structural development. Maple syrup provides this function while also contributing its unique, warm flavor that pairs perfectly with figs.
The Fig Filling Factor
The filling isn’t just about flavor; its texture is important too. By blending the dried figs with maple syrup, spices, and a touch of lemon juice in a food processor, you create a smooth, cohesive paste. This paste remains pliable and moist even after baking, providing that signature soft, chewy center that contrasts delightfully with the tender crust of these homemade gluten-free fig bars. The moisture from the filling also helps keep the surrounding crust soft.
Technique Matters
The simple technique of using a food processor to combine the dough ingredients is ideal for gluten-free baking. Over-handling gluten-free dough can make it tough (though less so than wheat dough), and processing quickly brings it together without extensive mixing. The chilling step allows the flours to fully hydrate and the fats to firm up, making the dough easier to handle for rolling and shaping your perfect gluten free fig bars. Rolling between parchment is a brilliant hack to manage the potentially sticky dough without adding excess flour, which could make the bars dry.
In conclusion, this recipe for gluten free fig bars succeeds because it thoughtfully combines ingredients that provide structure, moisture, and tenderness in the absence of gluten. The specific blend of almond and coconut flour, supported by the binding power of egg and the tenderizing effects of fat and liquid sweetener, works in harmony with the moist fig filling and smart techniques to produce bars that are not just “good for gluten-free,” but absolutely delicious in their own right. Enjoy every soft, chewy bite of these wonderful gluten-free fig bars!
Transform Your Mornings with 33 FREE Gluten-Free Breakfasts!
Unlock delicious, easy-to-make recipes that will make you excited to start every single day. No more boring breakfasts, just pure flavor and joy!

Get Your FREE Breakfast Ebook Now!
(No credit card required. Instant download.)
Ingredients, Nutritional Information, and Additional Tips for Gluten-Free Fig Bars
Creating delicious, healthy gluten free fig bars right at home means you have full control over the ingredients. This section breaks down exactly what you’ll need, the nutritional benefits of these wonderful bars, and how you can adapt the recipe to suit different dietary needs or simply switch things up!
Ingredients
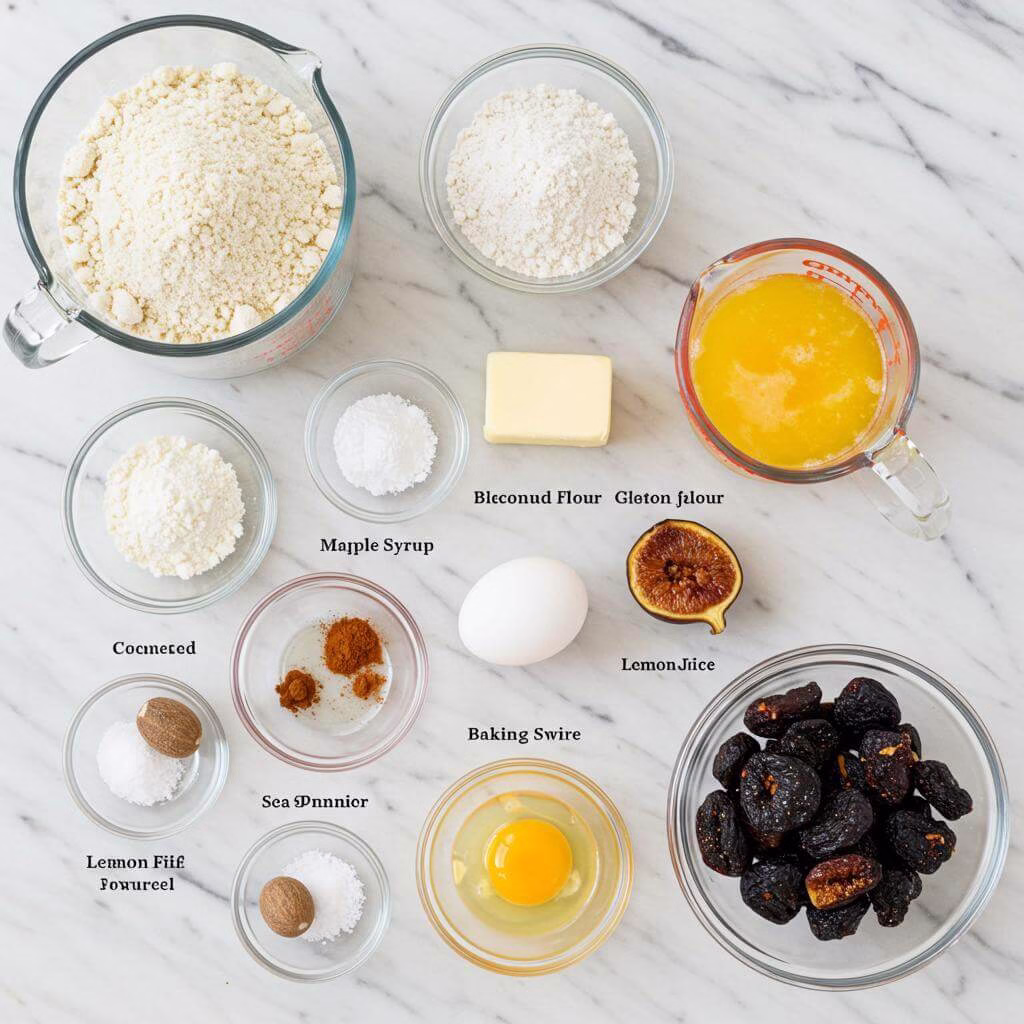
Gathering the right ingredients is the first step to baking these delightful homemade gluten-free fig bars. Here is the precise list:
- For Cookie Crust:
- 2.5 cups blanched almond flour: This is the primary flour for the cookie crust, providing a tender texture and a rich, nutty flavor. Almond flour is naturally gluten-free and adds protein and healthy fats, contributing to a more satisfying and nutrient-dense bar. Find blanched almond flour here.
- 3 tablespoons coconut flour or oat flour: Coconut flour is highly absorbent and helps bind the dough. Oat flour (ensure it’s certified gluten-free) works similarly. Both contribute unique textures and fiber to the crust. Grab coconut flour or certified gluten-free oat flour.
- 6 tablespoons melted salted butter or ghee (reserve 1 teaspoon aside): Adds richness, flavor, and helps create a pliable dough. Using salted butter enhances the taste.
- ⅓ cup maple syrup: Provides sweetness to the crust.
- ½ teaspoon baking powder: A leavening agent that helps give the crust a slight lift and tenderness.
- 1 egg: Acts as a binder, helping to bring the dough together and providing structure.
- For Fig Filling:
- ⅛ teaspoon nutmeg: Adds warmth and spice, complementing the sweetness of the figs.
- ¼ teaspoon cinnamon: A classic spice pairing with figs, enhancing their natural sweetness and aroma.
- ⅛ teaspoon sea salt: Balances the sweetness and enhances all the flavors.
- ¼ teaspoon lemon juice: A touch of acidity brightens the fig flavor and balances the sweetness. You can find measuring spoons for these small amounts.
- ¼ cup maple syrup: Sweetens the fig filling.
- 1 cup black mission dried figs (remove hard stem at the top): The heart of these gluten free fig bars! Dried figs provide natural sweetness, chewiness, and fiber. While black mission figs offer a classic look, any dried fig variety will work for flavor. Source dried figs for your filling.
Nutritional Information
These healthy gluten-free fig bars offer more than just delicious flavor; they come with notable nutritional benefits compared to many store-bought versions. By using almond flour as the base, you’re incorporating a good source of protein and healthy fats, making the bars more filling and less likely to spike blood sugar. The dried figs contribute significant dietary fiber, essential for digestive health, and provide natural sweetness, often meaning less added sugar is needed overall.
Based on approximately 24 servings, the nutritional breakdown per bar is:
- Calories: 138kcal
- Carbohydrates: 9g
- Protein: 3g
- Fat: 9g
These homemade gluten free fig bars are a smart choice for a snack or even a quick breakfast, offering a balance of macronutrients that can help keep you satisfied.
Substitutions & Variations
One of the joys of baking your own gluten-free fig bars is the ability to customize them. Here are some practical substitutions for dietary needs and ideas for variations:
- Almond Flour: This recipe relies heavily on the unique properties of blanched almond flour for texture and structure. It is specified that almond flour should not be substituted in this particular recipe formulation.
- Coconut Flour / Oat Flour: If you don’t have coconut flour, certified gluten-free oat flour is a suitable substitute because it also absorbs moisture well, helping to bind the dough. Garbanzo bean flour (chickpea flour) is also mentioned as a possibility, offering another gluten-free binding option.
- Butter or Ghee: To make these gluten free fig bars dairy-free, simply swap the butter or ghee for a dairy-free butter alternative or use coconut oil. Ensure the substitute is melted as specified in the recipe. Find dairy-free butter options.
- Maple Syrup: Other liquid sweeteners like agave or honey can be used in place of maple syrup for both the crust and the filling. However, be aware that this may subtly alter the flavor and potentially the texture of your gluten free fig bars.
- Eggs: While the recipe hasn’t been tested without eggs, a flax egg (1 tablespoon ground flaxseed mixed with 3 tablespoons water, allowed to gel) is suggested as a likely effective substitute for a vegan version.
- Nutmeg, Cinnamon, Sea Salt: Feel free to adjust the amounts of these spices in the filling to suit your preference. You could even add a pinch of ground cloves or cardamom for a different flavor profile.
- Lemon Juice: A small amount of vinegar could technically substitute the lemon juice, or it can be omitted entirely if necessary without significantly impacting the overall result, though the lemon does help brighten the flavor of the figs.
- Black Mission Dried Figs: If you can’t find black mission figs, any other type of dried fig (like Calimyrna or Turkish figs) will work perfectly well for the filling. The color and perhaps the sweetness level might vary slightly, but the essential fig flavor and texture will be there.
Adding a sprinkle of cinnamon sugar (sugar mixed with cinnamon) on top before baking gives the crust a lovely finish and extra flavor dimension, as suggested in the method.
Enjoy experimenting with these options to make these delicious gluten free fig bars your own!
Essential Equipment for This Recipe
To prepare this delicious recipe, you’ll need the following kitchen tools:
- Mixing Bowls – A set of good mixing bowls is essential for combining your ingredients.
Find Mixing Bowls on Amazon - Measuring Cups and Spoons – Accurate measuring is key for baking success.
Find Measuring Cups and Spoons on Amazon - Baking Sheets – Perfect for baking cookies, roasting vegetables, and more.
Find Baking Sheets on Amazon - Whisks – Ideal for whipping eggs, cream, or batter.
Find Whisks on Amazon - Spatulas – For mixing, folding, and scraping bowls clean.
Find Spatulas on Amazon - Food Processors – Great for chopping vegetables and preparing sauces.
Find Food Processors on Amazon - Saucepans – Perfect for making sauces, soups, and heating liquids.
Find Saucepans on Amazon - Chef’s Knives – A good chef’s knife is essential for prepping ingredients.
Find Chef’s Knives on Amazon - Cutting Boards – Protect your countertops while you chop.
Find Cutting Boards on Amazon
- Prepare the Gluten-Free Dough: Begin by adding all the ingredients listed for the cookie crust into your food processor. This usually includes blanched almond flour, coconut flour (or your chosen alternative like oat or garbanzo flour), melted salted butter or ghee (remember to reserve one teaspoon aside for later!), maple syrup, baking powder, and an egg. Process the ingredients continuously, without pulsing, until a cohesive dough ball forms. The mixture should come together and pull away from the sides of the food processor bowl. Once the dough has formed, transfer it out of the food processor and wrap it tightly or place it in a covered container. Pop it into the refrigerator to chill while you work on the filling. Chilling helps firm up this gluten-free dough, making it much easier to handle and roll out later.
- Make the Fig Filling: Without cleaning the food processor bowl (unless absolutely necessary), add all the ingredients for the fig filling. This includes the dried figs (ensure you remove any hard stem pieces at the top before adding!), nutmeg, cinnamon, sea salt, lemon juice (or vinegar), and maple syrup. Process the mixture until it forms a thick, well-combined paste. You’re looking for a consistency that is smooth enough to spread but still holds its shape – basically, something you’d be happy to eat straight away! This smooth filling is key to delicious gluten free fig bars.
- Preheat and Prep: Preheat your oven to 350°F (175°C). Line a baking sheet with a silicone baking mat or parchment paper. This prevents sticking and makes cleanup much easier.
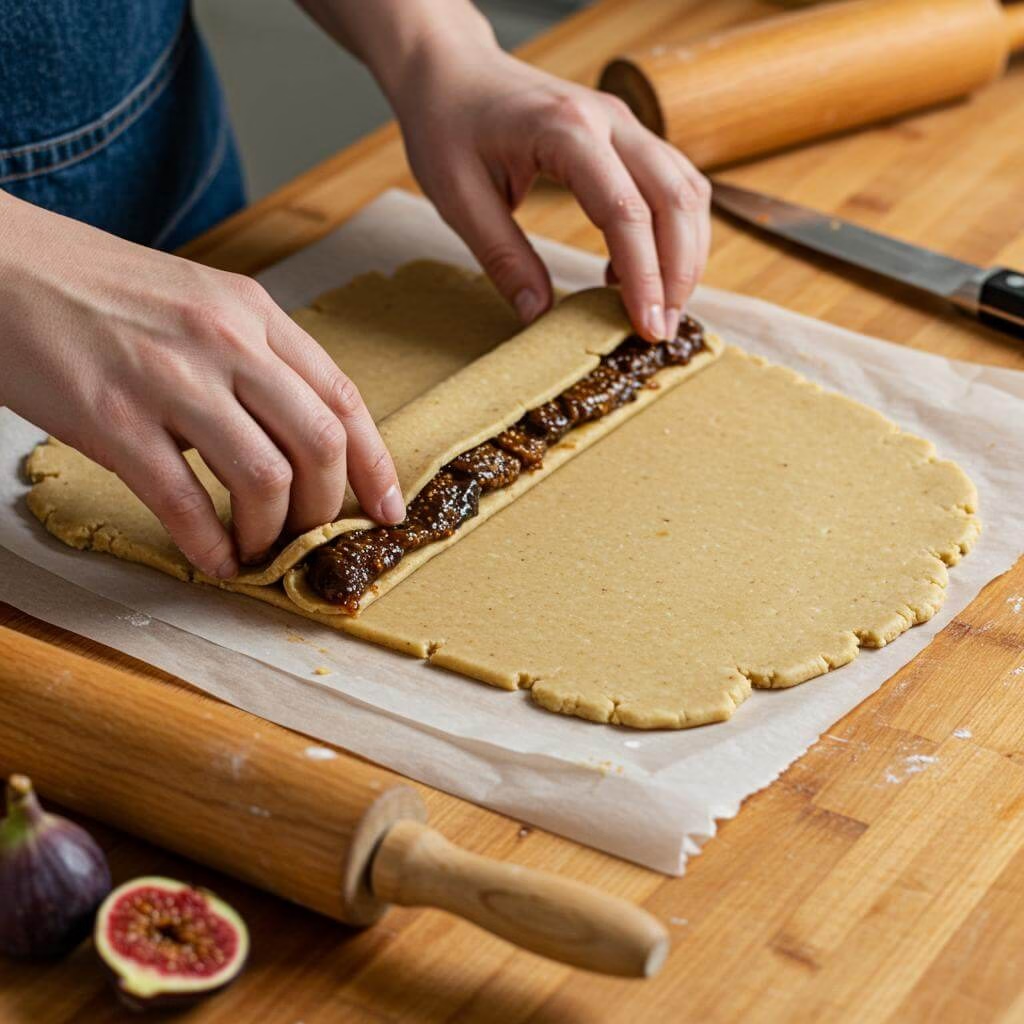
- Roll Out the Dough (First Half): Grab a large piece of parchment paper and lightly spray it with cooking spray or grease it slightly. Take *half* of the chilled gluten-free dough and place it onto one half of the parchment paper. Fold the other half of the parchment paper over the dough so it’s sandwiched between the layers. This method is crucial because this specific gluten-free dough can be quite sticky and challenging to roll directly with a rolling pin. Roll the dough out evenly between the parchment layers to a rectangle measuring approximately 5-6 inches wide by 8-10 inches long. Aim for a consistent thickness across the entire rectangle for even baking. Once rolled, carefully peel off the top layer of parchment and use a knife or bench scraper to trim the edges, creating a neat, rectangular shape – this helps in forming tidy gluten free fig bars.
- Fill and Shape (First Log): Take half of your prepared fig filling and place it in a strip down the center of your rolled-out dough rectangle. Now, carefully fold one long edge of the dough over the filling, bringing it towards the center. Then, fold the other long edge over, overlapping slightly with the first edge. Use your fingers to gently but firmly press the seam shut along the entire length of the log. When transferring this log to your prepared baking sheet, place it seam-side down. Don’t be alarmed if the sides of the log show some small cracks – this is common with gluten-free doughs. Simply use your fingers to smooth out any cracks along the sides and ends, shaping it into a uniform log. This careful shaping ensures your homemade gluten free fig bars look great and hold together during baking.
- Repeat and Use Extra Dough: Repeat steps 4 and 5 with the remaining half of the dough and the remaining half of the fig filling to create a second log. If you happen to have a small amount of dough left over after making both filled logs, you can simply shape it into a small, plain log without any filling. This extra plain log can serve as a helpful test piece for checking doneness during baking.
- Finish Before Baking: Remember that one teaspoon of melted butter you reserved earlier? Now’s the time to use it! Use a pastry brush to lightly brush this melted butter over the top surface of each dough log. For an extra touch of flavor and a lovely golden finish, you can optionally sprinkle a little sugar mixed with cinnamon over the buttered tops. This adds a little sweetness and helps the top crust brown beautifully.
- Bake the Fig Bars: Carefully place the prepared baking sheet with your dough logs into the preheated 350°F (175°C) oven. Bake for approximately 22-25 minutes, or until the edges of the logs appear nicely golden brown. The plain log (if you made one) is perfect for testing doneness; insert a toothpick into its center – if it comes out clean, your gluten free fig bars are ready! If you didn’t make a plain log, check for golden edges and a firm-but-not-hard feel.
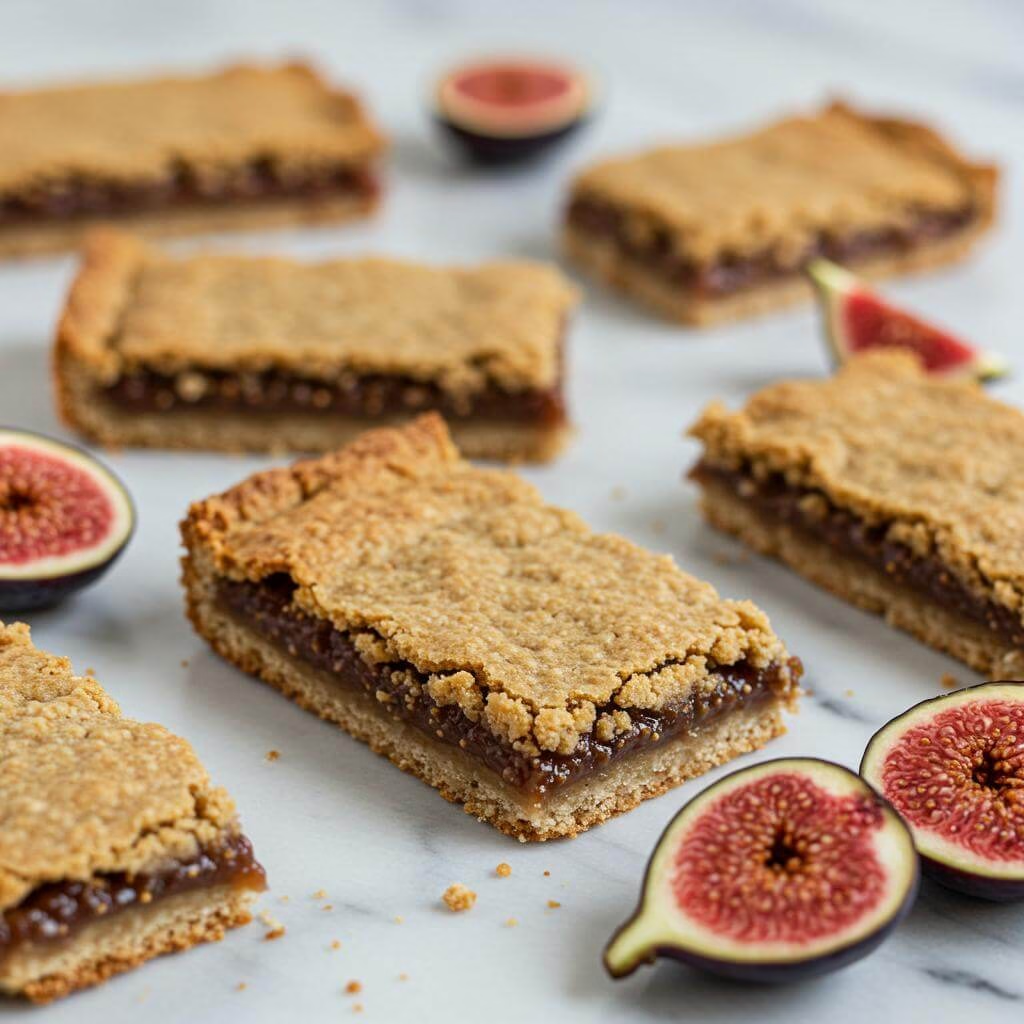
- Cool and Store: As SOON as the logs come out of the oven, while they are still warm and pliable, use a sharp knife to cut them into individual bars. Cutting them warm is much easier than waiting until they cool and become firmer. Once cut, let the bars cool completely on the baking sheet or a wire rack. Allowing them to cool fully is important before storing. Store the completely cooled gluten free fig bars in an airtight container. They can be kept on the counter for up to 3 days or in the refrigerator for up to two weeks. For longer storage, they freeze beautifully in a freezer-safe container for up to 3 months – just remember to defrost them in the refrigerator when you’re ready to enjoy them again!
Tips for Perfect Results
Making delicious gluten-free fig bars that are soft, chewy, and hold together beautifully is absolutely achievable! Gluten-free baking sometimes requires a little extra care and know-how, especially when working with flours like almond and coconut. Follow these expert tips to ensure your homemade gluten free fig bars turn out perfectly every time, rivaling (or surpassing!) your store-bought favorites.
- Chill the Dough Properly: Don’t skip the chilling step! Gluten-free doughs made with nut flours like almond flour can be quite soft and sticky at room temperature. Chilling allows the fats to firm up and the flours to hydrate, making the dough much easier to roll out and handle without it sticking excessively or falling apart. A chilled dough is key to forming neat logs for your gluten free fig bars.
- Master the Parchment Paper Rolling Technique: Gluten-free doughs are often less elastic than wheat dough, making traditional rolling tricky. Using parchment paper sprayed with cooking spray, as the recipe suggests, is a genius move for these gluten free fig bars. It prevents sticking to the rolling pin and your surface. Roll gently and consistently to an even thickness to ensure uniform baking.
- Seal the Seams Securely: While you want the signature soft texture, make sure the seam where the dough meets over the filling is well-sealed. Gluten-free dough can be a bit crumbly, so pressing firmly with your fingers (and smoothing any cracks that appear on the outside once flipped) helps create a strong closure. This prevents the delicious fig filling from leaking out during baking, which can make your gluten free fig bars dry or messy.
- Use the Plain Log as a Guide: That extra log you make without filling isn’t just for minimizing waste – it’s a brilliant visual cue! Since the filled bars can’t easily be tested with a toothpick, check the plain log for doneness. When a toothpick inserted into the center of the unfilled log comes out clean and the edges of *all* the logs are a nice golden brown, your homemade gluten free fig bars are ready.
- Cut While Warm: Gluten-free baked goods, especially those using nut flours, can become fragile once fully cool. Cutting your gluten free fig bars immediately after they come out of the oven while they are still warm (but not actively hot and falling apart) helps create clean cuts and reduces the likelihood of them crumbling or breaking apart.
- Trust the Flour Blend: The recipe specifically calls for almond flour as the base and a smaller amount of coconut or oat flour. Almond flour provides structure and moistness, while the absorbent coconut or oat flour helps bind everything. Avoid substituting the almond flour and consider the role of the secondary flour; these specific types work together to give your gluten free fig bars their desired texture.
- Proper Fig Preparation: Ensure you remove those hard stem knobs from the dried figs before processing the filling. These bits won’t break down and can create unpleasant hard pieces in your otherwise soft and chewy fig filling. A smooth filling is essential for the perfect texture of these gluten free fig bars.
- Don’t Skip the Butter Brush: Brushing the tops of the logs with that reserved melted butter before baking isn’t just for flavor (though it adds a lovely richness!). It helps the tops achieve that beautiful golden-brown color and slightly crisp outer layer while keeping the inside soft. The optional sugar/cinnamon sprinkle adds extra flavor and a touch of caramelized texture.
Common Mistakes to Avoid
Even experienced bakers can make small errors, and with gluten-free baking, these can sometimes have a bigger impact. Steer clear of these common pitfalls when making your gluten free fig bars:
- Overworking the Dough After Chilling: While you need to roll the dough, avoid excessive handling or re-rolling multiple times more than necessary. Gluten-free doughs, especially those with almond flour, don’t develop gluten (of course!), but overworking can still make them tougher or greasier by releasing too much oil from the nuts or warming the dough excessively, making it hard to manage and potentially leading to drier gluten free fig bars. Work efficiently once the dough is chilled.
- Not Chilling the Dough Long Enough: Trying to roll and shape the dough straight away or after only a very brief chill will likely result in a frustrating, sticky mess. The dough for these gluten free fig bars relies on chilling time to become firm enough to hold a shape and release from surfaces. Be patient with this step!
- Trying to Roll Directly on the Counter or Without Spray: Gluten-free dough tends to be stickier than wheat dough. Attempting to roll it directly on a floured surface or even just plain parchment can lead to it tearing, sticking, and being impossible to lift or fold. The parchment paper + cooking spray method is specifically recommended to combat this issue effectively when making gluten free fig bars.
- Waiting for the Bars to Fully Cool Before Cutting: As mentioned in the tips, cutting gluten-free bars once they are completely cold can cause them to crack, crumble, or splinter, especially along the filling line. Cutting them while still warm allows for cleaner, easier portioning, preserving the structure and appearance of your lovely gluten free fig bars.
Frequently Asked Questions
Why should I make these homemade gluten free fig bars instead of buying them?
Making these gluten free fig bars from scratch puts you in control of the ingredients! It’s an opportunity to use fewer sugars and fewer carbs overall compared to many store-bought options. Plus, using almond flour in the crust creates a more balanced and filling bar. Beyond the nutritional benefits, there’s a lot of satisfaction and pure joy in baking them yourself, filling your kitchen with that wonderful aroma!
Can I substitute the flours listed in the recipe?
This recipe is specifically formulated using blanched almond flour for the main crust component, and it’s recommended not to substitute the almond flour for another type. However, for the smaller amount of coconut flour specified, you *can* substitute it with certified gluten-free oat flour or even garbanzo bean flour (chickpea flour). These alternatives are also very absorbent and will help bind the dough effectively.
I need these gluten free fig bars to be dairy-free or vegan. Is that possible?
Absolutely! To make these gluten free fig bars dairy-free, you can easily substitute the melted salted butter or ghee with a dairy-free butter alternative or coconut oil. If you need a vegan version, the recipe uses one egg as a binder. While it hasn’t been tested personally, a flax egg (1 tablespoon ground flaxseed mixed with 3 tablespoons water, allowed to gel) is suggested as a promising substitute that should work well to replace the egg.
The dough seems sticky. How do I handle and roll it out effectively?
It’s true, this gluten-free dough can be a bit sticky! The key to handling it is to use parchment paper for rolling. Place half of the dough onto a piece of parchment paper that has been lightly sprayed with cooking spray. Then, fold the other half of the parchment paper over the dough. Roll the dough out *between* the layers of parchment paper using your rolling pin. This prevents the dough from sticking to your pin and surface, making it much easier to get that desired rectangular shape before adding the filling.
What kind of dried figs are best for the filling, and can I use different varieties?
The recipe specifically mentions using black mission dried figs, which give the bars that classic, dark fig bar look. However, the good news is that any type of dried fig will work wonderfully for the filling in these gluten free fig bars! If you have Calimyrna, Turkish, or another variety of dried figs on hand, feel free to use those. They will still provide the delicious natural sweetness and chewy texture needed for the filling.
How should I store these homemade gluten free fig bars, and can I freeze them?
Once your gluten free fig bars have cooled completely after baking, storage is simple! You can store them in an airtight container on the counter for up to 3 days. For longer storage, they will last in an airtight container in the refrigerator for up to two weeks. And yes, they freeze beautifully! After cooling completely, place them in a freezer-safe container and freeze for up to 3 months. When you’re ready to enjoy them, simply defrost them under refrigeration.
When is the best time to cut the fig bars into individual portions?
For the neatest and easiest cuts, slice your gluten free fig bars immediately after they come out of the oven, while the logs are still warm and slightly pliable. Cutting them when they’re warm is much smoother than waiting until they have cooled completely, as the dough becomes firmer as it cools.