The 4-Ingredient Magic That Changed My Snack Game (Hello, Healthy Peanut Butter Bars!)
Oh, fellow gluten-free friends, do you ever just hit that afternoon wall? That moment where you desperately need a little something sweet, maybe a touch salty, and definitely something that *feels* like a treat but won’t make you regret it later? For years, that moment sent me spiraling. I’d eye the conventional snack aisle with wistful longing, knowing my options were limited, often overpriced, and rarely hit all the right spots. Finding a simple, satisfying gluten-free snack that wasn’t loaded with questionable ingredients felt like a constant quest. And if that snack could involve the magical combination of peanut butter and chocolate? Forget about it – it felt nearly impossible without a ton of effort.
I went through phases. Trying to make complicated gluten-free baked goods that took hours only to crumble. Settling for bland rice cakes. Wishing there was an easy, wholesome answer to my cravings. I mean, we deserve deliciousness, right? Especially when you’re living gluten-free, those moments of simple indulgence matter so much. I longed for something I could whip up quickly, keep on hand, and grab whenever that energy dip or sweet tooth struck. Something like a healthier version of a classic peanut butter cup, but in a convenient bar form.
That’s when the experimentation began. I knew I wanted minimal ingredients – life is busy enough! I played around with different binders, different sweeteners, different textures. There were definitely a few flops that ended up more like peanut butter dust than bars! But through trial and error, a revelation happened. I discovered that with just four simple ingredients, I could create something truly special. Something that was easy, healthy, and tasted absolutely incredible.
And oh, these healthy peanut butter bars? They became an instant staple. My family devours them. I stash them in my bag for busy days. They are the perfect guilt-free treat after dinner. The blend of salty peanut butter, subtle sweetness, and chocolatey goodness is just divine. They are proof that you don’t need a pantry full of obscure ingredients or hours in the kitchen to enjoy amazing gluten-free treats. If you’re looking for other easy go-tos, you might also love these
Coconut Date Energy Balls or perhaps some
Flourless Chocolate Cake Bites for a different kind of chocolate fix. But seriously, these peanut butter bars are a game-changer for satisfying that specific craving. Ready to make some
4-ingredient peanut butter bars yourself? Let’s get baking (or rather, *not* baking!).
Why These Healthy Peanut Butter Bars Work (The Science Behind the Magic!)
You might look at these simple, four-ingredient **peanut butter bars** and wonder how they come together so perfectly without any baking or complex binders. The secret lies in the brilliant chemistry and synergy happening between these humble ingredients! Here’s the fascinating science that makes these gluten-free **peanut butter bars** a guaranteed success, turning simple pantry staples into delicious, structured treats.
The primary binder in these no-bake **peanut butter bars** is, perhaps unsurprisingly, the **peanut butter** itself. What’s truly remarkable is how its natural composition replaces the need for gluten or eggs. **Peanut butter** is rich in fats and proteins. When mixed with other ingredients and then chilled, these fats solidify significantly. This solidification is crucial – it’s what transforms the pliable mixture into a firm, sliceable bar that holds its shape beautifully out of the freezer or fridge. Think of it like nature’s edible glue, setting up firm when cold.
Next, let’s talk about the **oat flour**. While it doesn’t provide elasticity like wheat flour, it plays a vital role in texture and structure for these healthy **peanut butter bars**. The **oat flour** absorbs some of the liquid from the maple syrup and provides necessary bulk. It breaks up the richness of the **peanut butter** and contributes to that satisfying, slightly dense, and chewy texture that makes these **peanut butter bars** so appealing. Using **certified gluten-free oat flour** ensures these bars are safe for those with celiac disease or gluten sensitivity, offering a wholesome fiber boost compared to refined flours.
Maple syrup does more than just add sweetness; it acts as a flexible binder here. Unlike granulated sugars alone, the liquid nature of **maple syrup** (or honey/agave, as suggested) helps create a slightly sticky matrix throughout the **peanut butter bars** mixture. This stickiness, combined with the setting power of the chilled **peanut butter**, helps everything hold together tightly. It also keeps the bars from being too dry, contributing to their pleasing texture.
Finally, the chilling step is where the magic culminates for these no-bake **peanut butter bars**. As mentioned, the fats in both the **peanut butter base** and the melted chocolate-peanut butter topping solidify in the cold. This is a simple physical change, but it’s essential for creating that firm, cuttable structure. Without adequate chilling in the freezer, the bars would remain soft and gooey. The brief freeze is your shortcut to instant gratification!
Understanding how **peanut butter**, **oat flour**, and **maple syrup** work as a team reveals the power of simple ingredients in gluten-free cooking. These healthy **peanut butter bars** are a perfect example of ingredient synergy creating structural success, proving you don’t need traditional binders to achieve delicious, well-formed treats. Knowing this empowers you to experiment and confidently create more amazing no-bake gluten-free delights!
Newly Diagnosed? Start Every Morning Right!
Start your gluten-free journey with 33 handpicked breakfast recipes that are safe, simple, and full of flavor.
Whether you’re struggling with what to eat or just want new ideas, this guide is made for you.
Feel confident. Eat happily. Live healthier.

No spam. No credit card. Just delicious gluten-free breakfasts—delivered instantly.
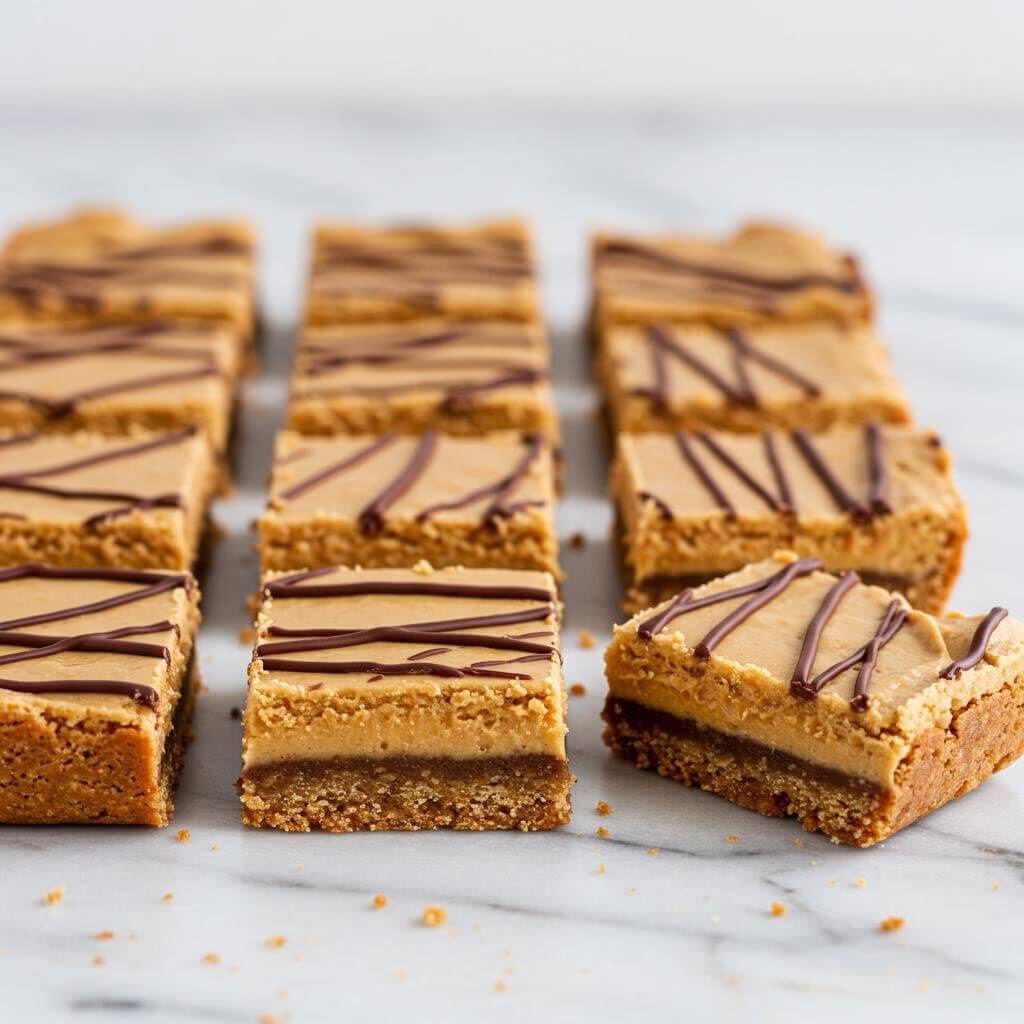
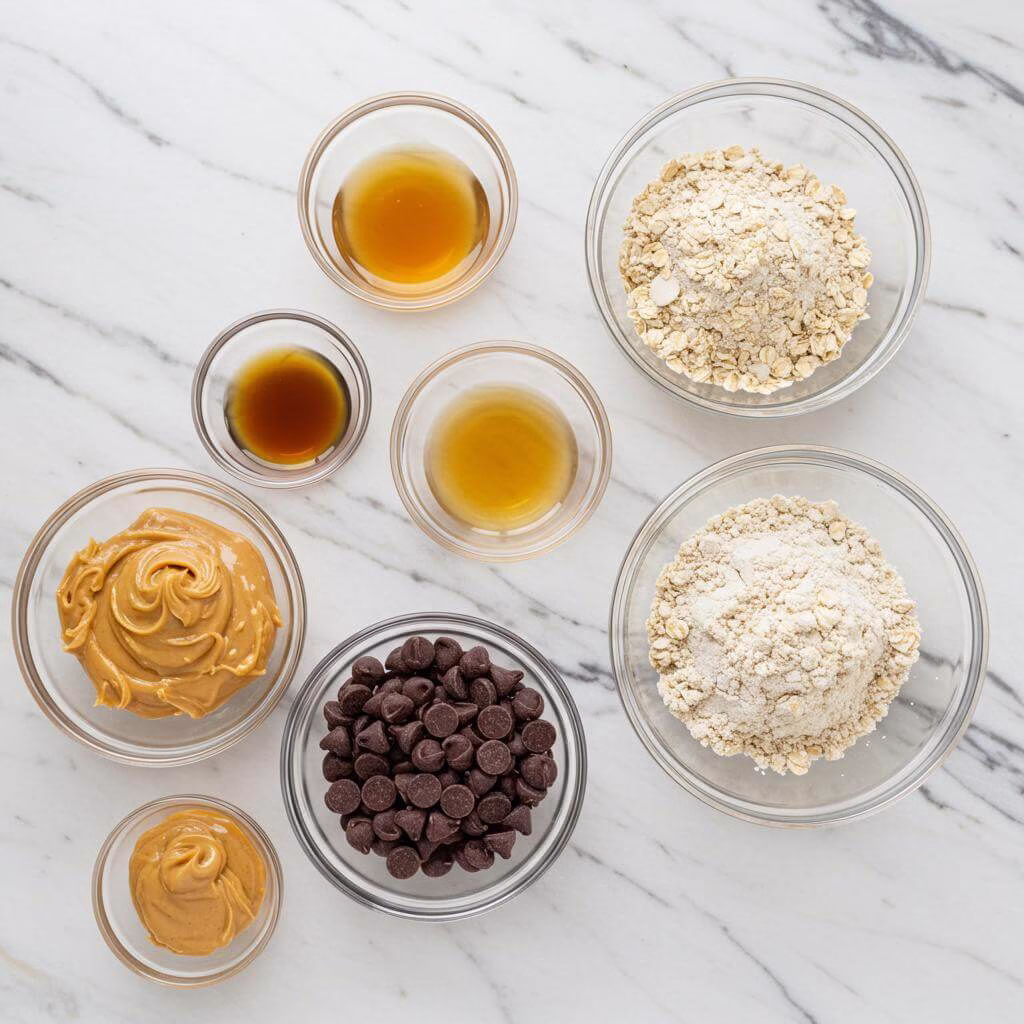
Ingredients for Healthy Peanut Butter Bars
Crafting these delicious **peanut butter bars** is a simple joy! This recipe uses just a few wholesome ingredients to create a satisfying, gluten-free treat. Here’s a breakdown of what you’ll need and why these ingredients shine:
Essential Ingredients
- 1 cup salted peanut butter: This is the heart of your **peanut butter bars**, providing rich flavor and serving as the primary binder. Using salted peanut butter enhances that irresistible sweet and salty combination. If you only have unsalted, just add a pinch of sea salt (about 1/4 teaspoon). Look for natural varieties with minimal added sugar for the healthiest option. Find your favorite creamy peanut butter here.
- 1/4 cup + 1 tbsp maple syrup: Pure maple syrup provides natural sweetness, keeping these **peanut butter bars** free from refined sugars. It also adds moisture and helps the bars hold their shape. You can also use honey or agave nectar if those are your preference. Stock up on pure maple syrup.
- 3/4 cup certified gluten-free oat flour: Oat flour is fantastic in gluten-free baking, adding fiber, a gentle texture, and a mild, nutty flavor. **Pro tip:** Ensure your oat flour is certified gluten-free to avoid cross-contamination if you have Celiac disease or high sensitivity. Don’t have oat flour? You can easily make your own by blending certified gluten-free rolled oats in a food processor until fine, or you can use almond flour as suggested (use 1 cup almond flour if swapping). Get certified gluten-free oat flour.
Topping Ingredients
- 1 cup chocolate chips: These melt down to create that classic chocolate layer over the **peanut butter bars**. Use mini chips, standard chips, dark chocolate, or even dairy-free chips depending on your dietary needs and preference. Dairy-free options like Enjoy Life chips work beautifully for a vegan version. Browse dairy-free chocolate chips.
- 1/2 cup peanut butter: A little extra peanut butter helps create a smooth, pourable ganache consistency for the topping when melted with the chocolate chips, ensuring a lovely chocolate-peanut butter swirl or layer on your **healthy peanut butter bars**.
Nutrition, Swaps & Variations for Your Peanut Butter Bars
These **peanut butter bars** are not just delicious; they’re also packed with goodness! Plus, they’re incredibly adaptable. Let’s explore the benefits and how you can customize them.
Nutrition Highlights
By choosing these simple, wholesome ingredients, you’re creating a treat that nourishes your body and taste buds. These **healthy peanut butter bars** are:
- Packed with Fiber: Thanks to the oat flour (or almond flour), these bars contribute valuable dietary fiber, supporting digestive health and keeping you feeling full.
- Rich in Protein & Healthy Fats: Peanut butter is a great source of plant-based protein and healthy monounsaturated fats, which help with satiety and energy.
- Naturally Sweetened: Using maple syrup avoids refined sugars, offering a more gradual energy release compared to treats made with white sugar.
- Gluten-Free Goodness: Naturally free from gluten, these bars are a safe and satisfying option for those with gluten sensitivities or Celiac disease.
Celebrate the goodness of these **peanut butter bars** knowing you’re making a smart and tasty choice!
Smart Substitutions & Tips
One of the best things about this **chocolate peanut butter bars** recipe is how forgiving and flexible it is! Don’t have an ingredient? No problem! Want to improve the process? We’ve got tips!
- Flour Swaps: While oat flour provides a unique texture, you can successfully use almond flour (use 1 cup) as an alternative gluten-free option. Experiment to see which texture you prefer in these no-bake **peanut butter bars**.
- Sweetener Swaps: Maple syrup is lovely, but honey or agave nectar work just as well if that’s what you have on hand.
- Nut Butter Options: Feel free to experiment with other creamy nut butters like almond butter, cashew butter, or even sunflower seed butter for a nut-free version (ensure it’s a creamy variety). This is a great way to put a unique spin on your classic **peanut butter bars**.
- Need Salt?: If using unsalted peanut butter, simply mix in about 1/4 teaspoon of sea salt with the base ingredients to get that crucial salty note that perfectly balances the sweetness of these **peanut butter bars**.
- Pro Tip for Easy Removal: Want a hack to easily cut and remove your **peanut butter bars** from the dish? Line your 8×8 baking pan with parchment paper before pressing in the base mixture. Leave some overhang on the sides to lift the finished bars out easily! Grab a pan and parchment paper here.
- Melted Chocolate Tip: When microwaving the chocolate chips and peanut butter for the topping, heat in 30-second increments, stirring really well after each interval. Chocolate holds its shape even when melted, so stirring is key to achieving a smooth consistency without burning it.
- Storing Your Bars: These **healthy peanut butter bars** store wonderfully! Keep them in an airtight container in the refrigerator for up to a week. For longer storage, wrap them individually or store in a freezer-safe container in the freezer for up to 3 months. Just thaw slightly before enjoying!
Creative Variations
Once you’ve mastered the basic **peanut butter bars**, feel free to get creative and add additional flavors or textures!
- Add-ins: Stir 1/2 cup of shredded coconut, chopped nuts (like peanuts or walnuts), or even mini gluten-free pretzels into the base mixture for added crunch and flavor.
- Different Shapes: Transform these into **peanut butter balls**! Roll the base mixture into bite-sized balls before dipping or drizzling with the chocolate topping. Freeze as directed.
- Extra Toppings: Sprinkle flaky sea salt over the melted chocolate before it sets for an extra pop of flavor, or add a swirl of white chocolate (ensure it’s gluten-free).
Essential Equipment for This Recipe
To prepare this delicious recipe, you’ll need the following kitchen tools:
- Mixing Bowls – A set of various sizes is ideal for prepping and combining ingredients.
Find Mixing Bowls on Amazon - Measuring Cups and Spoons – Accurate measurements are key for consistent results.
Find Measuring Cups and Spoons on Amazon - Baking Sheets – For baking, roasting, and toasting ingredients.
Find Baking Sheets on Amazon - Whisks – Essential for whipping cream or egg whites, and blending sauces.
Find Whisks on Amazon - Spatulas – Perfect for folding, scraping, and spreading ingredients.
Find Spatulas on Amazon - Food Processors – Great for chopping, slicing, and pureeing ingredients quickly.
Find Food Processors on Amazon - Saucepans – Used for simmering sauces and cooking ingredients on the stovetop.
Find Saucepans on Amazon - Chef’s Knives – A good quality knife makes chopping and slicing easier and safer.
Find Chef’s Knives on Amazon - Cutting Boards – Protect your countertops while you chop and prep.
Find Cutting Boards on Amazon
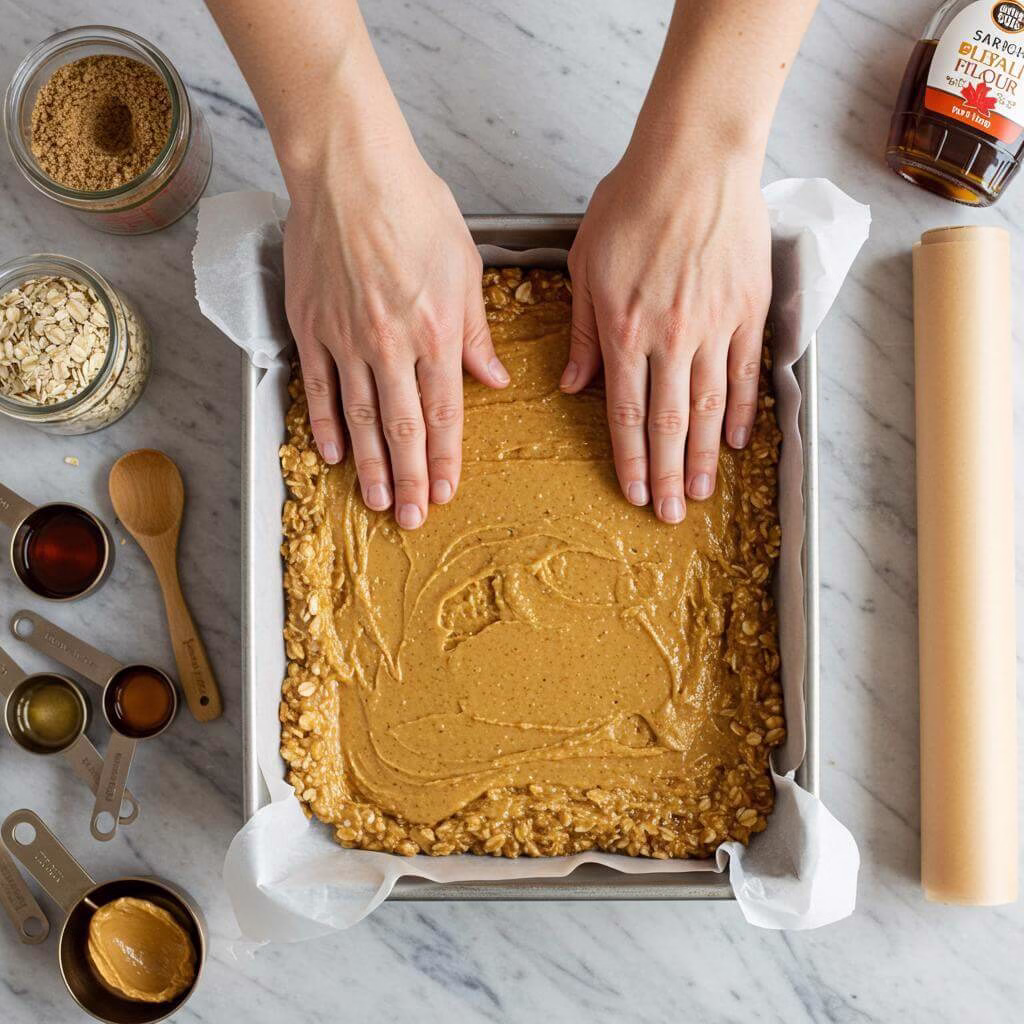
- Get ready to make your simple four-ingredient peanut butter base! In a medium mixing bowl, combine 1 cup of salted peanut butter (if using unsalted, stir in a pinch of salt now!), your 1/4 cup + 1 tablespoon (that’s a total of 5 tablespoons) of maple syrup, and 3/4 cup of certified gluten-free oat flour. (You can also use 1 cup of almond flour here if you prefer).
- Mix these base ingredients thoroughly. Stir everything together with a sturdy wooden spoon or rubber spatula until you have a thick, uniform mixture that looks like a stiff dough or paste. It will be quite dense, and that’s exactly what you want for the perfect peanut butter bars base!
- Prepare your baking pan. Line an 8×8 baking pan with parchment paper, leaving some overhang on the sides. This is our secret step for super easy bar removal and cutting later!
- Transfer the thick peanut butter base mixture into the parchment-lined pan. Use your hands or the bottom of a glass (or a flat spatula) to firmly press the mixture down into an even layer across the bottom of the pan. Make sure it’s compacted and smooth – this is the delicious foundation for your peanut butter bars.
- Now, let’s make that glorious chocolate topping! In a small microwave-safe dish, add your 1 cup of chocolate chips (feel free to use mini, dark, or dairy-free chocolate chips!) and the remaining 1/2 cup of peanut butter.
- Melt the chocolate and peanut butter together gently in the microwave. Heat in 30-second increments. After each 30 seconds, remove the dish and stir thoroughly with a spoon or spatula. Even if it doesn’t look melted yet, stirring helps distribute the heat and prevents burning. Continue microwaving and stirring until the mixture is completely smooth and glossy, with no visible chocolate chip lumps. This usually takes about 1-2 minutes total.
- Pour the warm, melted chocolate and peanut butter mixture evenly over the pressed peanut butter base in the pan. Use an offset spatula or the back of a spoon to gently spread it right to the edges, creating a beautiful, smooth layer of chocolatey goodness on top of your peanut butter bars base.
- Almost there! Carefully place the entire pan into the freezer. You need to chill the peanut butter bars for at least one hour. This crucial step allows both the peanut butter base and the chocolate topping to firm up completely, making them perfect for cutting. You’ll know they’re ready when the chocolate is solid to the touch.
- Once the bars are fully set, lift the entire block out of the pan using the parchment paper handles and place it on a cutting board. Use a sharp knife (warming it slightly under hot water can help get clean cuts through the chocolate layer!) to slice the block into individual peanut butter bars of your desired size.
- Your healthy, no-bake peanut butter bars are ready to enjoy! Store any leftovers in an airtight container in the refrigerator for up to one week. For longer storage, you can freeze them – they thaw quickly and are a perfect grab-and-go treat! Great job making these delicious peanut butter bars!
Tips for Perfect Results
- Master Your Peanut Butter Choice: This is truly game-changing for your peanut butter bars! While the recipe mentions using creamy salted peanut butter, the consistency of that peanut butter is paramount. Opt for a drippy, natural-style peanut butter (where the oil separates) for the most pliable base mixture. Conventional shelf-stable peanut butter (like Jif or Skippy) contains stabilizers and added sugars that can make the base too stiff and crumbly. If you must use it, you might need a tiny splash more maple syrup or a touch less oat flour, but natural is always best for texture here.
- Feel the Base Mixture: Achieve the Ideal “Dough” Consistency. After combining your peanut butter, maple syrup, and oat flour, the mixture should feel like a thick, moldable dough – similar to playdough. It shouldn’t be sticky and wet, nor dry and crumbly. If it feels too dry, add a teaspoon of maple syrup at a time. If it’s too wet, stir in a tablespoon more certified gluten-free oat flour. Learning this feel is key to perfect peanut butter bars that hold their shape but aren’t hard as rocks.
- The Parchment Paper Pro-Hack: Effortless Lifting and Cutting. You mentioned using parchment paper, which is a smart move! To make it truly foolproof, cut the parchment paper so it’s slightly longer than the dish and leaves overhangs on two opposite sides. These overhangs act as handles, allowing you to lift the entire set bar out of the dish before cutting. This prevents scraping the sides and allows for cleaner, more precise slices, making your healthy peanut butter bars look as good as they taste.
- Melt Your Chocolate Like a Chocolatier (Without the Hassle). Melting chocolate in the microwave is convenient, but it’s easy to scorch. The professional secret? Use a lower power setting (50-70%) and stir *vigorously* between each 30-second interval, even if the chocolate doesn’t look fully melted when you pull it out. The residual heat will continue melting the chips as you stir, giving you a silky-smooth topping without the risk of burning. Combine it thoroughly with the second batch of peanut butter for that luxurious finish on your peanut butter bars.
- Understand the Chill Time Chemistry. The recipe calls for freezing for an hour, which is great for a quick set. However, if you have time, letting the peanut butter bars set in the refrigerator for 2-3 hours (or even overnight) can sometimes result in a slightly smoother texture that’s less prone to getting *too* hard straight out of the freezer. The freezer is quick, the fridge offers a gentler set. Choose the method that suits your timeline and desired immediate texture.
- The Warm Knife Trick for Clean Cuts. Cutting cold, firm peanut butter bars can be tricky. For the neatest slices, dip a sharp knife in hot water, wipe it dry immediately, and then make your cuts. Repeat this process for each cut. The slight warmth of the blade glides through the chocolate and the peanut butter base beautifully, giving you clean edges every time.
Common Mistakes to Avoid
- Using the Wrong Type of Peanut Butter: As mentioned, using conventional, stabilized peanut butter can lead to a crumbly, dry base that doesn’t press or slice well. Prevention: Always opt for natural-style drippy peanut butter for this recipe. If you use a different type, be prepared to adjust the oat flour/liquid slightly.
- Burning the Chocolate Topping: Microwaving chocolate at full power for too long without sufficient stirring can result in a grainy, unpleasant texture. Prevention: Use lower microwave power (50-70%) and stir thoroughly after every 30-second burst. Stirring *off* heat is crucial; trust that the residual heat will finish the job.
- Not Using Certified Gluten-Free Oat Flour (If Cooking for Celiacs): While oats are naturally gluten-free, they are often cross-contaminated during processing. If you are making these for someone with Celiac disease or serious gluten sensitivity, using oat flour that is specifically labeled “certified gluten-free” is non-negotiable. Prevention: Always purchase certified gluten-free oat flour or certified gluten-free rolled oats to make your own flour if catering to strict gluten-free needs.
Frequently Asked Questions
My peanut butter mixture for the base is really thick and hard to stir. Is that normal?
Great question! Yes, absolutely! The base mixture for these healthy peanut butter bars is designed to be quite thick and dense. It’s essentially a stiff dough or paste because we’re using simple ingredients without extra liquids or binders like eggs. You’ll need to put a little muscle into mixing it, and then pressing it firmly into the pan is key. Don’t worry, that thick texture is exactly what helps these no-bake bars hold their shape beautifully once chilled!
What kind of peanut butter is best? Does it have to be salted?
I love using creamy, natural salted peanut butter because it gives the perfect salty-sweet balance without any extra steps! However, if you only have unsalted, no problem at all! Just add about 1/4 teaspoon of sea salt to the base mixture along with the peanut butter, maple syrup, and oat flour. While creamy is my preference for a smooth base, you could definitely use crunchy peanut butter if you love the added texture – it works great in these **peanut butter bars**!
Can I use something other than oat flour in this recipe?
Yes, you absolutely can! The recipe notes that you can successfully use 1 cup of almond flour as a straight swap for the 3/4 cup of oat flour. Oat flour gives a lovely, slightly chewy texture that I adore in these **peanut butter bars**, but almond flour will work too, resulting in a slightly different texture. While other gluten-free flour blends might technically work, results can vary greatly depending on the blend, so almond flour is the tested and recommended alternative here.
Help! My chocolate topping seized or burned when melting with the peanut butter. What went wrong?
Oh no, that’s a common frustration! Chocolate can be finicky. The key to melting the chocolate chips and peanut butter smoothly is to go slow and stir, stir, stir! Make sure you are microwaving in short 30-second bursts and removing the dish to stir thoroughly after *each* increment, even if it doesn’t look fully melted yet. Stirring helps distribute the heat and prevents hot spots that can cause burning or seizing. Keep stirring between bursts, and it should become smooth and glossy!
How should I store these healthy peanut butter bars, and how long do they last?
These **healthy peanut butter bars** store beautifully! Keep any leftovers in an airtight container in the refrigerator for up to 1 week. They are firm and ready to eat straight from the fridge. For longer storage, you can also freeze them! Wrap individual bars or store them in a freezer-safe container for up to 3 months. Just let them sit at room temperature for a few minutes or enjoy them slightly frozen for a different texture!
Do I have to use certified gluten-free oat flour, especially if I have Celiac disease?
This is a really important point for those with Celiac disease or significant gluten sensitivity. While oats are naturally gluten-free, they are very frequently processed on equipment shared with wheat, barley, and rye, leading to cross-contamination. To ensure these **peanut butter bars** are truly safe for Celiac, you absolutely should look for oat flour (or rolled oats if making your own flour) that is specifically labeled “certified gluten-free.” This certification means they meet strict standards for gluten content.
Why do you recommend using parchment paper in the pan before pressing the base?
Ah, the parchment paper is a total game-changer hack! It’s not strictly required, but it makes removing the set **peanut butter bars** block from the pan SO much easier. By lining the pan and leaving some overhang, you create little handles. Once chilled and firm, you can just lift the entire block out of the pan onto a cutting board. This results in cleaner cuts and less mess, ensuring your bars come out perfectly every time!