The Quest for the Perfect Grab-and-Go: My Journey to Homemade Protein Bars
Oh, fellow gluten-free friends, you know that feeling, right? The one where the morning rush hits, you need something quick and substantial, and you eye that aisle of “health” bars at the store? I’ve been there so many times. Grabbing a promising bar, reading the label with squinting eyes, hoping, *just hoping*, it’s truly gluten-free, dairy-free, and doesn’t contain some weird filler. And even when you find one that checks the boxes, how often are they actually *delicious*? Dry. Crumbly. A strange aftertaste. It felt like a constant compromise, settling for something “okay” just for the convenience. My cravings for a genuinely satisfying, soft, and flavorful bite felt impossible to meet with store-bought options. This struggle fueled my mission: I needed to create my own perfect gluten free protein bars.
My kitchen became a bit of a science lab for a while. I experimented with different flours (or lack thereof!), binders, sweeteners, and protein powders. There were batches that turned out rock hard, ones that crumbled into a million pieces the moment you touched them, and some that frankly tasted like flavored sawdust. I wanted something soft, almost cake-like in texture, but still packed with goodness and easy to take on the go. The fails were frustrating, but each one taught me something valuable about balancing ingredients without the help of traditional binders like gluten. I tried adding nuts, seeds, different kinds of butter… it felt like a puzzle with missing pieces.
Then came the breakthrough! A combination of creamy nut butter, natural sweetness, and the right ratio of protein powder and seeds finally yielded a dough that was pliable, easy to work with, and promised that soft, chewy texture I’d been dreaming of. The moment I pressed the mixture into the pan, I knew I was onto something special. Adding a simple chocolate topping elevated them from just a snack to a treat I actually looked forward to. These aren’t your average tough, dense bars; they’re truly luxurious gluten free protein bars. Making these meant I could control absolutely everything, ensuring they were free from hidden gluten and full of wholesome ingredients I trusted. It felt like a huge victory in my gluten-free journey!
Now, these homemade gluten free protein bars are a staple in my house. They’re perfect for busy mornings, a post-workout boost, or just a sneaky sweet treat. They pack well for travel, making gluten-free snacking on the road so much easier. They truly are the best no-bake gluten free protein bars I’ve ever made, and I can’t wait for you to try them! If you’re looking for more simple, delicious gluten-free snacks, you might also love my coconut date energy balls or a slice of gluten-free banana bread. But first, let’s make these fabulous gluten free protein bars!
Why This Recipe Works (Gluten-Free & Dairy-Free)
Get ready to uncover the secrets behind why these are simply the BEST no-bake gluten free protein bars you’ll ever make! Many people think gluten-free means compromising on texture or flavor, but this recipe proves that couldn’t be further from the truth. Here’s the brilliant chemistry happening in your kitchen:
The Foundation of Softness & Binding: The secret to this recipe’s melt-in-your-mouth, cake-y texture lies in the perfect marriage of creamy almond butter and liquid maple syrup. What’s truly remarkable is how these two simple ingredients combine to create a naturally cohesive, pliable “dough.” The fats in the almond butter and the sugars in the maple syrup work together as a powerful natural binder, expertly replacing the structural network that gluten would typically provide in a baked bar. Using a drippy, room-temperature almond butter is crucial here, as it ensures the mixture is easy to combine and stays beautifully soft.
Flaxseed Meal: The Gluten-Free Binding Superstar: Here’s where an extra layer of magic happens! The addition of flaxseed meal is key to boosting the structure and ensuring these no-bake gluten free protein bars hold together perfectly straight from the fridge. When flaxseed meal meets the moisture from the maple syrup and almond butter, it forms a gel-like substance. This natural gel acts as a fantastic binder in gluten-free recipes, adding stability and a slight chewiness without needing any eggs or artificial gums. It’s a simple yet incredibly effective scientific principle!
Seamless Protein Integration: Incorporating unsweetened protein powder into this mixture is effortless because the almond butter and maple syrup base is so forgiving. Unlike traditional baking where protein powders can sometimes dry things out or become dense, the high fat content of the almond butter and the moisture from the maple syrup ensure the protein powder is easily absorbed, contributing to the bar’s density and nutritional punch without negatively impacting the wonderfully soft texture. This is how we create truly effective gluten free protein bars that feel like a treat.
Flavor layered to Perfection: The warmth of cinnamon and vanilla extract permeates the base, creating a comforting, nutty flavor that’s anything but bland. The pinch of sea salt is vital, expertly balancing the sweetness of the maple syrup and chocolate. When you add the sesame seeds, you introduce a delightful textural contrast and an extra layer of subtle nutty flavor that makes these homemade gluten free protein bars truly addictive. The final flourish of flaky sea salt on the chocolate topping isn’t just for looks – it provides an exciting burst of salty crunch that elevates the entire tasting experience.
The Power of the Chill: The fascinating thing about gluten-free, no-bake creations like these gluten free protein bars is how they set. Refrigeration solidifies the fats in the almond butter and the melted chocolate, transforming the soft mixture into sliceable, firm bars. It’s a simple physical change that provides the necessary structure without any heat. This chilling time is essential for achieving that perfect bar consistency and ensuring the chocolate topping hardens into a satisfying shell.
By understanding how ingredients like almond butter, maple syrup, and flaxseed meal work together, you’re not just following a recipe – you’re mastering the art of creating delicious, satisfying gluten free protein bars. This recipe empowers you to control ingredients, avoid common allergens, and make incredible snacks that rival (or surpass!) anything store-bought. Enjoy crafting your own perfect gluten free protein bars!
Newly Diagnosed? Start Every Morning Right!
Start your gluten-free journey with 33 handpicked breakfast recipes that are safe, simple, and full of flavor.
Whether you’re struggling with what to eat or just want new ideas, this guide is made for you.
Feel confident. Eat happily. Live healthier.

No spam. No credit card. Just delicious gluten-free breakfasts—delivered instantly.
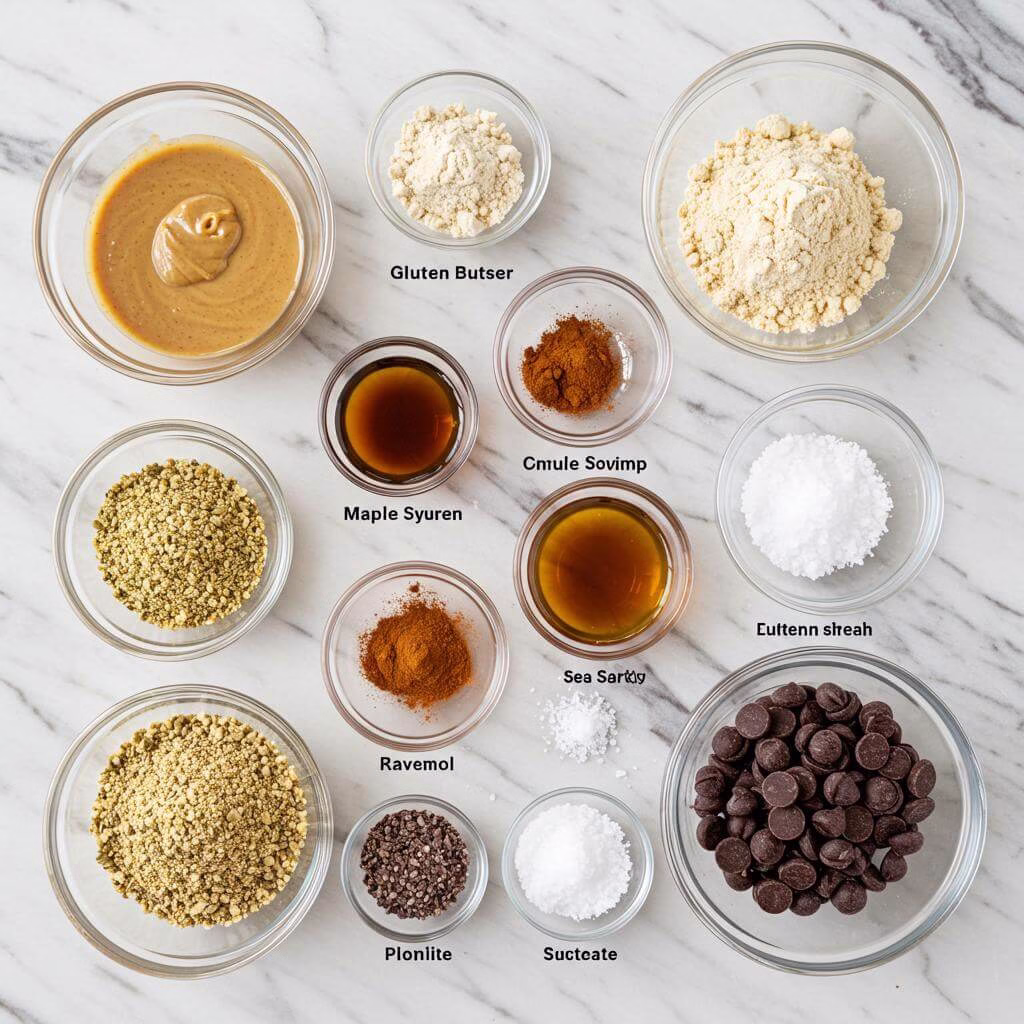
Ingredients
Crafting these delicious gluten free protein bars starts with a few simple, wholesome ingredients. Here’s a look at what you’ll need and why each component is key to making the very best homemade gluten free protein bars!
Essential Ingredients for These Gluten Free Protein Bars
- 1.5 cups almond butter: I recommend using a drippy, smooth variety (find a good one here). This forms the creamy, binding base for your no-bake gluten free protein bars, contributing healthy fats and a wonderful nutty flavor. Ensuring it’s well-mixed helps achieve the perfect consistency!
- 3-4 TBSP maple syrup: As an unrefined sweetener, maple syrup adds just the right touch of sweetness while keeping these bars dairy-free. Start with 3 TBSP and add more up to 6 TBSP if you prefer them sweeter – it won’t affect the texture! Using it at room temperature helps it blend smoothly.
- 2 tsp vanilla extract: Vanilla adds beloved warm depth of flavor that complements the nutty profile of these gluten free protein bars.
- 1/2 tsp cinnamon: Cinnamon enhances the overall warmth and coziness of the bars, making them feel like a real treat!
- 1/4 tsp sea salt: A little salt is crucial for balancing the sweetness and bringing out all the other flavors. If your almond butter is already salted, you might want to reduce this slightly.
- 1/2 cup flaxseed meal: Also known as ground flaxseeds, this ingredient acts as a binder, helping to hold your gluten free protein bars together without the need for eggs or gluten. It also adds beneficial fiber! (Grab flaxseed meal here).
- 3 TBSP unflavored, unsweetened protein powder (any kind): This is where you pack in the power! Using an unflavored powder allows the natural flavors of the nuts and chocolate to shine. Ensure your choice is certified gluten free if needed. (Shop for gluten free protein powder options).
- 3 TBSP sesame seeds: These little seeds add a delightful pop of texture and enhance the nutty taste, providing a pleasant contrast to the soft bar base.
- 6 ounces dairy-free dark chocolate, chopped or dairy-free chocolate chips (approx 1 cup): The luscious chocolate topping is essential! Using dairy-free chocolate keeps these bars vegan-friendly and free from dairy. (Find great dairy-free chocolate options).
- Flaky sea salt (optional, for garnish): Adding a sprinkle of flaky sea salt like Maldon (get Maldon sea salt here) on top of the chocolate coating adds a gourmet touch and a wonderful sweet and salty crunch. Pro tip: Don’t skip this if you love that flavor combination!
Smart Substitutions & Variations
Flexibility is key in gluten-free baking (and no-baking!). These gluten free protein bars are easy to adapt to your pantry and dietary needs.
- Almond butter: Don’t have almond butter? No problem! Feel free to swap it out for any other drippy nut butter you love, such as cashew butter, hazelnut butter, or even peanut butter if you don’t have nut allergies.
- Flaxseed meal: Ground chia seeds (buy ground chia seeds) can be used in place of flaxseed meal, though the texture might be slightly different.
- Sesame seeds: You can easily substitute sesame seeds with hemp seeds (shop for hemp seeds) or use a mix of both for slightly different nutritional profiles and textures.
- Protein powder: The world of protein powder is vast. The most important thing is to choose one that aligns with your dietary needs (ensuring it’s certified gluten free and dairy-free/vegan if necessary). While unflavored is recommended to let other tastes shine, a vanilla or nut-based flavor could also work. Just remember if your powder is sweetened, you’ll want to reduce the maple syrup accordingly.
- Vegan modifications: These bars are naturally vegan! Just double-check that your chosen protein powder is plant-based (like pea or brown rice) and that your dairy-free chocolate is also certified vegan (most are, but labels are your friend).
- AIP modifications (Modified AIP): Yes, you can make these AIP-friendly! Swap almond butter for sunflower seed butter (find AIP-compliant sunflower butter). You may need a little extra maple syrup since sunflower butter can be less sweet. Ensure your chocolate is AIP-compliant, like Hu Kitchen Gems (check out Hu Gems), and use a compliant protein powder (the Equip Prime Protein mentioned above is Modified AIP compliant).
- Add a crunch: Want more texture? Sprinkle some cacao nibs (get cacao nibs here) over the base before adding the melted chocolate for an extra layer of crunch and rich, slightly bitter flavor.
Nutrition Highlights
By choosing these wholesome ingredients, you’re not only making delicious gluten free protein bars but also nourishing your body! These no-bake bars offer fantastic benefits:
- Packed with Protein: Thanks to the added protein powder and almond butter, these bars are a great source of protein, which helps keep you feeling satisfied and supports muscle repair and growth – perfect for a post-workout snack!
- Rich in Healthy Fats: Almond butter and sesame seeds contribute healthy monounsaturated and polyunsaturated fats, supporting heart health and providing sustained energy.
- Good Source of Fiber: Flaxseed meal is an excellent source of dietary fiber, crucial for digestive health and also contributing to that feeling of fullness.
- Refined Sugar-Free (mostly): Using maple syrup instead of refined sugar is a great choice for a more natural sweetness.
- Naturally Gluten-Free & Dairy-Free: These bars are inherently free from gluten and dairy, making them a safe and delicious option for those with sensitivities or allergies, or who choose to avoid them.
- Versatile & Customizable: The ingredient flexibility means you can tailor these bars to fit various dietary protocols like Vegan and Modified AIP, celebrating your specific choices!
While I don’t provide specific calorie counts (you can use a free online calculator for that!), rest assured that each bite of these homemade gluten free protein bars is full of beneficial macronutrients and feel-good ingredients.
Essential Equipment for This Recipe
To prepare this delicious recipe, you’ll need the following kitchen tools:
- Mixing Bowls – A set of various sized mixing bowls is essential for combining ingredients.
Find Mixing Bowls on Amazon - Measuring Cups and Spoons – Accurate measuring is key for baking success.
Find Measuring Cups and Spoons on Amazon - Baking Sheets – Perfect for even baking and crispy results.
Find Baking Sheets on Amazon - Whisks – Essential for incorporating air into batters and sauces.
Find Whisks on Amazon - Spatulas – Ideal for folding and mixing without scratching your bowls.
Find Spatulas on Amazon - Food Processors – Makes chopping and pureeing ingredients quick and easy.
Find Food Processors on Amazon - Saucepans – A versatile tool for simmering sauces and melting ingredients.
Find Saucepans on Amazon - Chef’s Knives – A good quality chef’s knife is essential for food prep.
Find Chef’s Knives on Amazon - Cutting Boards – Protect your countertops while you chop and prep.
Find Cutting Boards on Amazon
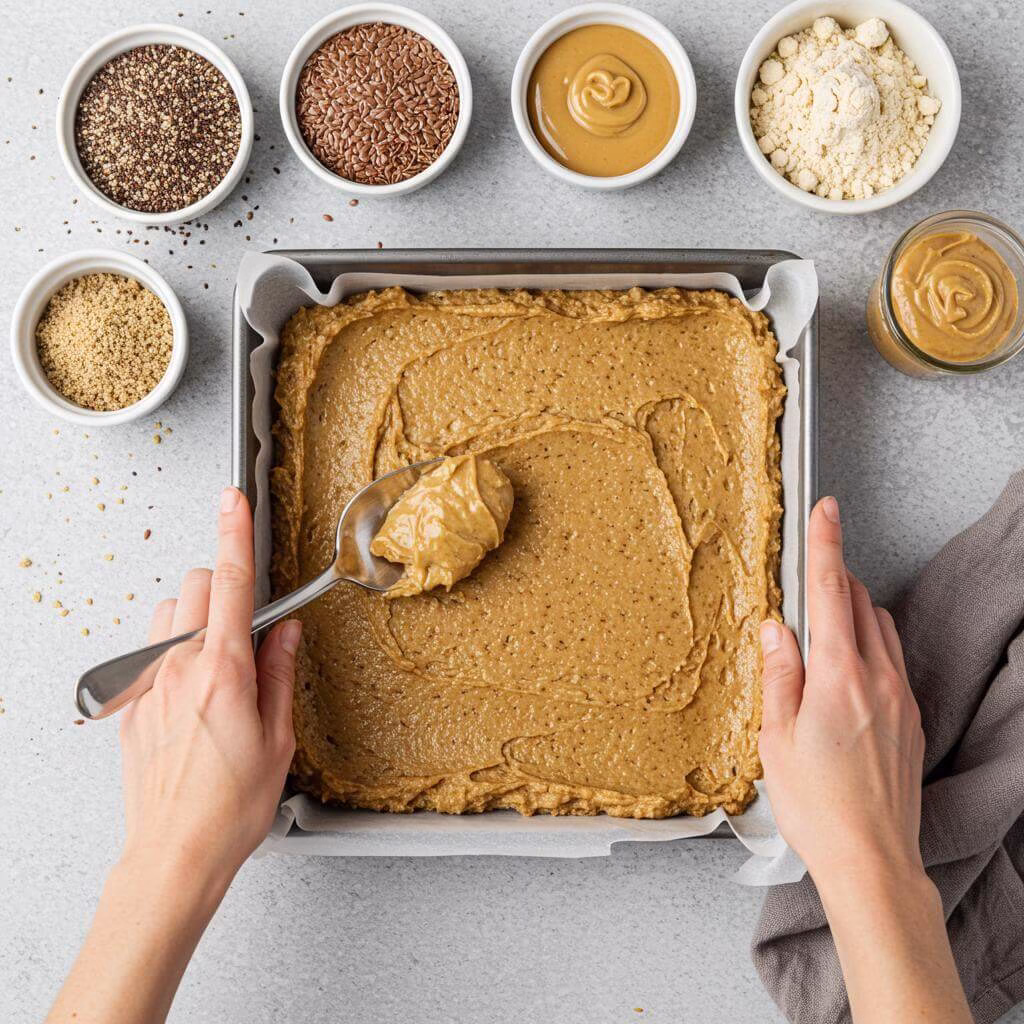
- First things first, let’s get your pan ready! Grab an 8×8 inch baking pan. To make lifting your finished gluten free protein bars out super easy, line the entire pan with parchment paper, leaving some overhang on the sides like little handles. Set this prepared pan aside for now.
- Let’s combine the wet ingredients! In a large mixing bowl, measure and add your creamy almond butter (or your chosen nut butter), maple syrup, and vanilla extract. Make sure your nut butter is well-mixed before measuring, so there’s no separated oil at the top! Also, aim for room temperature ingredients if possible – this helps everything blend together smoothly and prevents the mixture from seizing up or being crumbly. Stir everything together until it’s well combined and looks smooth.
- Now it’s time to add the binding and flavor! To that same bowl, add your flaxseed meal, your gluten free protein powder (make sure it’s certified gluten free for peace of mind!), cinnamon, and sea salt. If your nut butter was salted, you might want to use a little less salt here. Stir vigorously until all the dry ingredients are fully incorporated into the nut butter mixture. The texture should now be similar to a thick, pliable cookie dough – it should hold together when you squeeze it but not be overly sticky or crumbly. Don’t worry if it seems different from traditional wheat dough – this is normal for wonderful homemade protein bars! If your mixture seems too dry, add just a tiny splash more drippy almond butter. If it seems a bit too wet, stir in another teaspoon of flaxseed meal.
- Let’s add some texture! Introduce the sesame seeds to the bowl. Stir them in until they are evenly distributed throughout the “dough.” These little seeds add a delightful nutty pop and a bit of crunch that makes these dairy-free protein bars extra special.
- Time to shape your no-bake protein bars! Transfer the entire mixture into your prepared 8×8 inch pan. Now, this is a crucial step for bars that hold their shape: firmly press the mixture down into an even layer across the bottom of the pan. You can use your hands (might require a little non-stick spray or damp fingers), the back of a spoon, or a spatula. Press firmly – you want it densely packed! Once pressed, use the back of the spoon or spatula to smooth out the top surface so it’s nice and flat. You’ve done a great job getting them ready! Now, place the pan in the refrigerator for about 15 minutes. This brief chill time helps the base firm up before we add the chocolate topping.
- While the base chills, let’s get the chocolate ready! Melt the dairy-free dark chocolate (chips or chopped bar) using whichever method you prefer.
- Microwave Method: Place chocolate in a microwave-safe bowl. Microwave in 20-30 second bursts, stirring thoroughly with a heat-resistant spatula after each burst, until the chocolate is completely smooth and melted. Be careful not to overheat!
- Double Boiler Method: Place chocolate in a heatproof bowl set over a pot of simmering (not boiling) water, ensuring the bottom of the bowl doesn’t touch the water. Stir constantly with a spatula until the chocolate is fully melted and glossy.
If your melted chocolate seems a little thick, you can stir in about 1 tablespoon of melted coconut oil to thin it slightly for easier spreading.
- Almost there! Take the pan with the chilled base out of the fridge. Pour the lovely melted chocolate evenly over the top of the pressed mixture. Use a spoon or spatula to carefully spread it out from edge to edge, creating a smooth, even layer. The contrast between the cool base and the warm chocolate is exciting!
- Back to the fridge! Return the pan to the refrigerator for another 15-20 minutes. This time is needed for the chocolate layer to set completely and become firm. You’ll know it’s ready when the chocolate is hard to the touch and isn’t shiny or soft anymore.
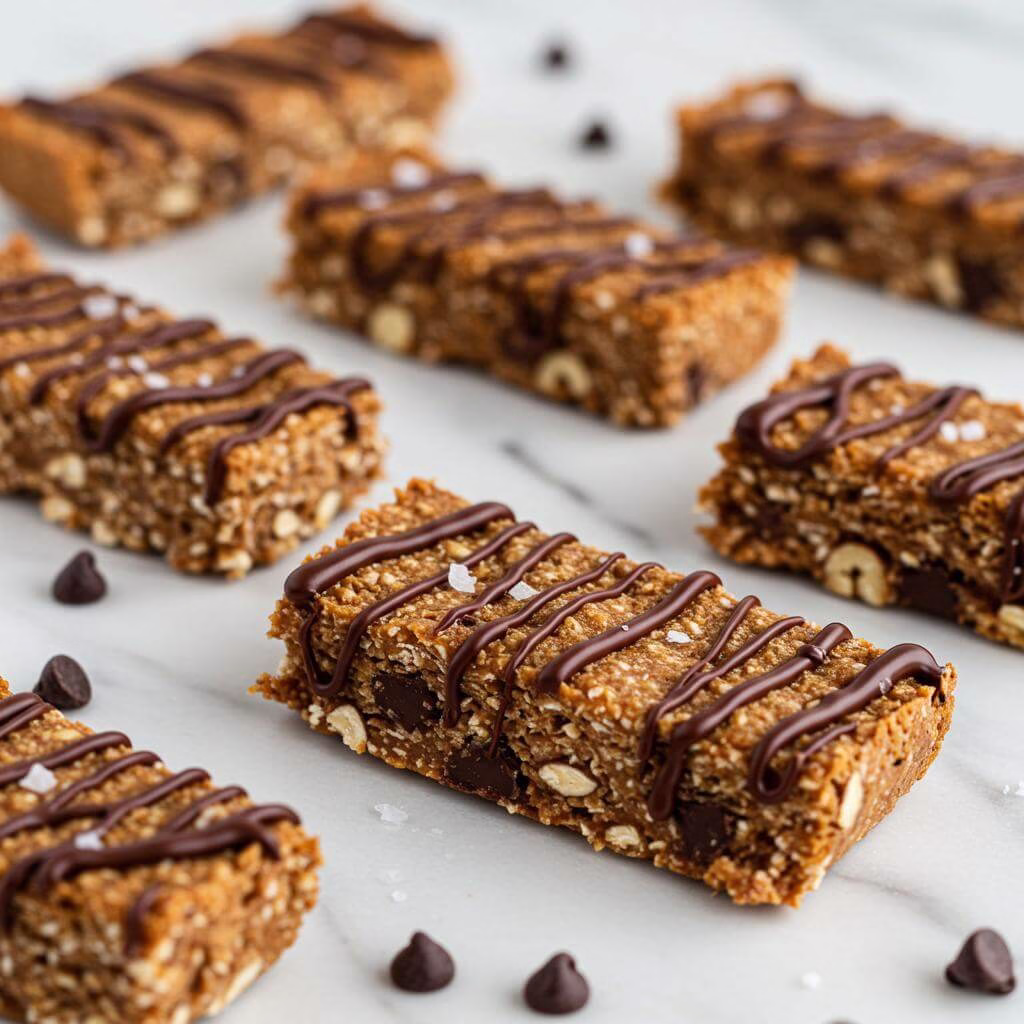
- Ready to slice? Once the chocolate is fully set, carefully remove the pan from the fridge. Use the parchment paper overhang as handles to gently lift the entire chocolate-covered block out of the pan and place it onto a cutting board. Using a sharp knife, cut the large square into your desired bar or square shapes. Take your time here for nice, clean slices! These beautiful gluten free dairy free protein bars are looking amazing!
- Serve and enjoy! You can sprinkle a little flaky sea salt over the tops of the bars after cutting for a wonderful salty-sweet contrast – it’s highly recommended! These delicious protein bars are best kept stored in the fridge in an airtight container or storage bag until you’re ready to grab one for a quick snack, post-workout fuel, or treat. They can also be frozen for longer storage! Congratulations, you’ve just made incredible gluten free protein bars from scratch!
Tips for Perfect Results
- The Game-Changer: Master the Almond Butter Consistency. This is the absolute secret weapon for these gluten free protein bars. Before you measure, always stir your natural almond butter intensely. You want it drippy and completely uniform with no oil separation. If your nut butter is stiff or paste-like, it simply won’t bind properly, leading to dry, crumbly bars. A smooth, runny natural nut butter is non-negotiable for that perfect soft, yet firm texture.
- Temperature Matters: Room Temp is Your Friend. Using almond butter and maple syrup straight from a cold fridge can cause the mixture to seize slightly and become harder to work with. For effortless mixing and optimal ingredient integration, ensure both are at room temperature. If they feel cold, a quick minute or two near a warm spot in the kitchen can make a big difference in achieving that ideal cookie dough texture.
- Achieving Dough Perfection: Adjust & Conquer. The finished mixture before pressing should resemble a thick, pliable cookie dough – not too sticky, not too crumbly. If your dough feels too dry after mixing, incrementally add just a teaspoon or two more of your drippy almond butter. If it seems too wet or loose, a tiny pinch more flaxseed meal can help absorb excess moisture and improve binding for these no-bake gluten free protein bars.
- The Power of Pressing: Firmness is Key. Don’t just gently spread the mixture into the pan; press it down *firmly* and evenly. Use the back of a spoon, a spatula, or even your hands (lightly dampened if needed) to compact the mixture into a dense, uniform layer. This compression is crucial for helping the ingredients bind together properly and ensures your cut bars hold their shape beautifully.
- Chill for Success: Don’t Rush the Set. The refrigeration steps are vital. The initial chill allows the nut butter and flaxseed meal to bind the dough into a cohesive layer before the chocolate is added. The second chill solidifies the chocolate topping. Ensure both chilling periods are completed to guarantee the bars are firm enough to cut cleanly and that the chocolate doesn’t melt off when handled.
- Elevate the Flavor: Unflavored Protein is Best. While you can use flavored protein powder, choosing an unflavored, unsweetened version (like the grass-fed beef protein recommended) allows the delicious natural flavors of the almond butter, maple syrup, cinnamon, and vanilla to shine. This creates a more sophisticated taste profile compared to bars dominated by artificial protein powder flavors. For truly exceptional gluten free protein bars, let the whole ingredients take center stage.
- The Finishing Touch: Flaky Sea Salt is Non-Negotiable. Trust me on this one! Sprinkling flaky sea salt (like Maldon) over the set chocolate topping isn’t just for looks. That pop of salinity provides a perfect contrast to the rich, sweet chocolate and nutty bar, enhancing the overall flavor experience and making these homemade gluten free protein bars truly irresistible.
Common Mistakes to Avoid
- Using Un-Mixed or Stiff Nut Butter: If your natural nut butter has separated oil and you don’t stir it completely before measuring, you’ll end up with a mixture that is either too oily or too dry and stiff. This directly impacts the texture and binding, resulting in crumbly bars that won’t hold together.Prevention: Always, always stir your natural nut butter until it is smooth and homogenous before measuring. If it’s naturally very thick or pasty, consider warming it gently or using a different brand that has a runnier consistency.
- Not Pressing Firmly Enough into the Pan: A loose mixture that isn’t well-compacted will simply fall apart when you try to cut it. The pressure helps create a dense matrix that holds everything together.Prevention: Use firm, even pressure to press the mixture into the pan. Don’t be afraid to use your hands or a sturdy tool to really compact it right to the edges. The flatter and more solid the surface before chilling, the better.
- Cutting Before Fully Chilled: Trying to cut the bars before the chocolate layer is completely set will result in a messy, smudged topping and bars that don’t hold their clean edges. Similarly, cutting before the base has chilled enough can cause it to crumble.Prevention: Respect the chill time! Ensure the pan has spent the full recommended time in the fridge after both the base and chocolate layers are added. The chocolate should be firm to the touch before you attempt to cut.
Frequently Asked Questions for Homemade Gluten Free Protein Bars
What if the “dough” mixture seems too dry or crumbly?
Great question! This is usually down to the consistency of your nut butter. If the mixture feels too dry after adding all ingredients, it likely means your almond butter (or other nut butter) wasn’t drippy or well-mixed enough, or perhaps was too cold. Don’t worry, it’s an easy fix! Add just a tiny splash more of your drippy almond butter (start with a teaspoon) and stir it in until the mixture comes together and has that pliable, cookie-dough-like texture described in the recipe. Make sure your nut butter and maple syrup are at room temperature next time for the smoothest mixing!
Can I use a different type of nut or seed butter instead of almond butter?
Absolutely! These gluten free protein bars are quite versatile. You can easily swap the almond butter for any other drippy, well-mixed nut butter you love, such as cashew butter, hazelnut butter, or even peanut butter if you don’t need them nut-free. Just ensure it’s the smooth, drippy kind, not a stiff, dry one, for the best texture.
What kind of protein powder is best for these gluten free protein bars?
The recipe is pretty flexible with protein powder type, as long as it’s unsweetened and unflavored. This allows the delicious nutty and chocolate flavors to really shine! However, if you prefer, a vanilla or nut-flavored protein powder *can* work, but you might want to slightly reduce the amount of maple syrup if your powder is sweetened. The most important thing for homemade gluten free protein bars is to ensure your chosen protein powder is certified gluten-free and dairy-free if that’s important for your diet. The post mentions Equip Prime Protein is a great option!
My chocolate topping didn’t set firmly, or it cracked/separated when I cut the bars. Why?
A few things could cause this! First, ensure you gave them enough time to chill in the fridge after adding the chocolate – usually 15-20 minutes is enough for the chocolate to harden completely. If your kitchen is warm, it might take a little longer. If it cracked when cutting, ensure the bars are adequately chilled but not frozen solid. Using a sharp knife helps! Also, sometimes warming your knife slightly under hot water (and drying it!) before slicing can give you cleaner cuts, especially through the chocolate layer. If the chocolate seemed slow to set, you might not have had enough chocolate, or the layer was very thin. Using the recommended amount and spreading evenly is key for that solid top layer on your gluten free protein bars.
How long do these dairy free protein bars last, and how should I store them?
These homemade gluten free protein bars keep really well! You should store them in an airtight container in the refrigerator for up to 2 weeks. For even longer storage, they freeze beautifully! You can keep them in a freezer-safe airtight container or bag for up to 3 months. Defrosting them in the fridge overnight or at room temperature for an hour or two before eating works perfectly. Storing them individually wrapped is also a great way to make them easy to grab and go!
Can I make these protein bars vegan or AIP-friendly?
Yes, absolutely! These protein bars are naturally vegan as written, provided your protein powder and dairy-free chocolate are also certified vegan (most dairy-free chocolate is, but always check!). For a Modified AIP version, you’ll need to make a couple of substitutions outlined in the post: use sunflower seed butter instead of almond butter, ensure your protein powder (like Equip Prime) and dark chocolate (like Hu Kitchen Gems) are AIP compliant. You might also need a little extra maple syrup with sunflower butter as it’s often less sweet than roasted nut butters.
Will these no-bake protein bars soften or melt if I take them out for a snack or workout?
They will soften a bit once they’re out of the fridge and come up to room temperature, especially that delicious chocolate layer. They are designed to be soft and cake-like, not hard granola bars. If you plan to take them on the go and want them to stay firm, our pro tip is to pop a small ice pack in your snack bag or container with the bar. This will keep them nicely chilled and firm until you’re ready to enjoy your gluten free protein bars!