Do you remember the first time you saw a slice of vibrant, impossibly red cake topped with a generous swirl of creamy frosting? That iconic, show-stopping classic – Red Velvet. For years, seeing it displayed in bakery windows sent a familiar pang through me, followed by the all-too-common gluten-free sigh. It felt like a distant dream, a treat reserved only for others. The rich cocoa hint, the subtle tang, the striking colour – how could I possibly recreate that? As fellow gluten-free friends know, living without gluten often means saying goodbye (or at least, ‘it’s complicated’) to many beloved baked goods, and a truly perfect gluten free red velvet cake felt like it might be at the top of that ‘complicated’ list.
Oh, the attempts! My kitchen became a science lab of sorts, filled with gluten-free flour blends, bottles of food colouring, and a whole heap of hope mixed with inevitable disappointment. There were the sponges that turned out dense and heavy, completely lacking that signature delicate crumb. Batches where the red colour looked more like faded pink or an alarming shade of brown. Don’t even get me started on the times the frosting was too runny or too stiff! Getting gluten-free bread right is one challenge, but cake can be a whole other beast. We’ve all been there, right? That moment you take the first bite of a hopeful creation, only for a gummy texture or bland flavour to hit, and you let out that slight sigh of disappointment, wiping imaginary flour dust off your apron.
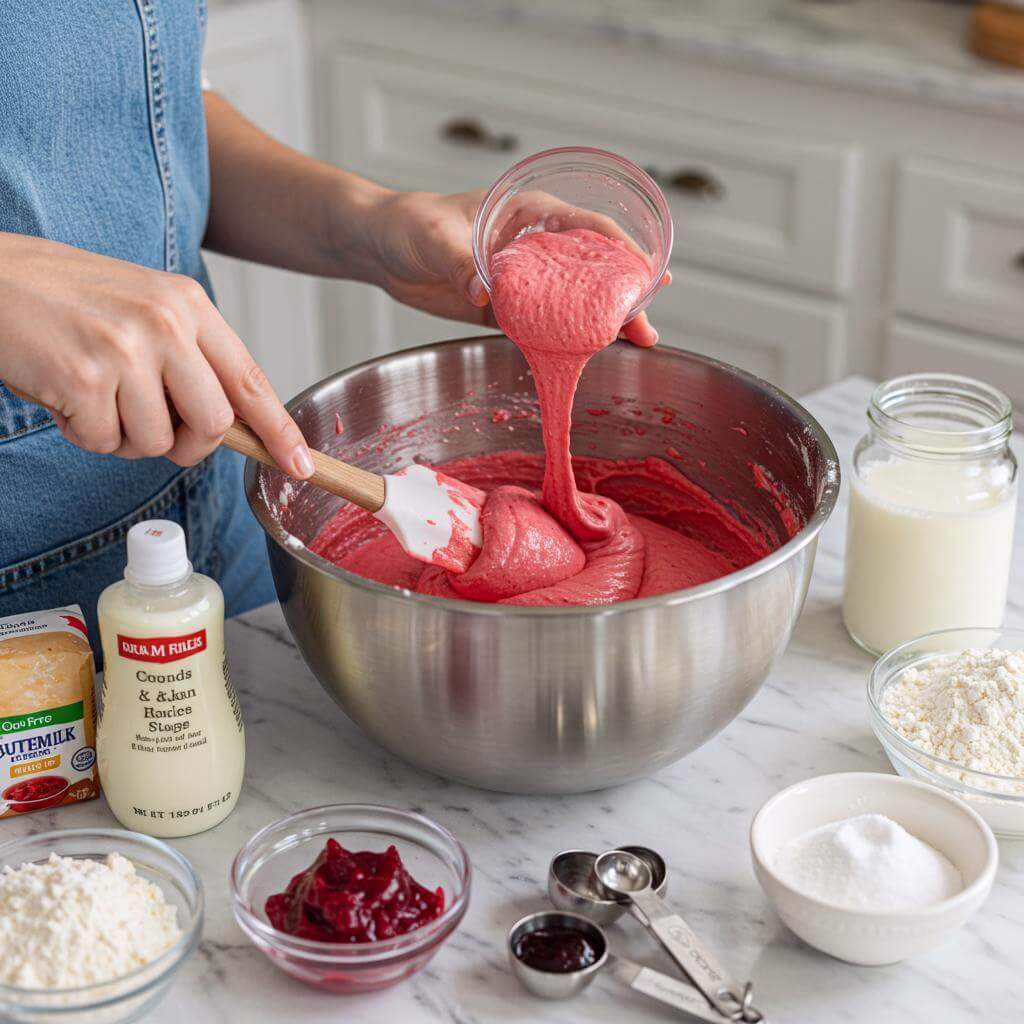
But giving up on a classic like gluten free red velvet cake just wasn’t an option for me. I was determined! I experimented with different ratios, tested countless types of cocoa, and crucially, went on a deep dive into finding the perfect red food colouring (trust me, it makes ALL the difference!). Then came the ‘aha!’ moment. A combination of the right ingredients, the proper technique, and finally discovering that vibrant, effective food paste. The batter poured into the pans with that stunning, deep crimson hue. As it baked, the kitchen filled with that unmistakable, slightly tangy cocoa aroma. Pulling the perfectly risen, beautifully coloured layers from the oven felt like winning the baking lottery.
The real test, of course, was sharing it. Presenting that first slice of this genuinely delicious **gluten free red velvet cake** to my non-gluten-free family and friends was nerve-wracking. The silence as they took the first bite felt eternal. Then, the exclamations! “This is gluten-free?!” The pure surprise and delight on their faces was all the validation I needed. It wasn’t just ‘good for gluten-free’; it was just plain *good* cake. Not only is this the **gluten free red velvet cake** you’ve been dreaming of, but I’ve also perfected it to be completely dairy-free and low FODMAP, meaning even more of us can enjoy a generous slice! So, if you’ve been searching for that perfect, show-stopping, truly satisfying **gluten free red velvet cake**, your quest ends here!
Loved This Gluten-Free Red Velvet Cake? Unlock More Baking Success!
Making this incredible gluten-free red velvet cake is just the beginning! If you’ve ever felt stumped by tricky gluten-free baking conversions or wished for a handy guide by your side, we’ve got something special for you, fellow gluten-free friends.
Download Your FREE “Gluten-Free Baking Substitutions Cheat Sheet” Today!
- ✓ Say goodbye to crumbly or dense bakes by mastering essential ingredient swaps.
- ✓ Confidently substitute flours, binders, eggs, and dairy in any recipe.
- ✓ Save time and avoid costly mistakes with proven gluten-free alternatives.
- ✓ Transform your favorite traditional recipes into delicious gluten-free versions with ease!
Get instant access to this invaluable resource and make your gluten-free baking journey smoother and more delicious. Click below to get your free cheat sheet!
We value your trust! We’ll only send you awesome gluten-free content, promise. No spam, ever.
Why This Gluten Free Red Velvet Cake Recipe Works
Creating a truly show-stopping gluten free red velvet cake might seem like a challenge, but the secret lies in understanding the brilliant science happening behind the scenes! This recipe isn’t just a simple swap of ingredients; it’s a carefully engineered blend designed to replicate the moist, tender crumb and iconic flavour of traditional red velvet, all while being completely gluten free.
Here’s the magic that makes this gluten free red velvet cake recipe stand out:
The Power Team: Gluten Free Flour & Xanthan Gum
Traditional cakes rely on gluten for their structure and elasticity. In gluten-free baking, we need to create that framework differently. This recipe uses a balanced gluten free plain flour blend combined with a precise amount of xanthan gum. Think of xanthan gum as the vital binder. It traps air bubbles created by leavening agents and provides that necessary structure, preventing your beautiful gluten free red velvet cake from becoming crumbly and falling apart. Without it, your cake wouldn’t hold its shape!
The Chemistry of Colour and Tenderness: Buttermilk, Bicarbonate of Soda & Vinegar
Red velvet’s signature tender crumb and subtle tang come from a classic chemical reaction. The acidity from the buttermilk (or its dairy-free counterpart made with lemon juice/vinegar) reacts with the alkaline bicarbonate of soda. This acid-base reaction produces carbon dioxide gas, which helps the cake rise beautifully and creates that desirable soft texture. The acidity also interacts with the cocoa powder, helping to define the subtle chocolate flavour and historically enhancing the red hue (though the concentrated food paste does most of the heavy lifting today!). Adding the bicarbonate of soda and vinegar right before baking ensures this reaction is active when the cake hits the oven.
Intense Colour Without Excess Liquid: Using Food Paste Wisely
Achieving that deep, vibrant red is crucial for a gluten free red velvet cake. This recipe specifically calls for a concentrated red food paste, and here’s why it’s essential: liquid food colouring requires adding a large volume to get a strong colour, which would throw off the delicate balance of wet and dry ingredients in the batter, resulting in a heavy, dense cake. The paste delivers maximum colour impact with minimal added liquid, preserving the perfect cake consistency.
Mastering Texture Through Method: Creaming and Gradual Mixing
While tempting, the “all-in-one” method isn’t ideal here. Creaming the butter and sugar together first incorporates air, which contributes to a light texture. Adding eggs one by one ensures they emulsify properly into the batter, preventing splitting and creating a smooth base. Gradually adding the dry ingredients alternating with the buttermilk allows the gluten free flour and xanthan gum to hydrate evenly without overworking the batter, which can lead to a tough result even in gluten-free baking. Each step is designed to build structure and tenderness.
By understanding these key interactions – how the xanthan gum binds, the buttermilk and bicarb lift, the food paste colours efficiently, and the mixing method builds texture – you gain the power to consistently bake a perfect gluten free red velvet cake. This recipe isn’t just follow-the-steps; it’s a demonstration of how clever ingredient combinations and precise techniques overcome the challenges of gluten-free baking to deliver delicious results every time.
Making This Recipe Your Own
One of the best things about baking your own gluten free treats is the endless possibility for customisation! This gluten free red velvet cake recipe is already fantastic as is, but feel free to play around with the ingredients and flavours to make it truly your own. Here are some easy swaps and exciting variations to inspire you!
Easy Swaps
Don’t have everything on hand, or need to tweak for dietary needs? No problem! These easy swaps will help you bake a delicious gluten free red velvet cake without missing a beat. Remember to always double-check ingredient labels to ensure they are certified gluten-free, especially when dealing with dietary restrictions.
- Butter ➡️ Dairy-Free Baking Margarine: No dairy butter? No problem! As mentioned in the recipe notes, you can confidently swap the regular butter for an equal amount (1:1 ratio) of a good quality hard block dairy-free baking margarine like Stork or similar. You might find the dairy-free frosting is a little softer, so pop it in the fridge before icing if needed! Find options like dairy-free baking margarine on Amazon.
- Buttermilk ➡️ Dairy-Free Buttermilk Substitute: Can’t find buttermilk or need it dairy-free? Easy! Whisk 1 tablespoon of lemon juice or white vinegar into 300ml of your preferred dairy-free milk (soy, almond, oat work well – ensure certified gluten-free). Let it sit for 5-10 minutes until it looks slightly curdled. Use this mixture 1:1 in place of the regular buttermilk.
- Cream Cheese ➡️ Dairy-Free Cream Cheese Alternative: For a completely dairy-free gluten free red velvet cake frosting, swap the regular cream cheese for an equal amount (1:1 ratio) of a dairy-free cream cheese alternative. Soya-based options are widely available. Again, chilling the frosting before application is key for stability when using dairy-free alternatives. Look for dairy-free cream cheese alternatives online.
- Vinegar (White Wine/Cider) ➡️ Any White Vinegar: The recipe calls for white wine or cider vinegar, but if all you have is standard distilled white vinegar, that’s perfectly fine! The vinegar works with the bicarbonate of soda and buttermilk to create lift and tenderness, and the specific type of white vinegar won’t drastically alter the flavour in this context. Use the same amount (3 tsp).
- Caster Sugar ➡️ Granulated Sugar: While caster sugar is preferred for its fine texture which helps dissolve easily and create a smooth batter, you can swap in standard granulated sugar at a 1:1 ratio if that’s what you have. The final cake might have a slightly coarser crumb, but it will still be delicious!
- Gluten Free Plain Flour Blend ➡️ Different GF Blends: The success of this gluten free red velvet cake relies on a good quality plain gluten-free flour blend. While most blends designed for plain flour substitution should work, results can vary depending on the starches used. Stick to a blend you trust that contains xanthan gum (or ensure you add the amount specified in the recipe). Using a blend without xanthan gum when the recipe calls for it is not recommended by the author, as it helps provide crucial structure. Find various gluten-free plain flour blends on Amazon.
Creative Variations
Ready to take your gluten free red velvet cake to the next level? Get creative with these fun flavour twists and presentation ideas!
- Turn it into Cupcakes: Want individual treats? Use this same batter to make gluten free red velvet cake cupcakes! Line cupcake tins with cases (cupcake tins available on Amazon) and fill them about two-thirds full. Bake at the same oven temperature, but reduce the baking time significantly – start checking around 20-25 minutes with a skewer. Frost once cooled.
- Add a Hint of Almond: For a subtle flavour twist that pairs beautifully with red velvet and cocoa, add 1/4 teaspoon of almond extract to the sponge batter along with the vanilla. Don’t skip the vanilla, just add a touch of almond alongside it! Find almond extract on Amazon. *Note: If baking for someone with nut allergies, skip this variation.*
- Lemon Cream Cheese Frosting: Give your frosting a zesty lift! Add 1-2 tablespoons of fresh lemon juice (to taste) and the zest of half a lemon to your finished cream cheese frosting. Beat until just combined. This adds a lovely bright contrast to the rich cake.
- Chocolate Chip Surprise: Fold 100g of your favourite gluten-free and dairy-free chocolate chips into the batter just before pouring it into the tins. This adds little pockets of melted chocolatey goodness throughout the cake.
- Holiday Colour Schemes: While traditional red is classic, you can adapt the colour paste for different occasions! Use green food paste for a festive Christmas cake, or even orange for Halloween (though orange velvet isn’t quite the same!). Remember to still use a high-quality concentrated paste, not liquid food colouring.
- Decorative Flourishes: Beyond crumbling the cake trimmings on top, get creative with decorations! Add fresh berries (strawberries or raspberries pair well), sprinkle with desiccated coconut (ensure nut-free if needed), pipe decorative swirls of frosting using a piping bag and nozzles, or gently press dairy-free chocolate shavings onto the sides of the cake.
Tips for Perfect Results
- Unlock That Iconic Red Colour: The Secret is in the Paste!
Forget watery supermarket drops. The single most crucial factor for achieving that deep, vibrant red in your gluten free red velvet cake is using a high-quality, concentrated food colouring paste like Sugarflair Colouring’s Red Extra. Trust me, using liquid colouring means adding too much moisture, ruining your batter’s delicate balance. Go for the paste – it delivers intense colour without compromising texture. - Xanthan Gum: Your Gluten-Free Baking Ally.
In gluten-free baking, we lose the natural binding power of gluten. Enter xanthan gum! This tiny ingredient is gluten free red velvet cake a game-changer, acting as the essential binder that prevents a crumbly, dry texture. Never skip the xanthan gum unless you are absolutely certain of a tested alternative; it’s key to that perfectly moist, cohesive crumb. - Mind the Temperature: Softened Butter and Room Temp Eggs are Non-Negotiable.
This one tip will completely transform your results and prevent split batter! Always ensure your butter (or dairy-free alternative) is genuinely softened, not melted, and your eggs are at room temperature. Cold ingredients struggle to emulsify with softened fat and sugar, leading to a curdled mixture. Plan ahead and get them out of the fridge a few hours before you start. - Master the Mixing Method: Gradual Additions are Key.
For a light and airy sponge, don’t rush the mixing process or use the all-in-one method. Cream the softened butter and sugar until light and fluffy first. Add eggs *one at a time*, mixing just until each is incorporated. When adding the dry ingredients and buttermilk, alternate in stages (flour, buttermilk, flour, buttermilk) and mix only until *just* combined. Overmixing develops toughness even without gluten. - Activate the Leavening Power: Bicarb & Vinegar Magic.
The signature rise and fine crumb of red velvet cake comes from the reaction between the acidic buttermilk/vinegar and the alkaline bicarbonate of soda. This reaction starts immediately when combined. Mix the bicarb and vinegar together right before adding them to the batter, mix briefly just to incorporate, and then get the cakes into the preheated oven straight away to capture that lift. - Perfect Your Frosting Consistency, Especially if Dairy-Free.
Dairy-free cream cheese frostings can sometimes be looser than traditional ones. The secret is chilling. After making your frosting and applying the crumb coat, chill the entire cake for at least 30 minutes before applying the final layer of icing. This firms up the base coat, prevents crumbs from mixing in, and gives the dairy-free frosting a better chance to firm up for smooth application. - Precision is Paramount: Always Weigh Your Ingredients.
Baking is a science, and quantities matter, perhaps even more so in gluten-free baking where ratios are finely tuned. Invest in digital kitchen scales and weigh your ingredients, especially flour. Measuring by volume (cups) can be inconsistent and lead to dry or dense results. Accurate measurements are your foundation for a successful gluten free red velvet cake. - Know Your Oven and Don’t Peek!
Ovens can vary significantly in temperature. Get to know how yours performs. Always preheat your oven fully before baking. During baking, resist the urge to open the oven door, especially during the first 20-25 minutes. Sudden temperature drops and disturbances to air circulation can cause cakes to sink. Use an oven thermometer if unsure about accuracy, and check for doneness with a skewer only when the cake is close to the recommended baking time.
Common Mistakes to Avoid
- Using Liquid Food Colouring: As mentioned earlier, this is the biggest culprit for disappointing red velvet colour and potentially ruining the texture. Liquid colours require adding too much volume to achieve the desired intensity, making your batter too wet. Prevention: Invest in a high-quality red food colouring paste like Sugarflair Red Extra.
- Cold Ingredients & Overmixing: These two often go hand-in-hand in causing dense or split batters. Cold eggs and butter don’t emulsify properly, and excessive mixing once the dry ingredients are added overdevelops the (limited) structure and can knock out air. Prevention: Ensure all cold ingredients are at room temperature before starting. Mix the batter gently and only until the dry and wet ingredients are just combined – stop as soon as you see no more streaks of flour.
- Guessing Measurements: Baking relies on specific chemical reactions and ratios. Altering quantities even slightly, intentionally or unintentionally (by not weighing), can throw everything off, leading to issues with rise, texture, and sometimes even flavour balance. Prevention: Always use digital scales to accurately measure all your ingredients, especially flour and sugar.
Armed with these expert tips and a few key mistakes to avoid, you’re ready to bake a stunning, delicious gluten free red velvet cake that tastes every bit as good as (if not better than!) any traditional version. Happy baking!
Common Mistakes to Avoid
We know you’re eager to bake this absolutely delicious **gluten free red velvet cake**, and we want to help you avoid any bumps along the road! Even experienced bakers can run into issues, especially when working with gluten-free recipes which sometimes require a slightly different approach. Here are a few common mistakes and how to steer clear of them.
Using the Wrong Red Food Colouring
The Problem: You’ve added red food colouring, but your batter isn’t turning that iconic, deep red, so you keep adding more and more liquid colouring from the supermarket. By the time it looks red, the batter is too wet and the cake won’t bake correctly.
Why it happens: Standard liquid food colourings found in most supermarkets are quite diluted. To achieve the vibrant colour needed for a red velvet cake, you’d have to add so much liquid that it completely throws off the delicate balance of the wet and dry ingredients in the batter. This excess moisture prevents the cake from setting properly in the oven.
Prevention: This is probably the most crucial step for achieving that signature colour in your **gluten free red velvet cake**. As the recipe specifies, you absolutely must use a concentrated food colouring paste, like Sugarflair’s Red Extra. A small amount of paste goes a long way in delivering intense colour without adding significant extra liquid to your batter.
Recovery: Unfortunately, if you’ve already added too much liquid food colouring and the batter is noticeably runny, it’s very difficult to recover. Adding more dry ingredients to compensate could alter the texture and flavour significantly. It’s often best to accept the loss and start again with the correct food paste.
Pro Tip: Purchase the recommended concentrated red food paste *before* you begin baking your **gluten free red velvet cake**. It’s a game-changer for achieving true red velvet colour!
Sponges Sinking or Failing to Rise Properly
The Problem: You excitedly open the oven door only to find your beautiful cake layers have sunk in the middle, or perhaps they just didn’t rise much at all compared to the edges.
Why it happens: Cakes sink or don’t rise for a few key reasons, often related to structure and leavening. Common culprits include: opening the oven door too early (causing a sudden temperature drop that collapses the structure before it’s set); over-mixing the batter (developing too much air initially which then collapses under its own weight); or using ingredients that aren’t at room temperature (like cold eggs or butter mixing into warm batter, potentially leading to a split mixture that affects rise).
Prevention: Ensure all your cold ingredients (butter, eggs, buttermilk/dairy-free milk sub) are at **room temperature** before you start mixing. Cream your softened butter and sugar well to incorporate air, but once you add the dry ingredients and liquids, mix *just until combined*. Most importantly, resist the urge to peek! **Do not open the oven door** during the first 20-25 minutes of baking. Trust the process and your preheated oven.
Recovery: A sunken cake is usually still perfectly edible! It might just have a denser texture in the collapsed area. You can level it by trimming the domed edges or creatively use your frosting to fill the dip. If the cake didn’t rise much but isn’t overly dense, focus on the flavour from the frosting. It might not be as tall, but it will still be a tasty **gluten free red velvet cake**.
Pro Tip: An oven thermometer is a great investment to ensure your oven is actually at the temperature you set, which helps prevent both under and over-baking.
Overbaking the Cake Layers
The Problem: Your sponges look cooked on the outside, perhaps a little dark or thick-crusted, and once cooled, they feel dry and crumbly rather than moist and tender.
Why it happens: Baking for too long or at too high a temperature causes excessive moisture loss from the cake batter. The starches and proteins in the flour mixture become too rigid and dry when exposed to heat for an extended period after the cake is already fully cooked.
Prevention: Pay close attention to the baking time given in the recipe (around 30 minutes for each 20cm tin in this case) but treat it as a guide, not an absolute rule. Ovens vary! Start checking your cakes a few minutes *before* the minimum time. The most reliable test is the **skewer test**: insert a skewer into the centre of the cake; it should come out clean when done. If it comes out with wet batter, give it a few more minutes. If it has moist crumbs clinging to it, that’s usually perfect for gluten-free cake!
Recovery: Unfortunately, once a cake is dry, it’s hard to bring back significant moisture. For a slightly dry cake, you *could* try gently brushing the cut sides or even the top with a simple sugar syrup (equal parts sugar dissolved in hot water and cooled) or a little extra buttermilk/dairy-free milk alternative after it cools completely. Be careful not to make it soggy. Embrace the frosting – a generous layer of cream cheese frosting can help mask some dryness.
Pro Tip: If baking in multiple batches (like the recipe suggests due to oven size), note the exact time the first batch took once it passed the skewer test and use that as a starting point for subsequent batches.
Problems with Frosting Consistency
The Problem: Your cream cheese frosting is either too runny and slides off the cake, or perhaps it looks split and curdled, or even grainy.
Why it happens: Cream cheese frosting relies on the emulsion of fat (butter) and liquid (cream cheese). If these ingredients are not at the correct temperature (often too cold or too warm), or if they are overmixed, the emulsion can break, leading to separation (curdling/splitting) or a lack of structure (runny frosting). Dairy-free alternatives can sometimes be less stable, making temperature even more critical.
Prevention: Ensure your butter and cream cheese (or their dairy-free alternatives) are both properly **softened to room temperature** but not melted. Beat the butter and cream cheese together first until smooth *before* adding the icing sugar. Add the icing sugar gradually, mixing on a very slow speed initially to prevent clouds of sugar and then increasing speed *just* until incorporated and smooth. For dairy-free frosting, the recipe specifically recommends **chilling it** before trying to ice the cake to help it firm up.
Recovery: If the frosting looks split, try gently warming a very small amount of the split frosting in a microwave or over a water bath until just barely soft, then gradually beat it back into the main batch. Sometimes adding a tablespoon or two of extra softened cream cheese or a tiny splash of milk/dairy-free milk alternative can help bring it back together. If it’s too runny, add more sifted icing sugar, a tablespoon at a time, beating until incorporated. If it’s grainy, this is usually due to sugar not dissolving or ingredients not creaming initially; it’s hard to fix completely but sometimes beating it for another minute can help a little.
Pro Tip: Sifting your icing sugar is key to avoiding grainy frosting and helps it incorporate smoothly into the butter and cream cheese mixture. Chill dairy-free frosting for at least 30 minutes before attempting to spread it.
Making a delicious **gluten free red velvet cake** is absolutely within reach. By being mindful of these potential pitfalls, you’ll be well on your way to baking a stunning and tasty cake you can be proud of! You’ve got this!
Essential Equipment for This Recipe
To prepare this delicious recipe, you’ll need the following kitchen tools:
- Mixing Bowls – A set of varying sizes is essential for preparing different components of the recipe.
Find Mixing Bowls on Amazon - Measuring Cups and Spoons – Accurate measurements are key to successful baking and cooking.
Find Measuring Cups and Spoons on Amazon - Baking Sheets – For even baking, use high-quality baking sheets.
Find Baking Sheets on Amazon - Whisks – Perfect for incorporating air and blending ingredients smoothly.
Find Whisks on Amazon - Spatulas – Ideal for folding and scraping bowls clean.
Find Spatulas on Amazon - Food Processors – Useful for quickly chopping and pureeing ingredients.
Find Food Processors on Amazon - Saucepans – Essential for heating liquids and making sauces.
Find Saucepans on Amazon - Chef’s Knives – A good knife makes food preparation easier and safer.
Find Chef’s Knives on Amazon - Cutting Boards – Protect your countertops and make chopping easier.
Find Cutting Boards on Amazon
Frequently Asked Questions
Why did my gluten free red velvet cake sink in the middle?
Oh no! That’s definitely frustrating, especially after all your hard work. Sinkage in gluten-free cakes, including this gluten free red velvet cake, can happen for a few reasons. The most common culprits are opening the oven door too early (that sudden temperature drop interrupts the bake!), over-mixing the batter (which can whisk in too much air that collapses later), or sometimes even using too much raising agent (it rises too fast before the structure sets). A slightly curdled batter can also play a minor role, though it’s usually not the main cause. Keep the oven door shut until near the end of the baking time, mix just until combined, and always use accurate measurements for your bicarbonate of soda!
Can I use any red food colouring for this recipe?
This is such an important question, and honestly, it’s a secret weapon for getting that iconic colour! The short answer is: no, please don’t use standard liquid food colouring you find in the supermarket for this specific gluten free red velvet cake recipe! You would need to add so much liquid colouring to get a true red that it would completely throw off the batter’s consistency, making it too wet and likely resulting in a dense or gummy cake. I highly recommend using a concentrated red food paste, specifically one like Sugarflair Red Extra. It gives you that vibrant, deep red with just a tiny amount, keeping your batter perfect. You can easily find it online!
There seems to be *a lot* of icing sugar for the frosting – is that right?
Yes, you read that correctly! It does look like a big number, but that amount of icing sugar is actually pretty typical for a generous, stable, and properly textured cream cheese frosting for a three-layer cake like this gluten free red velvet cake. The icing sugar isn’t just for sweetness; it provides the bulk and structure needed to create a thick, pipeable (if you choose to pipe) or spreadable frosting that won’t just melt off the cake, especially when layered heavily between sponges. Make sure you add it gradually and mix slowly at first to avoid a sugar cloud! Trust the process – it creates that perfect creamy consistency.
Is xanthan gum really necessary for this gluten free red velvet cake?
Absolutely, yes! Xanthan gum is a non-negotiable ingredient in this particular gluten free red velvet cake recipe. Think of it as the essential binder that replaces the function of gluten. Without gluten, flour doesn’t have the elasticity or structure to hold the cake together. Adding xanthan gum mimics that binding effect, preventing your beautiful cake from turning into a pile of dry crumbs. Skipping it will significantly impact the texture and likelihood of the cake holding together. Some people try psyllium husk, but I’ve found it often results in a denser sponge for this type of cake. So for the best results, definitely use the xanthan gum as listed!
My dairy-free cream cheese frosting is too soft – what can I do?
This is a very common experience when using dairy-free cream cheese alternatives, as they often have a higher water content or different fat composition than dairy versions. Don’t worry, it’s solvable! If your frosting feels too soft after mixing, there are a couple of tricks. First, you might need to add a little extra icing sugar, a tablespoon at a time, beating well, until you reach a thicker consistency. Second, and most importantly, chill your dairy-free frosting thoroughly before attempting to frost the cake. Pop it in the fridge for 30-60 minutes. This firming-up period is essential for dairy-free frostings and will make spreading much easier and more stable. You might even need to chill the cake briefly after the crumb coat (if you do one) before the final layer.
How long will this gluten free red velvet cake last, and can I freeze it?
Great question about keeping your delicious creation fresh! Stored in an airtight container at room temperature (unless it’s very warm, then the fridge is better for the frosting), your gluten free red velvet cake should stay lovely for about 4-5 days. If you won’t be eating it all within that timeframe, yes, it freezes beautifully! I highly recommend slicing the cake into individual portions before freezing. This allows for quicker thawing of just what you need. Wrap slices well in plastic wrap, then foil or place in a freezer-safe container. It will keep in the freezer for up to 2-3 months. Thaw individual slices at room temperature for about 4 hours.
How can I tell if my gluten free red velvet cake sponges are fully baked?
Knowing when your sponges are perfectly done is key to avoiding dryness! While the recipe gives an approximate timing (around 30 minutes), oven temperatures can vary. The most reliable method is the classic skewer test. Gently insert a clean wooden skewer or toothpick into the centre of one of the cakes. If it comes out clean with no wet batter attached, your sponge is ready! You should also look for the edges of the cake starting to pull away slightly from the sides of the tin and the top looking set. It will also spring back gently when lightly touched. If the skewer has wet batter, give it a few more minutes and test again.
My cake batter looked a bit split or curdled after adding the eggs – is that okay?
Totally okay! Don’t panic if your batter looks a little ‘broken’ or curdled after you add the eggs to the creamed butter and sugar. This is quite common and usually happens if your eggs or butter/dairy-free alternative weren’t quite at the same room temperature. While it doesn’t look the prettiest in the bowl, it generally does not affect the final baked texture or rise of the gluten free red velvet cake sponge at all. As you add the dry ingredients and buttermilk later, it usually smooths out anyway. So, if you see a little splitting, just carry on with the recipe steps – your cake will be fine!
“`
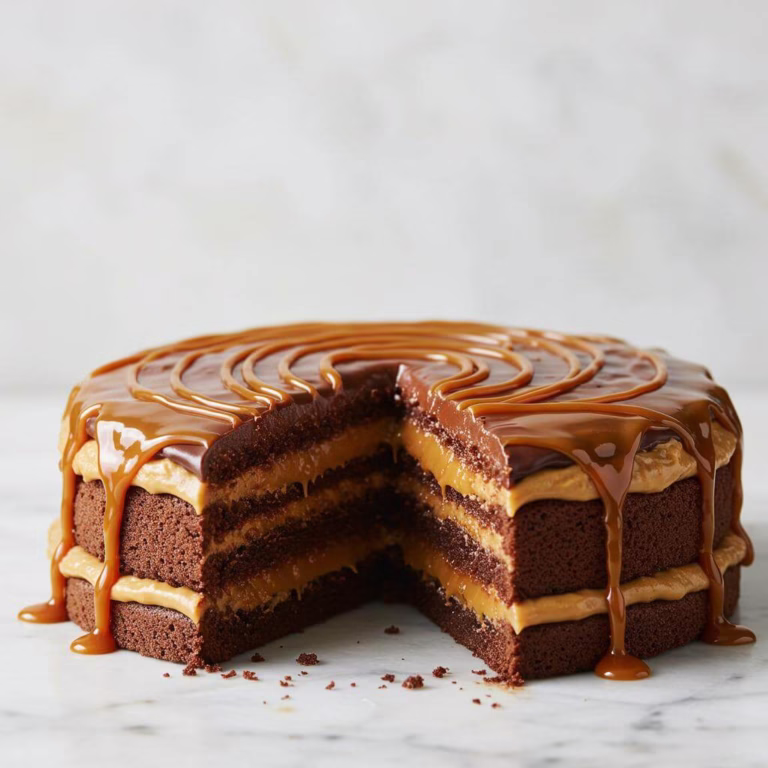
Gluten-Free Red Velvet Cake (Dairy-Free Option)
Gluten-Free Red Velvet Cake (Dairy-Free Option)
Not only is this the gluten free red velvet cake you’ve been dreaming of, but it’s also perfected to be completely dairy-free and low FODMAP, meaning even more of us can enjoy a generous slice! If you’ve been searching for that perfect, show-stopping, truly satisfying gluten free red velvet cake, your quest ends here!
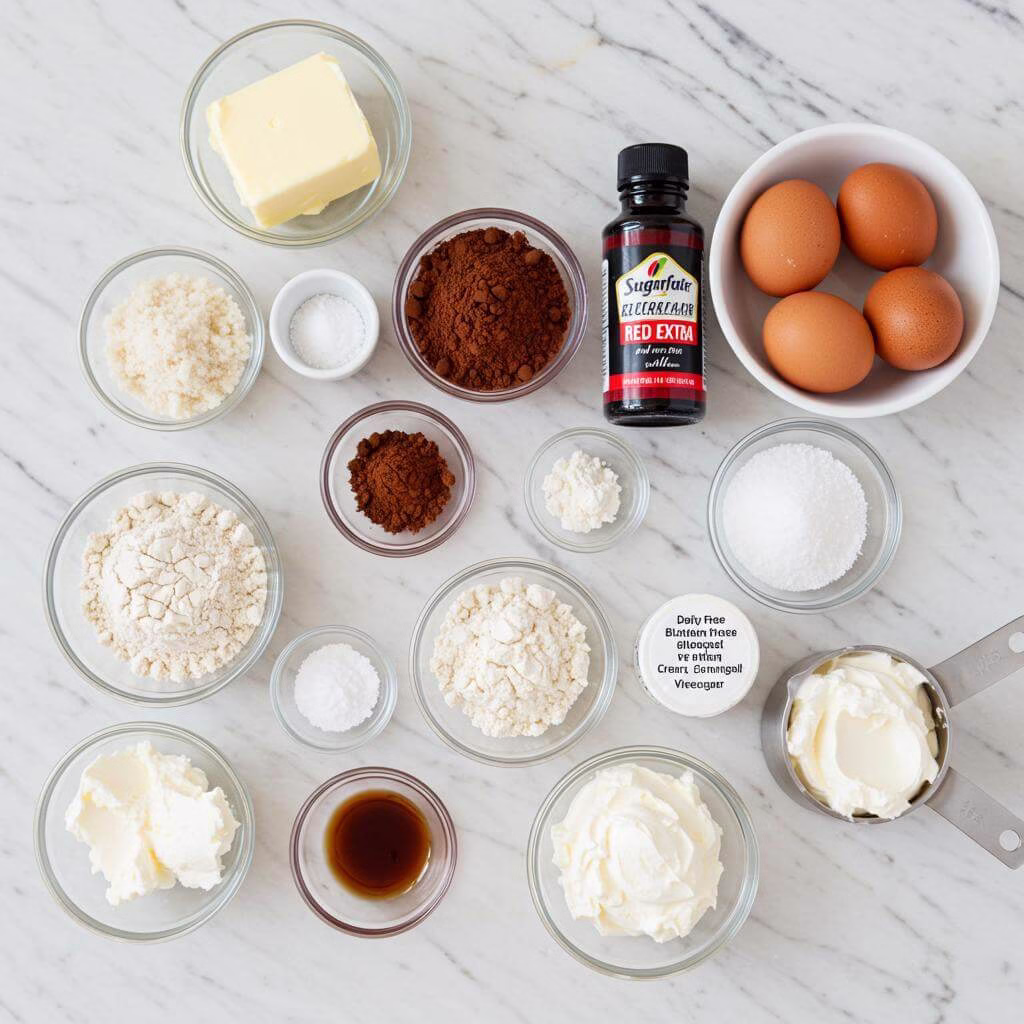
Ingredients
12
- 150 g butter, softened (Use a block-style dairy-free alternative like Stork if making this a dairy-free gluten free red velvet cake. Ensure it’s properly softened to cream correctly with the sugar, preventing a split batter.)
- 320 g caster sugar (Not just for sweetness! Sugar is crucial for the texture and structure of your sponge, contributing to moisture and a tender crumb.)
- 4 eggs (Help bind the ingredients and add richness and structure. Make sure they are at room temperature to prevent the batter from splitting when combined with softened butter/dairy-free spread.)
- 40 g cocoa powder (Provides that signature subtle chocolate flavour in red velvet. Ensure it’s dairy-free if needed. Sifting is key to avoid lumps!)
- 2 tsp red food paste (ONLY use a concentrated paste like Sugarflair Red Extra. Liquid supermarket colourings won’t give you the depth of colour without adding too much liquid and ruining the batter consistency.)
- 2 tsp vanilla extract (Enhances the flavour profile of the cake.)
- 300 ml buttermilk (Reacts with the bicarbonate of soda and cocoa to create rise and tenderness. You can easily make your own dairy-free buttermilk substitute by mixing 300ml dairy-free milk with 1 tbsp lemon juice or vinegar and letting it sit for 5 minutes until slightly thickened.)
- 360 g gluten free plain flour (Your base for this delicious gluten free red velvet cake. Using a good quality gluten free plain flour blend is important for consistent results.)
- 1/4 tsp xanthan gum (Prevents your cake from being crumbly.)
- 1 1/2 tsp bicarbonate of soda (Our key leavening agent.)
- 3 tsp vinegar (Either white wine vinegar or cider vinegar works. This acidity activates the bicarbonate of soda.)
- For the Cream Cheese Frosting:
- 170 g butter, softened (Again, use a dairy-free alternative if needed.)
- 270 g cream cheese (Use a dairy-free alternative if required.)
- 930 g icing sugar (Provides structure and sweetness.)
Equipment
- Three 20cm circular baking tins
- Parchment paper
- Large mixing bowl
- Medium bowl
- Small bowl
- Electric mixer
- Digital kitchen scales
- Whisk
- Spatula
- Skewer or toothpick
- Wire cooling rack
- Sharp knife or cake leveler
- Serving plate or cake stand
- Palette knife
- Cake scraper
Instructions
Prepare your baking tins and preheat the oven. Get your oven heating to 160°C Fan / 180°C. Take your three 20cm circular baking tins. Lightly grease the insides of each tin, then line the bottom of each with parchment paper. This helps your beautiful gluten free red velvet cake sponges release perfectly after baking. You’re setting yourself up for success!
Cream the butter and sugar. In a large mixing bowl, add your softened butter (or dairy-free alternative) and caster sugar. Using an electric mixer (or plenty of elbow grease with a wooden spoon!), beat them together until the mixture is wonderfully light and fluffy. This step is crucial for trapping air, which gives your gluten free red velvet cake a lovely tender crumb. It should turn pale and significantly increase in volume – this usually takes a with a mixer. Make sure your butter is at room temperature to avoid a split mixture! (Find a great electric mixer here).
Add the eggs. Crack your eggs into a separate bowl first (just in case!). Add the eggs into the butter and sugar mixture one at a time. Beat briefly after each addition, just until that egg is combined before adding the next. Don’t worry if the mixture looks slightly curdled at this stage; this is normal sometimes and won’t affect the final outcome of your gluten free red velvet cake.
Mix in the cocoa powder. Sift the cocoa powder directly into the bowl. Sifting is important, especially with gluten-free baking ingredients, to avoid lumps! Mix it in gently until it’s fully incorporated and the batter has taken on a beautiful deep brown hue. Ensure your cocoa powder is dairy-free if needed.
Introduce the iconic red colour and vanilla. In a small separate bowl, whisk together the vanilla extract and the red food paste. This specific food paste is key for that vibrant red colour without adding too much liquid. Do NOT use standard liquid food colouring from the supermarket as you’d need too much, which would ruin the batter consistency. Add this potent red mixture to your batter and mix until the colour is evenly distributed and your batter is a stunning, rich red. This is where your gluten free red velvet cake truly gets its identity! (Get the right red food paste here).
Prepare the dry ingredients. In a medium bowl, weigh out your gluten-free plain flour accurately using digital scales (Accurate scales are a gluten-free baker’s best friend!). Add the xanthan gum to the flour. Xanthan gum is vital in gluten-free baking as it acts as the binder that gluten provides in traditional recipes. Whisk it thoroughly into the flour so it’s evenly distributed. Skipping this will result in a very crumbly gluten free red velvet cake!
Alternate adding flour and buttermilk. Now for the wet and dry! Add about half of your flour mixture to the batter, followed by about half of the buttermilk (remember, you can easily make your own dairy-free buttermilk by adding 1 tbsp vinegar or lemon juice to 300ml dairy-free milk and letting it sit for ). Mix gently just until barely combined. Then add the remaining flour and remaining buttermilk. Mix again, being careful not to overmix. Mix just until you no longer see streaks of dry flour. Overmixing gluten-free batters can result in a tougher cake. Your batter will be thick and vibrant.
Activate the rising power! In a small cup or bowl, quickly mix together the bicarbonate of soda and the vinegar. You’ll see a slight fizzing reaction – this is exactly what you want! Immediately pour this mixture into your cake batter. Give it a quick, gentle fold or two to incorporate it. Again, do not overmix after adding this; the reaction is happening now and you want that leavening power in your oven, not in the bowl.
Divide the batter and bake. Carefully and equally divide the gorgeous red batter among your three prepared tins. Smooth the tops gently with the back of a spoon or spatula. Place the tins into your preheated oven. They will need approximately , but baking times can vary slightly. If your oven isn’t large enough for all three tins at once, bake them in batches – it’s absolutely fine! To check if they’re done, gently insert a clean skewer or toothpick into the centre of a cake; if it comes out clean, it’s ready! The edges should also look set and starting to pull away slightly from the tin. Try not to open the oven door too early during baking, as sudden temperature changes can cause cakes to sink.
Cool the sponges. Once baked, remove the tins from the oven. Let the cakes cool in their tins for about . This short cooling time in the tin helps the gluten-free sponges firm up before handling. After this initial cooling, carefully turn the cakes out onto a wire rack to cool completely. Ensure they are totally cool before you even *think* about frosting them! (A good cooling rack is essential!)
Make the cream cheese frosting (Part 1). While the cakes cool, start the frosting. In the bowl of a stand mixer (or using a hand mixer), add your softened butter (or dairy-free alternative) and cream cheese (or dairy-free alternative). Beat them together on a medium speed for about until they are just combined and smooth. If using dairy-free cream cheese, make sure it’s well-chilled, then beat it with the softened dairy-free butter. (Stand mixers make frosting a breeze!)
Make the cream cheese frosting (Part 2). Now it’s time for the icing sugar! This is a large amount, so add it gradually in 3 or 4 stages. Start your mixer on the lowest speed possible for the first addition to avoid a snowy cloud of sugar! Beat until the sugar is incorporated after each addition before adding the next. Once all the sugar is added, continue beating until the frosting is smooth, creamy, and a lovely pale white colour. It should be thick enough to spread easily. If making dairy-free frosting, you might find you need a little extra icing sugar to get the right consistency, and it’s highly recommended to chill it for before using as it can be softer.
Prepare the cake layers for assembly. Once your gluten free red velvet cake sponges are completely cool, use a sharp knife or cake leveler to carefully slice off the domed tops of each cake layer. This creates flat surfaces, making stacking and icing much easier and giving your finished gluten free red velvet cake a professional look. Keep these cake trimmings aside – don’t throw them away!
Stack and fill the cake. Place your first trimmed sponge layer onto your serving plate or cake stand. Spread a generous, even layer of cream cheese frosting over the top of this layer. Carefully place the second cake layer on top, pressing down gently. Spread another layer of frosting. Finally, add the third cake layer. You’ve built the base of your beautiful gluten free red velvet cake!
Apply the crumb coat and final icing (for a smooth finish). If you want that super smooth, bakery-style finish, apply a ‘crumb coat’ first. Use a palette knife or spatula to apply a very thin layer of frosting all over the top and sides of the stacked cake. This thin layer traps any loose crumbs. Don’t worry about it looking perfect – its job is just to collect crumbs! Once applied, chill the entire cake in the refrigerator for at least until the crumb coat is firm. This chilling step is especially helpful for gluten free cakes and dairy-free frosting. After chilling, apply the remaining frosting over the firm crumb coat. Use a palette knife to cover the top and sides with a thicker layer of frosting. Then, use a cake scraper (Achieve smooth sides with a cake scraper!) held vertically against the side of the cake, rotating the cake stand (or moving the scraper around a stationary cake) to scrape away excess frosting and create smooth sides. Do the same for the top if desired. This takes a little practice, but the results are so worth it for your gorgeous gluten free red velvet cake!
Decorate with trimmings. Take the red velvet cake trimmings you saved from step 13. Crumble them into small pieces using your fingers. Use these vibrant red crumbs to decorate the top of your cake, or press them gently around the base edge. This adds a lovely texture and enhances the classic red velvet look.
Enjoy your magnificent gluten free red velvet cake! You’ve done it! Step back and admire your creation. Slice into it and savour every delicious, moist bite.
Recipe Notes
- Making it Dairy-Free: Swap dairy butter for a hard block-style dairy-free margarine (like Stork) and dairy cream cheese for a soya-based alternative. Dairy-free frosting can be softer, so chilling it thoroughly before frosting the cake is crucial for stability.
- Making it Vegan: Replace eggs using Aquafaba (3 tbsp per egg), commercial egg replacer, Chia/Flax egg (1 tbsp seeds + 2 tbsp water per egg, gelled), or Applesauce (3 tbsp per egg). Results may vary.
- Sugar Adjustment: Reducing sugar in the cake isn’t recommended for structure. For less overall sugar, frost only the top and between layers.
- Nut-Free Baking: Recipe is naturally nut-free. Always check labels of all ingredients for ‘may contain nuts’ warnings if allergies are a concern.
- Frosting Variations: Add lemon zest to frosting for brightness, or swirl in melted dairy-free white chocolate.