Oh, the memories we make in the kitchen! Standing side-by-side with my little ones, even if it means flour dust everywhere and tiny fingers “sampling” the batter a bit too enthusiastically. It’s in these moments that some of the most cherished recipes come to life. This specific chocolate cherry cake creation was born from one of those perfectly imperfect baking sessions with my youngest. We wanted something decadent, something that felt like a real treat, and let me tell you, this gluten-free chocolate cherry cake delivered!
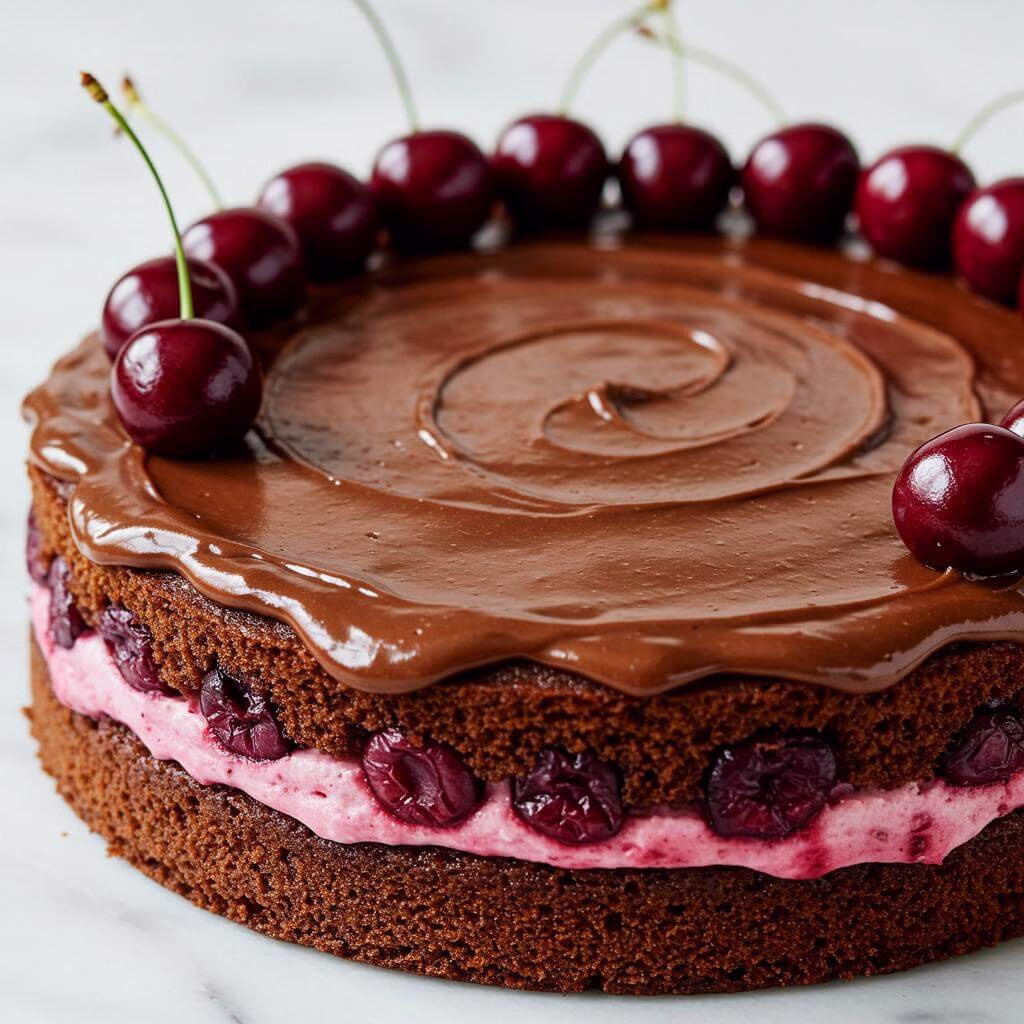
Finding truly moist and rich gluten-free cakes can sometimes feel like searching for a needle in a haystack, but this chocolate cherry cake breaks the mold. It’s a twist on the classic Black Forest, made accessible and absolutely delicious whether you’re using gluten-free flour or not. The way the deep chocolate pairs with the sweet burst of cherry is just *chef’s kiss*. If you’ve loved making other gluten-free treats with me, like my go-to gluten-free sheet cake or those super fudgy gluten-free brownies, you are going to adore this chocolate cherry cake. Seriously, this chocolate cherry cake is so simple, you’ll have it ready in no time. Get ready to fall in love with this dreamy chocolate cherry cake!
Tips for Recipe Success
- Prep Your Pans Thoroughly: This gluten-free chocolate cherry cake is incredibly moist, which also means it can be prone to sticking! Don’t skip the step of thoroughly greasing your pans AND lining them with parchment paper circles before greasing the parchment too. This double layer of protection is essential for ensuring your beautiful cake layers release cleanly.
- Embrace the Thin Batter: When you combine the wet and dry ingredients, the batter for this recipe will be quite thin and runny. Don’t panic! This is the intended consistency and is key to achieving the wonderfully moist texture of the finished cake. Resist the urge to add more flour.
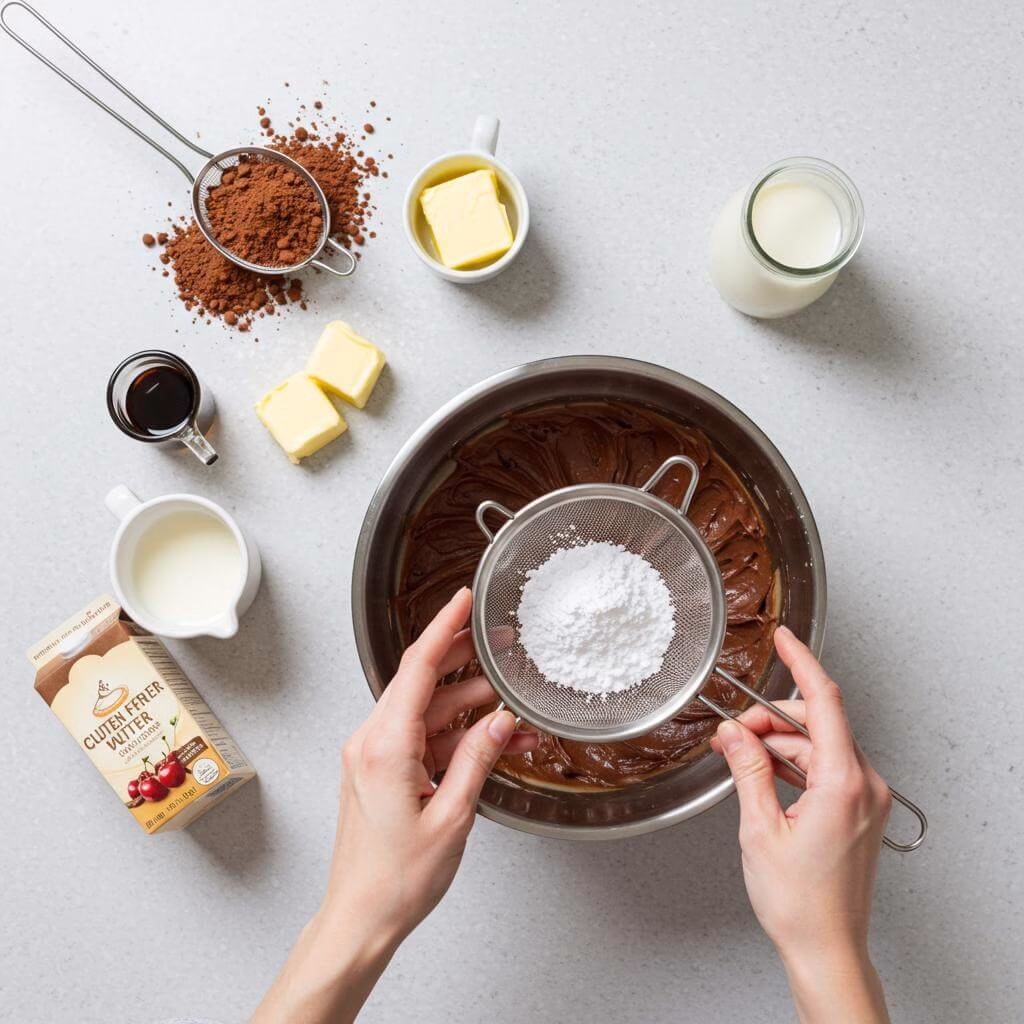
- Sift Powdered Sugar for Smooth Frosting: For a truly silky smooth homemade chocolate frosting without any annoying lumps, be sure to sift your powdered sugar before adding it to the melted butter and cocoa. This simple step makes a big difference in the final frosting texture.
- Cool Cakes Completely Before Frosting: Always allow your cake layers to cool *entirely* to room temperature on a wire rack before attempting to frost. Applying frosting to warm cake layers will cause it to melt and slide off, resulting in a messy finish and potentially unstable cake structure. Patience is key here!
Essential Equipment for This Recipe
To prepare this delicious recipe, you’ll need the following kitchen tools:
- Mixing Bowls – A set of good quality mixing bowls is a must-have for any kitchen.
Find Mixing Bowls on Amazon - Measuring Cups and Spoons – Accurate measurements are key to perfect baking and cooking.
Find Measuring Cups and Spoons on Amazon - Baking Sheets – Essential for baking cookies, roasting vegetables, and more.
Find Baking Sheets on Amazon - Whisks – Perfect for beating eggs, mixing batter, and creating smooth sauces.
Find Whisks on Amazon - Spatulas – Great for mixing, folding, and scraping bowls clean.
Find Spatulas on Amazon - Food Processors – For chopping, slicing, and pureeing ingredients quickly and easily.
Find Food Processors on Amazon - Saucepans – Ideal for simmering sauces, melting butter, and heating liquids.
Find Saucepans on Amazon - Chef’s Knives – A sharp chef’s knife is essential for efficient and safe food preparation.
Find Chef’s Knives on Amazon - Cutting Boards – Protect your countertops and provide a stable surface for chopping.
Find Cutting Boards on Amazon
Frequently Asked Questions
Why is my cake batter so thin and runny? Is that normal?
Absolutely! This is a super common question, and yes, for this specific chocolate cherry cake recipe, a very thin batter is totally normal and actually desired! It might seem counterintuitive compared to some traditional wheat batters, but this high liquid content is key to achieving the incredibly moist and rich texture that makes this cake so special, especially when working with gluten-free flours. Don’t worry, trust the process – it bakes up beautifully!
Help! My gluten-free cake stuck to the pan last time. How can I prevent that with this recipe?
Oh no, that’s so frustrating! Gluten-free cakes, especially moist ones like this chocolate cherry cake, can definitely be prone to sticking. We’ve learned the hard way too! The trick mentioned in step 1 and the “How to keep…” section is absolutely CRUCIAL here: you need to double up on your non-stick efforts. Don’t just spray the pan; make sure you also use a parchment paper circle cut to fit the bottom AND spray the parchment paper itself. It might seem like a lot of cooking spray, but this creates a barrier that virtually guarantees your gorgeous cake layers will release cleanly. Make sure you also let them cool in the pan for the recommended 10 minutes before inverting.
I don’t have Pamela’s blend. Can I use a different gluten-free all-purpose flour mix?
Great question! While the recipe was specifically tested with Pamela’s, most high-quality, cup-for-cup style gluten-free all-purpose baking mixes should work well in this chocolate cherry cake. Look for a blend that contains a mix of flours (like rice, potato, tapioca) and often includes xanthan gum (though some blends don’t need it). Different blends can absorb liquid slightly differently, so if your batter seems dramatically thicker or thinner than described, you might need a tiny adjustment (a tablespoon more water if too thick, or a tablespoon more blend if too thin), but generally, you should be just fine following the recipe as written with your preferred blend.
Can I make this chocolate cherry cake dairy-free?
Yes, absolutely! This recipe is quite flexible. You can easily swap out the dairy milk in both the cake batter and the frosting for your favorite unsweetened non-dairy milk (like almond, soy, or oat milk). If you need the frosting to be dairy-free as well, make sure to use a plant-based butter alternative for the melted butter component. It’s totally doable to enjoy this delicious chocolate cherry cake with dairy-free modifications!
How do I know when the cake layers are perfectly baked?
The best way to check for doneness is the classic toothpick (or wooden skewer) test! Insert a toothpick into the very center of one of the cake layers. When it comes out clean with no wet batter attached, your cakes are done. Remember, because this batter is so moist, you might see some moist crumbs attached, and that’s okay – but you shouldn’t see liquid batter. Also, pay attention to the baking times in the recipe: check earlier (20-25 mins) if you’re using three pans, as they’ll cook faster than two pans (around 30 mins).
My homemade chocolate frosting isn’t the right consistency – it’s too thick/thin! What should I do?
No worries, this is super easy to fix! Homemade frosting consistency is all about balance. If your frosting is too thick, simply whisk in a tiny bit more milk, about 1 teaspoon at a time, until it reaches a smooth, spreadable consistency. If it’s too thin, gradually whisk in a tablespoon or two of extra sifted powdered sugar until it thickens up. Pro Tip: Make sure your powdered sugar is well sifted beforehand! This is key to a smooth, lump-free frosting that’s easy to adjust.
How should I store this chocolate cherry cake, and can I freeze leftovers?
This moist chocolate cherry cake stores beautifully! Once assembled and frosted, cover it loosely and store it at room temperature for 2-3 days, or in the refrigerator for up to 5 days (especially if your kitchen is warm). To freeze, you have a couple of options: you can freeze the cooled, unfrosted cake layers individually wrapped tightly in plastic wrap and then foil for up to 2 months. You can also freeze slices of the assembled and frosted cake by placing them on a baking sheet until frozen, then wrapping individually and storing in a freezer-safe container for up to 1-2 months. Thaw overnight in the refrigerator.
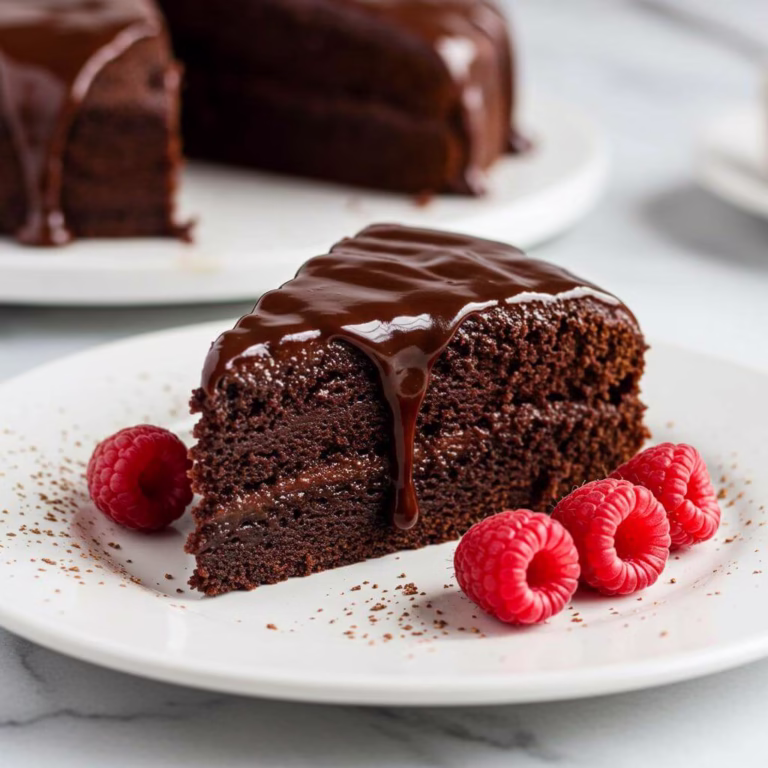
Gluten-Free Chocolate Cherry Cake
Gluten-Free Chocolate Cherry Cake
This gluten-free chocolate delight offers a rich, moist crumb and a decadent twist on the classic Black Forest cake. Surprisingly easy to make, it pairs deep chocolate flavor with sweet cherry bursts for an unforgettable treat, perfect for any occasion.
Ingredients
16
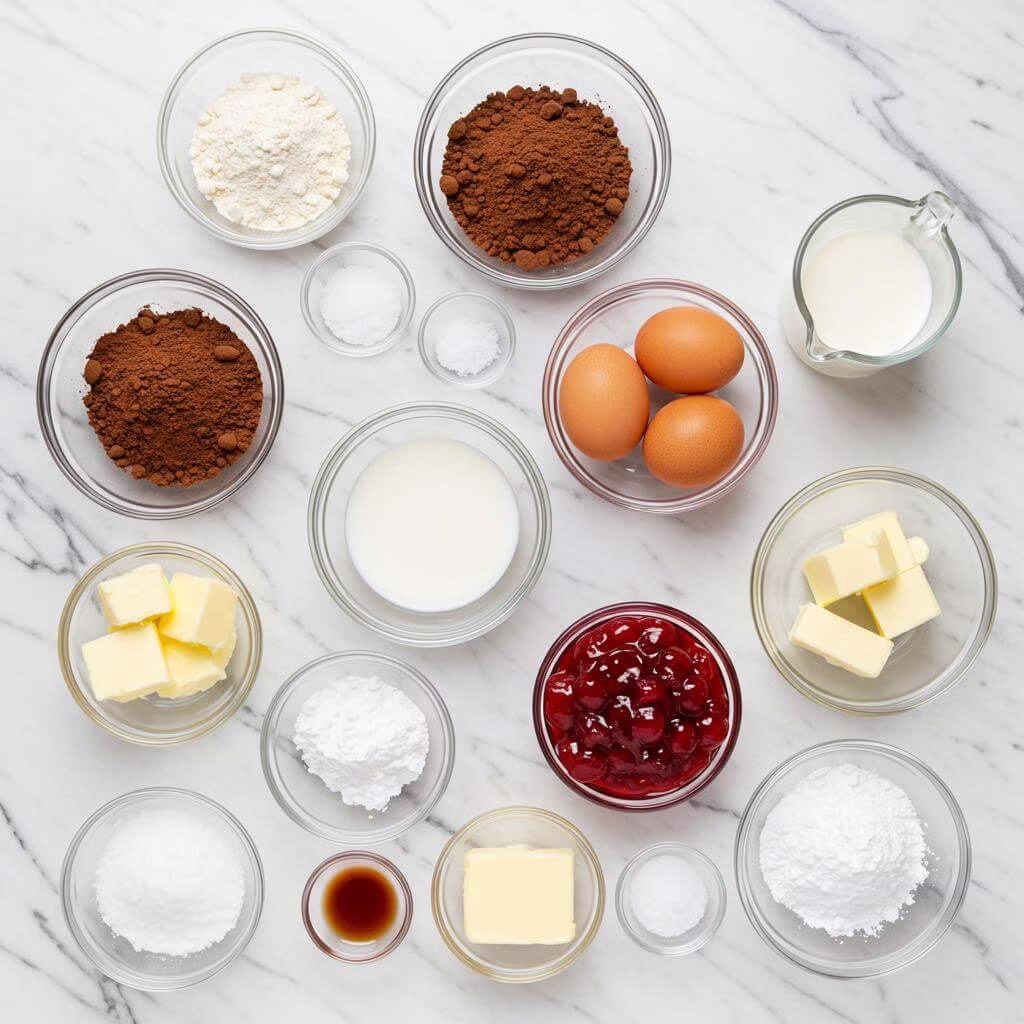
- 2 cups white sugar
- 1¾ cups Gluten-Free Baking Mix or all purpose flour (Pamela’s recommended)
- ¾ cup unsweetened cocoa powder
- 1 teaspoon baking powder
- 1 teaspoon baking soda
- 1 teaspoon kosher salt
- 3 large eggs
- 1¼ cups milk (dairy or non-dairy)
- ½ cup vegetable oil
- 2 teaspoons vanilla bean paste (or vanilla extract)
- 1 teaspoon almond extract
- 1 cup hot water
- For the Frosting:
- ½ cup butter, melted and slightly cooled
- ⅔ cups unsweetened cocoa powder
- 3 cups powdered sugar, sifted
- ⅓ cup milk (dairy or non-dairy, adjust as needed)
- 1 teaspoon vanilla bean paste (or vanilla extract)
- ½ teaspoon almond extract
- For the Filling:
- 1 (21 oz) can cherry pie filling
Equipment
- 9-inch round cake pans (2 or 3)
- Parchment paper rounds
- Large mixing bowl
- Medium mixing bowl
- Whisk
- Measuring cups and spoons
- Wire cooling rack
- Fine-mesh sieve or sifter
- Electric mixer (optional)
- Serving platter or cake stand
- Offset spatula
Instructions
Prepare your baking pans: Preheat your oven to 350°F (175°C). You’ll need two or three 9-inch round cake pans. Thoroughly spray each pan with cooking spray. Line the bottom of each pan with a parchment paper round, then spray the parchment paper.
Combine the dry ingredients: In a large mixing bowl, whisk together the white sugar, gluten-free baking mix, unsweetened cocoa powder, baking powder, baking soda, and kosher salt until fully combined and no clumps remain.
Prepare the wet ingredients: In a separate medium bowl, whisk together the eggs, milk, vegetable oil, vanilla extract, almond extract, and the hot water until smoothly combined.
Mix the batter: Pour the wet ingredients into the dry ingredients. Whisk until the batter is smooth. Don’t be alarmed – this batter will be quite thin and runny; this is normal.
Fill the pans: Divide the batter evenly among your prepared cake pans.
Bake the cake layers: Place pans in the preheated oven. If using two pans, bake for approximately . If using three pans, they will bake faster; start checking around . Cakes are done when a wooden skewer inserted into the center comes out clean.
Cool completely: Let cakes cool in pans on a wire cooling rack for about . Then, invert cakes onto the rack to cool completely. Peel off parchment paper. Complete cooling (1-2 hours) is crucial before frosting.
Prepare the frosting (Sift): While cakes cool, sift your powdered sugar using a fine-mesh sieve or sifter. This is important for a smooth frosting.
Prepare the frosting (Mix): In a mixing bowl, whisk the slightly cooled melted butter into the cocoa powder until a thick paste forms. Add a scoop of sifted powdered sugar and whisk. Add a little milk and whisk. Continue alternating powdered sugar and milk, whisking after each addition, until smooth and spreadable. An electric mixer can help. Adjust thickness with more milk or powdered sugar if needed.
Prepare the frosting (Finish): Stir in the vanilla extract and almond extract into the frosting. Mix well.
Assemble the cake (Layer 1): Place one completely cooled cake layer onto your serving platter or cake stand. Spoon a generous layer of cherry pie filling evenly over the top, almost to the edges.
Assemble the cake (Layer 2): Carefully place the second cake layer on top of the cherry filling. Add another generous layer of cherry pie filling.
Assemble the cake (Layer 3 – Optional): If using three layers, place the third cake layer on top. Ensure the top layer is plain cake for frosting.
Frost the cake: Frost the top and sides of the entire cake with your homemade chocolate frosting. Use an offset spatula for a smooth finish or create swirls.
Recipe Notes
- The cake batter will be quite thin and runny; this is normal for this recipe.
- Ensure cake layers are completely cool before frosting to prevent melting.
- For best results, sift powdered sugar for a smooth, lump-free frosting.
- Substitutions: Use any good all-purpose gluten-free flour blend if Pamela’s isn’t available. Dairy milk can be swapped for non-dairy alternatives. Vanilla extract can replace vanilla bean paste.
- Variations: Add gluten-free chocolate chips to the batter, or try different extracts like orange or peppermint.
Nutrition (per serving)

My #1 Recommendation
Artisan Series 5 Quart Tilt Head Stand Mixer with Pouring Shield KSM150PS, Matte Black
(19675 reviews)
The Artisan Series 5 Quart Tilt-Head Stand Mixer is a versatile and powerful kitchen appliance, essential for effortlessly preparing a wide range of gluten-free recipes. Its robust design and matte black finish make it a stylish and durable addition to any kitchen.
- 5-quart stainless steel bowl handles large batches of gluten-free dough and batter.
- Tilt-head design provides easy access to the bowl and beaters for adding ingredients.
- Includes a pouring shield for minimizing mess when adding ingredients during mixing.
As an Amazon Associate, I earn from qualifying purchases. This helps support the blog at no extra cost to you.
Loved this Chocolate Cherry Cake?
Don’t stop at just one amazing dessert! Get 3 MORE exclusive Gluten-Free Chocolate & Cherry dessert recipes delivered straight to your inbox – absolutely FREE!

Inside Your FREE Recipe Pack:
-
Irresistible Gluten-Free Chocolate Cherry Brownies -
Quick & Easy Gluten-Free Black Forest Parfaits -
Dreamy No-Bake Gluten-Free Chocolate Cherry Cheesecake Bites -
All recipes are 100% gluten-free & delicious!
Enter your email to unlock your free recipes now:
We value your privacy. Unsubscribe at any time. No spam, ever.