Oh, the quest for the perfect gluten-free brownie! It’s a journey many of us have been on, filled with crumbly edges, gummy centers, and sometimes, that tell-tale “gluten-free” flavor that just isn’t quite right. I remember trying countless flour blends, flax eggs, and other tricks, all searching for that elusive fudgy texture we all crave. It felt like a never-ending baking experiment, similar to trying to perfect a gluten-free chocolate cake or finding the ideal crumb for chewy chocolate chip cookies.
Then, I heard whispers about using black beans… and honestly, I was skeptical. Beans in brownies? It sounded completely wild! But the idea of naturally achieving that dense, moist center without relying on tricky gluten-free flours was too intriguing to pass up. After a few experiments, I finally cracked the code to truly amazing black bean brownies.
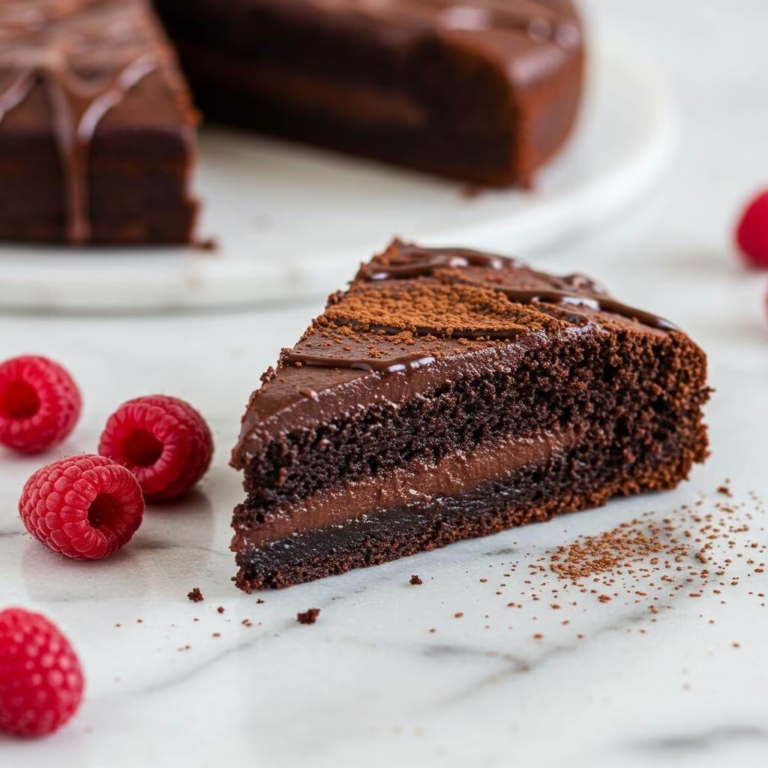
These aren’t just *okay* black bean brownies; they are rich, chocolatey, melt-in-your-mouth black bean brownies that absolutely do *not* taste like beans. Seriously. They deliver that classic brownie experience, hitting all the right notes – deep chocolate flavor, incredible chewiness, and pure fudginess. I even made a batch for gluten-eating friends, and they devoured these black bean brownies without a clue! If you’ve struggled with other gluten-free baked goods, you know the feeling of a genuine breakthrough. These black bean brownies are it! Let me show you how simple and delicious making black bean brownies can be. Get ready to fall in love with black bean brownies!
Tips for Recipe Success
- Why You Must Blend Until Smooth: The black beans are the foundation of these brownies, providing structure and moisture where flour typically would. Blending them completely smooth is crucial to ensure there are no grainy bits and you achieve that signature fudgy, melt-in-your-mouth texture. A food processor works, but a blender is best for maximum smoothness.
- Rinse Beans Thoroughly: To avoid any ‘beany’ flavor, make sure to drain and rinse your canned black beans exceptionally well under cold water until the water runs completely clear. This removes the starchy liquid that can impart unwanted tastes.
- Bake Just Until Set: For the perfect fudgy center, watch the brownies closely. Bake at 325°F until the top looks set and the center no longer jiggles when you gently shake the pan. Don’t wait for a clean toothpick – that will mean they’re overbaked and dry. Checking doneness is key for fudgy brownies, just as careful baking is important for a moist gluten-free lemon cake.
- Use a Light-Colored Metal Pan: Darker or glass pans absorb and retain more heat, which can lead to the edges overbaking before the center is done. A light-colored metal pan promotes more even heat distribution for consistent results throughout the batch.
- Chill Before Slicing: While it requires patience, letting the brownies cool completely and then chilling the pan (30 mins in the fridge or 10 in the freezer) is the secret to getting super neat, clean slices. The cold helps the fudgy texture firm up, making cutting effortless.
Essential Equipment for This Recipe
To prepare this delicious recipe, you’ll need the following kitchen tools:
- Mixing Bowls – A set of mixing bowls in various sizes is essential for prepping your ingredients.
Find Mixing Bowls on Amazon - Measuring Cups and Spoons – Accurate measurements are key to a successful recipe.
Find Measuring Cups and Spoons on Amazon - Baking Sheets – For evenly baked goods.
Find Baking Sheets on Amazon - Whisks – To beat eggs and other ingredients quickly.
Find Whisks on Amazon - Spatulas – Ideal for folding and mixing without scratching your bowls.
Find Spatulas on Amazon - Food Processors – Speeds up chopping or mixing.
Find Food Processors on Amazon - Saucepans – For cooking sauces, syrups, or other ingredients on the stove.
Find Saucepans on Amazon - Chef’s Knives – a great knife for quick cutting.
Find Chef’s Knives on Amazon - Cutting Boards – For cutting vegetables and other ingredients.
Find Cutting Boards on Amazon
Frequently Asked Questions
Do these black bean brownies *really* not taste like beans?
Great question! This is the most common concern, and the answer is a resounding NO, they absolutely do not taste like beans! This recipe is specifically designed to hide any beany flavor. The key is using plenty of rich cocoa powder and vanilla to provide deep chocolate flavor, and crucially, rinsing the black beans thoroughly until the water runs completely clear before blending. Trust us, we’ve made sure these pass the taste test even for the bean-averse!
Are these black bean brownies actually gluten-free and safe for Celiac?
Yes! Unlike some black bean brownie recipes that might sneak in a little flour, this recipe is naturally gluten-free. It uses only whole, naturally gluten-free ingredients like black beans, eggs, oil, cocoa powder, and sugar. There is no gluten-containing flour whatsoever, making them safe for those with gluten sensitivity or Celiac disease, provided all your individual ingredients are certified gluten-free (like chocolate chips, if using).
The batter seems really soft – is that normal?
Absolutely! Don’t worry if your batter feels much softer than traditional flour-based brownie batter. Because the base is blended black beans and not flour, the consistency is naturally quite smooth and soft. As long as you’ve measured the ingredients correctly, this soft texture is exactly what contributes to the incredibly fudgy texture after baking! You’ve got this.
How important is it to thoroughly blend the black beans?
This is super important for the best texture! Blending the beans with the wet ingredients until the mixture is completely smooth, with no visible bean flecks, is key to ensuring your black bean brownies have a creamy, fudgy texture rather than a grainy or “beany” one. A blender works best for this, but a food processor can also achieve the desired smoothness if blended long enough.
Help! My brownies seem underbaked (or overbaked)! How do I know when they’re done?
Getting the perfect fudgy texture means baking them just right! Bake your black bean brownies at 325°F for about 25 minutes. Look for these signs: the top should look set and spring back slightly when gently pressed, and the center should no longer jiggle when you gently shake the pan. If the edges look dry or pulling away, or the center feels completely firm and doesn’t spring back at all, they might be slightly overbaked for max fudginess. If they still seem wet and jiggle a lot, give them a few more minutes. Remember, they’ll continue to set up slightly as they cool.
Can I make substitutions for ingredients like sugar, eggs, or coffee?
Yes, this recipe is quite flexible!
- Sugar: You can swap brown sugar for coconut palm sugar, or use sugar-free brown sugar replacements like Swerve or Lakanto (you might need a little extra liquid if using sugar-free).
- Eggs: You can try using boiled flax eggs (2 tbsp ground flaxseed + 6 tbsp water); however, chia eggs won’t provide enough structure here.
- Coffee: The coffee just enhances the chocolate flavor without adding coffee taste. You can swap it for an equal amount of milk, water, or even 1½ tablespoons of maple syrup for a touch more sweetness and flavor.
Check the “Smart Substitutions” section in the post for more details and tips on making these swaps successfully!
Can I use fresh cooked black beans instead of canned?
Absolutely! If you prefer to cook your own black beans, make sure they are fully cooked and tender, and that you cooked them in plain water only (no salt, broth, or seasonings). Drain off all the cooking liquid. You’ll need about 1½ cups of cooked black beans to replace the single 15-ounce can (drained and rinsed) required for these black bean brownies.
What’s the best way to store these, and can I freeze them?
These black bean brownies store beautifully! Keep leftovers in an airtight container at room temperature for 2-3 days, or pop them in the refrigerator for up to a week for an even firmer, fudgier texture. For longer storage, you can definitely freeze them! Freeze them in a single layer first until firm, then transfer to a freezer-safe container or bag. They won’t freeze solid, so you can enjoy them straight from the freezer for a quick treat, or let them thaw briefly at room temperature.
Gluten-Free Fudgy Black Bean Brownies
Fudgy Black Bean Brownies
Rich, chocolatey, melt-in-your-mouth black bean brownies that absolutely do *not* taste like beans. Naturally gluten-free and incredibly fudgy!
Ingredients
9
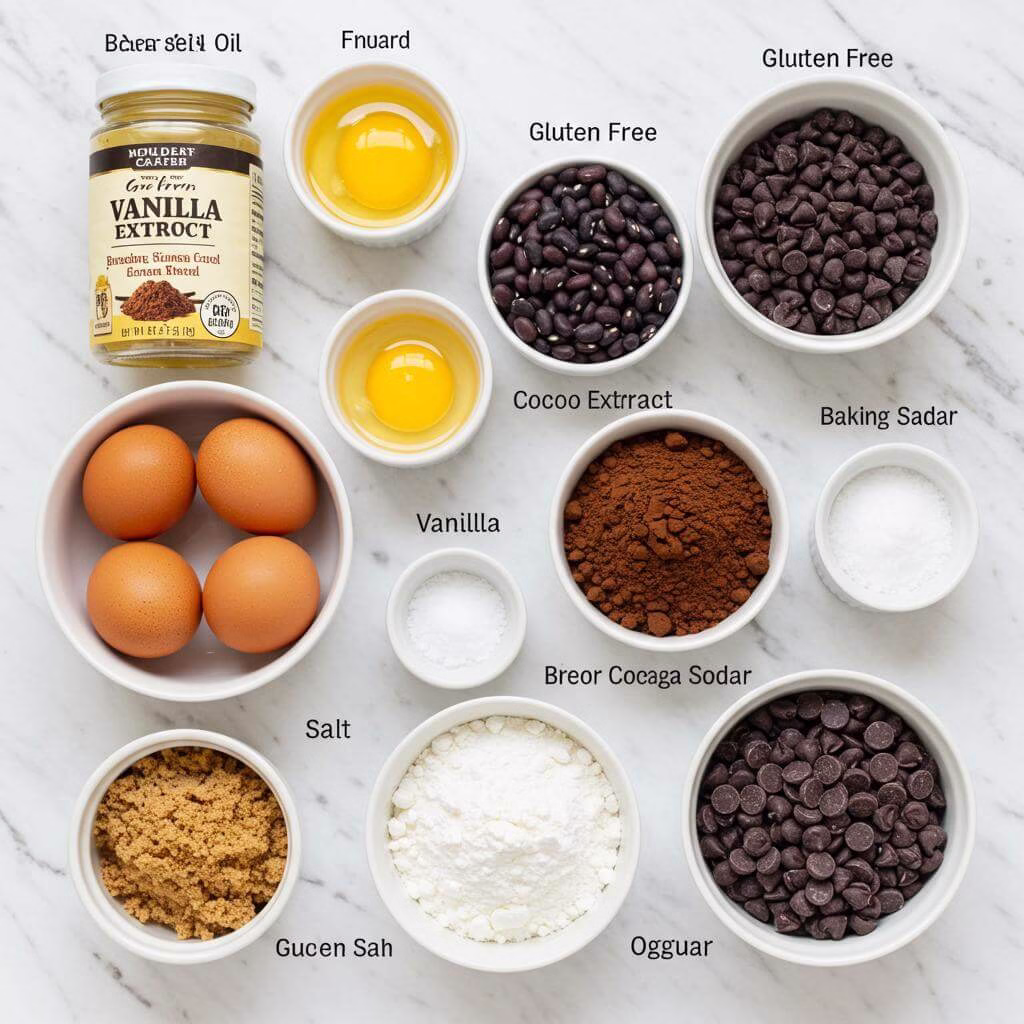
- 1 can (15oz) black beans, drained & well-rinsed (organic recommended)
- 2 large eggs, room temperature
- 1/4 cup neutral oil (e.g., grapeseed, canola)
- 2 tsp pure vanilla extract
- 2 tbsp strong brewed coffee (or water/milk)
- 3/4 cup unsweetened cocoa powder
- 1/2 tsp baking soda
- 1/4 tsp kosher salt
- 3/4 cup packed light brown sugar
- 3 oz gluten-free chocolate chips, optional
Equipment
- 8-inch square baking pan (metal, light-colored recommended)
- Blender or Food Processor (for smooth batter)
- Parchment paper or foil
- Large mixing bowl
- Wire cooling rack (essential for cooling)
Instructions
Preheat oven to 325°F (160°C). Line an 8-inch square baking pan with parchment paper or foil, leaving an overhang for easy removal. Set aside.
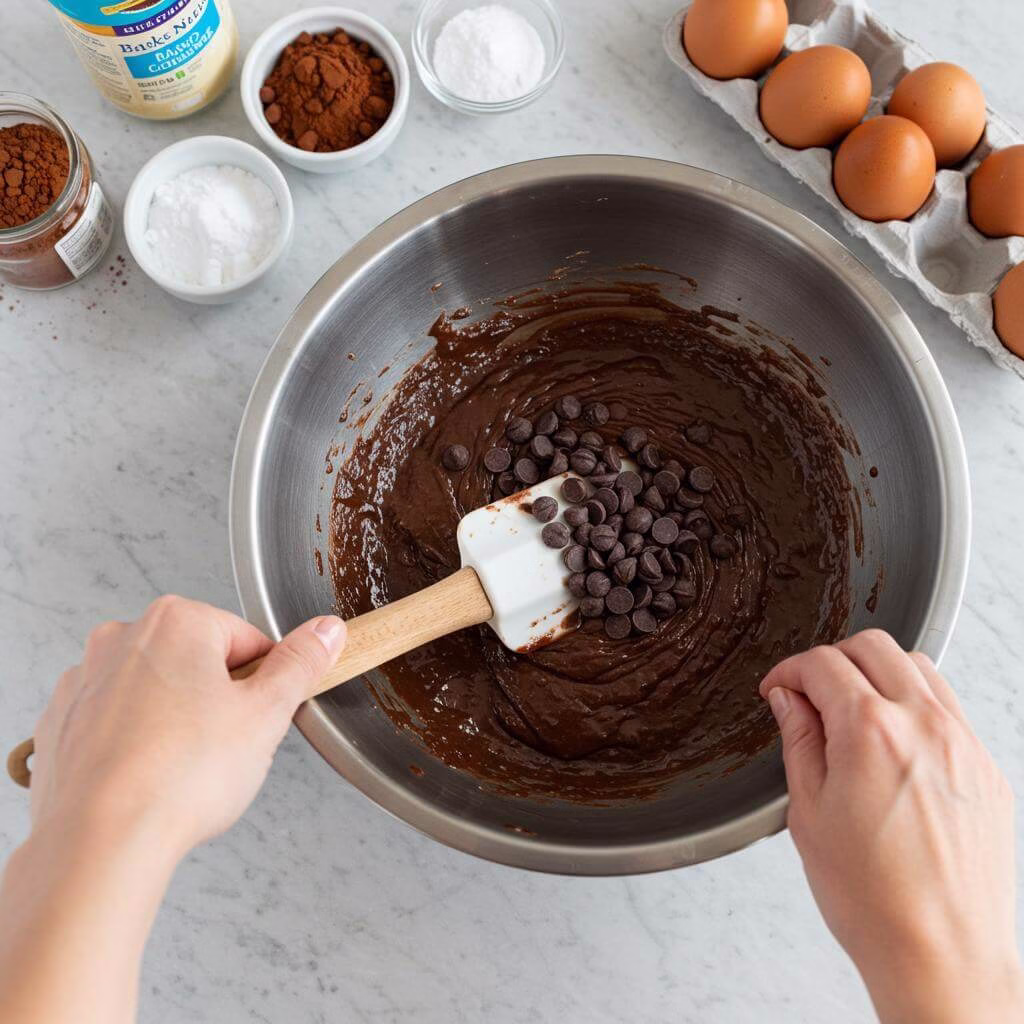
In a blender or food processor, combine the thoroughly rinsed black beans, eggs, oil, vanilla extract, and brewed coffee. Blend until completely smooth and glossy – no bean flecks should remain.
In a large mixing bowl, whisk together unsweetened cocoa powder, baking soda, kosher salt, and packed light brown sugar. Ensure no lumps remain.
Pour the smooth black bean mixture into the dry ingredients. Stir gently with a spatula until just combined. The batter will be quite soft and glossy; this is normal.
If using, gently fold in about half of the gluten-free chocolate chips.
Scrape the batter into your prepared pan and spread evenly. Sprinkle the remaining chocolate chips over the top.
Bake at 325°F (160°C) for about 25 minutes. The top should look set and spring back lightly when tapped, and the center should no longer jiggle when the pan is gently nudged.
Remove from oven and cool completely in the pan on a wire rack. For the cleanest slices, once at room temperature, chill the pan in the refrigerator for at least 30 minutes (or freezer for 10 mins).
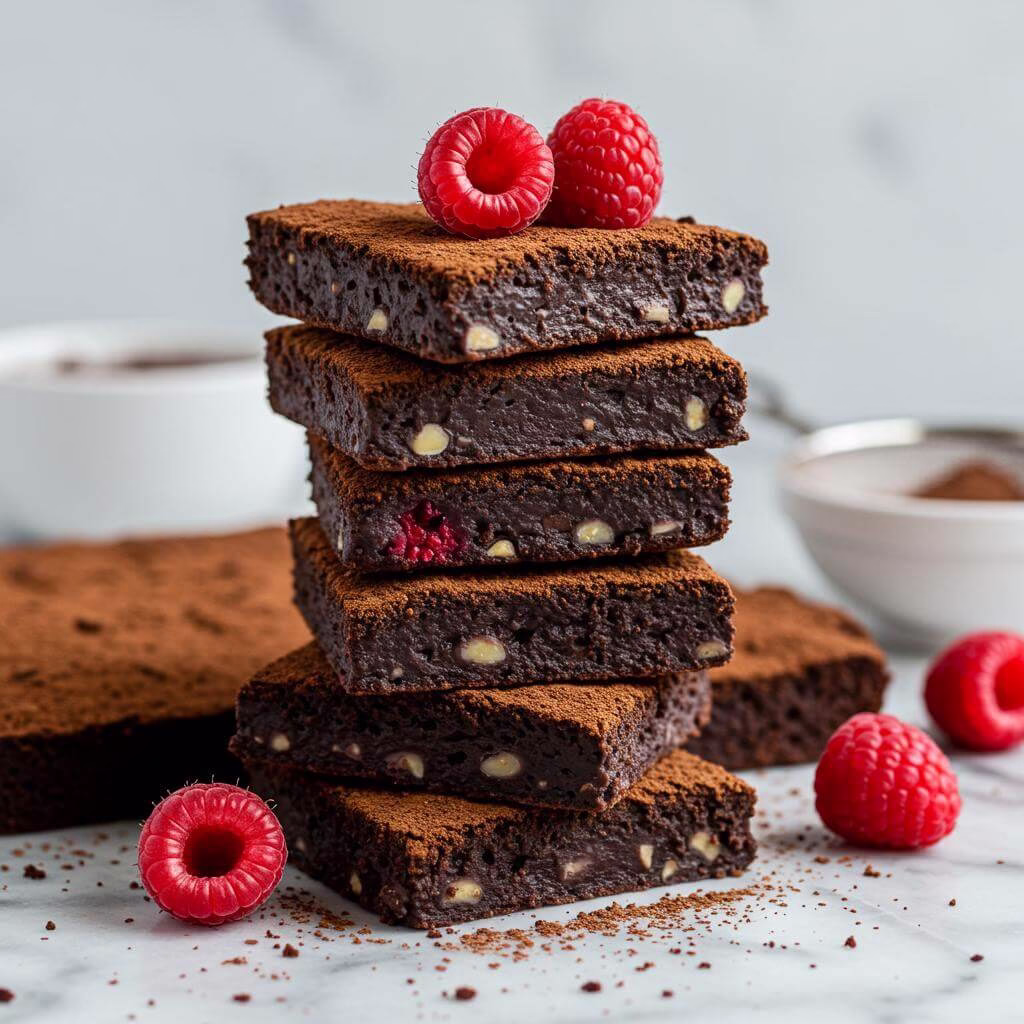
Use the parchment/foil overhang to lift the chilled brownies out. Slice into 9 squares with a sharp knife, wiping the knife clean between cuts. Enjoy!
Recipe Notes
- Do not overbake for the fudgiest texture.
- Ensure black beans are rinsed *very* well until water runs clear to avoid any bean flavor.
- For cakier brownies: after the initial 25 mins at 325°F, lower oven to 300°F (150°C) and bake 3-5 mins more, until center is stable.
- Completely cooling and then chilling the brownies is key for clean slicing and best texture.
Nutrition (per serving, approx.)

My #1 Recommendation
Ninja BN701 Professional Plus Blender, 1400 Peak Watts, 3 Functions for Smoothies, Frozen Drinks & Ice Cream with Auto IQ, 72-oz.* Total Crushing Pitcher & Lid, Dark Grey
(31805 reviews)
Experience powerful blending with the Ninja BN701. Its 1400 peak watts and Auto-IQ technology make perfect smoothies, frozen drinks, and ice cream with ease in its large 72-oz.* pitcher. (*64 oz. max liquid capacity)
- Powerful 1400 Peak Watts for crushing ice and tough ingredients.
- 3 Intelligent Auto-IQ Programs for one-touch smoothies, frozen drinks, and ice cream.
- Large 72-oz.* Total Crushing® Pitcher great for making batches for family and guests. (*64 oz. max liquid capacity)
As an Amazon Associate, I earn from qualifying purchases. This helps support the blog at no extra cost to you.
Loved These Fudgy Black Bean Brownies?
Grab your FREE copy of “5 More Mind-Blowing (and Secretly Healthy!) Gluten-Free Dessert Recipes” and keep the deliciousness going!

Inside Your FREE Recipe Guide, You’ll Discover:
-
5 Exclusive GF Dessert Recipes that taste indulgent (but aren’t!). -
Tips for perfect results every time, even if you’re new to GF baking. -
How to use simple, wholesome ingredients for amazing flavor. -
Bonus: Ideas to satisfy your sweet tooth the healthy way!
Send Me The FREE Recipes!
Get instant access to your FREE recipe guide now!