Okay, let’s be real for a second. Finding a genuinely *good* gluten free chocolate cake? It can feel like a quest worthy of a knight! So many attempts lead to cakes that are dry, crumbly, or just… sad. You want that rich, deep chocolate flavor, that moist tenderness, that luxurious feel – everything a classic chocolate cake should be, but without the gluten. I’ve certainly had my kitchen mishaps on this particular journey, ending up with things better suited for doorstops than dessert.
But guess what? After countless tries and a little bit of baking magic, I stumbled upon *the* recipe that changed everything. This isn’t just another okay gluten free chocolate cake; it’s a revelation! Seriously, the first time I made this gluten free chocolate cake, my family couldn’t believe it was gluten free chocolate cake at all. The secret? An ingredient you might not expect in cake! It creates a gluten free chocolate cake that’s unbelievably moist and fudgy, giving those classic flourless chocolate cake bites a run for their money. Forget disappointing textures; this gluten free chocolate cake delivers pure decadence. If you’ve loved making other delicious gluten-free treats like fudgy gluten-free brownies or chewy gluten-free chocolate chip cookies, get ready for your new chocolate obsession. This is truly the best gluten free chocolate cake I’ve ever made, and I cannot wait for you to try it!
Tips for Recipe Success
- Don’t Skip Blending for the Best Gluten-Free Chocolate Cake Texture: The magic of this recipe lies in blending the cooked quinoa with the wet ingredients until completely smooth. This step is crucial because the blended quinoa creates the unique structure and incredibly moist texture that replaces traditional flour, resulting in a truly decadent gluten-free chocolate cake.
- Measure Cooked & Cooled Quinoa Accurately: The recipe specifies 2 cups of *cooked* and *cooled* quinoa. Measuring after cooking ensures the correct ratio of dry base to wet ingredients. Make sure it’s fully cooled before blending, as warm quinoa can affect batter consistency. Also, follow the note to cook the quinoa in water, not broth, to avoid savory flavors.
- Mix Just Until Combined for a Tender Gluten-Free Crumb: Once you combine the wet blended mixture with the dry ingredients, mix only until everything is just incorporated. Over-mixing, even in gluten-free baking, can lead to a tougher or denser crumb texture by over-developing starches or creating excessive air pockets that collapse.
- Chill Your Ganache Thoroughly for Whipped Perfection: The whipped chocolate frosting relies on a well-chilled ganache base. After melting the chocolate chips in the hot cream and whisking smooth, it *must* be refrigerated until completely cold (2-3 hours, or use an ice bath). Attempting to whip warm or even slightly cool ganache will result in a runny mess, not light, airy peaks.
- Allow the Frosted Cake to Chill Before Serving: While tempting to dive right in, chilling the assembled and frosted cake in the refrigerator for at least 2 hours allows the whipped frosting to set up properly and the flavors to meld. This makes for cleaner slicing and an overall better serving experience.
Essential Equipment for This Recipe
To prepare this delicious recipe, you’ll need the following kitchen tools:
- Mixing Bowls – A set of sturdy mixing bowls is essential for combining ingredients.
Find Mixing Bowls on Amazon - Measuring Cups and Spoons – Accurate measuring is key for baking and cooking success.
Find Measuring Cups and Spoons on Amazon - Baking Sheets – Perfect for evenly baking your culinary creations.
Find Baking Sheets on Amazon - Whisks – Essential for incorporating air and creating smooth batters and sauces.
Find Whisks on Amazon - Spatulas – Ideal for mixing, folding, and scraping bowls clean.
Find Spatulas on Amazon - Food Processors – Saves time and effort when chopping or pureeing ingredients.
Find Food Processors on Amazon - Saucepans – A versatile tool for heating sauces, melting butter, and more.
Find Saucepans on Amazon - Chef’s Knives – A high-quality knife makes food preparation safer and easier.
Find Chef’s Knives on Amazon - Cutting Boards – Protect your countertops and provide a safe surface for chopping.
Find Cutting Boards on Amazon
Frequently Asked Questions
What kind of quinoa is best for this recipe, and do I need to rinse it first?
Great question! For this particular gluten free chocolate cake, we recommend using white quinoa. It tends to have a milder flavor and blends up slightly smoother than red or black quinoa. And yes, it’s always a good idea to thoroughly rinse your dry quinoa under cold water before cooking. Quinoa has a natural coating called saponin, which can taste bitter or soapy if not rinsed off. Rinsing ensures the cleanest flavor for your delicious cake!
How smooth does the cooked quinoa mixture need to be in the blender? Can I use a food processor?
Achieving a super smooth blend in step 3 is absolutely key to the texture of this unique gluten free chocolate cake! You really want to blend the cooked quinoa with the wet ingredients until it’s completely liquid and no grainy texture remains. This might take a minute or two, depending on your blender’s power. Stop and scrape down the sides as needed to make sure everything gets incorporated. A high-powered blender works best, but a standard blender or a food processor can also work – just be prepared to blend for a bit longer and scrape diligently until it’s silky smooth. Don’t leave any noticeable quinoa texture!
My cake layers seem dense or didn’t rise well. What happened?
Oh no, that can be frustrating! A few things could be at play here with any cake, including this gluten free chocolate cake. First, double-check your **baking powder and baking soda** – are they fresh? They lose their leavening power over time. Second, ensure you didn’t **overmix the batter** after adding the wet ingredients to the dry; gentle mixing until *just* combined is sufficient. Overmixing can develop toughness. Also, make sure your **oven temperature** is accurate (an oven thermometer can help!) and that you didn’t **open the oven door too early** while they were baking. Lastly, ensure your **quinoa was measured *after* cooking** and was fully cooled before blending.
The whipped chocolate frosting isn’t whipping! What should I do?
This is a super common issue with whipped ganache, and almost always comes down to one thing: **it wasn’t chilled long enough!** The ganache base absolutely *must* be **completely and thoroughly chilled** – it should be quite firm, almost like soft fudge, before you try to whip it. If it’s still liquidy or even just cold, it won’t whip into peaks. The recipe says 2-3 hours, but sometimes it needs longer, particularly if your fridge runs warm or the bowl was very full. The best fix? **Put it back in the fridge**! Give it at least another hour or two to get really cold, then try whipping again. You’ve got this!
Can I make this delightful gluten free chocolate cake dairy-free?
Yes, absolutely! One of the great things about this recipe is how adaptable it is. I’ve had readers report great success making this gluten free chocolate cake dairy-free. For the cake itself, you can often substitute the butter with a combination of melted coconut oil and a dairy-free baking stick/margarine (like Earth Balance), following the proportions mentioned in the blog post’s substitution section (e.g., 1/4 cup coconut oil + 1/2 cup dairy-free margarine for the butter). For the frosting, whipping chilled full-fat coconut cream (from a can, make sure it’s the solid part!) with melted dairy-free chocolate chips makes a fantastic alternative whipped ganache. Feel free to check the comments section too, as other readers often share their successful dairy-free tweaks!
Can I make this cake ahead of time or freeze leftovers?
Definitely! You can make the cake layers a day ahead of time, let them cool completely, wrap them tightly in plastic wrap, and store them at room temperature until you’re ready to frost. The chilled ganache can also be made a day ahead and stored in the fridge (just remember it needs to be whipped *before* frosting). As for freezing, this gluten free chocolate cake **freezes beautifully**! You can freeze individual slices (wrap tightly in plastic wrap and then foil) or entire unfrosted layers (wrap well). Thaw in the refrigerator. The whipped frosting also freezes surprisingly well, though it might lose a *tiny* bit of its whipped texture upon thawing – still delicious though!
Can I bake this recipe as cupcakes instead of a layer cake?
Yes, you certainly can! This recipe translates really well into cupcakes. The instructions in the blog post mention that the recipe makes about 24 cupcakes and they typically bake in around 15 minutes. They might not have that perfectly domed top that some wheat-based cupcakes do, but they will be incredibly moist and delicious. Just fill cupcake liners about two-thirds full and keep a close eye on them after 12-13 minutes with a toothpick test.
Will I be able to taste the quinoa in the finished gluten free chocolate cake?
This is the magic of the recipe! When prepared correctly – meaning the cooked quinoa is **blended *very* smoothly** with the wet ingredients – you should **not be able to taste the quinoa** in the finished gluten free chocolate cake. The rich chocolate flavor from the cocoa powder and the sweetness from the sugar completely mask any subtle quinoa taste. Its role is purely functional, providing structure and moisture that gluten flour normally would. Prepare to amaze yourself and others who won’t believe there’s quinoa in it!
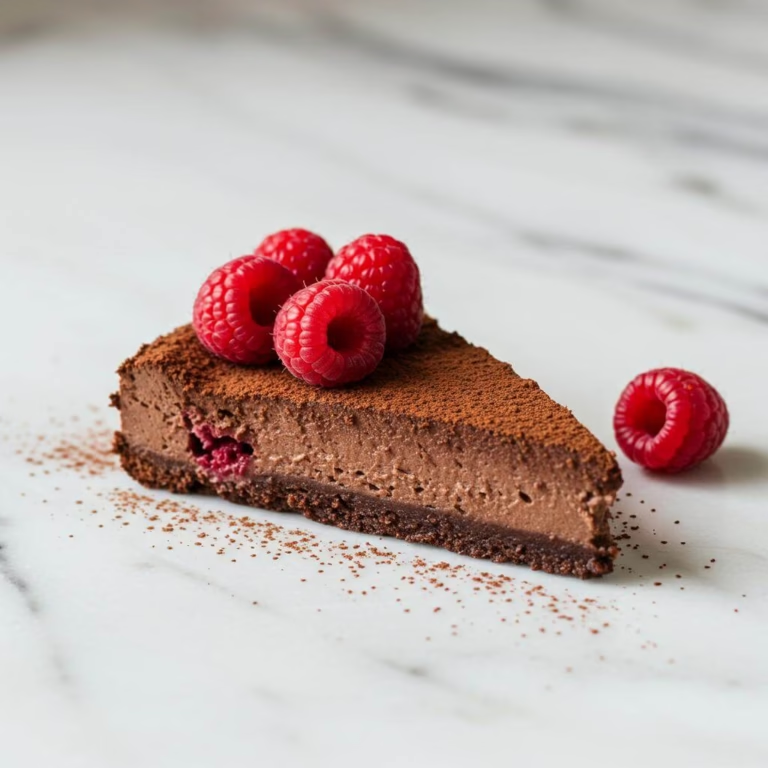
Gluten-Free Quinoa Chocolate Cake

Quinoa Chocolate Cake Recipe
The ultimate moist and fudgy gluten-free chocolate cake made with a secret ingredient: quinoa! It’s a revelation and the best you’ll ever try.
Ingredients
12
- For the Cake:
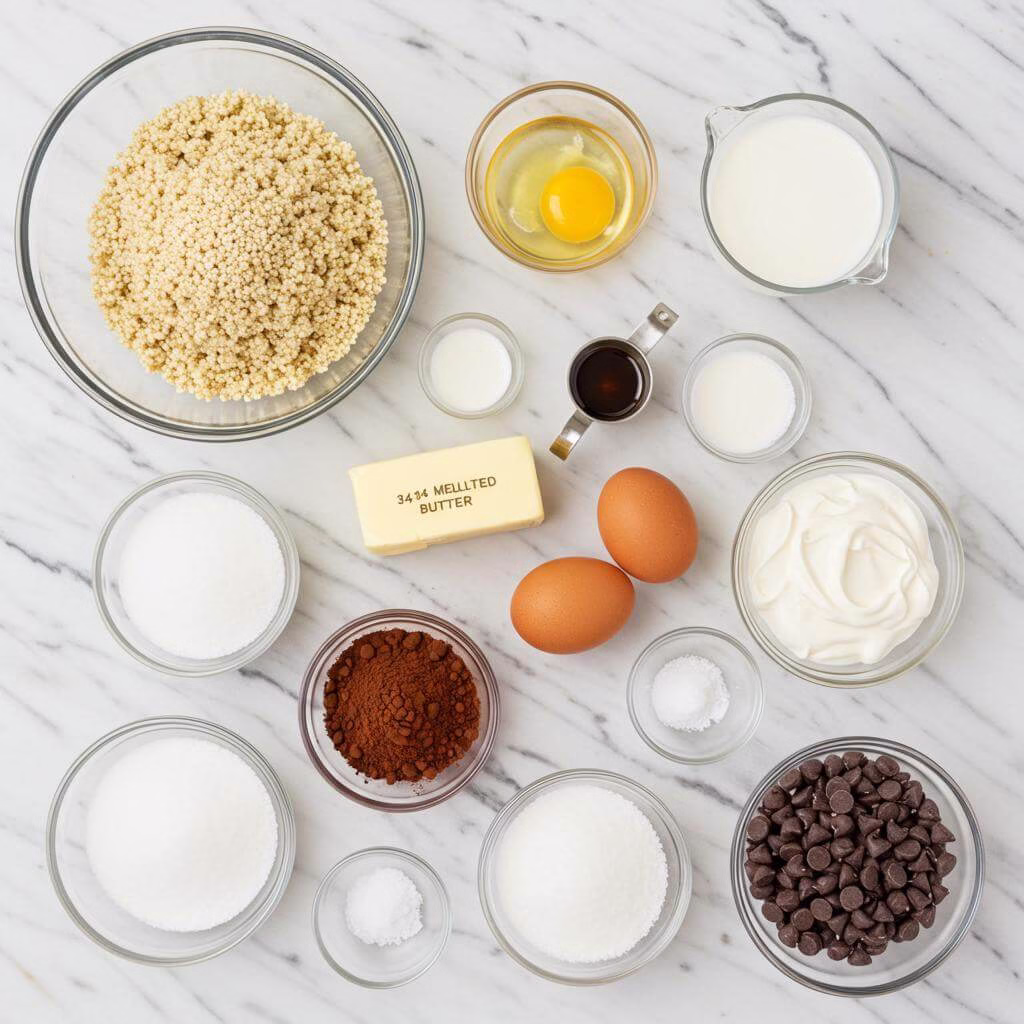
- 2 cups cooked and cooled white quinoa
- 1/3 cup milk
- 4 large eggs
- 1 tsp pure vanilla extract
- 3/4 cup (170g) salted butter, melted and cooled
- 1 1/2 cups (318g) granulated sugar
- 1 cup (85g) unsweetened cocoa powder
- 1 1/2 tsp baking powder
- 1/2 tsp baking soda
- 1/2 tsp salt
- For the Whipped Chocolate Frosting:
- 2 1/4 cups heavy whipping cream
- 1 1/4 cups (213g) semisweet or bittersweet chocolate chips
Equipment
- Two 8-inch round cake pans
- Parchment paper rounds
- Blender or food processor
- Large mixing bowl
- Whisk
- Wooden spoon or spatula
- Wire cooling rack
- Medium heat-safe bowl
- Saucepan
- Plastic wrap
- Stand mixer or handheld electric mixer
- Serving platter or plate
Instructions
Prepare for Baking Success: Preheat your oven to 350 degrees F (175 degrees C). While the oven heats, prepare two 8-inch round cake pans. Lightly grease the insides of the pans, then line the bottoms with rounds of parchment paper.
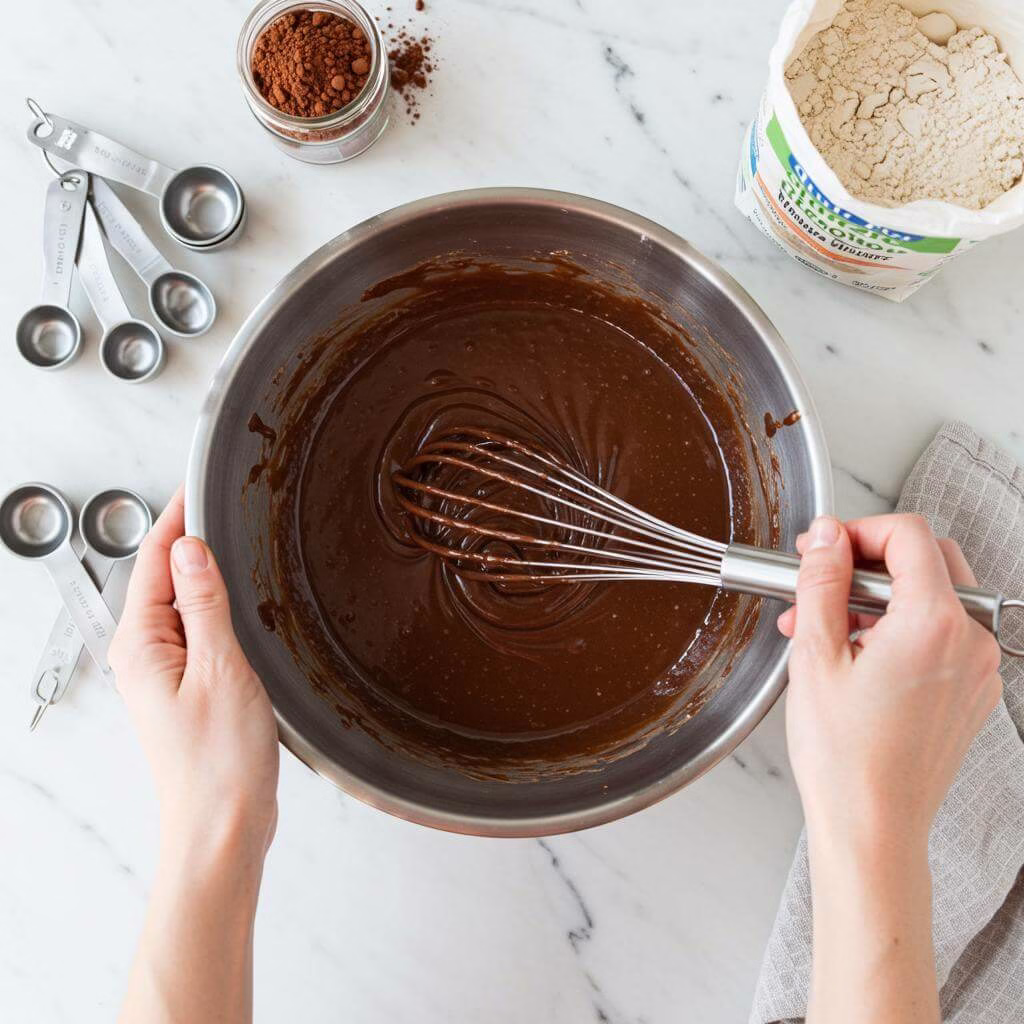
Blend the Wet Ingredients (Part 1): In a powerful blender or food processor, combine the ⅓ cup milk, 4 large eggs, and 1 teaspoon pure vanilla extract. Process until well combined.
Introduce the Secret Ingredient: Add the 2 cups of *cooked and cooled* quinoa and ¾ cup (170g) of melted and cooled salted butter to the blender. Blend thoroughly until incredibly smooth and creamy. Scrape down sides as needed.
Combine the Dry Ingredients: In a large separate bowl, whisk together the 1 ½ cups (318g) of granulated sugar, 1 cup (85g) unsweetened cocoa powder, 1 ½ teaspoons baking powder, ½ teaspoon baking soda, and ½ teaspoon salt for about 30 seconds.
Mix the Batter: Pour the blended wet mixture into the dry ingredients. Gently mix with a wooden spoon or whisk until just combined. Do not overmix.
Fill the Pans and Get Ready to Bake: Divide batter evenly between the two prepared 8-inch cake pans. Place pans on a middle rack in the preheated oven.
Bake Until Done: Bake for 28-30 minutes, or until edges pull away and a toothpick inserted into the center comes out clean.
Initial Cooling: Remove cakes from oven. Let cool in pans on a wire cooling rack for 10 minutes.
Cool Completely: Run a knife around cake edges, then invert onto wire racks. Peel off parchment. Cool completely (at least 1 hour) before frosting.
Make the Whipped Chocolate Frosting (Ganache Base): Place 1 ¼ cups semisweet or bittersweet chocolate chips in a medium heat-safe bowl. Heat 2 ¼ cups heavy whipping cream in a saucepan over medium heat until just simmering. Pour hot cream over chips. Let sit undisturbed for 5 minutes.
Whisk and Chill the Ganache: Gently whisk cream and chocolate until smooth and glossy. Cover with plastic wrap, pressing it onto the surface. Refrigerate until cold and firm (about 2-3 hours). This step is critical.
Whip the Frosting: Transfer chilled ganache to the bowl of a stand mixer fitted with whisk attachment, or use a handheld electric mixer. Beat on medium-high speed until lightened and soft peaks form. Do not over-whip.
Assemble Your Gluten-Free Chocolate Cake: Place one cooled cake layer upside down on a serving platter. Spread about half the frosting onto this layer, stopping ½ inch from the edge.
Add the Second Layer and Frost: Place the second cooled cake layer upside down on the first. Spread remaining frosting over the top. Frost sides if desired.
Chill the Finished Cake: Refrigerate the assembled cake for at least 2 hours before slicing and serving to allow frosting to set.
Enjoy Your Amazing Gluten-Free Chocolate Cake! Slice and serve this incredibly moist and decadent cake.
Recipe Notes
- Ensure quinoa is fully cooled before blending for best texture.
- Do not overmix batter; mix only until just combined to keep the cake tender.
- The ganache must be completely cold and firm before whipping; this is crucial for the frosting.
- Avoid over-whipping the ganache, as it can become grainy. Stop when soft peaks form.
- Chill the assembled cake for at least 2 hours before serving; this allows the frosting to set and flavors to meld.
- For a dairy-free version: use 1/4 cup melted coconut oil + 1/2 cup dairy-free margarine for butter in cake; use whipped chocolate coconut cream for frosting.
- To make cupcakes: Bake for approximately 15 minutes.
Nutrition (per 1/12th of cake)

My #1 Recommendation
Ninja BN701 Professional Plus Blender, 1400 Peak Watts, 3 Functions for Smoothies, Frozen Drinks & Ice Cream with Auto IQ, 72-oz.* Total Crushing Pitcher & Lid, Dark Grey
(31810 reviews)
This Ninja Professional Plus Blender boasts 1400 peak watts of power and intelligent Auto-IQ programs, making it a breeze to whip up delicious smoothies, frozen drinks, and even homemade ice cream. Its generous 72-oz Total Crushing Pitcher ensures you can make enough for everyone.
- Powerful 1400 Peak Watts motor for superior blending.
- 3 Auto-IQ programs for smoothies, frozen drinks, and ice cream.
- Large 72-oz.* Total Crushing Pitcher for big batches.
As an Amazon Associate, I earn from qualifying purchases. This helps support the blog at no extra cost to you.
Loved Our Gluten-Free Chocolate Cake?
Don’t stop at just one amazing dessert! Sign up below to get our FREE exclusive ‘Top 5 Must-Try Gluten-Free Desserts‘ e-book, packed with simple, delicious recipes your whole family will adore. Satisfy your sweet tooth the easy way!