
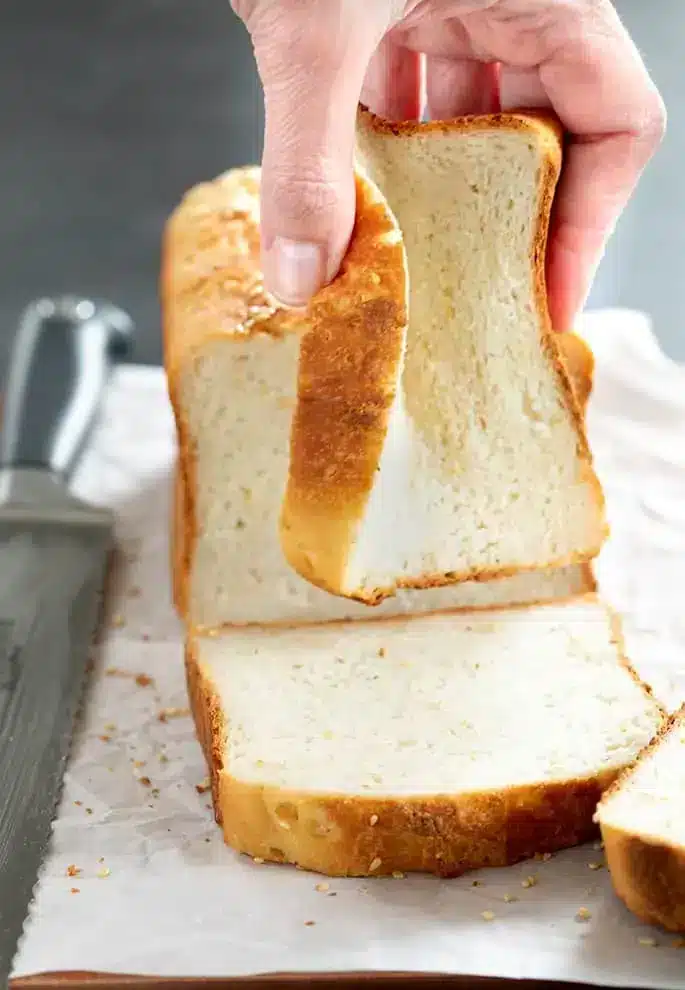
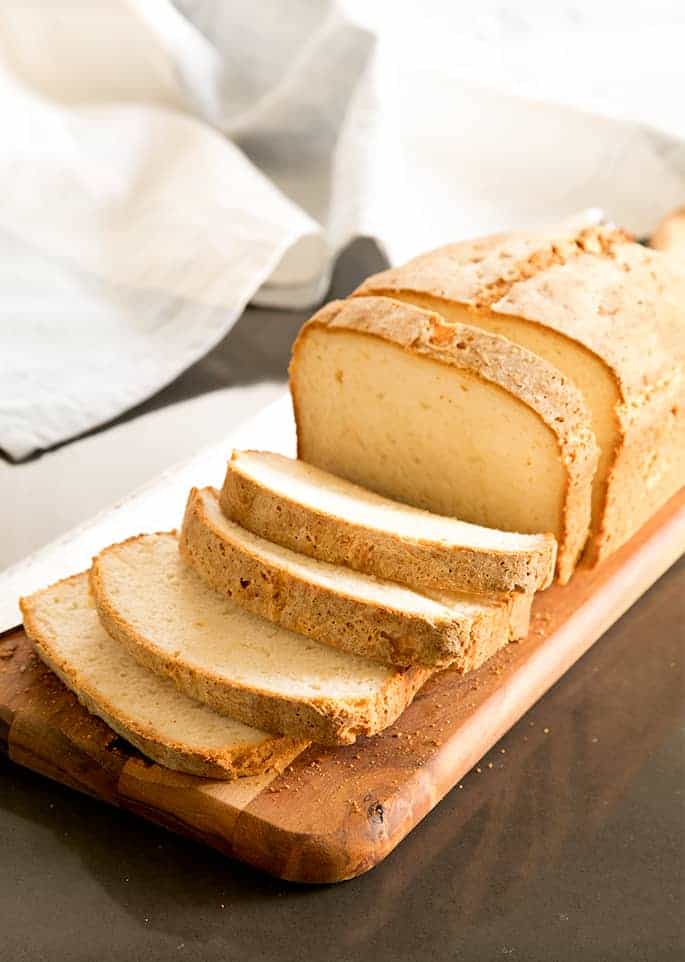
With a soft and tender crumb, this gluten free bread recipe is the original and best. The bread bends and squishes, tastes like the “real thing”, and has a beautiful bakery-style crust.
It tastes and behaves just like regular bread. This recipe is easy to make and if you follow the recipe faithfully, you'll get perfect bread every time. This is the white sandwich bread you've been missing since you started on your gluten free journey.
For More Recipes we highly recommend this cookbook for You
%20(2).png)
.png)
How to make this gluten free bread recipe
This gluten free bread recipe calls for a stand mixer fitted with the paddle attachment to make a smooth, cohesive dough that rises cleanly and evenly. Here is how you make the best basic gluten free bread recipe using high-quality gluten free baking ingredients:
- In the bowl of a stand mixer with the paddle attachment, place one of my recommended all purpose gluten free flour blends (including xanthan gum; I highly recommend Better Batter’s classic blend here), instant yeast, cream of tartar, and sugar. Whisk to combine well, and then add some salt, and whisk again. We’re trying to prevent the yeast from clumping with the salt, since salt will inhibit yeast activity.
- Let the mixer run on low speed while you add warm milk, butter that’s melted and allowed to cool, a bit of apple cider vinegar, and some egg whites. Turn the mixer speed up and beat for about 3 minutes until the dough is smooth. If you’re not familiar with this sort of batter-style gluten free bread, you may be surprised by how wet and soft the dough is.
- Scrape the dough into a greased, lined standard loaf pan, and smooth it into an even layer. I like to smooth the top with a moistened silicone spatula. Be sure that all the dough is together in one cohesive piece, not smushed up against the walls of the pan.
- Spray some plastic wrap with cooking oil spray and, placing the oiled side against the dough, cover the pan. Don’t pull the plastic tight around the pan since you want the dough to be able to rise freely, but make sure the plastic adheres to the edges of the pan to prevent most air from getting in.
- Let the dough rise in as warm and draft-free an area of your kitchen as possible until it’s about 50% bigger than it was when it started out. If you’re using a standard 9-inch x 5-inch pan, the dough should rise just above the top of the pan. It may take as little as 30 or 40 minutes to rise fully, or as much as 2 hours if your kitchen is cool and drafty. If the dough starts to develop craters or cracks, it’s beginning to overproof, so act quickly.
- Once it’s finished rising, remove the plastic and slice along the top along the length about 1/4-inch deep to encourage the bread to rise evenly in the oven.
- Bake the loaf at 375°F for 45 minutes to 1 hour, or until an instant-read thermometer inserted into the center of the loaf reads about 195°F. The outside will have a thick, brown, bakery-style crust and if you lift the loaf out of the pan and tap it on the sides or the bottom, it will sound hollow.
- Remove the loaf from the oven and allow the bread to cool in the pan for 10 minutes. Then, carefully remove the loaf from the pan and place it in a wire rack to cool completely. If you had lined the loaf with paper in the pan, before to remove the paper to allow it to cool. We want there to be lots of air circulating all the way around the bread so the steam from the oven isn’t trapped.
What is the dough for this gluten free bread like?
As we discuss in our beginner's guide to gluten free baking, if you have any experience baking conventional yeast bread, this gluten free bread dough will seem completely unfamiliar to you.
This batter-style gluten free yeast bread dough is more like a loose cookie dough than it is conventional bread dough. You need a stand mixer with a paddle attachment to mix it, most definitely not a dough hook since it isn't stretchy like conventional yeast bread dough.
The one drawback of this recipe is that I’ve never made it with total success with a bowl and spoon. And believe me, I've tried! Mixing all the ingredients until they’re truly smooth and fully incorporated is just really hard without a stand mixer.
It’s a bit fragile once it’s risen, so handle with care. If you’d like to add seeds to this gluten free bread, do it and after the dough has risen. Just brush the top lightly with melted butter and sprinkle with seeds. But be gentle or you'll ruin the rise.

Rules for baking the perfect gluten free sandwich bread
I've put together my top tips to help you get perfect gluten free bread every time. Trust the recipe and follow these tips for flawless gluten free sandwich bread time and time again.
Rule # 1: Follow the recipe
Try to avoid making any substitutions the first time you make a gluten free bread recipe, especially one which is unfamiliar to you. If you have chosen a recipe that you can only make with substitutions, select another recipe.
Whenever a reader tells me that they are having trouble with a recipe, my first question is always whether they have made any substitutions. Some may work, but many will not. And early failure will make it very hard to stay motivated.
Rule # 2: Measure ingredients by weight, not volume
I provide weight measurements (grams and pounds) in all of my recipes wherever possible, and in this recipe all but the smallest amounts can be measured by weight.
Volume measurements (cups) for dry ingredients like flour are inherently unreliable, as human error is unavoidable and volume measuring containers vary in size. Since proper proportions make the difference between success and failure, it's worth your time to measure by weight using a simple digital kitchen scale (affiliate link), which is cheap, and easy to use.
To use a digital scale, simply finish measuring one ingredient, and hit “tare.” It zeroes out the scale, and you can measure the next ingredient until the scale reaches the proper amount specified in the recipe.
In all of my recipes, 1 cup of all purpose gluten free flour weighs 140 grams. Don’t bother trying to see if the measuring cups you have in your kitchen match their volume to my weight measurements.
A common misunderstanding is that you can “test” my weight measurements by comparing them to the corresponding volume. I provide volume measurements as a courtesy, since we Americans tend to resist baking by weight, but I hope you will ignore them.
Rule # 3: Gluten substitutes are vital for making gluten free bread that holds together
Don’t try to bake bread without any gluten substitutes, like xanthan gum. When yeast gives off carbon dioxide during the baking process, gluten acts like a cloak and suspends the bubbles, so to make gluten free bread, we need a replacement.
When gluten traps the rise, it allows the bread to bake around the air pockets. Without gluten and without a gluten substitute, there's nothing to “hold” the rise. Xanthan gum also keeps baked goods fresher longer.
Some people find that they react poorly to “the gums,” which generally refers to xanthan gum and guar gum, and prefer not to bake with them. Xanthan gum is better suited to heated applications like bread baking, and guar gum to cold applications like making ice cream. However, my gluten free bread recipes are developed to require baking with xanthan gum.
Rule # 4: Use an oven thermometer
Use a simple oven thermometer to gauge your oven's baking temperature properly. Most ovens are calibrated improperly, and off by around 50°F.
I don't bother having the oven calibrated, since it will just drift out of calibration again. Instead, I use a simple analog oven thermometer that's easy, cheap, essential. I just replace it at least twice a year, and never worry whether my oven temperature is accurate.
When you bake bread in a too-hot oven, the outside will bake before the inside has a chance to develop enough structure to support it. The bread will then cave in on itself as it cools.
Rule # 5: Use the right gluten free flour blend
Choosing a well-balanced all purpose gluten free flour blend made only with flours that are ground superfine is the most important decision you'll make in gluten free baking. Baking yeast bread requires large amounts of your chosen flour blend, and it must be able to support a rise, both before it goes in the oven and while it's baking, and still keep its shape.
Particularly for yeast bread baking, I most often bake with Better Batter's classic gluten free flour blend. It's such a versatile blend, and it's always worked beautifully for any recipe that's called for an all purpose gf flour.
If you try to make this recipe using a gluten free blend like King Arthur or Bob's Red Mill, or another blend that I don't recommend, there are many possible ways in which your bread will not turn out. I wish these widely available blends were suitable for bread baking, but they aren't.
Rule # 6: Be patient while your bread rises
Yeast is active at a very wide range of temperatures, but in cooler temperatures it just rises more slowly. Overproofing is a function of too much rise, but not too long a rise. In a warm, moist environment, your yeast bread will rise more quickly.
An ideal rise is slow and steady. A too-quick rise at too-high temperatures is more likely to overproof, leading to a dough that won’t hold its shape, and is less stable. Don’t raise the temperature with anything that isn’t intended to aid in yeast bread rising, like an oven that you think is on its lowest temperature but actually kills your yeast.
Rule # 7: Make sure your bread dough doesn't dry out
Yeast won't rise without enough moisture. Be sure not to allow your dough to rise uncovered, exposed completely to the air, or moisture will evaporate, drying out the dough and preventing a proper rise.
Rule #8. Treat your yeast right to get your gluten free bread to rise
Yeast can generally survive the cold of my refrigerator at 40°F/4°C, and water as hot as 120°F/49°C will likely kill yeast. Anything in between and your yeast should survive.
But surviving is different from thriving. Yeast in bread dough needs a few conditions to thrive:
- Enough moisture (without enough moisture, or if your raw dough loses too much moisture, the yeast won't be active)
- Enough time (yeast will rise more slowly at lower temperatures, but it will rise given enough time)
- Freshness (check the date on your yeast and don't use anything past its freshness date)
There are a few conditions that will inhibit the growth of your yeast:
- Too much salt (don't add yeast and salt in at the same time, and don't overmeasure your salt, which inhibits yeast growth)
- Too much sugar (which will absorb liquid in the dough; a proper sweet yeast bread recipe will already have accounted for that by adding more yeast)
- Too much heat (I do not recommend setting your bread dough to rise in an oven that's on, even if you're certain it's only set to 100°F; most ovens won't retain a temperature setting that low and your yeast will probably die)
For best results when making this easy gluten free bread recipe, please don't use a warm oven for proofing. Instead, choose a naturally warm, draft free spot and let the yeast do its thing. And keep in mind that, if your environment seems quite cool (but isn't truly cold), your yeast bread will still rise, just more slowly.
More tips for the best gluten free bread
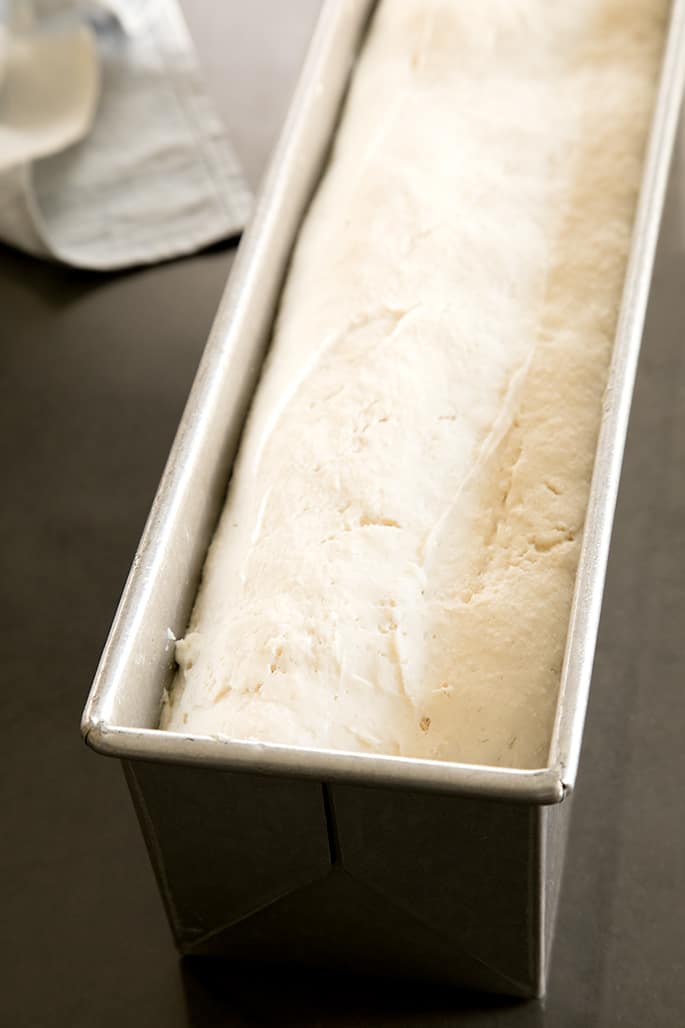
Use the best bread pan for baking gluten free sandwich bread — the Pullman loaf pan
I had always wanted to try making it in a Pullman loaf pan. That was the only way to see if I could get those perfect, no-dome slices that are truly made for sandwiches.
Baking in a Pullman pan (which is that taller, narrow pan with a lid that slides on) also tends to make softer bread. The moisture in the bread is trapped inside the pan during baking, and the bread absorbs it as it bakes.
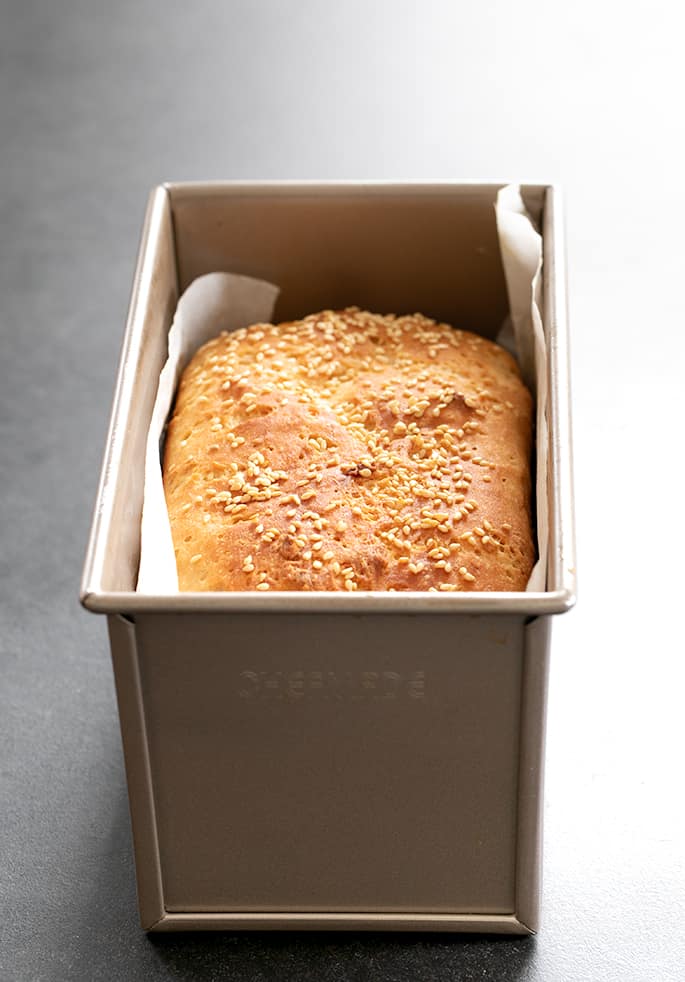
The photo above is a loaf baked in a 2 pound Pullman loaf pan. The photos below are of the bread rising in a 1-pound Pullman loaf pan.
You can make a 1-pound Pullman loaf, or a 2-pound Pullman loaf. The baking time is nearly the same, as the pans are much longer but also considerably more narrow.
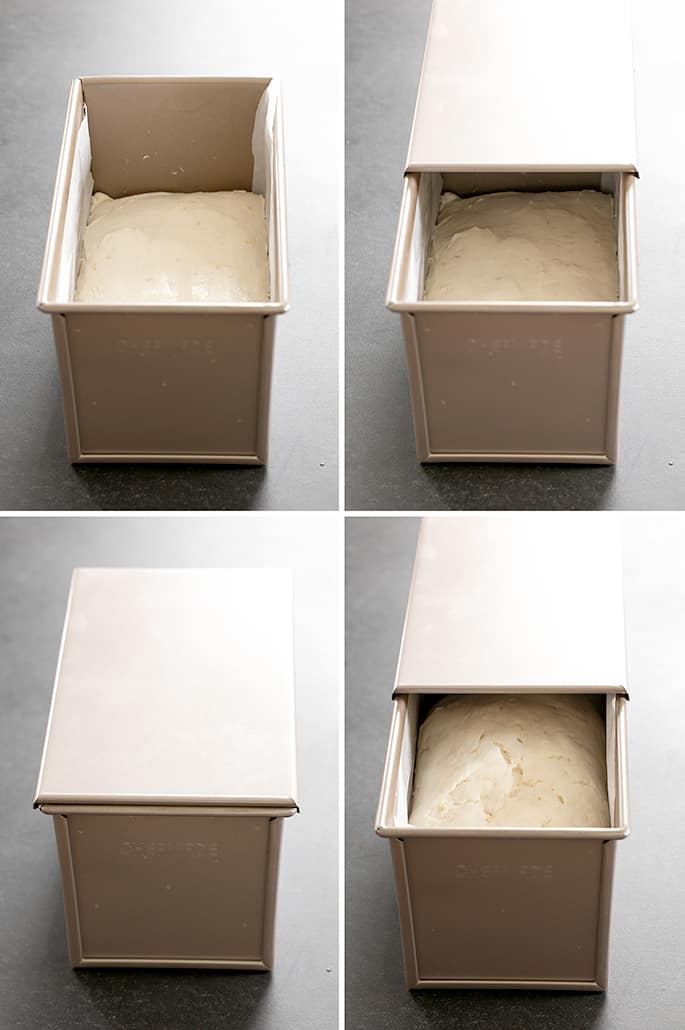
For the 1-pound Pullman pan
For the 1-pound pan, you don't do anything different to prepare the bread dough. When it's ready to rise, use the Pullman cover instead of plastic wrap, then bake for about 40 minutes with the lid on. Remove the lid and allow the top to brown.
For the 2-pound Pullman pan
For the 2-pound loaf pan, double the recipe and be sure to mix the ingredients with a bit of extra care. The instructions are the same as for the 1-pound pan for rising and baking, just baked in a 2 pound Pullman loaf pan.
Choosing the right yeast for gluten free sandwich bread
Yeast is an essential ingredient for most bread recipes, but when you head to the grocery store, you may notice a few different varieties, including instant yeast and active dry yeast.
Instant yeast vs active dry yeast
Two of the most common products you'll find on the shelf are instant yeast and active dry yeast.
My homemade gluten free sandwich bread recipe calls for instant yeast, which may also be labeled as quick rise.
If you'd like to substitute active dry yeast instead, you can, but you'll need to take a few extra steps. First, multiply the weight of instant yeast by 1.25 for the right ratio.
Because active dry yeast has a thicker coating around the yeast, you'll need to help break it down. You can do this by soaking it in some of the milk for this recipe until it foams.
Once foamy, add it and the rest of the milk when the recipe calls for it.Use a pan liner or cooking spray
Don't let the bread cool completely in the pan
Let your homemade gluten free sandwich bread cool in the pan for about 10 minutes. After that, transfer the loaf to a cooling rack and remove any paper liner so cool air circulates all the way around the bread. Otherwise, the crust can get soggy from trapped steam.
Use a bread knife or serrated knife
If you don't have a bread knife, be sure to use some kind of serrated knife for slicing. Otherwise, you may squish or tear your bread. And let it cool before you slice it or it won't slice cleanly.
For More Recipes we highly recommend this cookbook for You
Gluten free white sandwich bread recipe ingredients and substitution suggestions
As always, unless specifically indicated otherwise, I haven't made this recipe with any substitutions.
These are mostly just my best-educated guesses for how to accommodate other dietary restrictions. Proceed with caution when modifying any recipe!
Gluten free dairy free bread
Making this bread dairy free is easy. Just replace the butter with vegan butter. Melt and Miyoko's Kitchen brands are my favorite.
You can even use Earth Balance Buttery Sticks and reduce the salt to 1 teaspoon, but keep in mind that it has more moisture than butter, so our loaf may sink a little as it cools.
Avoid using the soft vegan spreads though. This bread recipe calls for butter, so be sure to use a block the plant butter blocks for the best dairy free results.
Use any dairy free milk you like, just be sure it's not nonfat and is unsweetened. I really like unsweetened almond milk here, as it doesn't impact flavor and still contains enough fat so the rest of the recipe doesn't require any adjustment. Full fat canned coconut milk is never an appropriate substitute for dairy milk, as it has very little moisture, so the hydration ratio won't be what it needs to be for this yeast bread to rise if you use it.
Egg free gluten free bread recipe
This is a little harder since the recipe calls for egg whites, not a whole egg.
I’ve never tried this recipe with any substitutions to make it egg-free, but I’d recommend trying a “chia egg” (1 tablespoon ground chia seeds + 1 tablespoon lukewarm water, mixed and allowed to gel). Alternatively, aquafaba may behave more like egg whites. If you try either, let us know how it goes!
Adding seeds
If you want to dress your bread up a little, and turn it into a fancier-looking bread, or give it a bit more flavor and crunch, you can sprinkle the top with seeds. Do it after the loaf has risen and is ready for the oven.
Lightly sprinkle the seeds over the top, but don't push them down too much as the risen dough is quite fragile. Add sesame, chia, quinoa, sunflower, or pumpkin seeds, and maybe even some finely chopped nuts.

How to store this gluten free bread
This easy gluten free bread recipe produces incredibly tender bread that stores easily on the kitchen counter. Just keep it sealed tightly in an airtight wrap at room temperature, and it will last for about 2 days.
I also recommend that you don't pre-slice any gf bread before use, unless you're going to freeze it. Doing so may cause it to dry out prematurely, so leave the loaf whole and slice as needed, but wrap the remaining loaf tightly in between.
If you have a slice of bread that seems to have started to go stale, you can refresh it to make it as good as new. Just sprinkle it lightly with lukewarm water and toast it on a very low setting just to warm it up and allow the bread to absorb the extra moisture.
Freezing this gluten free bread
This gluten free sandwich bread freezes really well. You can freeze the whole, cooled loaf without slicing it, but I really prefer to slice it fully, and then wrap each slice separately in freezer-safe wrap. If you want to slice the loaf and then freeze it all together, try adding a small piece of parchment paper between slices to keep them from sticking together once frozen.
When you're ready to make a sandwich, remove as many slices as you need from the freezer, and refresh them in the toaster. There's no need to defrost them first.
Gluten Free Bread Recipe FAQs
Here are some specific questions that are frequently asked about this particular white gluten free bread recipe:
While they're designed to make life easier, I can't recommend using a bread machine for this recipe, even if it has a gluten free setting.
Again, it's not because I'm a fan of more work or that I dislike using a bread machine. Rather, I'm a fan of consistent results, and you just can't achieve that with a bread machine. There are simply too many bread machine models to tailor this recipe, and a set of instructions for one brand of machine doesn't work for another, so I say skip the machine for best results.
Some gluten free bread does taste different than what you're used to, but that just means that you're eating the wrong gluten free bread. This recipe makes bread with a good crust, crumb, and chew, just like you'd expect. You can use it to make any sort of sandwich you like, with wet and dry fillings, and it won't fall apart.
There are several reasons why your gluten free bread may not be rising. Here are a few of the most common reasons:
• You're not using the correct gf flour blend or you're not using the correct amount (you must measure by weight for accurate results)
• Your yeast is not fresh or it's not activating due to use of cold ingredients
• You didn't allow enough time or the proper conditions for proofing
• You didn't measure your ingredients by weight, including water, so the hydration ratio is wrong
Gluten free flours are very absorbent, so if you don't include the right ratio of dry and wet ingredients, you'll end up with a loaf that's dry and crumbly. If you made ingredient substitutions, especially with respect to the flour blend, didn't measure your ingredients by weight, or let your dough exposed to the air so it dried out as it rose, your results will be dry.
While it's possible to include too little liquid in your gluten free bread recipe and end up with dry bread, you'll experience the opposite if you add too much liquid, don't let the dough rise enough before baking, or don't bake the loaf for long enough until it's baked all the way to the bottom.
Another reason you may pull gummy bread from the oven is that the bread wasn't baked at a high enough temperature, so you don't get any “oven spring.” If your oven runs too hot, the outside may bake too quickly and you can't bake it long enough to bake all the way to the center. Finally, altitude, humidity, or temperature may affect final results.
When your bread is done baking, the internal temperature of the bread reaches about 195°F on an instant-read thermometer. The outside will form a thick, brown crust, and it will sound hollow when you thump it on the bottom with your thumb or forefinger.
The most common reasons for gluten free bread sinking after cooling include:
• Too much proofing; the bread rose higher than it could support itself. Raw gf bread dough tends to take on a pock-marked appearance when it's overproofed, so watch carefully.
• Too much yeast, so the bread rose too quickly and the dough couldn't support the rise and still hold its shape
• Too much liquid, leading to too a rapid overproofing, and too much liquid to properly bake off in the oven
• A too-hot oven that baked the outside to burning long before the inside of the loaf was cooked through enough to support the structure.
No, gluten free bread should not be refrigerated. The refrigerator tends to dry out bread, and doesn't extend its shelf life. To store bread, wrap it tightly and let it sit at room temperature for up to 2 days, and then freeze for longer storage.
No. Homemade bread, gluten free or otherwise, never stays fresh as long as packaged bread, which contains artificial preservatives to make them last longer than homemade baked goods.
I recommend using the classic blend from Better batter as the all purpose gluten free flour blend in this recipe. It has the right balance of ingredients to make chewy bread that still has a moist, tender crumb.
No, you can't just substitute gluten free flour for traditional flour — gluten free baking requires several adjustments, and it's even more important when it comes to baking a gf bread recipe. To produce a gluten free bread that looks and tastes anything like the “real thing”, you have to use a specially formulated gluten free bread recipe—like this one
I'm afraid you really do need a stand mixer fitted with a paddle attachment to make the kind of smooth, uniform bread dough that rises evenly and bakes properly with a tender, uniform crumb. If you're willing to take a chance that it doesn't turn out, and you have a 7-cup food processor, you can try pulsing the ingredients in that, particularly if you have a plastic blade to use instead of the steel blade. Your food processor needs to work on the dough enough to make it smooth, but not so much that it heats the dough, which can kill the yeast and even begin to cook the ingredients.
Easy White Gluten Free Bread Recipe For Sandwiches | Tender And Springy
Ingredients
- 3 cups (420 g) all purpose gluten free flour blend (I used and highly Better Batter or my mock Better Batter blend here; click thru for the mock blend and full info)
- 3 teaspoons xanthan gum omit if your blend already contains it
- 2 ½ teaspoons (8 g) instant yeast
- ¼ teaspoon cream of tartar
- 2 tablespoons (25 g) granulated sugar
- 2 teaspoons (12 g) kosher salt
- 1 ½ cups (12 fluid ounces) warm milk (about 95°F)
- 4 tablespoons (56 g) unsalted butter melted and cooled (plus more for brushing if using seeds)
- 1 teaspoon apple cider vinegar
- 2 (50 g) egg whites at room temperature
- Toasted sesame seeds for sprinkling optional
Instructions
-
Grease or line a 9-inch x 5-inch loaf pan (or slightly smaller) and set it aside.
-
In the bowl of a stand mixer fitted with the paddle attachment, place the flour, xanthan gum, yeast, cream of tartar and sugar. Whisk together with a separate, handheld whisk. Add the salt, and whisk again to combine.
-
Add the milk, butter, vinegar and egg whites, mixing on low speed after each addition. Scrape down the sides of the mixer bowl as necessary during mixing.
-
Turn the mixer to medium-high speed and mix for about 3 minutes. The dough will be thick, smooth and quite wet.
-
Scrape the dough into the prepared loaf pan. Using a wet spatula, smooth the top.
-
Cover the dough with lightly oiled plastic wrap and allow it to rise in a warm, draft-free place for 30 to 45 minutes or until it’s about 150% of its original size.
-
It should be overflowing the top of the loaf pan by at least 1/2 inch when you retrieve it, but it will not have doubled in volume. It may take longer to rise properly in colder, drier weather and less time in warmer, more humid weather.
-
When the dough has nearly reached the end of its rise, preheat the oven to 375°F.
-
Remove the plastic wrap, and using a sharp knife or lame slash the top of the loaf about 1/4-inch deep. If using the optional seeds, brush the top of the risen bread gently with melted butter, and sprinkle with the seeds.
-
Place the pan in the center of the preheated oven. Bake for 45 minutes to 1 hour, or until the internal temperature of the bread reaches about 195°F on an instant-read thermometer. The outside will form a thick, brown crust.
-
Remove the loaf from the oven, and allow it to cool for about 10 minutes in the pan before transferring to a wire rack to cool completely.
-
To freeze this bread, cool completely and then slice, wrap tightly, and freeze. Defrost as many slices at a time as you need in the toaster.
Nutrition
For More Recipes we highly recommend this cookbook for You