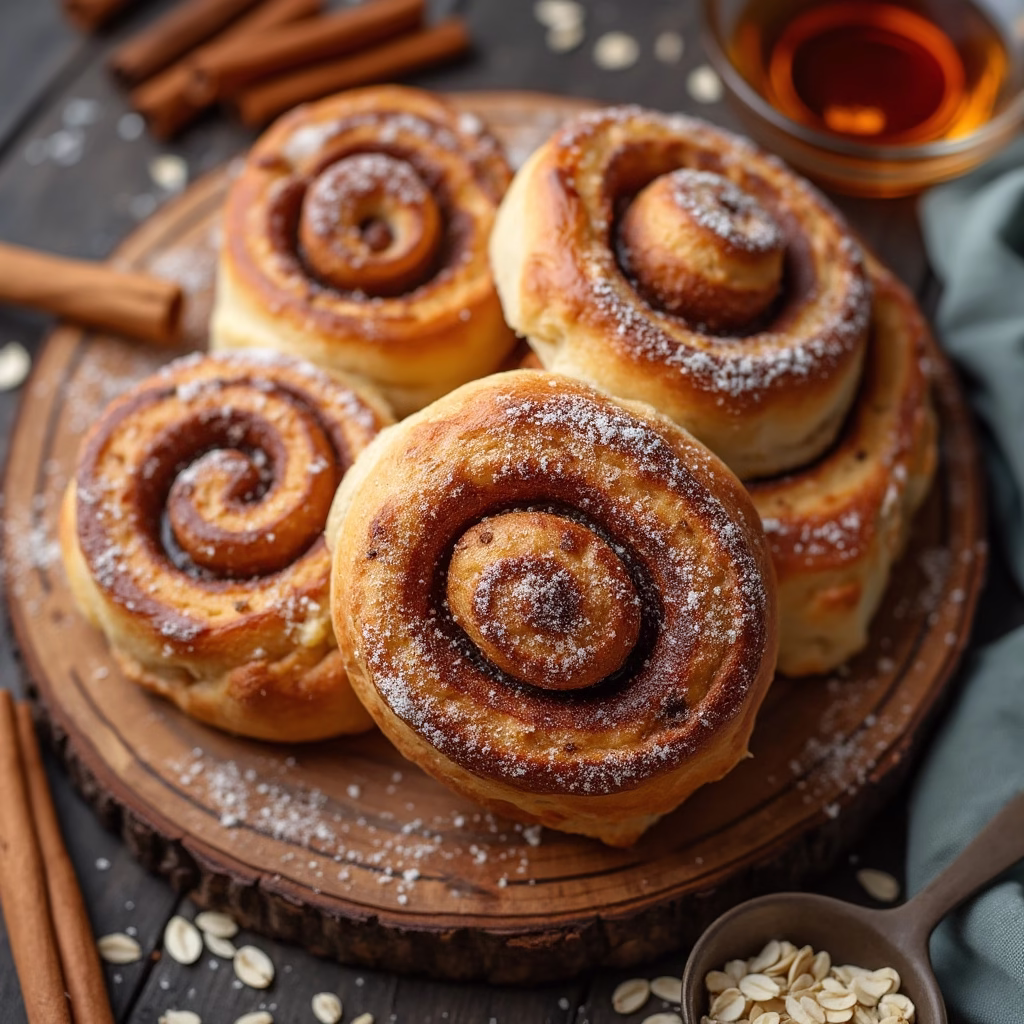
The Ultimate Gluten-Free Cinnamon Roll Experience
Craving warm, gooey cinnamon rolls but living a gluten-free lifestyle? Look no further! These homemade cinnamon rolls are so delicious, you won't believe they're gluten-free. Forget about dry, crumbly, or gluey textures – these rolls are soft, pillowy, and packed with a delectable cinnamon-sugar filling, all topped with a luscious vanilla bean cream cheese icing.
What Makes These Cinnamon Rolls Gluten-Free Game Changers?
Gluten-free baking can be a challenge, especially when it comes to yeasted doughs. Many recipes require a mix of obscure flours, and the results can be unpredictable. But not this one!
Amazing Taste & Texture: These cinnamon rolls have the perfect bounce and tenderness, just like traditional rolls.
Simplified Gluten-Free Flour: This recipe uses just one gluten-free flour mix, easily found in most stores. No need to buy a bunch of different flours!
Easy to Make: Despite the sticky dough, the unique method for rolling and cutting makes this recipe surprisingly easy. Follow the simple steps: make the dough, roll it out, add the filling, slice, let rise, and bake!
Key Insights for Gluten-Free Bakers
- Embrace the Stickiness: Gluten-free doughs are often stickier than their gluten-containing counterparts. Don't be afraid to use plenty of cornstarch when rolling out the dough to prevent sticking.
- Warmth is Key for Rising: Give your gluten-free cinnamon rolls a helping hand by creating a warm environment for rising. A preheated (then turned off) oven works wonders.
- Spacing Matters: Proper spacing in the baking pan is essential for even baking. Give each roll enough room to expand without crowding, which can lead to doughy centers.
Making the BEST Gluten-Free Cinnamon Rolls: Step-by-Step
Here's how to create those soft, gooey, and utterly irresistible gluten-free cinnamon rolls you've been dreaming about:
Gluten-Free Cinnamon Rolls
- In the bowl of a stand mixer fitted with the dough hook attachment, combine the gluten-free bread flour mix (discard the yeast packet), granulated sugar, instant yeast, baking powder, baking soda, and kosher salt. Mix on low speed for about a minute to ensure all ingredients are evenly distributed.
- In a microwave-safe measuring cup, combine the water, sliced butter, and apple cider vinegar. Microwave for 1-2 minutes, or until the mixture is warm to the touch but not scalding. The warmth is crucial for activating the yeast. It's okay if the butter isn't fully melted.
- With the dough hook running on medium speed, gradually pour the warm liquid mixture into the dry ingredients. Use a rubber spatula to scrape down any dry ingredients clinging to the sides of the bowl, incorporating them into the dough.
- Once the wet and dry ingredients are almost fully combined, add the egg and egg white (or your vegan substitute).
- Increase the mixer speed to medium-high and mix for a full 5 minutes. This extended mixing time is essential for developing a smooth and slightly stretchy dough.
- After 5 minutes of mixing, let the dough rest in the bowl for 10 minutes.
- While the dough rests, prepare your work surface. Lay down a sheet of plastic wrap and generously dust it with cornstarch. Remember, the dough will be rolled into a 13×19 inch rectangle, so ensure you have enough space covered.
- After the 10-minute rest, gently scoop the dough from the bowl and place it in the center of the prepared cornstarch bed. Dust the top of the dough with additional cornstarch. Gently press the dough down into a rectangular shape.
- If you don't have a rolling pin, you can continue pressing and shaping the dough with your hands, as it's quite pliable. However, a rolling pin will make it easier to achieve a uniform 13×19 inch rectangle. Aim for even sides.
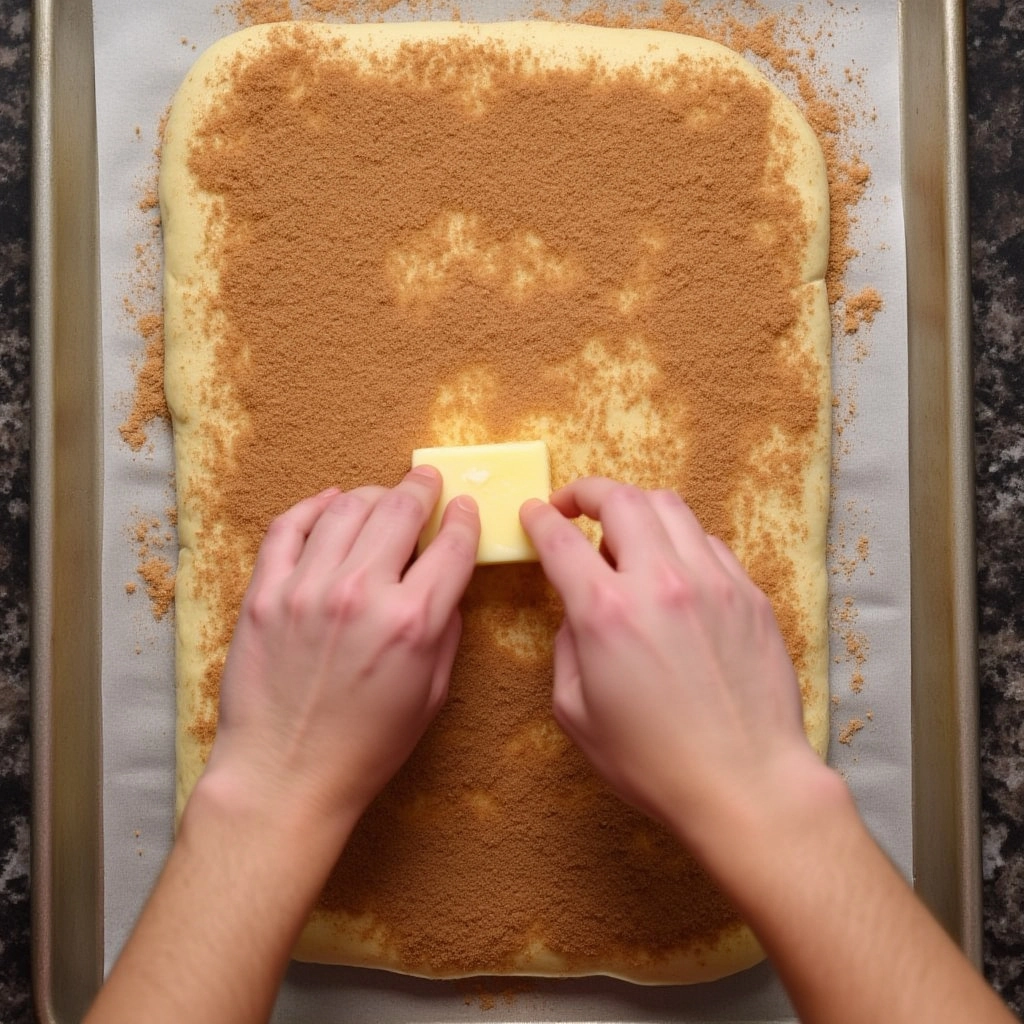
- Important: The butter for the filling MUST be very soft to prevent tearing the delicate dough. A helpful trick is to slice chilled butter into tablespoons and microwave for about 15 seconds, just until it begins to melt. Then, use a fork to mash the butter into a smooth, spreadable consistency.
- Spread the softened butter evenly over the entire surface of the dough. Sprinkle with packed brown sugar, pressing lightly to adhere. Finally, dust the top generously with ground cinnamon.
- Carefully roll the dough into a tight log. The cornstarch underneath should make this process relatively easy. If you encounter any sticking, use the edges of the plastic wrap to help guide the rolling. Use a pastry brush to gently remove any excess cornstarch from the surface of the log.
- Using flavorless floss, trim about 3 inches off each end of the log and discard (or bake them off separately!). Cut the remaining dough into 7 equal-sized rolls.
- Line a 10-inch cast-iron skillet with a sheet of crumpled (then unfolded) parchment paper. This prevents sticking and adds a rustic touch. Arrange the rolls in the skillet, leaving about an inch of space between each roll. Place one roll in the center and surround it with the remaining six.
- Preheat your oven to its lowest possible temperature. Once preheated, turn the oven OFF and place the skillet with the rolls inside. Allow the rolls to rise in the warm oven for 45 minutes to 1 hour, or until doubled in size. (For overnight rolls, cover and refrigerate after this step. The next day, bring to room temperature before baking).
- After the rising time, remove the rolls from the oven and preheat the oven to 350°F (175°C).
- Bake the cinnamon rolls for 25-30 minutes, or until the tops are golden brown. To test for doneness, gently poke a roll with your finger; it should feel soft and spring back slightly.
- While the rolls are cooling slightly, prepare the vanilla bean cream cheese icing.
Vanilla Bean Cream Cheese Icing
- In a small mixing bowl, combine the room-temperature butter and cream cheese.
- Use a fork to mash and mix the butter and cream cheese together until smooth and well combined.
- Gradually add the powdered sugar, about ½ cup at a time, mixing well after each addition. Stir in the vanilla bean paste (or vanilla extract).
- Once the icing is smooth and creamy, dollop it generously over the warm cinnamon rolls and spread evenly.
Dig in while the rolls are still warm, and enjoy every delicious bite!
Notes
- Gluten-Free Bread Flour Mix: For best results, use a gluten-free bread flour mix specifically designed for yeasted doughs. I tested this recipe with other gluten-free flour mixes (like cup-for-cup blends), and the results were not ideal (either too mushy or too gritty).
- Vegan Option: To make this recipe vegan, substitute vegan butter for dairy butter and use a vegan cream cheese alternative. For the egg and egg white, use a powdered egg replacer, following the package instructions to substitute for one whole egg and one egg white.
Be Gluten Free: The Ultimate Gluten-Free Cinnamon Rolls
Indulge in the comforting taste of homemade cinnamon rolls without the gluten! These rolls boast a soft, pillowy texture, a rich cinnamon-sugar filling, and a luscious vanilla bean cream cheese icing. Perfect for a weekend treat or a special occasion, these gluten-free cinnamon rolls will delight everyone, regardless of their dietary restrictions.
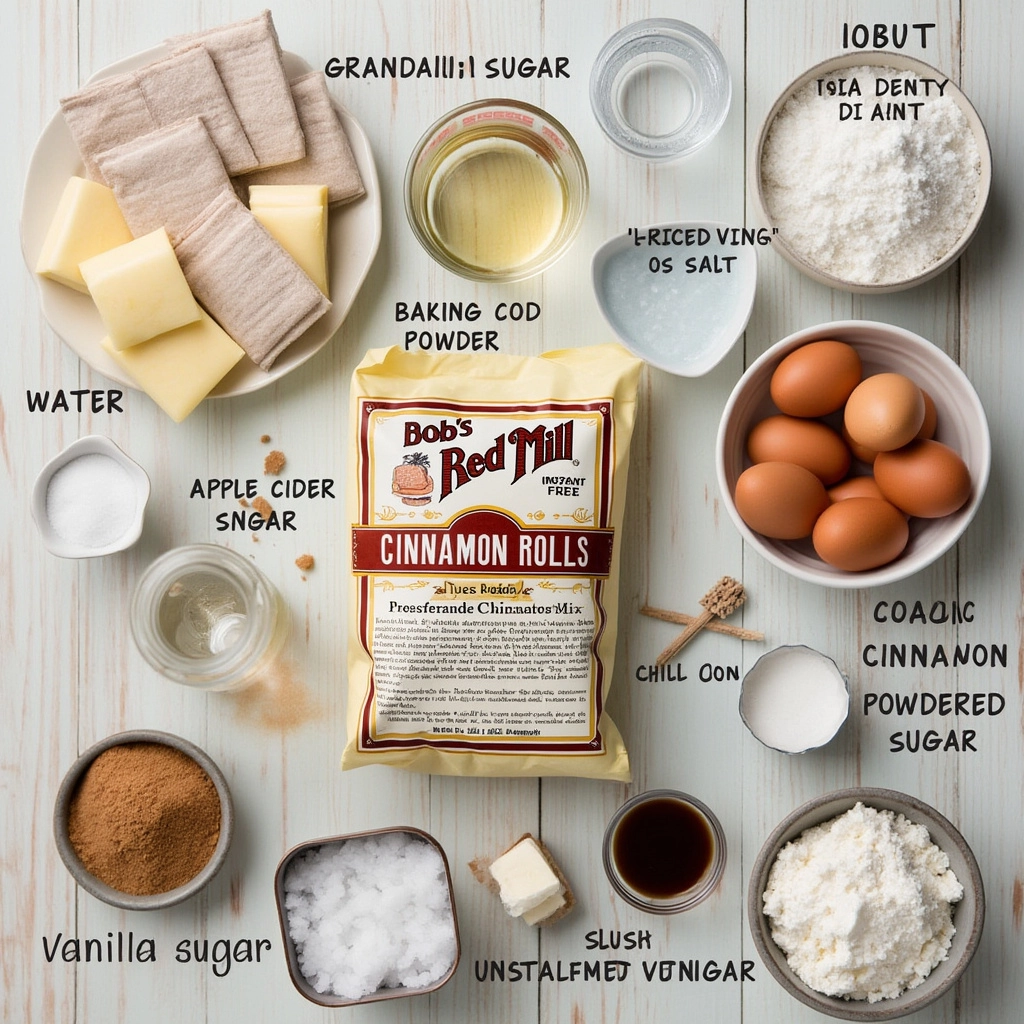
Ingredients
Gluten-Free Cinnamon Rolls
- 1 16oz bag Bob’s Red Mill Gluten Free Bread Mix *SEE NOTES
- 1/2 cup (100g) granulated sugar
- 4 1/2 tsp (or two packets) instant yeast
- 1 1/2 tsp baking powder
- 1/2 tsp baking soda
- 1 tsp kosher salt
- 1 1/4 cups (300g) water
- 1/2 cup (110g) unsalted butter, sliced into tablespoons (vegan butter can be subbed)
- 1 tsp apple cider vinegar
- 1 large egg + 1 egg white **SEE NOTES for vegan substitute
- Cornstarch, for dusting
Cinnamon Sugar Filling
- 6 tbsp unsalted butter, very soft (vegan butter can be subbed)
- 1/2 cup (100g) light brown sugar, packed
- 2 tbsp ground cinnamon
Vanilla Bean Cream Cheese Icing
- 1/4 cup (55g) unsalted butter, room temp (vegan butter can be subbed)
- 4 oz cream cheese, room temp (vegan cream cheese can be subbed)
- 1 1/2 cups (170g) powdered sugar
- 1 tsp vanilla bean paste (or vanilla extract)
Gluten-Free Nutrition & Benefits
These cinnamon rolls are crafted to be a delightful treat while keeping gluten sensitivities in mind. By using Bob's Red Mill Gluten-Free Bread Mix, this recipe avoids common gluten-free baking issues like grittiness or a strange aftertaste. This mix provides a solid base for a soft, enjoyable texture that rivals traditional cinnamon rolls.
- Gluten-Free Goodness: Enjoy a classic treat without the gluten! Perfect for those with celiac disease or gluten intolerance.
- Fiber Boost: Depending on the gluten-free flour blend used, these rolls can provide a source of dietary fiber, aiding digestion and promoting gut health.
- Customizable Sweetness: Adjust the amount of sugar in the filling and icing to suit your taste preferences, helping you control your sugar intake.
Tips and Variations for the Best Gluten-Free Cinnamon Rolls
Here are some tips and tricks to ensure your gluten-free cinnamon rolls turn out perfect every time, along with variations to suit different dietary needs:
- Flour Power: For best results, we recommend using the Bob's Red Mill Gluten Free Bread Mix. We cannot guarantee the same outcome with other gluten-free flour blends due to varying starch and protein compositions.
- Dairy-Free Delight: Easily make this recipe dairy-free by substituting vegan butter and cream cheese. Ensure your vegan cream cheese is smooth and creamy for the best icing texture.
- Vegan Variation: To make these rolls vegan, substitute both the dairy products and the eggs. Use a flax egg (1 tablespoon flaxseed meal mixed with 3 tablespoons water, let sit for 5 minutes) or a commercial egg replacer.
- Yeast Activation: Ensure your yeast is active by mixing it with warm (not hot) water and a pinch of sugar. It should become foamy within 5-10 minutes.
- Rising Time: Gluten-free dough often requires a longer rising time. Place the dough in a warm, draft-free area, or use the oven-warming method described in the recipe.
- Overnight Option: For a convenient morning treat, prepare the rolls through the shaping stage, then cover and refrigerate overnight. In the morning, let them rise slightly at room temperature while the oven preheats.
- Even Baking: Space the rolls evenly in the pan to ensure they bake uniformly. If using a smaller pan, you may need to adjust the baking time.
- Storage: Store leftover cinnamon rolls in an airtight container at room temperature for up to 2 days or in the refrigerator for up to 4 days. Reheat in the microwave or oven for the best taste.