Oh, the quest for the perfect layered cake when you’re eating gluten-free! It can feel like a never-ending challenge, right? Finding layers that are sturdy enough to hold a filling but still incredibly moist, and then crafting that filling and frosting to be just right… it’s a journey I’ve been on countless times. My latest obsession? Creating a show-stopping gluten free chocolate caramel cake that defies all expectations. I wanted that rich, deep chocolate flavor paired with luscious, gooey caramel and a silky fudge frosting. The first few attempts at combining a fudgy gluten-free base with a flowing caramel were… messy, to say the least. Figuring out the right caramel consistency and a frosting that wouldn’t overpower but enhance the chocolate and caramel took some serious kitchen time. But the result? This gluten free chocolate caramel cake is my proudest baking moment! It’s everything you dream of in a dessert – rich, decadent, and utterly flawless. It’s even better than some standard cakes I’ve tried! Forget everything you thought you knew about gluten-free baking; this gluten free chocolate caramel cake is here to change the game. It’s truly the ultimate gluten free chocolate caramel cake recipe, and once you try it, you’ll understand the obsession. Looking for other layered gluten-free treats? You might also enjoy my gluten free strawberry cheesecake or a simple gluten free banana bread if you prefer something less elaborate. Get ready to bake the most incredible gluten free chocolate caramel cake of your life!
Tips for Recipe Success
- Why Oil?: Unlike traditional recipes using butter, this gluten-free chocolate cake utilizes oil as the primary fat source. Oil is liquid at room temperature, meaning it coats the flour particles more effectively and helps the cake retain moisture, resulting in a wonderfully moist crumb that stays tender for days.
- Spotting Perfect Caramel: When boiling the initial brown sugar, butter, and syrup mixture, stir constantly and look for the moment when no sugar crystals are visible when you lift your spoon. This ensures a smooth, non-gritty caramel base before adding the dairy.
- Patient Cooling is Key: Ensure your cake layers are completely cooled before attempting to fill and frost them. Warm cakes are fragile and prone to breaking, and warm caramel or frosting will simply melt and slide off, making assembly impossible.
- Storing Your Gluten-Free Chocolate Caramel Cake: While the assembled cake benefits from a brief chill before frosting, avoid storing the finished cake in the refrigerator for extended periods. The cold can cause the caramel layer to harden and crystallize, affecting the texture when serving. Room temperature storage is best for maintaining its deliciousness.
Essential Equipment for This Recipe
To prepare this delicious recipe, you’ll need the following kitchen tools:
- Mixing Bowls – A set of good quality mixing bowls is essential for combining wet and dry ingredients.
Find Mixing Bowls on Amazon - Measuring Cups and Spoons – Accurate measurements are key to a successful recipe.
Find Measuring Cups and Spoons on Amazon - Baking Sheets – Perfect for baking cookies, roasting vegetables, and more.
Find Baking Sheets on Amazon - Whisks – A whisk is necessary to whip eggs or to incorporate air to your mixes.
Find Whisks on Amazon - Spatulas – Great for folding ingredients and scraping the bowl clean.
Find Spatulas on Amazon - Food Processors – Ideal for chopping vegetables, making doughs, and creating smooth purees.
Find Food Processors on Amazon - Saucepans – Essential for cooking sauces, heating liquids, and simmering ingredients.
Find Saucepans on Amazon - Chef’s Knives – A versatile knife for chopping, dicing, and slicing.
Find Chef’s Knives on Amazon - Cutting Boards – A safe and stable surface for all your cutting needs.
Find Cutting Boards on Amazon
Frequently Asked Questions
What kind of gluten-free flour blend should I use for this cake?
Great question! The recipe specifically calls for a gluten-free flour blend that contains xanthan gum. This is really important because xanthan gum acts as a binder in gluten-free baking, replacing the structure that gluten provides. Look for a blend labeled “cup-for-cup” or “all-purpose gluten-free flour blend” and check the ingredients list to ensure xanthan gum is included. Using a blend without it will likely result in a cake that doesn’t hold together well.
Why does the cake recipe use oil and hot coffee instead of butter and milk?
Ah, this is one of the secrets to how incredibly moist this gluten free chocolate caramel cake is! Using oil as the fat keeps the cake light and tender because oil is liquid at room temperature, unlike butter. This helps it stay moist for days! The very hot coffee (or boiling water) doesn’t just add a subtle depth of flavor (especially coffee!), but it also helps to fully bloom the cocoa powder, which intensifies the chocolate flavor significantly. It’s a fantastic technique for rich, moist chocolate cakes!
What if my caramel seems too thin or thick? And I’m worried about it crystallizing!
It’s totally normal to be a little nervous about caramel, but this recipe is designed to be pretty forgiving! If your caramel seems a little thin after boiling for the recommended time, it will thicken considerably as it cools, especially in the fridge. If it’s too thick after cooling, you can gently warm it again in a saucepan over very low heat with an extra tablespoon or two of heavy cream, stirring until it reaches your desired consistency. To prevent crystallization, the golden syrup (or corn syrup) helps a lot! But remember the tip in the recipe: don’t scrape the bottom or sides of the pan when you pour the finished caramel into the cooling container, as sugar crystals can cling to the sides and cause the whole batch to crystallize. Also, follow the storage instructions – storing the *assembled* cake in the fridge can cause the caramel layer to crystallize and harden.
The frosting uses boiling water and needs to be chilled? That’s different!
Yes, this fudge frosting technique is a game-changer! Using boiling water helps to dissolve the powdered sugar and cocoa in a way that creates a unique, smooth, and fudgy texture rather than a typical fluffy buttercream. It really contributes to the decadent feel of this gluten free chocolate caramel cake. And yes, chilling is essential! The warmth from the boiling water and melted chocolate means the frosting needs time in the fridge to firm up to a spreadable consistency. Don’t skip that 30 minutes of chill time!
Some of the caramel is squeezing out when I stack the cake layers. Is that okay? Why do I need to chill the stacked cake before frosting?
Don’t worry, a little bit of caramel trying to escape is completely fine when assembling this grand gluten free chocolate caramel cake! The fudge frosting will cover all that deliciousness. The most important thing is the chilling step after stacking the layers. This is a pro tip for layered cakes, especially those with softer fillings like caramel! Chilling the stacked cake firms up the layers and the caramel filling, making the entire structure much more stable and easier to frost neatly. You’ll find that applying the frosting is much simpler and cleaner when the cake isn’t shifting around.
How should I store this gorgeous gluten free chocolate caramel cake and how long will it stay fresh?
This is important! The assembled gluten free chocolate caramel cake should be stored at room temperature. It will stay wonderfully moist and delicious for up to 3 days this way. You should avoid storing the finished cake in the refrigerator because the caramel layer will likely crystallize and become hard, which nobody wants! Just keep it covered on your counter.
Can I make any substitutions, like making this cake dairy-free?
You can make some minor substitutions! For the cake, other neutral oils like vegetable or grapeseed work fine for the canola oil. For the caramel syrup, light corn syrup is a good substitute for golden syrup. However, making this cake completely dairy-free would be quite challenging and require significant recipe testing. You’d need dairy-free milk for the cake, and dairy-free butter, condensed milk alternative, and heavy cream alternative for the caramel and frosting. While it *might* be possible, it would change the texture and flavor profiles considerably and isn’t a simple swap. For this specific recipe as written, it’s best enjoyed with the dairy components for that truly rich and fudgy texture!
Gluten-Free Salted Caramel Chocolate Cake
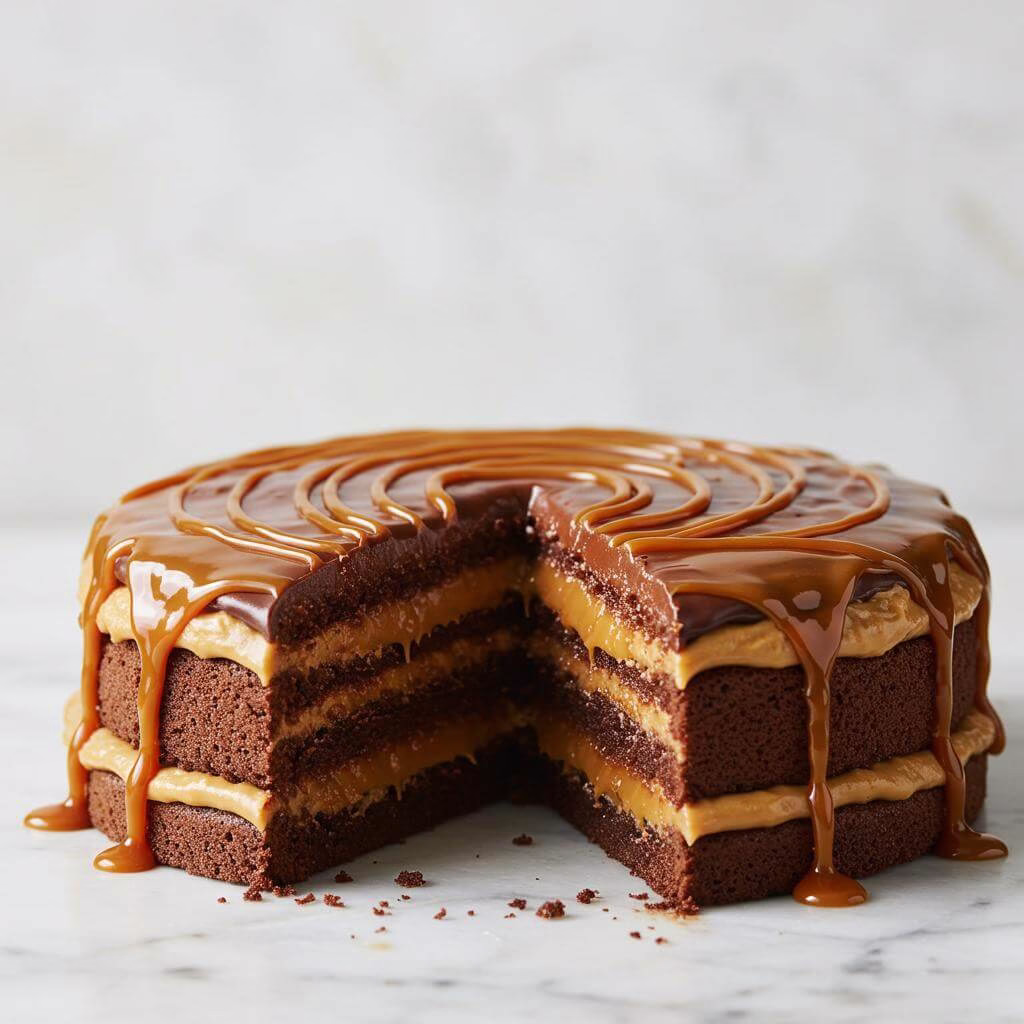
Gluten-Free Salted Caramel Chocolate Cake
A show-stopping gluten free chocolate caramel cake with rich chocolate, luscious caramel, and silky fudge frosting. This decadent dessert is utterly flawless and a true baking triumph.
Ingredients
12
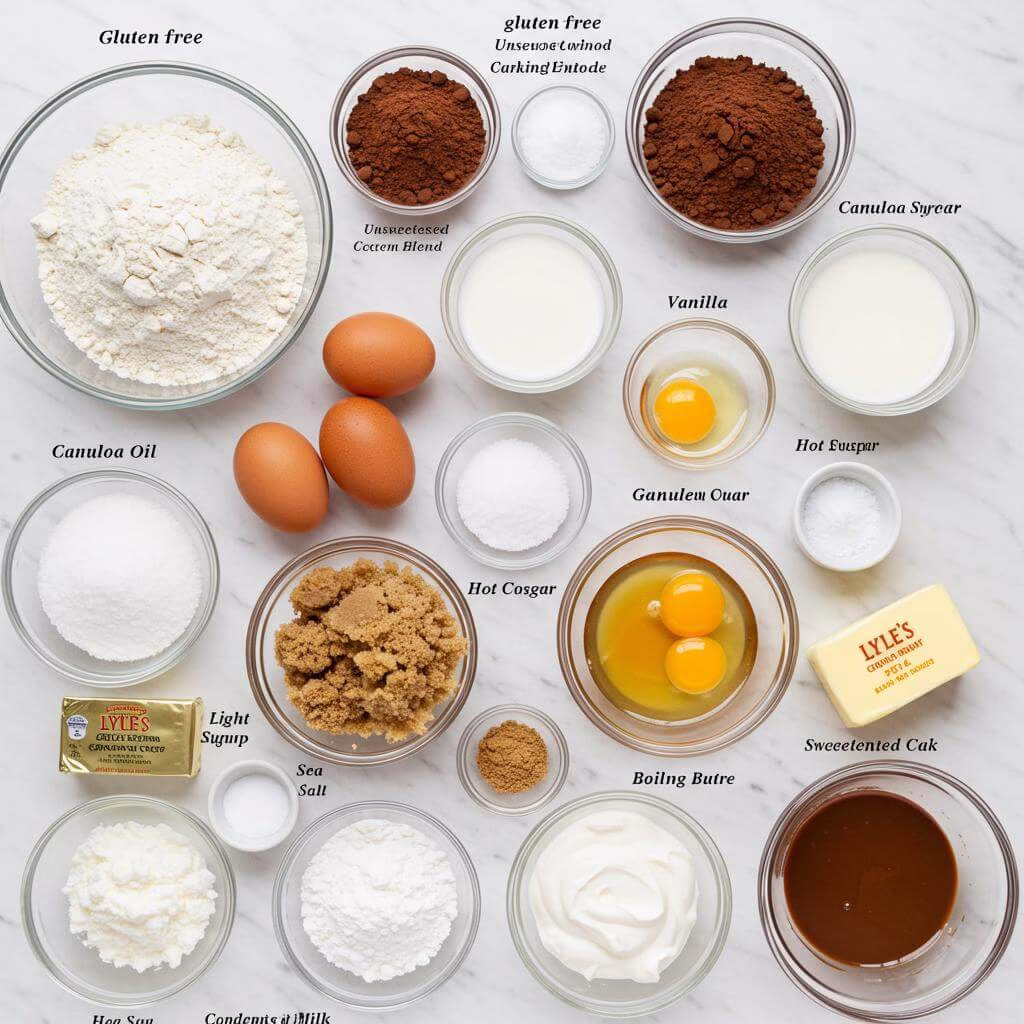
- 2½ cups Kim’s gluten free flour blend (or any flour blend with xanthan gum) (375 g)
- 1¼ cups unsweetened cocoa powder (132 g)
- 2¼ teaspoon baking powder
- 1½ teaspoon baking soda
- ¾ teaspoon salt
- 3 large eggs, at room temperature
- 1¾ cups milk, at room temperature (415 ml)
- 1 tablespoon vanilla extract
- ¾ cup canola or vegetable oil (or any neutral-flavored oil, 180 ml)
- 2¾ cup granulated sugar (550 g)
- 1¼ cups very hot coffee or boiling water (272 g)
- For the Caramel:
- ½ cup light brown sugar, lightly packed (100 g)
- ¼ cup Lyle’s golden syrup (or light corn syrup, 60 ml)
- 4 tbsp butter (56 g)
- 1 can sweetened condensed milk (14 ounces or 394 g)
- 2 teaspoon vanilla extract
- 1 pinch of sea salt
- ½ cup heavy cream (120 ml)
- For the Fudge Frosting:
- 3¼ cups powdered sugar (400 g)
- ⅔ cup unsweetened cocoa powder (80 g)
- 1⅓ sticks butter, softened (150 g)
- ⅓ cup + 1½ tbsp boiling water (100 ml)
- 2 ounces melted dark chocolate (60 g)
Equipment
- Three 8-inch round cake pans
- Parchment paper
- Nonstick cooking spray
- Medium bowl
- Whisk
- Large bowl
- Stand mixer (or hand mixer)
- Toothpick or cake tester
- Wire cooling racks
- Small, heavy-bottomed saucepan
- Heat-resistant spatula or wooden spoon
- Heat-resistant container (e.g., mason jar)
- Serving plate, cake board, or turn table
- Small offset spatula
- Offset spatula (for frosting)
Instructions
Prepare your cake pans: Preheat your oven to 350°F (175°C). Take three 8-inch round cake pans. Line the bottom of each pan with circles of parchment paper. Spray the parchment paper and the sides of the pans with nonstick cooking spray.
Combine dry ingredients: In a medium bowl, measure out your gluten-free flour blend, unsweetened cocoa powder, baking powder, baking soda, and salt. Whisk together.
Mix wet ingredients and combine: In a large bowl (stand mixer ideal), combine eggs, milk, vanilla extract, and oil. Mix briefly. Add granulated sugar, blend. Add dry ingredients, mix on low until mostly smooth.
Add the hot liquid: Carefully add hot coffee or boiling water to batter. Pulse mixer gently to combine. Mix only until just incorporated. Batter will be thin.
Bake the cake layers: Divide batter evenly among prepared pans. Bake for approximately , or until a toothpick inserted into the center comes out clean.
Cool the cake layers: Remove cakes from oven, cool in pans on wire racks for . Invert onto racks, peel parchment. Cool completely.
Start the caramel: In a small, heavy-bottomed saucepan, combine light brown sugar, Lyle’s golden syrup (or corn syrup), and butter. Stir constantly over medium-low heat as ingredients melt.
Boil until sugar dissolves: Continue stirring as mixture boils. Boil, stirring, for about , until sugar is completely dissolved and no crystals remain.
Add condensed milk and cream: Carefully pour in sweetened condensed milk and heavy cream. Stir vigorously (mixture will bubble up).
Boil and thicken the caramel: Continue stirring and cooking until caramel returns to a full boil. Boil, stirring constantly, for about , until thickened.
Finish the caramel: Remove from heat. Pour into a clean, heat-resistant container. Stir in vanilla extract and sea salt. Cool completely in refrigerator, uncovered.
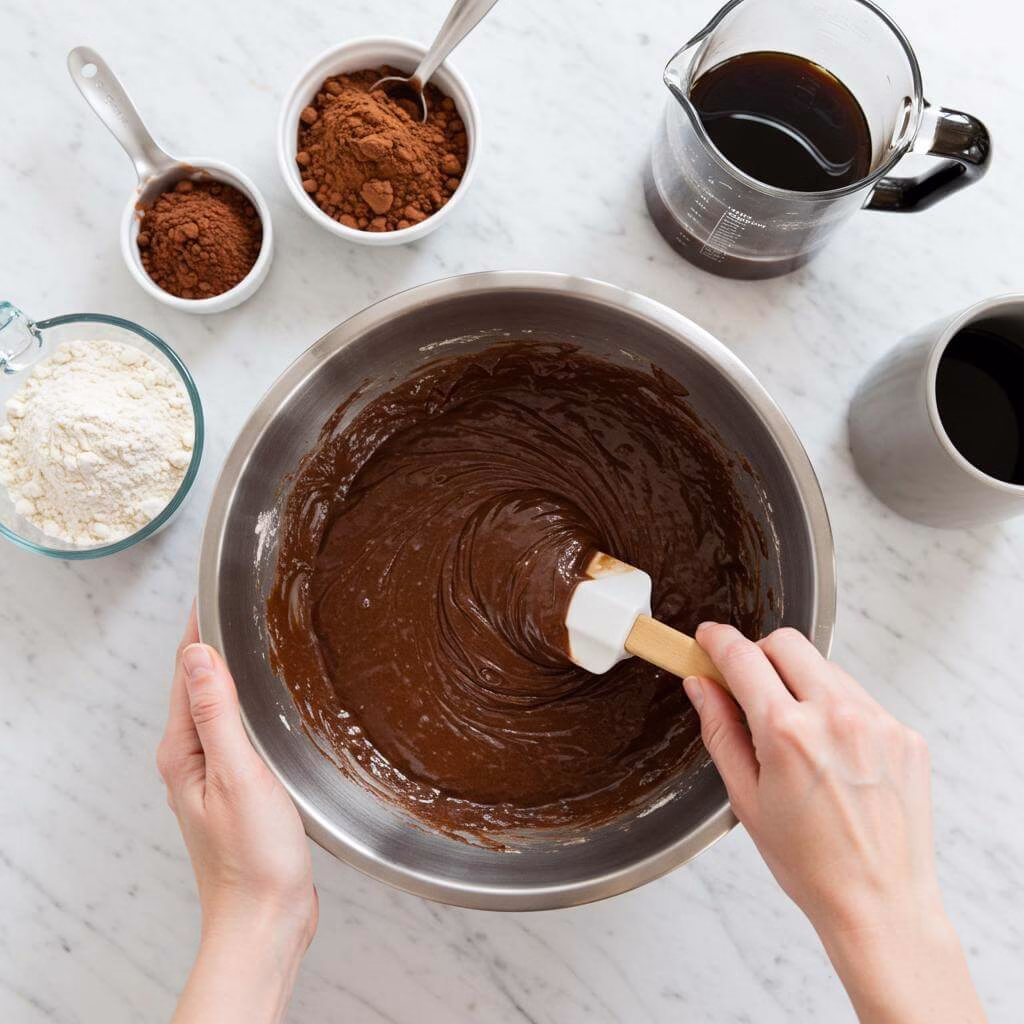
Prepare the frosting base: In a large bowl (stand mixer ideal), whisk together powdered sugar and unsweetened cocoa powder.
Add butter and hot water: Add softened butter to sugar/cocoa. Pour in boiling water. Beat until smooth and creamy.
Add melted chocolate: Pour in melted dark chocolate, blend until smooth and fully incorporated. Taste and add a pinch of salt if desired.
Chill the frosting: Cover bowl and refrigerate frosting for about to firm up.
Assemble the first layers: Place one cooled cake layer on serving plate. Ladle ⅓ to ½ cup cooled caramel onto layer, spread evenly.
Add the second layer and caramel: Place second cake layer on top. Gently press. Repeat caramel step with another ⅓ to ½ cup caramel.
Add the final layer and chill: Place third cake layer on top. Refrigerate for , or freeze for to stabilize.
Frost the cake: Remove chilled cake. Use an offset spatula to apply fudge frosting to top and sides, smoothing as desired.
Serve and enjoy: Serve cake at room temperature. If refrigerated after frosting, let sit out for before slicing.
Recipe Notes
- You might have leftover caramel – it’s wonderful warmed slightly and spooned over ice cream!
- Most reliable cup-for-cup gluten free flour blends with xanthan gum should work. Measure carefully.
- Light corn syrup can substitute Lyle’s golden syrup.
- Neutral-flavored oils like grapeseed or sunflower oil can be used.
- Don’t skip refrigerating stacked cake layers before frosting; it makes frosting easier.
- If frosting is too thick, let it sit at room temp. If too thin, add more powdered sugar.
- Serve cake at room temperature for best texture and flavor.
- Cake stays moist at room temperature for up to 3 days. Avoid refrigerating after assembly to prevent caramel hardening.
Nutrition (per serving)

My #1 Recommendation
KitchenAid Classic Series 4.5 Quart Tilt-Head Stand Mixer K45SS, Onyx Black
(10815 reviews)
As an Amazon Associate, I earn from qualifying purchases. This helps support the blog at no extra cost to you.
Enjoyed This Gluten-Free Chocolate Caramel Cake? Want More Baking Wins?
We know that creating delicious gluten-free treats like this cake can be incredibly rewarding. But what if you could confidently tackle *any* gluten-free baking challenge?
Unlock the Secrets with Our FREE “Gluten-Free Baking Substitutions Cheat Sheet”!
- ✔ Master ingredient swaps: Effortlessly replace common gluten-containing ingredients in any recipe.
- ✔ Achieve perfect textures: Say goodbye to dry, crumbly, or dense gluten-free bakes for good!
- ✔ Bake with confidence: Save time, reduce waste, and enjoy consistently delicious results.
- ✔ Expand your baking repertoire: Adapt your old favorite recipes to be wonderfully gluten-free.
As your fellow gluten-free friends, we created this Recipes to make your baking journey easier and more joyful. No more guesswork, just delicious success!
Get Your FREE Baking Cookbooks!
We respect your privacy and promise to only send helpful gluten-free tips, recipes, and resources. No spam, ever.