The air outside is crisp, maybe even a little snowy, and the sound of carols is starting to drift through the house. For me, certain flavors just scream ‘holiday season,’ and right near the top of that list is the magical pairing of chocolate and peppermint. There’s something so utterly comforting about that cool blast of peppermint mixed with rich cocoa. But let’s be honest, finding a truly spectacular holiday dessert that’s also genuinely gluten free can sometimes feel like searching for a hidden present under a pile of wrapping paper, right? That’s why I got into the kitchen determined to create something truly special. I wanted a showstopper, a center-of-the-table kind of treat. And friends, I did it! I created the most decadent, perfectly balanced gluten free chocolate peppermint cake you could ever hope for. This isn’t just *any* cake; it’s *the* cake that will make you forget it’s gluten-free. The crumb is just right, the chocolate is deep and satisfying, and the peppermint is bright without being overpowering. It’s everything you want in a festive bake. Whether you’re serving it for Christmas dinner or just enjoying a slice with a cup of tea, this gluten free chocolate peppermint cake is pure holiday joy. If you loved my fudgy gluten free brownies or classic gluten free gingerbread men, get ready to add this incredible gluten free chocolate peppermint cake to your holiday baking rotation. Making a truly delicious gluten free chocolate peppermint cake requires the right balance. Trust me, making this gluten free chocolate peppermint cake will fill your home with the most wonderful aromas! This amazing gluten free chocolate peppermint cake recipe is simple enough for anyone to tackle.
Tips for Recipe Success
- Spoon and Level Your Flour: For accurate gluten-free baking, always spoon your gluten-free all purpose baking flour into the measuring cup and level it off with a straight edge. Scooping directly can pack the flour, leading to adding too much and resulting in a dry cake.
- Ensure Your Gluten-Free Flour Blend Contains Xanthan Gum: Most gluten-free blends need xanthan gum to provide structure and elasticity that gluten provides. Using a blend without it, or not adding it separately, can result in a crumbly cake. The recipe recommends a blend with xanthan gum for best results with this gluten-free chocolate peppermint cake.
- Why Adding Boiling Water is Key: The boiling water isn’t just for mixing; it helps bloom the cocoa powder, intensifying the chocolate flavor and also adds moisture, contributing to a tender crumb in your gluten-free cake.
- Cool Completely Before Frosting: Patience is a virtue! Letting the cake layers cool fully on a wire rack before frosting is crucial. Attempting to frost a warm or even slightly warm cake will cause the buttercream to melt and slide off, ruining the finish.
Essential Equipment for This Recipe
To prepare this delicious recipe, you’ll need the following kitchen tools:
- Mixing Bowls – A set of various sized mixing bowls is essential for combining ingredients.
Find Mixing Bowls on Amazon - Measuring Cups and Spoons – Accurate measuring is key for baking success.
Find Measuring Cups and Spoons on Amazon - Baking Sheets – Perfect for even baking and crisp results.
Find Baking Sheets on Amazon - Whisks – Essential for beating air into mixtures and blending ingredients smoothly.
Find Whisks on Amazon - Spatulas – Ideal for folding, scraping, and mixing without scratching your bowls.
Find Spatulas on Amazon - Food Processors – For chopping, slicing, and pureeing ingredients quickly and efficiently.
Find Food Processors on Amazon - Saucepans – Needed for heating liquids, making sauces, or cooking small batches of ingredients.
Find Saucepans on Amazon - Chef’s Knives – A versatile knife for chopping, slicing, and dicing.
Find Chef’s Knives on Amazon - Cutting Boards – Provides a safe surface for cutting and chopping ingredients.
Find Cutting Boards on Amazon
Frequently Asked Questions About This Gluten Free Chocolate Peppermint Cake
Why is the batter so thin after adding the boiling water? Did I do something wrong?
Great question, and absolutely not! This is totally normal and exactly how the batter for this
Can I use a different gluten-free flour blend than Bob’s Red Mill?
Yes, you can! The most important thing is to use a
My peppermint buttercream is too thick/thin. How can I fix it?
This is a common issue with buttercream, but it’s easy to fix! If your frosting is too thick, add more milk a tiny splash at a time (like ½ teaspoon) and beat until smooth. If it’s too thin or runny, gradually beat in a tablespoon or two more powdered sugar until it reaches your desired frosting consistency. Keep beating until it’s smooth and spreadable!
Can I make this gluten free chocolate peppermint cake dairy-free? What about vegan?
You can absolutely make this cake dairy-free! Simply use a dairy-free milk alternative (like almond, soy, or oat milk) in both the cake batter and the frosting, and use dairy-free butter or a baking stick alternative for the frosting. Since the recipe only uses one egg, it’s also adaptable for vegan! You can substitute the egg with a flax egg (1 tbsp ground flaxseed + 3 tbsp water, let sit) or 3 tablespoons of applesauce, as mentioned in the ingredient swaps section. Just ensure all other ingredients (like chocolate chips if adding) are also vegan.
Can I bake this recipe in 8-inch pans or as cupcakes instead of 6-inch cake layers?
This recipe is specifically designed for two 6-inch layers, but you can definitely adapt it! If using 8-inch pans, the layers will be thinner, and the baking time will be shorter (start checking around 25-30 minutes). You might even need to halve the recipe depending on how thin you want them. However, this recipe works wonderfully as **cupcakes**! Follow the same instructions but pour the batter into a lined 12-cup muffin tin. Bake for about 20-25 minutes, or until a toothpick comes out clean. Let them cool completely before frosting, just like the cake layers!
How important is it to let the cake layers cool completely before frosting?
It’s really, really important! Frosting warm or even slightly warm cake layers is a recipe for disaster. The heat from the cake will melt the butter in your buttercream, causing the frosting to slide right off and become a sticky mess. Patience is key here! Let them cool in the pans for the initial 15 minutes, flip onto the wire rack, and then wait until they are completely cooled to the touch before adding any frosting. This might take an hour or more depending on your kitchen temperature.
How should I store this gluten free chocolate peppermint cake, and can I make it ahead?
Once frosted, store the cake covered with a cake dome or foil at room temperature for 3-5 days. For longer storage or in warmer climates, the fridge is a good option. If you slice it, placing parchment paper or plastic wrap directly onto the cut side helps prevent it from drying out. And yes, you can totally make the cake layers ahead of time! Once baked and completely cooled, wrap each layer tightly in plastic wrap and store them in the freezer. You can even frost the layers while they’re still frozen – they’ll continue to thaw as you frost and decorate!
Gluten-Free Chocolate Peppermint Cake
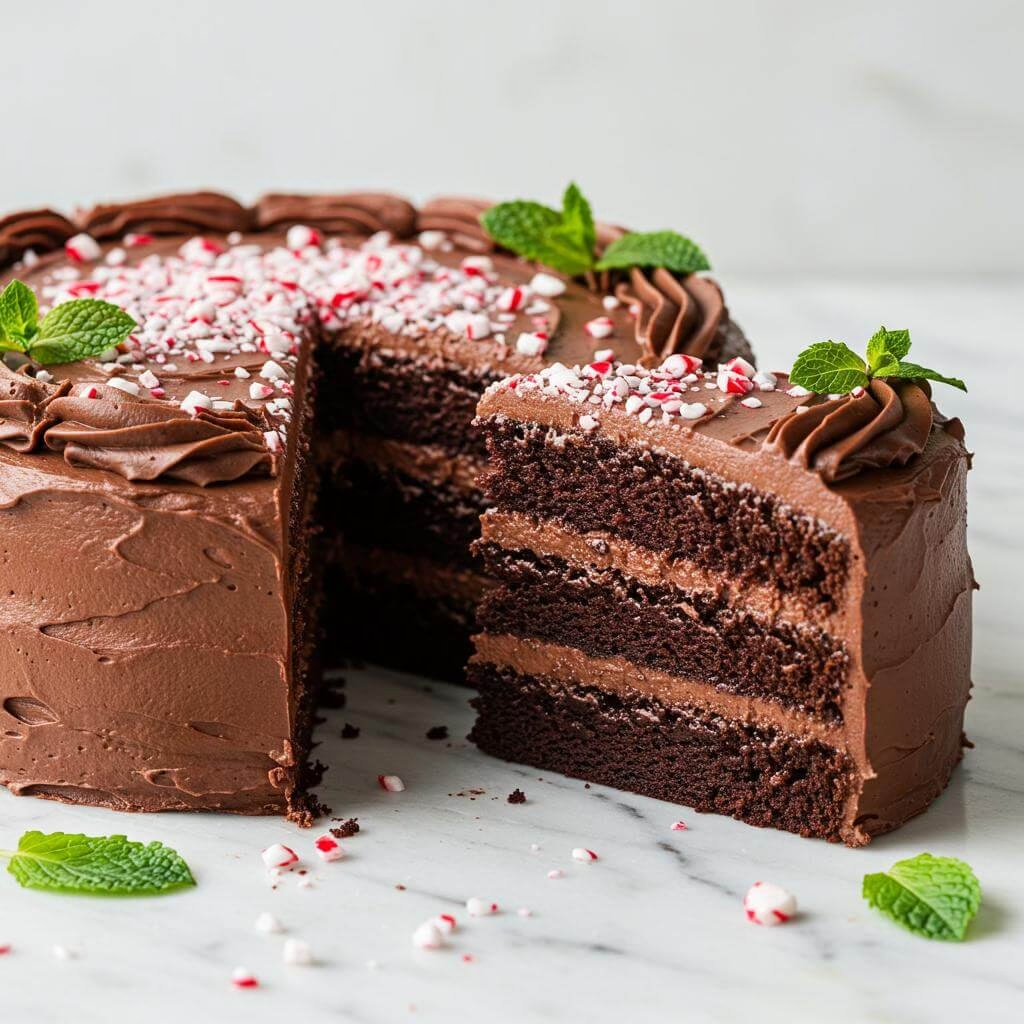
Gluten-Free Chocolate Peppermint Cake
This isn’t just *any* cake; it’s *the* cake that will make you forget it’s gluten-free. The crumb is just right, the chocolate is deep and satisfying, and the peppermint is bright without being overpowering. It’s everything you want in a festive bake.
Ingredients
10
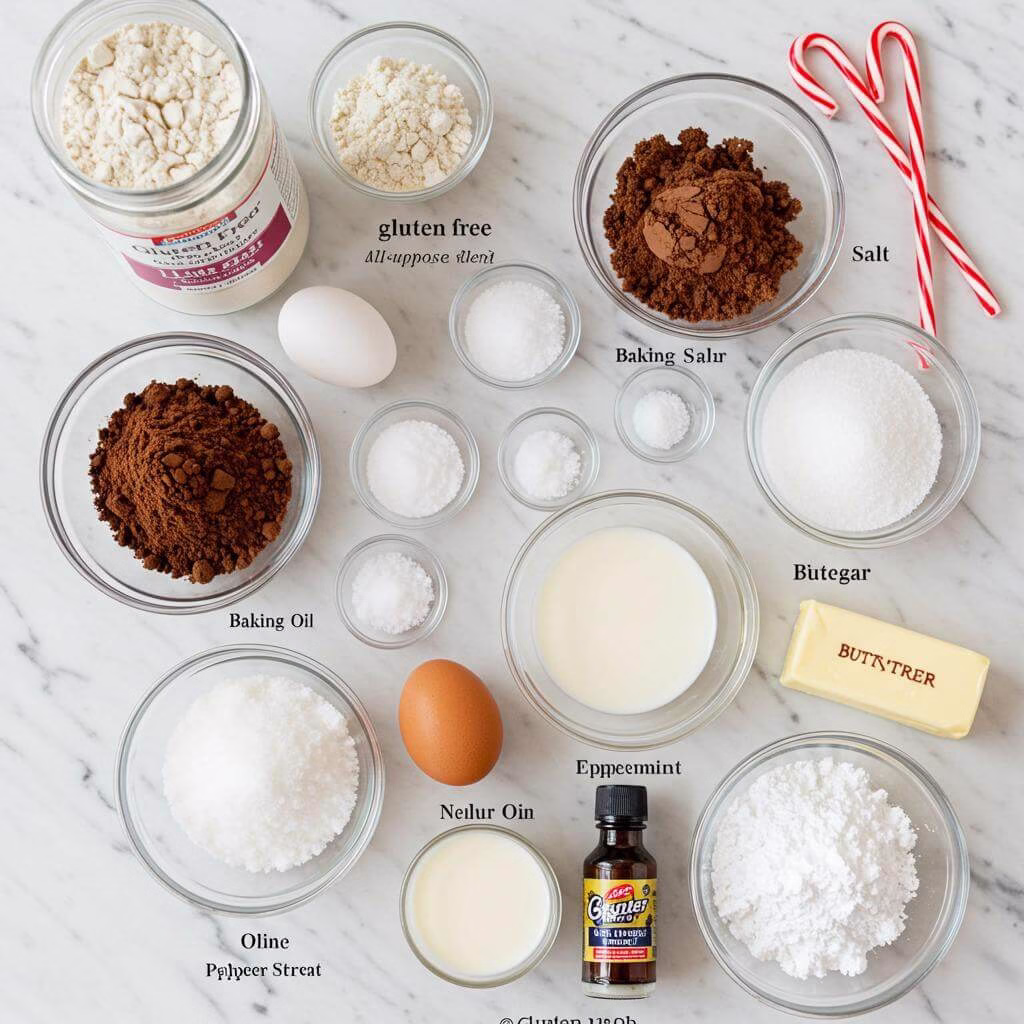
- ½ cup neutral-flavored oil (e.g., refined avocado, vegetable)
- ¾ cup white sugar
- ⅓ cup brown sugar
- 1 egg
- ½ cup milk (dairy or non-dairy)
- 2 teaspoons vanilla extract
- 1 teaspoon vinegar
- ½ teaspoon peppermint extract
- ½ cup boiling water
- 1 ½ cups gluten free all purpose baking flour (1:1 blend with xanthan gum recommended)
- ½ cup unsweetened cocoa powder
- ½ teaspoon baking soda
- ¼ teaspoon salt
- For the Peppermint Buttercream:
- ¾ cup butter (room temperature)
- 3 cups powdered sugar (sifted recommended)
- 2 tablespoons milk
- ½ teaspoon peppermint extract
- Pinch of salt
Equipment
- Two 6-inch cake pans
- Parchment paper / 6-inch rounds
- Medium-sized mixing bowl
- Whisk
- Measuring cups and spoons
- Wire cooling rack
- Electric mixer (hand or stand)
- Mixing bowl (for frosting)
- Spatula
- Offset spatula
- Serving plate or cake stand
Instructions
Prepare for Baking! Start by preheating your oven to 350 degrees Fahrenheit (175 degrees Celsius). Line the bottoms of each of two 6-inch cake pans with parchment paper. Set aside.
Wet Ingredients First! In a medium-sized mixing bowl, whisk together oil, white sugar, brown sugar, egg, milk, vanilla extract, vinegar, and peppermint extract until well combined and sugar starts to dissolve.
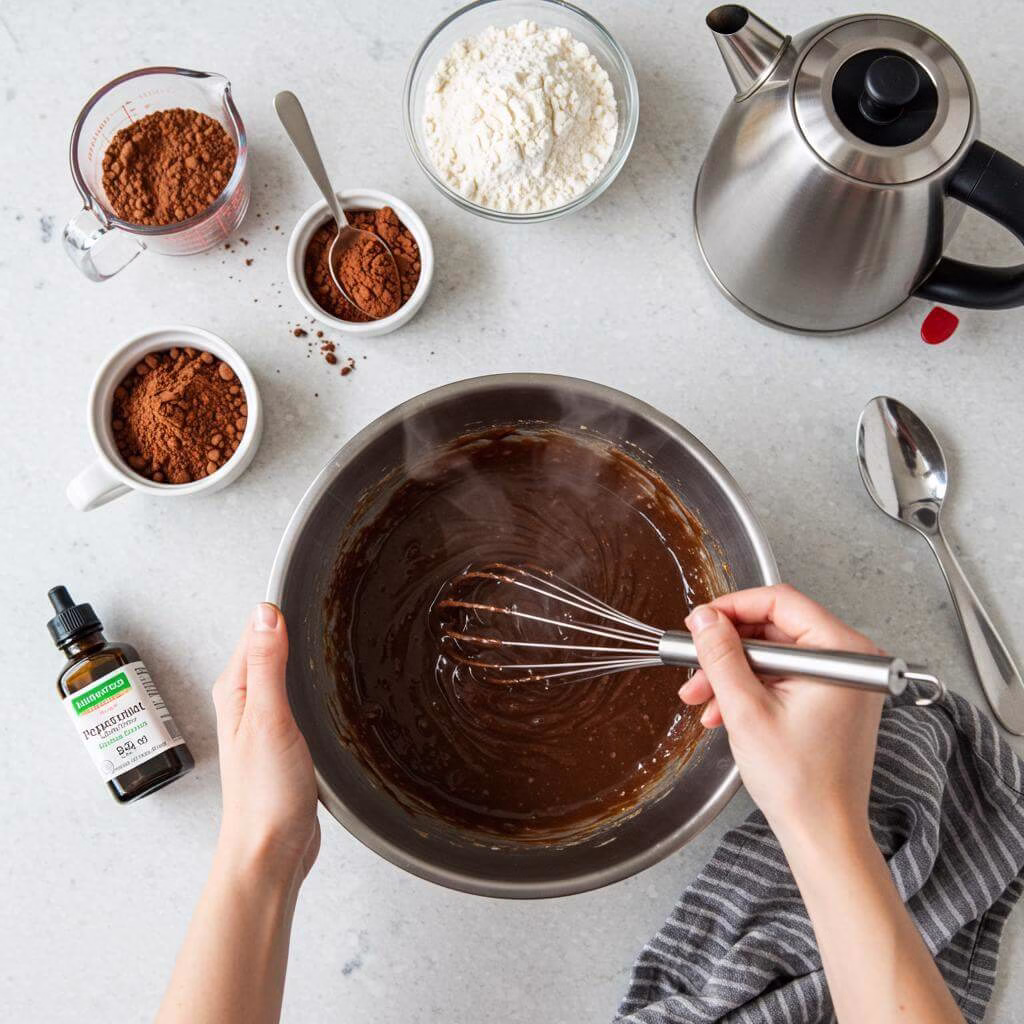
Add the Dry Goodness! Carefully add the gluten free all purpose baking flour, cocoa powder, baking soda, and salt to the wet mixture. Use the spoon and level method for flour and cocoa. Gently whisk until just combined. Do not overmix.
The Boiling Water Magic! Whisk in the ½ cup of boiling water. The batter will become very thin; this is correct. Whisk until smoothly combined.
Into the Pans! Carefully pour the batter evenly into your two prepared 6-inch cake pans.
Time to Bake! Place pans in the preheated oven. , or until a toothpick inserted into the center comes out clean. Start checking around 40 minutes.
Cooling Patience! Remove cakes from oven. Allow them to cool in pans on a wire cooling rack for . Then, gently flip cakes out onto the rack, then flip back over (top-side up). Let cool completely.
Whip Up the Frosting! While cakes cool, beat softened room temperature butter in a mixing bowl with an electric mixer for until light and fluffy.
Add Frosting Goodies! Slowly add powdered sugar (about 1 cup at a time), beating well after each addition. Scrape down sides of bowl. Beat in milk, ½ tsp peppermint extract, and pinch of salt until smooth and creamy. Adjust consistency with more milk (if too thick) or powdered sugar (if too thin).
Taste and Adjust! Taste the buttercream and adjust peppermint flavor if desired.
Assemble and Decorate! Once cake layers are completely cool, place one layer top-side up on a serving plate. Spread a generous layer of buttercream on top. Place second cake layer on top. Frost top and sides of cake with an offset spatula.
Finishing Touches! Sprinkle crushed candy canes over the top and/or around the base.
Recipe Notes
- Flour: Use a good quality gluten-free 1:1 baking flour blend that contains xanthan gum.
- Egg-free: For 1 egg, use a flax egg (1 tbsp ground flaxseed + 3 tbsp water, let sit to thicken) or 3 tbsp applesauce.
- Cupcakes: Recipe makes about 12 cupcakes. Bake in lined tins for 20-25 minutes, checking with a toothpick.
- Decoration: Sprinkle with crushed gluten-free candy canes for extra crunch and flavor.
- Flavor Boost: Fold in a handful of gluten-free mini chocolate chips or mint chocolate chips into the batter. Or, replace 1-2 tablespoons of the boiling water with hot brewed coffee for richer chocolate flavor.
Nutrition (per serving)

My #1 Recommendation
KitchenAid Classic Series 4.5 Quart Tilt-Head Stand Mixer K45SS, Onyx Black
(10807 reviews)
Make your gluten-free baking a breeze with the iconic KitchenAid Classic Series Stand Mixer. Its powerful performance and versatile attachments handle everything from delicate meringues to dense gluten-free doughs, ensuring consistent results every time. A must-have for any serious gluten-free kitchen!
- 4.5-Quart Stainless Steel Bowl: Perfect capacity for whipping up batches of gluten-free cookies, cakes, or bread.
- Tilt-Head Design: Allows clear access to the bowl and attached beater or accessory, making it easy to add ingredients.
- 10-Speed Control: Offers versatility from a slow stir to a fast whip, ideal for various gluten-free recipes.
As an Amazon Associate, I earn from qualifying purchases. This helps support the blog at no extra cost to you.
Loved This Gluten Free Chocolate Peppermint Cake? Ready to Conquer ALL Gluten-Free Baking?
Making a stunning holiday cake like this is a triumph! But if you’ve ever felt stuck trying to convert other recipes or wished for a simple guide to gluten-free baking swaps, you’re not alone, fellow gluten-free friends!
Unlock Stress-Free Baking with Our FREE ‘Gluten-Free Baking Substitutions Cheat Sheet’!
Stop the guesswork and start baking with confidence! This handy cheat sheet will help you:
- Instantly find reliable swaps for common gluten-containing ingredients like flour, eggs, and dairy.
- Achieve the perfect texture in your gluten-free cakes, cookies, and breads – no more crumbly disasters!
- Save time and money by avoiding common baking mistakes and wasted ingredients.
- Confidently adapt your favorite traditional recipes to be deliciously and safely gluten-free.
We get it – gluten-free baking can feel like a science experiment sometimes! This cheat sheet is designed to be your trusted kitchen companion, making your baking adventures easier and much more enjoyable.
Your email is safe with us! We’ll only send you genuinely helpful gluten-free recipes, tips, and resources. No spam, ever.