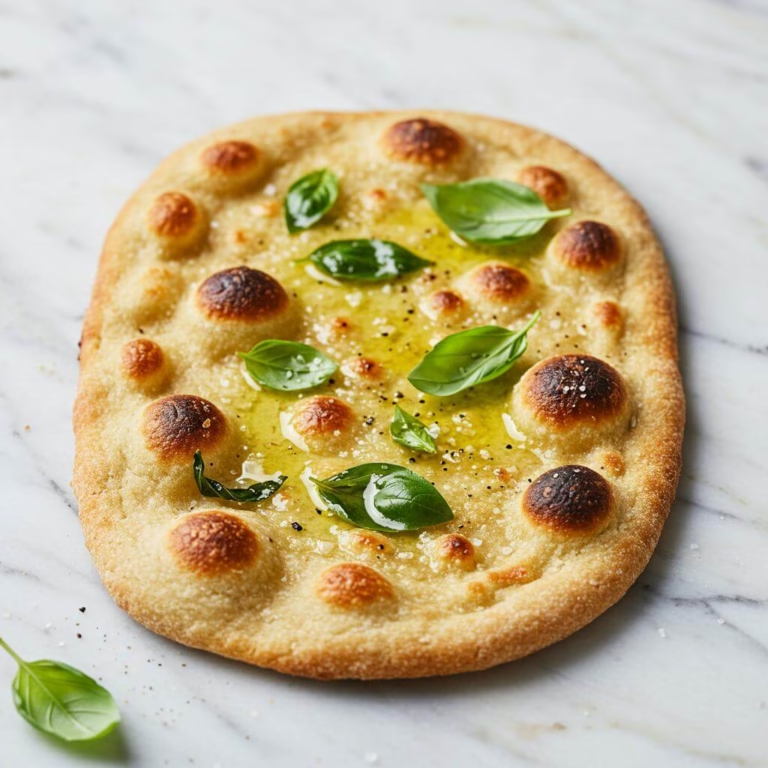
Chickpea Pizza Crust: Easiest Gluten-Free Recipe EVER!
Craving that perfect pizza night but need to keep it gluten-free? We get it! Finding a pizza crust that’s both delicious and meets your dietary needs can feel like a quest. But what if we told you that a wonderfully simple, protein-packed, and completely gluten-free pizza base is just minutes away? Get ready to welcome this amazing chickpea pizza crust into your life! It’s a game-changer for anyone looking for an easy and satisfying meal, and it’s so good, you’ll want pizza every night. If you’re exploring more easy gluten-free options, you might also love our incredibly simple 3-Ingredient Peanut Butter Cookies for a quick treat!
This chickpea pizza crust is a true gem. Made with just a handful of simple ingredients – primarily chickpea flour, tapioca starch, and your favorite dried herbs (plus water and salt) – it bakes up quickly and boasts a fantastic texture that won’t fall apart. It’s the perfect hearty canvas for all your favorite toppings, transforming your pizza dreams into a delicious, filling, and versatile reality. Plus, it’s naturally vegan!
Why This Chickpea Pizza Crust Will Become a Favorite
There are so many reasons to adore this recipe, especially when you’re navigating a gluten-free lifestyle:
- Incredibly Easy & Quick: With just 5 main ingredients, you mix, pour, and bake. It’s perfect even if you’re new to gluten-free baking or just want a no-fuss meal. This chickpea pizza crust makes homemade pizza accessible to everyone!
- Packed with Protein: Thanks to the goodness of chickpea flour, this crust is wonderfully filling and satisfying, keeping you energized long after your meal.
- Lower in Carbs: Compared to traditional pizza doughs, this chickpea pizza crust offers a lighter alternative without skimping on flavor, making it a guilt-free pleasure.
- Naturally Gluten-Free & Vegan: Enjoy pizza night without a worry! This recipe is inherently free from gluten and animal products, catering to various dietary needs. If you’re looking for more inspiration for gluten-free staples that can be adapted, check out our Gluten-Free Cornbread Recipe.
One serving (half of a 10-inch pizza) also provides a good 5 grams of fiber, contributing to a wholesome meal.
Understanding Chickpea Flour for Your Gluten-Free Needs
So, what exactly is this star ingredient? Chickpea flour, also known as gram flour, besan, or garbanzo bean flour, is a fantastic gluten-free powerhouse made from finely ground whole chickpeas.
Beyond being a safe choice for those avoiding gluten, it’s an excellent source of plant-based protein (around 21 grams per cup!) and is naturally rich in dietary fiber. This makes your chickpea pizza crust not just tasty but also nourishing.
Chickpea flour also brings along essential vitamins and minerals, adding a nutritional boost that many traditional pizza crusts lack. It has a subtly nutty, earthy flavor that beautifully complements common pizza toppings like tomato sauce, herbs such as oregano and basil, and your favorite (vegan) cheese. This makes it an irresistible foundation for your gluten-free pizza creations. If you enjoy experimenting with different gluten-free flours, you might also like our Coconut Flour Pancakes, which showcase another versatile option.
Key Ingredients for Your Chickpea Pizza Crust
Simplicity is key with this recipe. Here’s what you’ll need:
- Chickpea Flour: The heart of our chickpea pizza crust, providing structure, a pleasant nutty taste, and a wonderful texture. It’s readily available in most grocery stores, often in the international aisle or with other gluten-free flours. (Please note: this recipe is specifically developed for chickpea flour and substitutions with almond or oat flour are not recommended for this particular crust.)
- Tapioca Starch: This gluten-free starch (also called tapioca flour) acts as a binder, helping to hold the dough together and giving the baked crust a desirable pliable, slightly chewy texture. If you need an alternative, ground flax or chia seeds can be used, though the texture will be slightly different.
- Dried Mixed Herbs (Optional): A touch of oregano, basil, parsley, or your favorite Italian blend elevates the flavor. Quality herbs make a difference!
- Olive Oil & Salt: Salt enhances the flavors, while olive oil helps create a delightfully crispy edge when heated in the pan.
- Your Favorite Toppings: This is where you get creative! Classic tomato sauce, (vegan) mozzarella, fresh basil, mushrooms, peppers, olives – the sky’s the limit for your personalized chickpea pizza crust masterpiece.
Why This Chickpea Pizza Crust Recipe Works So Well
Discovering delicious, reliable gluten-free recipes can feel like hitting the jackpot, especially when it comes to comfort food classics like pizza! This easy chickpea pizza crust is a true winner for anyone embracing a gluten-free lifestyle, offering a delightful alternative that doesn’t compromise on flavor or satisfaction. But what makes this particular chickpea pizza crust stand out?
The genius lies in its simplicity and the power of its key ingredients. Unlike many gluten-free crusts that rely on complex flour blends and binders, this recipe harnesses the natural capabilities of chickpea flour. Chickpea flour, also known as besan or garbanzo bean flour, isn’t just a gluten-free substitute; it brings its own unique qualities to the table. It provides a sturdy, hearty base structure without the need for wheat flour’s gluten network. Plus, it imparts a subtle, earthy, and slightly nutty flavor that pairs beautifully with traditional pizza toppings, adding depth that white flour simply can’t match.
To ensure this simple chickpea pizza crust holds together and achieves the right texture, a small amount of tapioca starch is included. Tapioca starch acts as a binder, helping to create a cohesive batter that bakes into a crust that is firm enough to hold your favorite toppings without crumbling – a common hurdle in gluten-free baking! If tapioca isn’t your preference, the recipe offers the smart substitution of ground flax or chia seeds, which also provide binding power thanks to their mucilaginous properties when combined with water. This binding is key to getting a slice that you can actually pick up and enjoy!
The method itself is also crucial to the success of this chickpea pizza crust. Using a hot pan, especially cast iron with a little oil, isn’t just a suggestion; it’s a technique that helps create a wonderfully crispy exterior. This contrast between the crispy bottom and the naturally dense and satisfying interior is one reason this gluten-free chickpea pizza crust is so enjoyable.
Chickpea flour also packs a nutritional punch often missing in traditional pizza crusts. It’s high in protein and fiber, meaning this pizza crust isn’t just a tasty vehicle for toppings; it’s genuinely filling and contributes to a more balanced meal. This is a huge plus for anyone managing their diet while navigating gluten-free options.
Ultimately, this chickpea pizza crust recipe works because it’s designed with the unique properties of its gluten-free ingredients in mind. It leverages the natural binding and flavoring capabilities of chickpea flour and tapioca (or flax/chia) to create a reliable, delicious, and easy-to-make base that empowers you to enjoy pizza night whenever the craving strikes, completely gluten-free. Give this chickpea pizza crust a try – you might just find it becomes your new go-to!

🎁 33 Gluten-Free Breakfasts
Start every day with a smile and flavor. Get our FREE recipe eBook!

Making Your Delicious Chickpea Pizza Crust: Step-by-Step
Ready to create the easiest, most satisfying gluten-free pizza base ever? Follow these simple steps to whip up your very own protein-packed chickpea pizza crust. You’ll be amazed at how quickly it comes together!
- Prepare for Baking: Start by preheating your oven to 400°F (205°C). If you’re using a cast iron pan for that extra crispy bottom (highly recommended!), add 1 tablespoon of olive oil to it and place the pan carefully in the preheating oven to get nice and hot. If you don’t have a cast iron pan or prefer to go oil-free, simply line a large baking sheet with parchment paper instead. This simple chickpea pizza crust accommodates both methods!
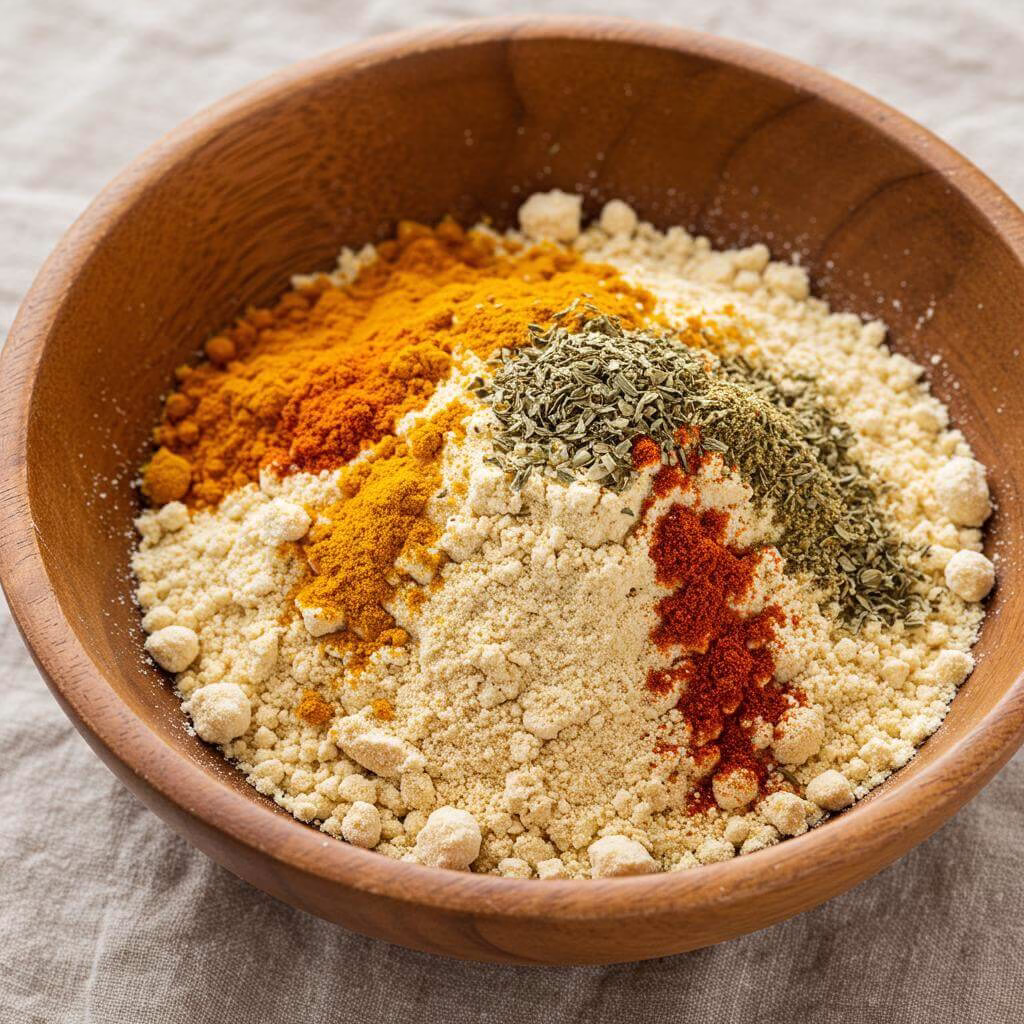
- Combine Dry Ingredients: In a mixing bowl, whisk together the dry ingredients: the chickpea flour (this is the star of our gluten-free show!), tapioca starch (which helps with binding and pliability – see note below for a tapioca-free option), dried mixed herbs (optional, but they add lovely flavour!), and sea salt to taste. Give it a good whisk to ensure everything is evenly distributed.*Tapioca-Free Note: If you prefer not to use tapioca starch, simply substitute it with 2 tablespoons of either ground flaxseed or chia seeds. The texture of your chickpea flour pizza crust will be slightly less pliable, but still delicious!
- Add Water Slowly: Now, it’s time to add the water. This is a key step for a smooth batter! Add the ¾ cup of water gradually, about ¼ cup at a time, whisking very thoroughly after each addition. Keep whisking until no lumps remain before adding the next portion of water. Once all the water is incorporated, set the mixture aside for just 5 minutes. This resting time allows the batter to thicken slightly, although it will still be quite runny. This careful mixing helps ensure a smooth base for your chickpea pizza crust.*Tip for No Lumps: Patience is your friend here! Adding the water slowly and whisking well after each small addition is the secret to avoiding a lumpy batter.
- Pour and Spread: Carefully remove the hot cast iron pan from the oven (use oven mitts!). Pour the prepared chickpea batter evenly into the pan, swirling or tilting it slightly so it covers the entire surface in a thin layer. If you’re using the baking sheet method, pour the batter onto the parchment paper and use the back of a spoon to gently spread it out into a rough circle or rectangle, about 5mm thick. Getting the pan hot first (or using oil in the pan) helps this gluten-free crust crisp up beautifully!
- Initial Bake: Place the pan or baking sheet back into the preheated oven. Bake the plain pizza crust for approximately 8 minutes. You want the crust to be firm to the touch but not yet golden brown. This initial bake sets the base for your toppings.
- Add Your Toppings: Carefully remove the partially baked chickpea flour pizza base from the oven. Now for the fun part! Spread a layer of your favourite pizza sauce evenly over the crust. Scatter your chosen gluten-free cheese (like a delicious vegan mozzarella!) over the sauce, then add your desired toppings. Think fresh tomato slices, mushrooms, olives, spinach, bell peppers – whatever makes your heart happy! This hearty chickpea pizza crust holds up well to lots of yummy additions.
- Final Bake: Return the topped pizza to the oven. Bake for another 7-10 minutes, or until the cheese is melted and bubbly, and your delicious toppings are cooked through. The edge of the chickpea pizza crust should be golden and crispy.
- Serve and Enjoy: Once baked to perfection, carefully remove the pizza from the oven. For a finishing touch, scatter fresh basil leaves over the top if you like. Slice, serve warm, and savour every bite of your homemade, gluten-free chickpea crust pizza!
That’s it! You’ve successfully made a delightful easy gluten-free pizza crust using simple chickpea flour. Enjoy your pizza night!
Frequently Asked Questions
Can I substitute other flours like almond or oat flour for the chickpea flour?
This recipe is specifically developed to work with chickpea flour. We don’t recommend substituting it with other types like almond or oat flour, as it will likely change the texture and structure significantly.
What if I don’t have tapioca starch? Are there any substitutions?
Absolutely! If you prefer not to use tapioca starch, you can substitute it with 2 tablespoons of ground flaxseed or chia seeds instead. Keep in mind that this might result in a slightly less pliable texture compared to using tapioca, but it will still create a delicious crust.
Does this chickpea pizza crust taste and feel exactly like traditional wheat pizza crust?
This chickpea crust has its own wonderful qualities! It tends to be a bit denser and more filling than traditional yeast-based wheat crusts. Since it’s made without yeast, it’s also less airy. It offers a unique, satisfying texture and a subtle nutty flavour from the chickpea flour that pairs beautifully with pizza toppings.
How should I store leftover chickpea pizza, and what’s the best way to reheat it?
Leftovers of this chickpea pizza crust (with toppings) can be stored in an airtight container in the refrigerator for up to 3 days. For easy reheating, it’s best to cut the pizza into slices before storing, perhaps placing parchment paper between layers if stacking. To reheat, simply arrange the slices on a baking tray and warm them in the oven at 375°F (190°C) for about 5-8 minutes, or until heated through. It’s definitely best enjoyed warm!
Is it necessary to use a cast iron pan for this recipe?
While a hot cast iron pan with oil can help give the crust an extra crispy bottom and speed up cooking, it’s not strictly necessary! If you don’t have one, or if you prefer an oil-free method, you can easily use a standard baking sheet lined with parchment paper instead. Just follow the instructions provided in the recipe steps for the baking sheet method.
“`
Tips for Perfect Results
Making a delicious, sturdy, gluten-free pizza crust is totally achievable! This simple chickpea pizza crust recipe is forgiving, but a few expert tips will help you get that perfect texture and flavour every time. Here’s how to ensure your chickpea flour crust is a success:
- Mix Your Batter Smoothly: Chickpea flour can sometimes clump. As the recipe suggests, add the water gradually (a quarter cup at a time) and whisk thoroughly after each addition. This helps create a smooth batter, essential for an even pizza base. Don’t rush this step!
- Heat is Your Friend: Whether you’re using a cast iron pan or a baking sheet, make sure it’s properly preheated with the oil (if using). Starting your chickpea pizza crust on a hot surface is key to developing that desirable crispy edge that can sometimes be tricky with gluten-free bases.
- Pre-Bake the Base: The recipe calls for an initial bake of just the plain crust before adding toppings. Do not skip this step! It allows the chickpea flour base to set up enough to hold your delicious toppings without becoming soggy. It should be firm, but not necessarily browned yet.
- Stick to Chickpea Flour: This recipe is specifically designed for chickpea flour, which has unique binding properties. Substituting other gluten-free flours like almond or oat flour will likely result in a different texture and might not work as a direct swap. Embrace the wonderful qualities of chickpea flour for this chickpea crust pizza!
- Don’t Overload: While the chickpea pizza crust is quite sturdy, piling on too many heavy or wet toppings can still make the centre soft. Spread your sauce and toppings evenly and avoid excessive moisture for the best result.
A common mistake to avoid when making this chickpea pizza crust is trying to add all the water at once, which can leave you with stubborn lumps that are hard to whisk out.
Ingredients for Your Chickpea Pizza Crust
Creating a delicious, naturally gluten-free chickpea pizza crust is simpler than you might think! This recipe uses minimal ingredients, focusing on the power of chickpea flour to create a sturdy and satisfying base. Remember, we’re keeping the ingredient list exactly as written in the original recipe to help you follow along seamlessly.
Pizza Crust
You will need:
- 1 tablespoon olive oil
- 1 cup chickpea flour
- 2 tablespoon tapioca starch (can use ground flax instead if you’d prefer not to use tapioca)
- ½ tablespoon dried mixed herbs (optional)
- Sea salt to taste
Toppings – all optional (feel free to use your own)
Get creative with your favourite toppings! Here’s a suggestion:
- ½ cup tomato sauce
- ½-¾ cup your favourite mozzarella (I love making my own vegan mozzarella cheese)
- Tomato slices
- Any other desired toppings (mushrooms, olives, basil pesto, spinach and artichokes are all delicious on this pizza)
- Fresh basil leaves
Nutritional Spotlight: Why This Chickpea Pizza Crust is Great for Gluten-Free Living
Understanding what’s in your food is key, especially when navigating a gluten-free lifestyle. This chickpea pizza crust recipe offers a delicious way to enjoy pizza while providing some fantastic nutritional benefits.
For one serving (which is half of the 10-inch pizza), you can expect the following:
- Calories: 274kcal
- Carbohydrates: 35.8g
- Protein: 10.3g
- Fat: 10.1g
- Saturated Fat: 1.3g
- Sodium: 30mg
- Potassium: 399mg
- Fiber: 5.1g
- Sugar: 5g
- Calcium: 27mg
- Iron: 2mg
One of the standout benefits of this chickpea pizza crust comes from the main ingredient: chickpea flour. Chickpeas are naturally packed with plant-based protein and dietary fiber, which are crucial for keeping you feeling full and supporting digestive health.
Compared to traditional wheat-based pizza dough, this chickpea pizza crust often contains a lower glycemic load, meaning it may help prevent sharp spikes in blood sugar. Plus, it provides valuable vitamins and minerals like Iron and Potassium, contributing positively to your overall nutrient intake.
Enjoying this chickpea pizza crust means you don’t have to miss out on pizza night just because you’re gluten-free. It’s a wholesome base that supports your dietary needs while being utterly delicious!
Tips and Variations for Your Perfect Chickpea Pizza Crust
Making a great chickpea pizza crust is easy, and a few simple tips and variations can help you achieve the best results tailored to your needs and preferences.
Expert Tips for Success
- Avoid Lumpy Batter: The key to a smooth chickpea pizza crust batter is adding the water gradually. Pour in about ¼ cup at a time, and whisk thoroughly after each addition before adding more. This prevents lumps from forming, making for a much smoother crust.
- Hot Pan is Your Friend: Preheating your cast iron pan (or baking sheet if using) with the olive oil is crucial. This initial heat helps the chickpea pizza crust become wonderfully crispy on the bottom and ensures it cooks evenly and quickly.
- Topping Ideas: While the recipe provides suggestions, feel free to use any toppings you love! A classic combination of tomato sauce, fresh basil, mozzarella, and tomato slices is always a winner on a chickpea pizza crust.
Simple Variations
- Tapioca-Free Option: If you prefer to avoid tapioca starch, you can substitute it with 2 tablespoons of ground flax or chia seed instead. Note that this may result in a slightly less pliable texture compared to using tapioca, but it will still create a functional and tasty chickpea pizza crust.
- Oil-Free Method: For an oil-free version of this chickpea pizza crust, simply skip adding oil to the pan. Instead, line a standard large baking sheet with baking parchment paper before pouring the batter.
Storing and Reheating
Just like regular pizza, your cooked chickpea pizza crust (with or without toppings) can be stored in an airtight container in the refrigerator for up to 3 days. For easier reheating, consider cutting the pizza into slices before storing, placing parchment paper between layers if stacking.
To reheat, arrange slices on a baking tray and warm them in the oven at 375°F/190°C for about 5-8 minutes, or until heated through and the cheese is bubbly again. This chickpea pizza crust is definitely best enjoyed warm!
Essential Equipment for This Recipe
To prepare this delicious recipe, you’ll need the following kitchen tools:
- Mixing Bowls – A set of sturdy mixing bowls is essential for combining wet and dry ingredients.
Find Mixing Bowls on Amazon - Measuring Cups and Spoons – Accurate measurements are key to baking success!
Find Measuring Cups and Spoons on Amazon - Baking Sheets – Perfect for evenly baking your creations.
Find Baking Sheets on Amazon - Whisks – A whisk is ideal for blending liquids and creating fluffy mixtures.
Find Whisks on Amazon - Spatulas – Essential for folding ingredients and scraping bowls clean.
Find Spatulas on Amazon - Food Processors – A food processor can quickly chop, slice, and dice ingredients.
Find Food Processors on Amazon - Saucepans – A saucepan is perfect for heating liquids and making sauces.
Find Saucepans on Amazon - Chef’s Knives – A sharp chef’s knife is essential for all your chopping needs.
Find Chef’s Knives on Amazon - Cutting Boards – Protect your countertops with a durable cutting board.
Find Cutting Boards on Amazon