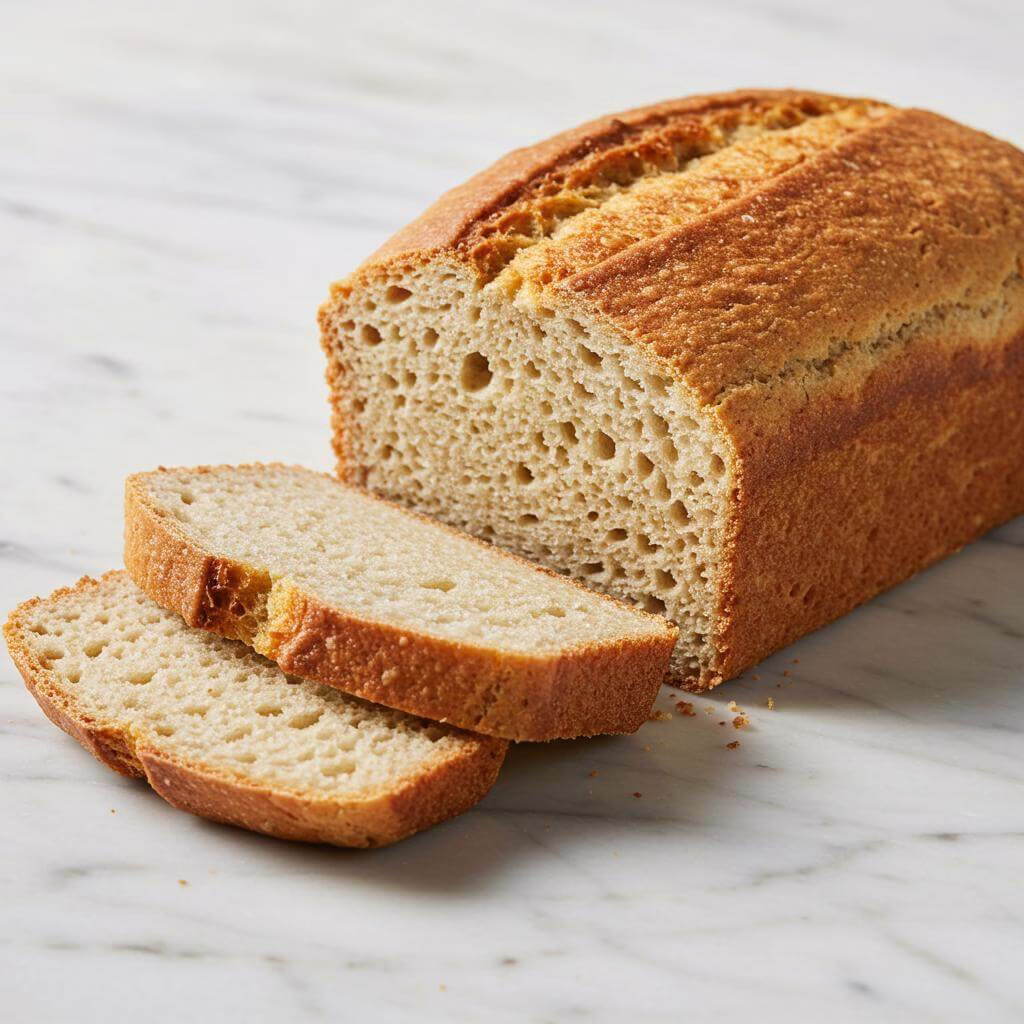
The Search for the Perfect Gluten-Free Bread Ends Here!
If you’ve been tirelessly searching for a truly soft, fluffy, and delicious gluten-free bread recipe that doesn’t crumble at the mere thought of a sandwich, your quest ends here! We understand the challenge: finding store-bought gluten-free bread that satisfies taste, texture, and versatility can feel impossible. But imagine pulling the most amazing gluten-free bread, perfect for sandwiches or toast, straight from your own oven with minimal fuss. This incredible oven-baked gluten-free bread recipe is about to become your kitchen staple, bringing back the simple joy of a satisfying slice.
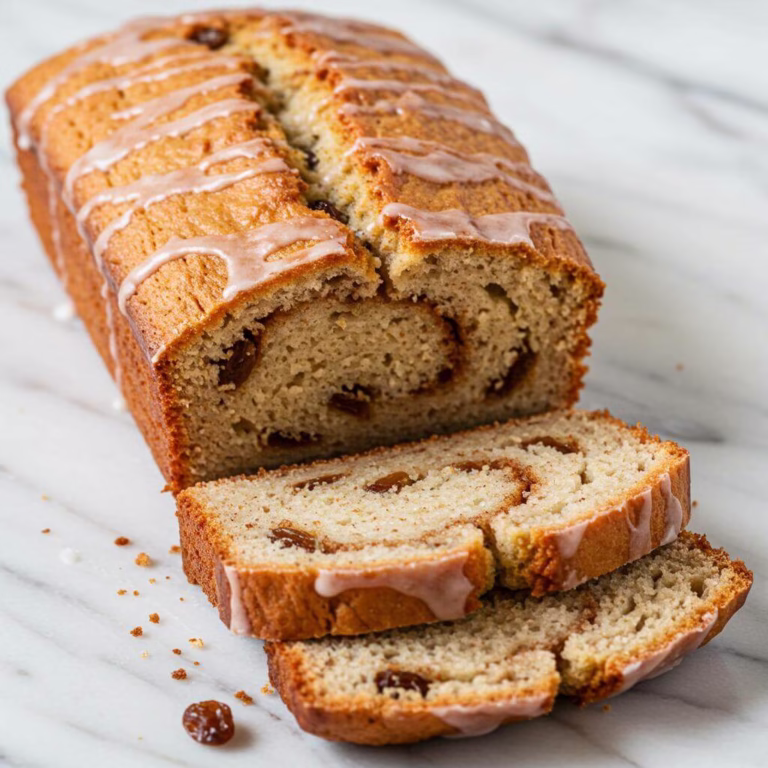
This isn’t just another gluten-free bread; it’s a game-changer, meticulously developed for those who crave genuine bread texture without the gluten. What makes this gluten-free bread recipe so special? It’s also completely dairy-free! We achieve fantastic moisture and a tender crumb using a simple mix of olive oil and warm water. The result is a yeast bread so soft it actually bends, with an amazing texture that’s easy to slice – say goodbye to crumbly sandwiches! It’s the kind of reliable, homemade goodness that brings delight to every gluten-free household. And while you’re in a baking mood, why not explore other favorites like our delightful Gluten-Free Banana Nut Muffins?
Embarking on a homemade gluten-free bread recipe might seem daunting, but we’ve designed this one for pure success. We’ll guide you with key gluten-free baking insights, like ensuring a warm spot for your dough to rise (some ovens even have a proofing mode!). Using the right pan, such as a smaller Pullman loaf pan, can help achieve that beautiful bakery-style height. Plus, accurately measuring your chosen gluten-free flour blend with the “spoon & level” method is crucial, as different blends can yield different results with yeast. With these pointers and this exceptional gluten-free bread recipe, you’ll soon be enjoying fragrant, golden loaves. For another versatile baked good, check out our much-loved Gluten-Free Dinner Rolls, perfect for any occasion.
Why This {Gluten-Free Bread Recipe} Works Like Magic!
Oh, the quest for the perfect slice of {gluten-free bread}! It can feel like searching for a unicorn sometimes, right? So many recipes promise soft centers and lovely crusts, but often deliver dense, crumbly loaves that fall apart the moment you look at them. That’s why discovering a {gluten-free bread recipe} that *truly* works is like striking gold! This particular recipe isn’t just good; it’s exceptional. Let’s dive into the brilliant science and clever technique behind why this {gluten-free bread recipe} delivers that dreamy, soft, and sliceable texture we all crave.
The Foundation: Choosing the Right Gluten-Free Flour Blend
Success in gluten-free baking often begins with the flour. This {gluten-free bread recipe} specifically mentions using a blend like Pillsbury gluten-free flour and importantly, cautions against others like Bob’s Red Mill 1:1 or King Arthur Measure for Measure for *yeast* baking. This isn’t just brand preference; it’s about the blend’s composition. Gluten-free all-purpose blends are typically a mix of rice flour, tapioca starch, potato starch, and sometimes other flours or starches. The *ratio* of these ingredients significantly impacts how the dough behaves, especially when yeast is involved. Some blends are formulated primarily for baking powder/soda leavened goods (like cakes or muffins), where a strong elastic network isn’t needed. Yeast bread requires a blend that can support gas development without collapsing. A blend recommended or proven for yeast loaves provides the right balance of structure (from proteins in rice or other grains) and tenderness (from starches) to allow for a good rise and a soft crumb.
The Unsung Heroes: Binders and Leavening Working Together
Without gluten’s elastic network to trap the carbon dioxide gas produced by yeast, gluten-free dough needs help holding its shape and volume. This is where the dynamic duo of xanthan gum and baking powder comes in, alongside the instant yeast.
- Xanthan Gum: Often called the “gluten substitute,” xanthan gum is a hydrocolloid, meaning it forms a gel-like substance when hydrated. In this {gluten-free bread recipe}, it mimics gluten’s function by providing elasticity and viscosity to the dough. It creates a matrix that traps the gases released by the yeast and baking powder, allowing the bread to rise and maintain its structure during baking. The note to adjust if your flour blend already contains it is crucial – too much xanthan gum can make bread gummy. This recipe uses just the right amount for its specific flour blend.
- Instant Yeast: This is the primary driver of rise and provides that classic bread flavor through fermentation. Using instant yeast is easier as it can be mixed directly with the dry ingredients and doesn’t require initial proofing (though the finished dough still needs a rise). The recipe correctly emphasizes using warm water (100-110°F) to ensure the yeast is active and happy, producing plenty of gas.
- Gluten-Free Baking Powder: While yeast provides the main lift and fermentation flavor, baking powder acts as a backup or booster leavener. It reacts when moistened and heated, providing an extra puff during the initial stages of baking. This double leavening system helps ensure a lighter, airier crumb, counteracting the natural tendency for gluten-free doughs to be dense.
Moisture, Tenderness, and Structure: More Than Just Liquid!
Achieving a soft, moist crumb is key to a successful {gluten-free bread recipe}. This recipe uses a thoughtful combination of wet ingredients:
- Olive Oil & Warm Water: This powerful pair replaces traditional dairy milk or butter. Olive oil adds richness and tenderness, contributing to that soft texture. Warm water is essential for activating the yeast and hydrating the flour blend and xanthan gum, allowing them to form their necessary structure.
- Honey (or alternative): Beyond adding a touch of sweetness and aiding in crust browning, honey serves as food for the yeast, boosting its activity and ensuring a good rise.
- Apple Cider Vinegar: The addition of a small amount of acid might seem odd, but it plays a subtle yet supportive role. Acid can help tenderize the crumb by slightly breaking down proteins (like those in the egg whites) and can also react with baking soda (if present in the blend) or baking powder to enhance leavening. It can also positively impact flavor and crust color.
- Egg Whites: This is a brilliant inclusion for structure. Egg whites are mostly protein. When heated, these proteins coagulate, creating a firm yet delicate network that supports the bread’s structure after the initial rise. They help lift the dough and contribute to a lighter, less dense interior compared to using whole eggs or no eggs at all. Using them at room temperature, as the recipe suggests, helps them incorporate more smoothly and contributes to a better overall dough temperature for the yeast.
The Method Matters: Mixing and Proofing for Success
Unlike wheat bread, where kneading develops gluten, gluten-free dough doesn’t benefit from extensive manipulation. This recipe correctly treats the dough more like a thick batter, mixing it briefly with a paddle attachment. This ensures ingredients are well hydrated and distributed without overworking the delicate structure formed by the binders and egg whites. The specific, relatively short 30-minute proofing time is also key. Gluten-free doughs are more prone to collapsing if over-proofed because the structure provided by binders isn’t as robust as gluten’s. Rising until *just* doubled is the perfect cue to bake, capturing the gas while the structure is strong.
Baking & Cooling: The Final Touches
The recommendation for a Pullman loaf pan is excellent advice for any {gluten-free bread recipe} aiming for a classic sandwich loaf shape. These pans, often taller and narrower than standard pans, encourage the dough to rise upwards, producing a nicely shaped slice. Baking to the correct internal temperature (205-210°F) ensures the starches are fully gelatinized and the proteins set, guaranteeing a cooked-through, stable crumb. Finally, the instruction to cool the loaf on a rack immediately after a short time in the pan is critical. Trapped steam can make the bottom crust and crumb soggy. Cooling on a rack allows air circulation, letting steam escape, resulting in that desired soft yet stable texture throughout the loaf.
Effortless {Gluten-Free Bread Recipe} for Everyday Life
Putting it all together, the thoughtful selection of a suitable gluten-free flour blend, the strategic use of binders and dual leavening, the balance of moistening and structuring wet ingredients (including the clever use of egg whites and dairy substitutes), and the tailored mixing/proofing/baking methods all contribute to why this {gluten-free bread recipe} is such a winner. It truly overcomes the common hurdles of gluten-free baking, yielding a loaf that is soft, flexible, flavorful, and sturdy enough for slicing and enjoying in all the ways you love traditional bread. It seamlessly fits into a gluten-free lifestyle, proving that skipping gluten doesn’t mean skipping delicious, satisfying bread!
Transform Your Mornings with 33 FREE Gluten-Free Breakfasts!
Unlock delicious, easy-to-make recipes that will make you excited to start every single day. No more boring breakfasts, just pure flavor and joy!

Get Your FREE Breakfast Ebook Now!
(No credit card required. Instant download.)
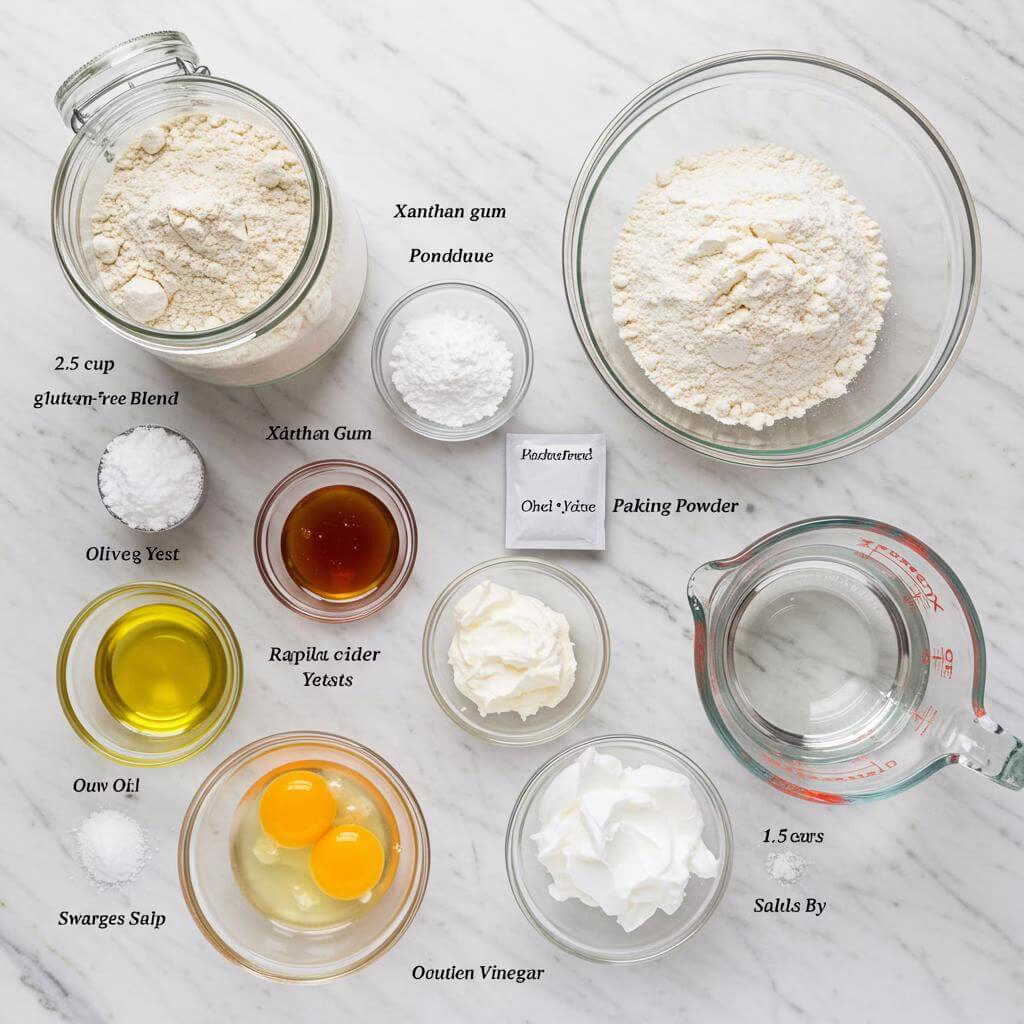
Ingredients for Your Perfect Gluten-Free Bread Recipe
Crafting this soft and delicious gluten-free bread comes down to a careful selection of ingredients. Each one plays a vital role in achieving that perfect texture and rise without gluten. Here’s what you’ll need:
-
- 2 1/2 cups all-purpose gluten-free flour blend
Choosing the right all-purpose gluten-free flour blend is crucial for a successful gluten-free bread recipe. These blends typically combine various flours (like rice, potato starch, tapioca starch) to mimic the structure building properties of wheat flour. Note that some blends, like Bob’s Red Mill 1:1 or King Arthur Measure for Measure, may not be ideally formulated for yeast baking according to their manufacturers, so check your package. A blend specifically designed for or suitable for yeast breads is often recommended for best results.
-
- 1 teaspoons xanthan gum (omit if your flour blend contains it)
Xanthan gum is a common additive in gluten-free baking. It acts as a binder and emulsifier, replacing the elasticity and structure that gluten provides. It helps prevent the dough from crumbling and gives gluten-free baked goods like this bread a better texture and crumb structure.
-
- 1 teaspoon gluten-free baking powder
Adding a little gluten-free baking powder provides an extra lift and tenderness to the crumb of this gluten-free bread recipe, working alongside the yeast for a light and airy loaf.
-
- 1 packet rapid rise/instant yeast* (2 1/4 teaspoons)
Rapid rise or instant yeast is fantastic for quick gluten-free bread recipes as it doesn’t require proofing beforehand and can be mixed directly with the dry ingredients. Ensuring your yeast is active (check the expiry date!) and using warm water is key for a good rise.
-
- 1/4 cup extra virgin olive oil
- 1/4 cup honey (or agave nectar or maple syrup)
- 1 teaspoon apple cider vinegar
- 1 1/2 cups warm water, 100-110°F
Warm water is essential to activate the rapid rise yeast. Make sure it’s not too hot (which can kill the yeast) or too cold (which won’t activate it).
-
- 3 large egg whites, at room temperature**
Using egg whites rather than whole eggs helps create a lighter texture in gluten-free bread. Ensuring they are at room temperature helps them incorporate better into the dough and can contribute to a better rise.
-
- 1 teaspoon salt
- Gluten-free cooking spray
A good gluten-free cooking spray ensures your beautiful loaf doesn’t stick to the pan.
*Using Fleischmann’s Rapid Rise Yeast is common for this specific recipe. This type of yeast is designed to be mixed directly with dry ingredients and helps produce a quick rise. Optimal water temperature is 100°–110°F for activation.
**Using room temperature ingredients, especially egg whites and water, is beneficial when working with yeast as it creates a more favorable environment for the yeast to activate and the ingredients to combine smoothly.
Nutritional Information
Understanding the nutritional profile of this gluten-free bread recipe can be helpful. Based on an automatic calculation for one serving:
- Serving: 1 serving
- Calories: 114 kcal
- Carbohydrates: 18g
- Protein: 3g
- Fat: 4g
- Saturated Fat: 0.5g
- Polyunsaturated Fat: 0.5g
- Monounsaturated Fat: 3g
- Sodium: 189mg
- Potassium: 18mg
- Fiber: 2g
- Sugar: 5g
- Vitamin C: 0.03mg
- Calcium: 29mg
- Iron: 1mg
This gluten-free bread recipe is also naturally dairy-free, making it suitable for those with dairy sensitivities or allergies. It offers a moderate amount of fiber and protein per serving. Please note that this nutritional information is automatically calculated and should be used as an approximation.
Substitutions, Variations, and Baking Tips for Your Gluten-Free Bread Recipe
Making a successful gluten-free bread recipe at home is rewarding! Here are some tips for success, potential substitutions, and ideas for variations:
Essential Baking Tips:
- Measuring Flour: Always use the “spoon and level” method for your gluten-free flour blend. Spoon the flour into your measuring cup and level off with a straight edge. Scooping directly from the bag can compress the flour, leading to too much dry ingredient and a dense loaf.
- Proofing Location: Yeast doughs, especially gluten-free ones, love warmth. A warm spot (around 100°F like an oven’s proofing setting) is ideal. Avoid drafty areas. Don’t over-proof; the dough should double in size, usually around 30 minutes for this rapid-rise gluten-free bread recipe.
- Pan Choice: For a tall, classic sandwich loaf shape, a 9-inch x 4-inch small Pullman loaf pan is highly recommended over a standard 9-inch x 5-inch loaf pan. The smaller size encourages the dough to rise upwards more effectively. Ensure your pan is well-greased with gluten-free cooking spray.
- Dough Consistency: Gluten-free bread dough is different from wheat dough. It will be quite wet and resemble a thick cake batter rather than a traditional kneadable dough. Use the paddle attachment on your stand mixer if using one, not a dough hook.
- Checking for Doneness: Your loaf should look golden brown on top. The most accurate way to tell if your gluten-free bread is baked through is to check its internal temperature with a food thermometer. It should register between 205-210ºF (96-99°C).
- Cooling is Crucial: Do not skip the cooling steps! Let the loaf cool in the pan for about 10 minutes, then transfer it completely onto a wire cooling rack to allow air circulation. Letting it cool completely before slicing (it needs several hours!) prevents a gummy texture inside.
- Slicing: Once fully cooled, use a serrated knife for clean slices without squishing your soft loaf.
Possible Substitutions:
- Sweetener: If you don’t have honey, you can easily substitute it with an equal amount of agave nectar or maple syrup as mentioned. Granulated sugar can also work, but the liquid sweeteners contribute to moisture.
- Egg Whites: Replacing egg whites in gluten-free yeast bread can be tricky. A commercial egg replacer designed for baking or a “flax egg” (1 tbsp ground flaxseed + 3 tbsp water, mixed and let sit 5-10 mins per egg white needed) might work, but results can vary significantly in yeast breads compared to quick breads. You might need to experiment.
- Oil: While olive oil is specified, other neutral-flavored oils like melted coconut oil (ensure it’s liquid), canola oil, or avocado oil could potentially be used, though the flavor profile might change slightly.
- Flour Blend: As noted above, the performance of gluten-free flour blends varies. If your blend already contains xanthan gum, omit the added gum. If using a new blend, be aware that minor adjustments to liquid might be needed, though it’s best to follow the recipe closely first.
Fun Variations:
- Seeded Loaf: Add 1-2 tablespoons of seeds (like poppy, sesame, sunflower, or flax) to the dry ingredients for added texture and nutrition in your gluten-free bread recipe.
- Herb Bread: Incorporate a teaspoon or two of dried Italian herbs or finely chopped fresh rosemary into the dough for a savory twist.
- Slightly Sweet Bread: Increase the sweetener slightly (another tablespoon) for a loaf that’s great for breakfast toast.
- Everything Bagel Seasoning: Sprinkle some everything bagel seasoning on top of the dough before baking for a flavorful crust.
Storage:
Once completely cooled, store leftover gluten-free bread in an airtight container at room temperature on your counter. It’s best to store the entire loaf or larger sections and slice only as needed to maintain freshness and prevent drying.
This gluten-free bread recipe also freezes beautifully. Wrap the cooled loaf tightly first in plastic wrap, then in foil or freezer paper. Place the wrapped loaf in a freezer-safe bag. It can be frozen for up to 3 months. Thaw overnight in the refrigerator before using.
Essential Equipment for This Recipe
To prepare this recipe, you’ll need the following essential kitchen tools:
- Mixing Bowls – A set of sturdy mixing bowls is essential for combining wet and dry ingredients.
Find Mixing Bowls on Amazon - Measuring Cups and Spoons – Accurate measurements are key to baking success!
Find Measuring Cups and Spoons on Amazon - Baking Sheets – For baking cookies, roasting vegetables, and more.
Find Baking Sheets on Amazon - Whisks – Perfect for whipping cream, eggs, and incorporating air into mixtures.
Find Whisks on Amazon - Spatulas – Ideal for folding ingredients and scraping bowls clean.
Find Spatulas on Amazon - Food Processors – Great for chopping vegetables, making sauces, and more.
Find Food Processors on Amazon - Saucepans – Essential for cooking sauces, soups, and grains.
Find Saucepans on Amazon - Chef’s Knives – A versatile knife for all your chopping and slicing needs.
Find Chef’s Knives on Amazon - Cutting Boards – Protect your countertops while you chop!
Find Cutting Boards on Amazon
- Prepare your baking environment by preheating your oven to 350°F (175°C). Adjust one of your oven racks so it is positioned in the middle, as this is the optimal spot for even heat circulation around your loaf while it bakes. Select your preferred loaf pan; this recipe highly recommends using a 9-inch x 4-inch Small Pullman loaf pan if you have one, as it encourages the dough to rise taller, yielding a loaf with a more traditional slice shape. A standard 9-inch x 5-inch loaf pan will also work, but the resulting loaf may be slightly shorter. Generously coat the inside of your chosen pan with a gluten-free cooking spray or grease it well to prevent your loaf from sticking after baking. Starting your oven-baked gluten-free bread recipe with a properly prepared pan sets you up for success.
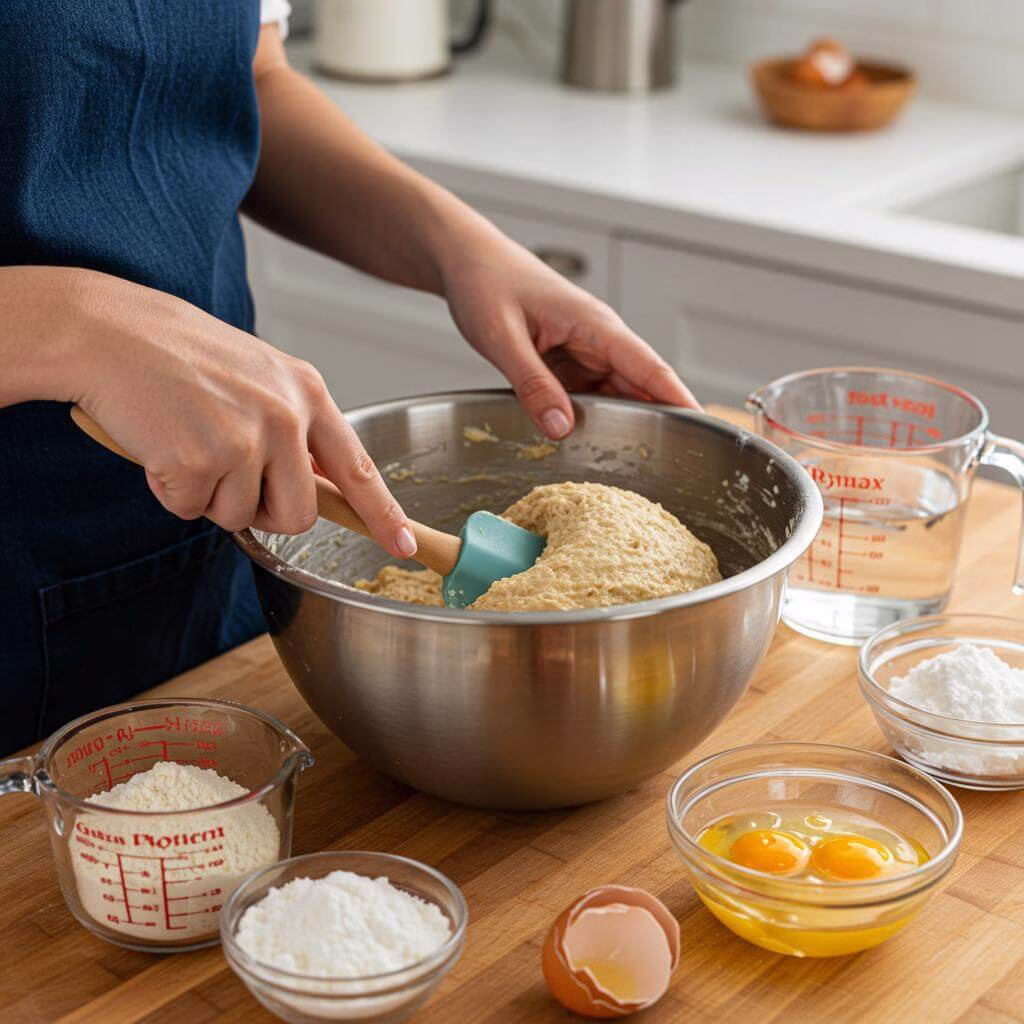
- In the bowl of a stand mixer – remember to attach the paddle attachment, not the dough hook, as this gluten-free dough behaves differently than traditional wheat dough – carefully measure out 2 ½ cups of your preferred all-purpose gluten-free flour blend. For best results, use the “spoon & level” method to measure your flour: gently spoon the flour from its container into your measuring cup until it overflows, then use a straight edge (like the back of a knife) to level off the excess flour without packing it down. Add 1 teaspoon of gluten-free baking powder and 1 packet (which is typically 2 ¼ teaspoons) of rapid rise or instant yeast to the bowl. If your chosen gluten-free flour blend does not already contain xanthan gum, add 1 teaspoon of xanthan gum now; it acts as a binder in gluten-free baking. Briefly stir these dry ingredients together by hand or on the lowest mixer speed to ensure they are evenly distributed before adding liquids.
- Now, it’s time to start forming the dough. Into the bowl with the dry ingredients, pour in ¼ cup of extra virgin olive oil, ¼ cup of honey (or your chosen alternative like agave nectar or maple syrup), and 1 ½ cups of warm water. The temperature of the water is critical for activating the yeast; aim for a temperature between 100°F and 110°F (38°C-43°C). Water that is too hot can kill the yeast, while water that is too cold won’t activate it properly, leading to a dense loaf. Attach the bowl to your stand mixer and mix these ingredients on low speed using the paddle attachment for exactly 1 minute. The mixture will start to come together into a wet batter.
- Next, add the remaining wet ingredients to the bowl. Include 3 large egg whites, ensuring they are at room temperature beforehand (leaving them out for about 5-10 minutes is usually sufficient, as yeast loves a warm environment), and 1 teaspoon of salt. Increase the mixer speed to medium and continue mixing for precisely 1 minute more. At this point, the dough won’t look like traditional elastic bread dough. It will be quite wet, resembling a thick cake batter consistency. This texture is perfectly normal and desired for this specific gluten-free bread recipe. Do not be tempted to add more flour!
- Carefully transfer the thick batter into the greased loaf pan you prepared in Step 1. A spatula can be helpful here to scrape all the dough from the mixer bowl into the pan. Lightly spray one side of a piece of plastic wrap with gluten-free cooking spray and gently lay it, greased-side down, directly onto the surface of the dough in the pan. This prevents the dough from forming a skin and sticking to the wrap as it rises. Loosely drape a clean kitchen towel over the pan for extra warmth and insulation. Place the covered pan in a warm, draft-free location to proof (rise). A proofing function in your oven set to 100°F (38°C) is ideal, or you can place it in a slightly warm oven (turned off) or just a warm spot in your kitchen. Let the dough rise undisturbed for 30 minutes. The dough should visibly expand during this time, ideally doubling in size.
- Once the dough has proofed for 30 minutes, it’s ready to bake! Carefully transfer the loaf pan to the *middle rack* of your preheated 350°F (175°C) oven. Position the pan horizontally on the rack for optimal and even heat distribution. Bake for about 30 minutes. You’ll know your gluten-free bread is done when the top is beautifully golden brown and an instant-read thermometer inserted into the center of the loaf registers an internal temperature between 205°F and 210°F (96°C-99°C). Baking to the correct internal temperature is crucial for ensuring your homemade gluten-free bread is cooked through and has the perfect texture.
- After baking, carefully remove the hot loaf pan from the oven. Allow the loaf to cool *in the pan* for the first 10 minutes. This initial cooling period helps the structure of the loaf set. After 10 minutes, gently invert the pan to turn the loaf out and transfer it onto a wire cooling rack. It’s very important to remove the loaf from the hot pan and cool it on a rack to allow air circulation, which prevents trapped steam from making the bottom and sides of your delicious gluten-free bread soggy. Let the loaf cool *completely* on the wire rack before attempting to slice it – this step can take up to 2 hours depending on your kitchen temperature. Slicing a warm gluten-free loaf can result in a gummy texture.
- Once your homemade gluten-free bread is fully cooled, it’s ready to be sliced and enjoyed! For the cleanest cuts that won’t squish your soft loaf, use a serrated bread knife. The saw-like edge glides through the bread effortlessly.
- To store any leftover bread after it has completely cooled, place it in an airtight container or a sealed plastic bag. It can be stored at room temperature on your kitchen counter. For maximum freshness, it’s best not to pre-slice the entire loaf at once. Only slice the portion you plan to use right away and store the remaining unsliced part to keep it from drying out. This helps keep your homemade gluten-free bread fresh for longer.
- If you won’t be eating the entire loaf within a couple of days, this gluten-free bread recipe freezes beautifully! Once completely cooled, you can freeze the whole loaf or slice it first (making sure to separate slices with parchment paper if desired). Wrap the loaf or slices tightly in plastic wrap, ensuring no air pockets. For added protection against freezer burn, wrap it again in aluminum foil or specialized freezer paper. Place the double-wrapped loaf or slices inside a freezer bag, squeezing out as much air as possible before sealing. Properly frozen, your homemade gluten-free bread can last for up to 3 months. When you’re ready to enjoy it, thaw the bread in the refrigerator overnight, or simply leave it on the counter for a few hours until defrosted.
Tips for Perfect Gluten-Free Bread Baking
Creating a truly soft, beautiful loaf with a gluten-free bread recipe can feel like magic, but it’s really about understanding a few key principles unique to working without gluten. This specific gluten-free bread recipe is designed for ease and fantastic results, but these extra tips will help you achieve perfection every single time. Think of these as your secret weapons for amazing homemade gluten-free bread!
- Master the “Spoon & Level” Flour Measurement: This is non-negotiable for success with *any* gluten-free bread recipe. Never scoop the flour directly from the bag with your measuring cup. Gluten-free flours compact easily, and scooping can add significantly more flour than intended, resulting in a dry, dense, or crumbly loaf. Spoon the flour lightly into your measuring cup, then level off the excess with a straight edge like a knife. Precision here is key!
- Respect Ingredient Temperatures: Yeast is happiest and most active in a warm environment. Ensure your water is within the specified 100-110°F range – too hot will kill the yeast, and too cold won’t activate it properly, leading to a poor rise in your homemade gluten-free bread. Similarly, using room-temperature egg whites helps them incorporate better and contributes to a lighter texture.
- Understand Gluten-Free “Dough”: Unlike wheat doughs, gluten-free yeast doughs are typically much wetter, more like a thick batter or scoopable mixture. Do *not* expect it to look or feel like traditional pliable dough. The recipe correctly instructs to use a paddle attachment on your mixer for this reason – a dough hook isn’t suited for this consistency and won’t mix it effectively.
- Choose the Right Pan Size: The recommendation for a 9″x 4″ Small Pullman loaf pan is spot on! A smaller, taller pan size provides better support for gluten-free batter-like dough as it rises. It encourages the loaf to rise upwards rather than spreading outwards, giving you a taller, more traditionally shaped slice for your sandwich bread. Using a standard 9″x 5″ pan will still yield delicious bread, but it will be shorter.
- Pay Attention to Proofing, But Don’t Overdo It: While yeast needs time to work, gluten-free dough lacks the strong elastic structure of gluten. Over-proofing can cause the fragile structure to collapse or result in a gummy texture. The recipe’s suggested 30-minute proofing time is often sufficient; watch for the dough to roughly double in size, then get it into the preheated oven quickly. A warm, draft-free spot (like a proofing setting in your oven, if you have one) helps ensure an even rise within that time.
- Cool Completely Before Slicing: This might be the hardest part, but it’s absolutely crucial for this soft gluten-free bread recipe. The internal structure of the loaf is still setting as it cools. Slicing too early can cause the bread to gum up, compress, or seem underbaked in the center. Letting it cool fully on a wire rack (outside of the pan after the initial 10 minutes) allows steam to escape and the crumb to stabilize, giving you clean, perfect slices.
- Slice with a Serrated Knife: Once completely cooled, use a sharp serrated knife for slicing. The gentle sawing motion of a serrated blade cuts through the soft gluten-free crumb without squishing the loaf, preserving its light texture.
Common Gluten-Free Bread Baking Mistakes to Avoid
Even with a great gluten-free bread recipe, little slip-ups can happen. Being aware of these common pitfalls will help you navigate your baking journey smoothly.
- Ignoring Flour Type & Xanthan Gum: The recipe specifically mentions that not all gluten-free blends work well for yeast baking and highlights blends *not* recommended. Using the wrong blend, or incorrectly adding/omitting xanthan gum (which provides necessary structure in gluten-free baking), can lead to a loaf that doesn’t rise, crumbles excessively, or has a poor texture. Always check your flour blend and adjust xanthan gum as needed based on its ingredients – follow the recipe’s guidance carefully.
- Using Cold Ingredients or Incorrect Water Temp: As mentioned in the tips, yeast requires warmth to activate. Using cold water or cold egg whites slows down or completely stops the yeast activity, resulting in a dense, heavy gluten-free bread recipe that doesn’t rise properly. Ensure your liquids are within the recommended temperature range and other refrigerated ingredients are brought to room temperature.
- Slicing the Bread While Still Warm: This is perhaps the most common mistake! While the aroma of warm, homemade gluten-free bread is irresistible, slicing a hot loaf traps steam, makes the crumb gummy, and can cause the center to collapse. Patience is your friend here. Wait until the loaf is completely cool – it will be worth it for the perfect slice!
- Over-Proofing the Dough: While proofing is essential, unlike wheat dough, gluten-free dough does not develop more strength with longer proofing. Allowing it to double in size, typically around the 30-minute mark for this recipe, is usually sufficient. Letting it proof for too long can cause the delicate structure created by the yeast and binders to overstretch and collapse during baking, resulting in a fallen or dense loaf.
Frequently Asked Questions
What kind of gluten-free flour blend should I use for this gluten-free bread recipe?
Choosing the right gluten-free flour blend is truly important for success with this bread! The recipe calls for an all-purpose gluten-free flour blend. It’s highlighted in the post that not all blends are created equal, and your results might vary. Some brands, like Bob’s Red Mill 1:1 or King Arthur Measure for Measure, mention on their packaging or websites that they aren’t specifically recommended for yeast baking. Look for a blend that you’ve had good yeast baking results with, or one that states it’s suitable for yeast recipes. Using the “spoon and level” measuring method is also key to ensure you don’t use too much flour!
My dough looks really wet, kind of like a thick cake batter. Is that the correct consistency for this gluten-free bread recipe?
Yes, absolutely! Don’t worry if your dough looks quite wet after mixing; that’s exactly how it should be for this gluten-free bread recipe. It won’t be like traditional, kneadable wheat dough. This recipe is designed for a batter-like consistency, which helps achieve that soft, fluffy texture we’re aiming for. Make sure you used the paddle attachment on your stand mixer if you have one, as a dough hook isn’t suitable for this type of dough.
Why do you highly recommend using a Small Pullman loaf pan? Can I still make this gluten-free bread recipe in a regular 9×5 inch pan?
The Small Pullman loaf pan (9-inch x 4-inch) is highly recommended because its smaller size encourages the dough to rise taller during proofing and baking. This helps you achieve a lovely, high loaf with a more classic sandwich slice shape. You *can* definitely still use a standard 9-inch x 5-inch loaf pan, as the recipe mentions, but be aware that your final loaf might not rise quite as high as it would in the Pullman pan. Either way, make sure your pan is well-greased with gluten-free cooking spray!
How should I store this homemade gluten-free bread once it’s baked? Can I freeze it?
To keep your delicious gluten-free bread fresh after it’s completely cooled, store it in an airtight container or a sealed plastic bag on your kitchen counter at room temperature. It’s best to store the whole loaf or larger pieces and slice off what you need just before using it, as pre-slicing can cause the bread to dry out faster. This gluten-free bread recipe also freezes beautifully! Once fully cooled, wrap the loaf tightly in plastic wrap, then wrap it again in foil or freezer paper. Place the wrapped loaf in a freezer-safe bag. It can be frozen for up to 3 months. To thaw, just leave it in the refrigerator overnight.
Is there a way to make this gluten-free bread recipe without the egg whites?
This specific gluten-free bread recipe uses egg whites to contribute to the light texture. While the post mentions potential substitutions for other ingredients like sweetener or oil, it notes that replacing egg whites in yeast bread can be tricky. Commercial egg replacers for baking or flax eggs (1 tbsp ground flaxseed + 3 tbsp water per egg white) might work, but results can vary significantly compared to using the egg whites as written. Experimentation might be needed if you need an egg-free version.
How can I tell for sure if my gluten-free bread is fully baked?
Besides the top being a nice golden brown color, the most reliable way to know your gluten-free bread is done is to check its internal temperature. Using an instant-read thermometer, insert it into the center of the loaf after baking for 30 minutes. The bread is perfectly baked when it reaches an internal temperature between 205°F and 210°F (96°C-99°C). Baking to this temperature ensures the inside is cooked through and not gummy.
Why is it so important to cool the bread completely on a wire rack before slicing?
Cooling is a crucial step you shouldn’t skip! After baking this gluten-free bread recipe, letting it cool for just 10 minutes in the pan helps its structure set a little. But then, moving it to a wire cooling rack allows air to circulate all around the loaf. This prevents steam from getting trapped, especially on the bottom, which can make the bread soggy. Also, slicing warm gluten-free bread can often lead to a gummy texture inside. Letting it cool completely (which might take a couple of hours) ensures the crumb structure is fully set for the best slicing and texture.
2 Comments