Embrace Simple, Savvy Gluten-Free Cooking
Navigating the gluten-free lifestyle often means finding smart solutions for everyday staples. If you’ve ever looked at the price of store-bought gluten-free breadcrumbs, you know they can be quite an investment! But what if we told you that you can easily make your own delicious, crispy gluten free breadcrumbs right at home? This simple guide will show you how to transform your leftover gluten-free bread into a versatile kitchen essential, saving you money and reducing food waste. Imagine adding the perfect crunchy coating to your Gluten-Free Chicken Parmesan, a lovely golden topping to a comforting Gluten-Free Baked Ziti, or even using them as a base for a flavorful crust like in our Pecan Coconut Crusted Fish, all with breadcrumbs you made yourself!
Why Make Your Own Gluten-Free Breadcrumbs?
Making your own gluten free breadcrumbs is a fantastic way to take control of your ingredients and your budget. It’s incredibly straightforward – if you have some gluten-free bread that’s perhaps a day or two old, you’re already halfway there! Not only does this prevent perfectly good bread from going to waste, but it also means you always have a stash of this handy ingredient ready for your favorite recipes. Plus, homemade means you know exactly what’s in them – no hidden additives or allergens, just pure, simple goodness. These breadcrumbs freeze beautifully, so you can make a big batch and have them on hand whenever inspiration strikes. For those times when your gluten-free bread isn’t at its freshest for sandwiches, or perhaps a baking experiment didn’t go quite as planned, turning it into breadcrumbs is a wonderfully resourceful solution. It’s all about making the most of what you have and enjoying delicious, gluten-free food without unnecessary expense or waste.
Why This Recipe for Gluten Free Breadcrumbs Works So Well
Discovering delicious, reliable gluten-free recipes can feel like finding gold, and this guide to making your own gluten free breadcrumbs is exactly that – a golden opportunity! It takes something you might otherwise discard – your leftover or slightly stale gluten-free bread – and transforms it into an essential ingredient for countless dishes. This simple process isn’t just about saving money (though it definitely does!), it’s about empowering you to make the most of your gluten-free ingredients and achieve fantastic results in the kitchen.
The beauty of this recipe lies in its practicality and flexibility. Unlike many gluten-free baked goods that rely on precise ratios of different flours and binders, making gluten free breadcrumbs from existing bread is wonderfully forgiving. The structure that the original gluten-free flour blend, starches, and gums provided in the bread is now simply the foundation for the crumb. The process of pulsing the bread in a food processor breaks down the cellular structure, and critically, the toasting step dries out the crumbs completely. This drying and toasting process is key; it removes moisture, preventing staleness and creating that desirable crisp texture necessary for coatings, binders, or toppings, regardless of the specific flour blend used in your original gluten-free loaf.
Using your own gluten-free bread ensures you know exactly what ingredients are in your breadcrumbs, which is essential for anyone managing food sensitivities. Plus, you can control the texture, from coarse, Panko-style flakes perfect for crispy coatings like chicken tenders, to finer crumbs for meatballs or casseroles. Keeping them plain allows for maximum versatility, letting you add specific herbs and spices for different recipes as needed. This method turns potential waste into a reliable, versatile, and high-quality pantry staple, making your gluten-free cooking more efficient, affordable, and delicious. It’s a simple, genius trick that makes navigating a gluten-free lifestyle just a little bit easier and a lot more rewarding!

🎁 33 Gluten-Free Breakfasts
Start every day with a smile and flavor. Get our FREE recipe eBook!
How to Make Homemade Gluten-Free Breadcrumbs
Ready to turn that leftover gluten-free bread into kitchen gold? It’s easier than you think! Follow these simple steps to create your own stash of versatile gluten-free breadcrumbs right at home. You’ll save money and always have exactly what you need for your favorite recipes.
- Prepare Your Oven and Baking Sheet: Start by preheating your oven to 325°F (160°C). Line a large rimmed baking sheet with aluminum foil. Set this aside for later.
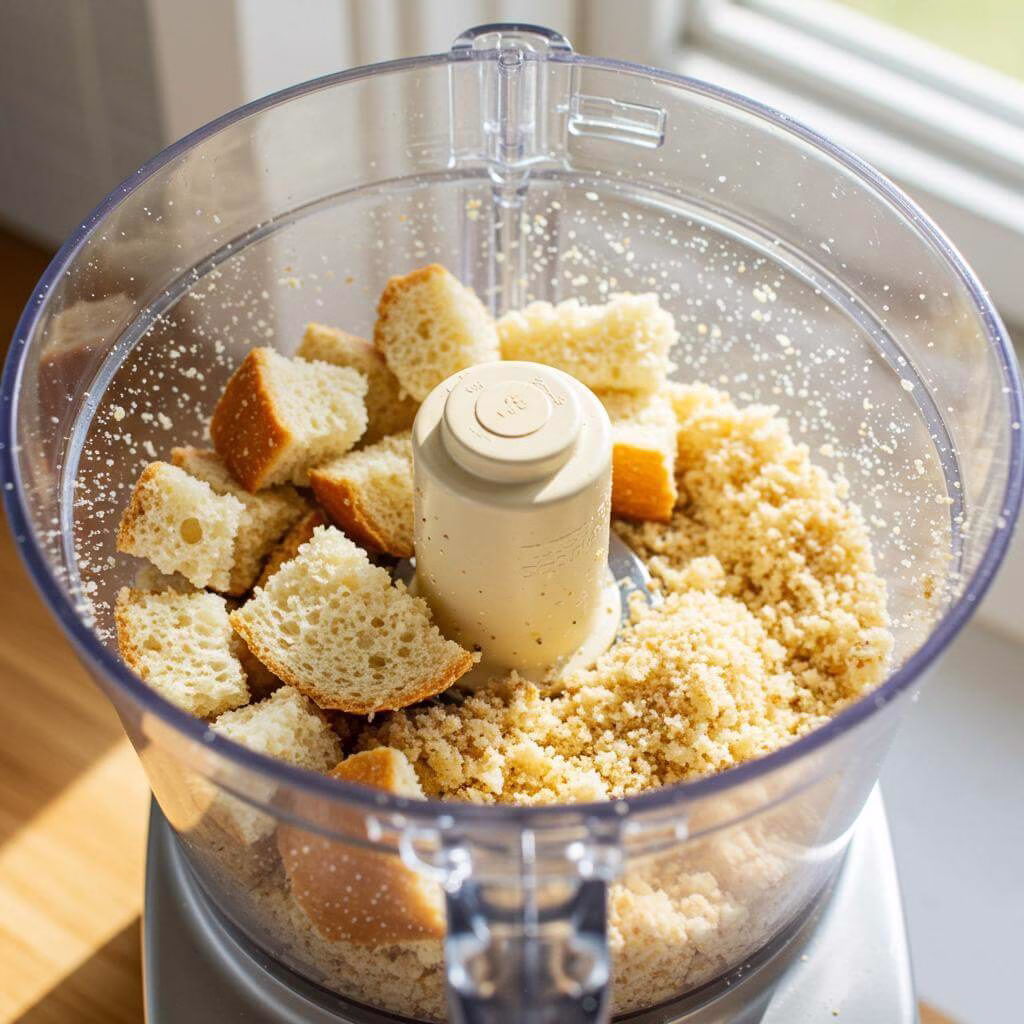
- Break Apart the Bread: Take 4 to 5 slices of your favorite gluten-free bread (any kind will work!), break them into smaller chunks, and place them into the bowl of a standard 7-cup food processor that’s fitted with the steel blade.
- Pulse for Coarse Crumbs: Secure the lid on the food processor and pulse it until you see coarse crumbs beginning to form.
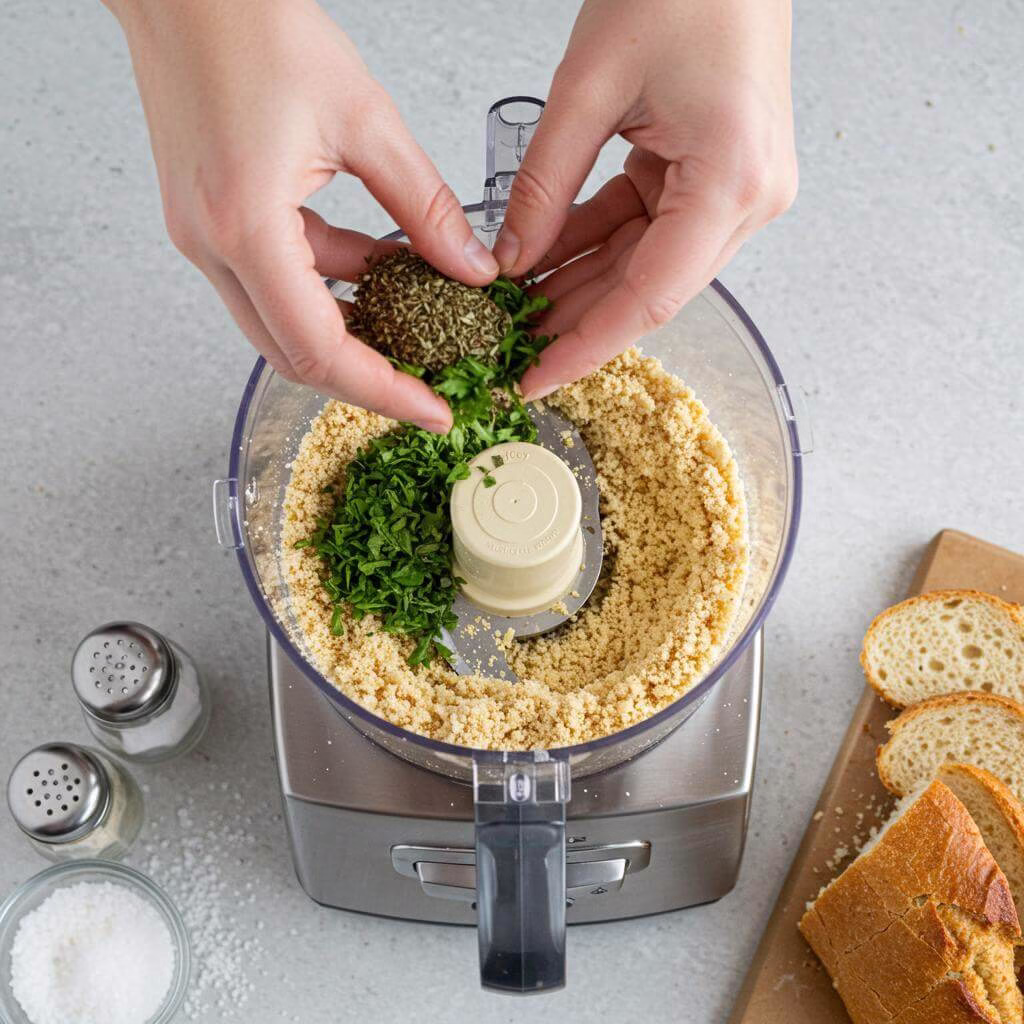
- Add Flavor (Optional): Open the lid carefully. If you’d like to add flavor to your breadcrumbs, now is the time to include optional ingredients like ½ teaspoon kosher salt and dried seasonings such as oregano and parsley, adding them to taste.
- Refine Crumb Consistency: Close the lid again and pulse until the seasonings are just combined, or continue pulsing until your crumbs reach the desired consistency. For a coarser texture similar to Panko, pulse briefly. For a finer crumb, pulse a bit longer.
- Spread on Baking Sheet: Transfer the processed bread crumbs evenly onto the prepared baking sheet, spreading them in a single layer. Place the baking sheet in the center of your preheated oven.
- First Bake: Bake the crumbs for approximately 8 minutes. This starts the drying process.
- Stir the Crumbs: Carefully remove the baking sheet from the oven. Use a spatula or spoon to stir the crumbs around, ensuring they toast evenly.
- Second Bake Until Golden: Return the baking sheet back to the oven and bake until the crumbs are lightly golden brown all over. This usually takes about another 7 minutes, but keep an eye on them as ovens can vary.
- Cool Completely: Remove the baking sheet from the oven once more. Allow the breadcrumbs to cool completely on the baking sheet. This step takes about 10 minutes and helps them get nice and crisp.
- Store Your Homemade Crumbs: Once totally cool, transfer your delicious homemade gluten-free breadcrumbs. For storing at room temperature, a glass jar works wonderfully to maintain their texture. For longer storage, transfer them to a freezer-safe container.
- Ready to Use: Your breadcrumbs are now ready! You can use them directly from the refrigerator or freezer without needing to defrost them. They will stay fresh for months when stored in the freezer.
Frequently Asked Questions
What kind of gluten-free bread should I use for making breadcrumbs?
The great thing about this recipe is that you can use pretty much any kind of gluten-free bread you have on hand! It’s an excellent way to use up slices that are a day or two old, or even bread you’ve had tucked away in the freezer. Using bread that isn’t super fresh actually works perfectly for this process.
Can I add flavorings to my homemade gluten-free breadcrumbs?
Absolutely! While the recipe works beautifully with just plain breadcrumbs (which gives you flexibility for different dishes), you can definitely add flavorings. The post mentions adding optional kosher salt and dried seasonings like oregano and parsley during the pulsing step. Feel free to customize them to your liking!
What’s the best way to store my homemade gluten-free breadcrumbs?
You have a few options depending on how soon you plan to use them. If you’re keeping them at room temperature, a glass jar is recommended to help maintain their toasted texture. For longer storage and to keep them fresh for months, transfer the cooled crumbs to a freezer-safe container or bag and store them in the freezer. The refrigerator is also an option for slightly longer storage than room temperature.
Do I need to thaw frozen homemade breadcrumbs before using them?
No, you don’t! One of the beauties of freezing them is how convenient they are. You can take the breadcrumbs directly from the freezer and use them right away in your recipes. They thaw almost instantly, or can be used frozen depending on the dish.
Tips for Perfect Gluten Free Breadcrumbs
Making your own gluten free breadcrumbs is simple and rewarding! Here are a few tips to ensure yours turn out perfectly crisp and delicious every time:
- Start with Stale Bread: Using gluten-free bread that’s a few days old is key! Fresh GF bread tends to be quite moist and can clump or turn into a paste in the food processor instead of light, airy crumbs. Let it sit out for a day, or even lightly toast fresh bread slices in the oven first if you’re in a hurry.
- Consider the Bread Type: The specific gluten-free bread you use will influence the final color and texture of your crumbs. A rice-based loaf might give you lighter crumbs, while a seeded or whole-grain GF bread could result in darker, more textured crumbs. Any type works beautifully, so use what you have on hand!
- Pulse for Perfect Texture: The wonderful thing about homemade is you control the size! Pulse your torn bread pieces in the food processor in short bursts. Stop and check frequently until you get the crumb size you desire, whether you prefer a fine texture for coating or a coarse, Panko-like crumb for topping.
- Toasting is Non-Negotiable: Toasting the crumbs in the oven is crucial! This step dries them out completely, giving them that essential crispy texture and extending their shelf life significantly. Don’t rush it – bake until they are a light golden brown.
- Cool Down Completely: Patience pays off here! Let your toasted breadcrumbs cool fully on the baking sheet before transferring them to storage. This allows any residual heat to dissipate and ensures they are truly dry and crispy before being sealed.
Avoid processing bread that is too fresh and soft, as it will likely become gummy instead of forming crisp crumbs.
Ingredients
- ▢ 4 to 5 slices gluten free bread, any kind
- ▢ ½ teaspoon kosher salt (optional)
- ▢ Dried seasonings, such as oregano and parsley, to taste (optional)
Nutritional Information
Please note: Calculating precise nutritional information for homemade gluten-free breadcrumbs can be tricky as it depends heavily on the specific type and brand of gluten-free bread used. Values can vary significantly based on the flour blend, added ingredients, and preparation method of your base bread.
However, using gluten-free bread ensures these crumbs are free from wheat and gluten, making them safe for individuals with celiac disease or gluten sensitivity. Generally, breadcrumbs provide carbohydrates and a modest amount of protein. Making them at home allows you to control the amount of salt and any added seasonings, giving you more oversight of your dietary intake. Use the nutritional information provided on your original gluten-free bread packaging as a guide, keeping in mind that the toasting process removes moisture but doesn’t significantly alter the core nutritional profile of the dry matter.
Making Your Gluten-Free Breadcrumbs
Turning leftover gluten-free bread into versatile breadcrumbs is incredibly simple and a fantastic way to reduce waste (and save money!). Here’s how to do it:
Prep Work
- Preheat your oven to 325°F (160°C).
- Line a large rimmed baking sheet with aluminum foil for easy cleanup. Set it aside.
Creating the Crumbs
- Break your slices of gluten free bread into smaller chunks.
- Carefully place the bread chunks into the bowl of your standard 7-cup food processor fitted with the steel blade.
- Secure the lid and gently pulse the bread until it forms lovely, coarse crumbs.
- If you’d like to add extra flavor, open the lid and sprinkle in the optional kosher salt and dried seasonings like oregano or parsley.
- Close the lid and pulse again briefly to combine the seasonings, or continue pulsing until your crumbs reach your desired consistency. Many people love a coarser, Panko-style crumb, but a finer crumb works beautifully too – it’s totally up to you!
Toasting for Perfection
- Transfer the bread crumbs from the food processor onto your prepared baking sheet, spreading them out evenly.
- Place the baking sheet in the center of your preheated oven.
- Bake for about 8 minutes to start the drying and toasting process.
- Remove the baking sheet from the oven and use a spatula or spoon to stir the crumbs around, helping them toast evenly.
- Return the baking sheet to the oven and continue baking until the crumbs are lightly golden brown all over. This usually takes another 7 minutes or so, but keep a close eye on them as they can toast quickly!
- Once toasted, remove the baking sheet from the oven and let the breadcrumbs cool down completely on the baking sheet. This should take about 10 minutes. Cooling helps them crisp up perfectly.
Storing Your Homemade Breadcrumbs
Proper storage is key to keeping your homemade gluten-free breadcrumbs fresh and ready whenever you need them. You have a few great options:
- **Room Temperature (for immediate use):** Once completely cool, transfer the breadcrumbs to a clean glass jar with a tight-fitting lid. Storing them in glass helps preserve their lovely toasted texture. Keep the jar in your pantry.
- **Refrigerator:** For slightly longer storage than room temperature, an airtight freezer-safe container or glass jar in the refrigerator works well.
- **Freezer (Recommended for Long-Term):** For saving those precious crumbs for months (and preventing waste!), the freezer is your best friend. Transfer the cooled crumbs to a freezer-safe container or bag, removing as much air as possible. They will stay fresh for months! The best part? You can use them directly from the freezer without needing to defrost – they thaw almost instantly or can be added frozen depending on your recipe.
Homemade gluten-free breadcrumbs are a true game-changer for saving money and ensuring you always have safe, delicious crumbs on hand!
How to Use Your Gluten-Free Breadcrumbs
Homemade gluten-free breadcrumbs are incredibly versatile! Since this recipe focuses on making a plain base (unless you added seasonings), you can flavor them specifically for any dish. Use them just like you would traditional breadcrumbs!
- **Coating:** Perfect for giving a crispy crust to chicken tenders, fish fillets, or vegetables.
- **Binders:** Essential for adding texture and helping hold together recipes like meatballs, meatloaf, or veggie burgers.
- **Toppings:** Sprinkle them over casseroles (like green bean casserole), macaroni and cheese, or baked pasta dishes for a lovely crunch.
- **Stuffing/Filling:** Incorporate them into stuffings or fillings for poultry or vegetables.
Keeping a stash in your freezer means you’re always prepared to add that perfect crisp or texture to your favorite gluten-free meals!
More Gluten-Free Baking Resources
If you’re enjoying using your gluten-free bread to make these versatile crumbs, perhaps you’re also interested in making the bread itself! Exploring different gluten free flour blends or even specific flours like Gluten Free Bread Flour can open up a whole world of baking possibilities. Many wonderful books and resources can guide you on your gluten-free baking journey, helping you create delicious baked goods from scratch.
Essential Equipment for This Recipe
To prepare this delicious recipe, you’ll need the following kitchen tools:
- Mixing Bowls – A set of good quality mixing bowls is essential for prepping various ingredients.
Find Mixing Bowls on Amazon - Measuring Cups and Spoons – Accurate measurements are key for successful baking and cooking.
Find Measuring Cups and Spoons on Amazon - Baking Sheets – For baking cookies, roasting vegetables, or toasting nuts.
Find Baking Sheets on Amazon - Whisks – Perfect for whipping cream, beating eggs, and combining dry ingredients.
Find Whisks on Amazon - Spatulas – Ideal for folding ingredients, scraping bowls, and spreading frosting.
Find Spatulas on Amazon - Food Processors – Useful for chopping, slicing, shredding, and pureeing ingredients quickly.
Find Food Processors on Amazon - Saucepans – Essential for cooking sauces, melting butter, and simmering ingredients.
Find Saucepans on Amazon - Chef’s Knives – A sharp chef’s knife is indispensable for prepping fruits, vegetables, and herbs.
Find Chef’s Knives on Amazon - Cutting Boards – Protect your countertops while chopping and prepping ingredients.
Find Cutting Boards on Amazon