The Quest for Perfect Gluten Free Dinner Rolls Ends Here!
Let’s be honest, finding truly amazing gluten-free bread can sometimes feel like searching for a unicorn. But what if I told you that your search for the softest, fluffiest, most incredibly delicious gluten free dinner rolls is officially over? Yes, you read that right! We’re talking about rolls so good, they’ll have everyone at the table – gluten-free or not – reaching for seconds (and maybe even thirds!). These aren’t just a substitute; they’re a celebration of how wonderful gluten-free baking can be, and this recipe for gluten free dinner rolls is a testament to that.
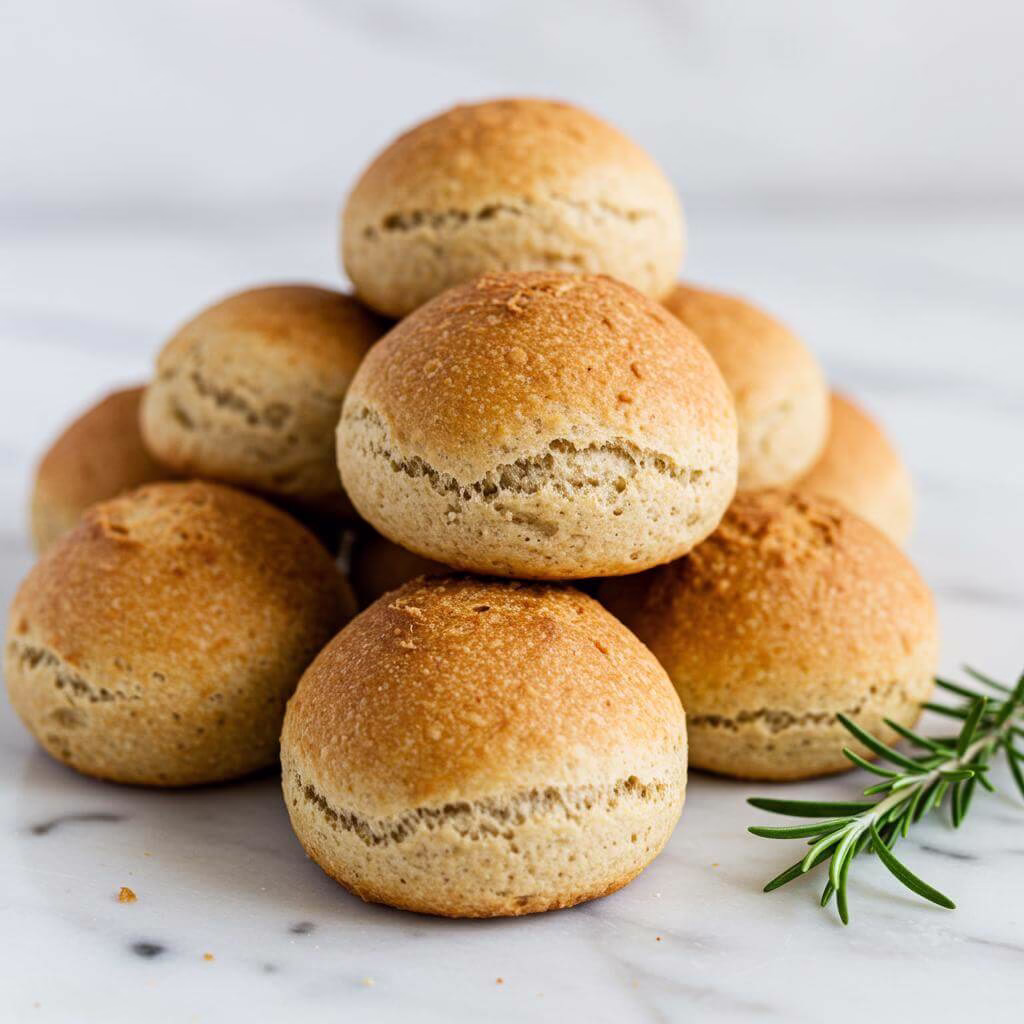
Imagine pulling apart a warm, golden roll, the steam gently rising, revealing an airy, tender crumb that practically melts in your mouth. That’s exactly what you get with this recipe. For too long, many of us have settled for dense or crumbly gluten-free options, but these homemade gluten free dinner rolls are here to change everything. They bring back that comforting, satisfying experience of enjoying bread with your meals, making any dinner feel a little more special. Whether you’re planning a big holiday feast or a simple weeknight supper, these rolls are the perfect accompaniment. They are surprisingly quick to whip up, too, meaning fresh-baked goodness is never too far away. This recipe is all about bringing joy and ease back to your gluten-free kitchen, proving that you don’t have to miss out on your favorite baked treats.
One of the best things about these gluten free dinner rolls is their incredible texture, achieved with a thoughtful blend of gluten-free flours and binders that work together to mimic the softness and slight chewiness of traditional rolls. You can serve them warm from the oven, slathered with butter, and watch them disappear! If you’re looking for other fantastic dishes or baking projects, imagine these rolls served alongside our comforting Gluten-Free Baked Ziti for a truly satisfying meal. Or, if you’re in the mood for more gluten-free baking, our Best Gluten-Free Banana Bread is always a crowd-pleaser. But for now, let’s get ready to bake the best gluten-free rolls of your life!
Why This Gluten Free Dinner Roll Recipe Works Like Magic
Let’s talk about the magic behind these truly incredible gluten free dinner rolls! Achieving that perfect, pillowy-soft texture, golden crust, and delightful flavor in gluten-free baking, especially with a yeasted roll like these, is often seen as the holy grail. So many gluten-free bread recipes can turn out dense, crumbly, or gummy. But this recipe? It absolutely nails it, producing gluten free dinner rolls that honestly rival their traditional counterparts. How does it pull off such a feat? It’s all in the carefully chosen ingredients and clever techniques working together in beautiful harmony.
The Power Duo: Psyllium Husk and Xanthan Gum
In traditional baking, gluten provides the structure and elasticity that allows dough to be kneaded, shaped, and rise, trapping the gases produced by yeast. Without gluten, we need super-powered substitutes! This recipe smartly employs not one, but two primary binders: psyllium husk and xanthan gum.
Psyllium husk is a total rockstar in gluten-free baking. When mixed with liquid (as done here to create a “psyllium gel”), it forms a viscous, jelly-like substance. This gel mimics gluten’s ability to hold moisture and create a flexible network throughout the dough. It provides the structure that allows the gluten free dinner rolls to rise without collapsing and gives them a pleasant, slightly chewy bite – a signature of excellent rolls.
Xanthan gum is another essential binder, particularly effective when paired with psyllium husk in enriched doughs like these gluten free dinner rolls. While psyllium provides bulk and a chewier structure, xanthan gum contributes a slickness and elasticity that helps the dough come together more like wheat dough. Using a specific *blend* of psyllium and xanthan gum, as this recipe does, is intentional. It balances the binders’ effects, creating a crumb that is both soft and delicate, rather than overly tough or robust which can sometimes happen with psyllium alone. This binder combination is absolutely key to the success and wonderful texture of these gluten free dinner rolls.
A Balanced Flour Blend for Optimum Texture
This recipe doesn’t rely on a single gluten-free flour, but a carefully chosen blend of tapioca starch, millet flour, and sorghum flour. This is crucial because different gluten-free flours bring different characteristics to the table.
Tapioca starch is a high-starch flour that contributes significantly to the lightness and softness of the final gluten free dinner rolls. It helps create that desirable pillowy texture.
Millet flour and sorghum flour are often used in gluten-free baking for their relatively mild flavors and balanced properties. Millet offers a tender crumb and a slightly sweet note, while sorghum contributes structure and a pleasant taste without being heavy. Using this specific blend provides a good balance of starch for softness and structure-building flours for body, resulting in delicious gluten free dinner rolls that aren’t dense or gummy.
The Secret Ingredient: Baking Powder?!
One of the most brilliant, non-traditional secrets to these gluten free dinner rolls is the addition of **baking powder**. Yes, in a *yeasted* dough! While yeast provides the primary leavening and flavor development over time, baking powder offers an immediate chemical lift when introduced to liquid and heat. In gluten-free baking, where the structure isn’t as naturally robust as wheat, this extra boost from baking powder helps ensure a truly light, airy, and fluffy crumb. It’s a clever trick borrowed perhaps from quick breads or cakes, applied here to yeasted dough, and it makes a huge difference in achieving that signature soft dinner roll texture.
Enriching the Dough for Richness and Tenderness
These are “enriched” gluten free dinner rolls, meaning they include fat (butter) and eggs. These ingredients play vital roles in adding richness, flavor, and contributing to a soft, tender crumb. The egg provides structure and helps keep the rolls moist, while the melted butter adds flavor and inhibits the formation of a tough structure. The recipe notes using a slightly *smaller* amount of butter than a traditional recipe, which is key in gluten-free baking to prevent the dough from becoming too heavy or dense – a thoughtful adjustment for successful gluten free dinner rolls.
Technique Supports the Ingredients
Beyond the ingredients, the techniques outlined also contribute to the success:
- Proper Kneading: Even without gluten development, kneading helps distribute the binders and hydrate the flours evenly, leading to a smoother dough and better texture.
- Hydration Management: The instruction to let the slightly sticky dough rest or chill acknowledges the importance of allowing gluten-free flours and binders adequate time to absorb moisture. This improves handling and final texture.
- Proofing: Giving the rolls sufficient time to proof allows the yeast (supported by the binders trapping gas) to create volume, resulting in fluffy gluten free dinner rolls.
- Hot Butter Brush: Brushing the hot rolls with melted butter immediately after baking keeps the crust soft and adds moisture and flavor, preventing the hard crust sometimes found in GF breads.
This recipe is a triumph because it understands the nuances of gluten-free baking. It doesn’t just swap out wheat flour; it strategically uses a combination of binders (psyllium AND xanthan gum), a balanced multi-flour blend, a clever leavening assist from baking powder, and enriching ingredients managed carefully, all supported by specific techniques. The result is consistently soft, fluffy, and utterly delicious gluten free dinner rolls that you can enjoy warm from the oven, proving that going gluten-free doesn’t mean sacrificing comfort food classics.

🎁 33 Gluten-Free Breakfasts
Start every day with a smile and flavor. Get our FREE recipe eBook!
Ingredients
Crafting these incredibly soft and fluffy gluten free dinner rolls starts with selecting the right ingredients. Precision is key in gluten-free baking, especially when it comes to binders and flour blends. Here is the exact list of ingredients you’ll need:
- For the gluten free enriched dough:
- 10 g (2½ tsp) active dried yeast (If using instant yeast, use 8g.) – *Active dried yeast provides essential leavening, giving the rolls their rise and wonderful yeasted flavor. Activating it in warm liquid first ensures it’s alive and ready to work.*
- 25 g (2 tbsp) caster/superfine or granulated sugar, divided – *Sugar feeds the yeast, enhancing its activity for a better rise, and also balances the flavors in the rolls.*
- 90 g (⅓ cup + 2 tsp) whole milk, warm – *Warm milk is used to activate the yeast and adds richness and tenderness to the dough.*
- 10 g (2 tbsp) whole/rough psyllium husk (If using psyllium husk powder, use only 8g.) – *This is a crucial binder in gluten-free baking. Psyllium husk absorbs liquid and forms a gel, mimicking the structure provided by gluten. It’s essential for creating a dough that can be handled and shaped, giving these gluten free dinner rolls their signature soft and slightly chewy texture.* Look for whole psyllium husk on Amazon.
- 150 g (½ cup + 2 tbsp) warm water – *Used in combination with psyllium husk to form the necessary gel binder.*
- 160 g (1⅓ cups + 1 tbsp) tapioca starch (You can use an equal weight of arrowroot starch, cornstarch or potato starch instead.) – *A light, starchy flour that contributes to the tender crumb and soft texture of the rolls.*
- 130 g (¾ cup + 3½ tbsp) millet flour, plus extra for flouring the surface (You can use an equal weight of finely milled/ground brown rice flour instead, but your dinner rolls might be slightly less fluffy.) – *A nutrient-rich whole grain flour that provides structure and a subtle, slightly sweet flavor.*
- 25 g (3 tbsp) sorghum flour (You can use an equal weight of light buckwheat flour, white teff flour or oat flour instead. Use the latter only if you’re not sensitive to oats.) – *Another nutritious whole grain flour that adds flavor complexity and structure to the gluten free blend.*
- 5 g (2 tsp) xanthan gum – *Another essential gluten-free binder. Xanthan gum works synergistically with psyllium husk in enriched doughs like these gluten free dinner rolls to create a softer, more delicate crumb structure compared to using psyllium alone.* Find xanthan gum on Amazon.
- 5 g (1 tsp) salt – *Enhances all the flavors in the rolls and helps control yeast activity.*
- 8 g (2 tsp) baking powder – *While these are yeasted rolls, a touch of baking powder provides an extra lift, contributing significantly to the extra soft and fluffy texture that makes these gluten free dinner rolls so close to traditional ones.*
- 1 US large/UK medium egg, room temperature – *Adds richness, helps create a tender crumb, and contributes to the overall structure and soft crust of the rolls.*
- 20 g (1½ tbsp) unsalted butter, melted – *Provides flavor and richness, crucial for an enriched dough like this, while keeping the rolls tender.*
- You will also need:
- Unsalted butter for greasing the baking tin – *Ensures the rolls don’t stick and bake evenly.* Consider an 8-inch square baking pan for this recipe.
- 1 US large/UK medium egg, for egg wash – *Brushing the rolls with egg wash before baking gives them a beautiful golden color and a slightly shiny, soft crust.*
- ¼ tsp salt – *Added to the egg wash to make it less viscous and easier to brush.*
- 30 g (¼ stick) salted butter, melted – *Brushing the hot rolls with melted butter post-baking adds moisture, flavor, and ensures the crust stays wonderfully soft.*
A Note on Measurements: For best results in gluten-free baking, especially when making delicious gluten free dinner rolls, using a digital kitchen scale to weigh your ingredients (particularly flours and binders) is highly recommended over volume measurements (cups and spoons). This provides much greater accuracy, leading to more consistent and successful outcomes.
Nutritional Information
While specific numerical nutritional values can vary based on ingredients used and serving size, these gluten free dinner rolls offer several valuable nutritional insights compared to their traditional wheat-based counterparts.
- **Naturally Gluten-Free:** The most significant benefit is that these rolls are free from gluten, making them safe and enjoyable for individuals with Celiac disease or gluten sensitivity.
- **Fiber Content:** The inclusion of psyllium husk significantly boosts the fiber content of these rolls. Fiber is essential for digestive health, can help regulate blood sugar levels, and contributes to a feeling of fullness.
- **Whole Grains:** Using millet and sorghum flour incorporates whole grains, providing more vitamins, minerals, and slower-digesting carbohydrates than refined flours often found in conventional dinner rolls. These flours offer nutrients like B vitamins, iron, and magnesium.
- **Enriched Dough Benefits:** The egg and small amount of butter contribute protein, healthy fats, and micronutrients, making these rolls more nutrient-dense than lean bread recipes.
- **Control Over Ingredients:** Baking at home gives you complete control over the quality and type of ingredients used, allowing you to avoid artificial additives often found in store-bought bread products.
Enjoying these homemade gluten free dinner rolls means savoring a delicious bread option without compromising on dietary needs or flavor and texture!
Substitutions & Variations
One of the joys of baking at home is the ability to adapt recipes to suit different dietary needs and preferences. Here are some tested substitutions and creative variations for these gluten free dinner rolls:
Substitutions
- Active Dried Yeast: As mentioned, you can swap active dried yeast for 8g instant yeast. If using instant yeast, simply add it directly to your dry ingredients along with the sugar, omitting the activation step in warm milk. The amount of milk designated for yeast activation would then be added with the wet ingredients (psyllium gel, egg, melted butter).
- Psyllium Husk: This ingredient is critical for the structure of these gluten free dinner rolls and *cannot* be substituted with another binder like flax or chia seeds. If using psyllium husk powder instead of whole husk, use only 8% of the weight listed (8g instead of 10g), as the powder is more concentrated.
- Tapioca Starch: You can substitute tapioca starch with an equal weight of arrowroot starch, cornstarch, or potato starch. These starches function similarly to provide tenderness.
- Millet Flour: Finely milled brown rice flour can be used as a direct weight-for-weight substitute for millet flour. However, be aware that this may result in slightly less fluffy gluten free dinner rolls.
- Sorghum Flour: For sorghum flour, you can use an equal weight of light buckwheat flour, white teff flour, or oat flour. If using oat flour, ensure it is certified gluten-free if you have celiac disease or are highly sensitive to cross-contamination.
- Dairy-Free Milk: To make the rolls dairy-free, substitute the whole milk with your preferred unsweetened plain dairy-free milk (like almond, soy, or oat milk). Ensure it’s warned to the correct temperature for yeast activation.
- Dairy-Free Butter: Replace both the melted unsalted butter in the dough and the melted salted butter brush with a good quality plant-based butter alternative. For greasing the pan, use vegan butter or oil.
- Egg: Substituting the egg in enriched GF doughs can be tricky, but options like a commercial egg replacer designed for baking, or a flax egg (1 tbsp flax meal + 3 tbsp water per egg, letting it gel) could potentially work. However, the texture and richness may be slightly different, and the rolls might not be quite as soft or have the same golden crust without the egg wash. For the egg wash, a mix of dairy-free milk or water with a pinch of sugar or maple syrup can provide some color.
Variations
- Garlic Herb Rolls: Mix finely minced fresh garlic and chopped fresh herbs (like rosemary, chives, or parsley) into the dough after the initial kneading phase.
- Cheesy Rolls: Fold in some shredded gluten-free friendly cheese (like cheddar or Gruyere) into the dough during the last minute of kneading. You can also sprinkle cheese on top before baking.
- Larger Rolls: Divide the dough into fewer pieces (e.g., 6 instead of 9) to make larger rolls. Adjust the baking time slightly, potentially adding a few more minutes.
- Different Shapes: Instead of round rolls, you could shape them into knots or small loaves, adjusting baking time as needed for the shape and size.
- Sweet Rolls: Increase the sugar slightly (add an extra tablespoon to the dough) and consider adding a touch of cinnamon or vanilla for a subtly sweeter roll perfect for breakfast or brunch.
Don’t be afraid to experiment with these suggested changes to make these easy gluten free dinner rolls your own!
Essential Equipment for This Recipe
To prepare this recipe, you’ll need the following kitchen tools:
- Mixing Bowls – A set of various sized mixing bowls is essential for preparing ingredients.
Find Mixing Bowls on Amazon - Measuring Cups and Spoons – Precise measurements are key to successful baking.
Find Measuring Cups and Spoons on Amazon - Baking Sheets – For baking cookies or roasting vegetables, a good baking sheet is a must.
Find Baking Sheets on Amazon - Whisks – Perfect for whipping cream or blending sauces.
Find Whisks on Amazon - Spatulas – Ideal for mixing, folding and scraping bowls.
Find Spatulas on Amazon - Food Processors – Great for chopping vegetables or pureeing ingredients.
Find Food Processors on Amazon - Saucepans – For cooking sauces or boiling liquids.
Find Saucepans on Amazon - Chef’s Knives – A sharp knife is essential for any kitchen.
Find Chef’s Knives on Amazon - Cutting Boards – Protect your counters while you chop and slice.
Find Cutting Boards on Amazon
-
Activate the Yeast for Light, Fluffy Gluten Free Dinner Rolls
Begin by activating your active dried yeast. In a small bowl, combine the yeast with 10g (about 1 tablespoon) of the granulated or superfine sugar specified in the ingredients list, and the warm milk. Gently stir them together. Set this mixture aside in a warm spot for 10 to 15 minutes. You’ll know the yeast is active and ready when the mixture becomes foamy and starts frothing on top. This bubbling indicates that the yeast is alive and working, which is crucial for the rise and texture of your delicious gluten free dinner rolls.
Tip: If you’re using instant yeast instead of active dry, you can skip this activation step. Simply add the instant yeast directly to the dry ingredients in a later step along with the rest of the sugar. The warm milk that would have been used for activation should then be added to the dry ingredients along with the psyllium gel, egg, and melted butter.
-
Prepare the Psyllium Gel
In a separate bowl, measure out the psyllium husk (ensure you’re using the correct type – whole psyllium husk is specified, but if using powder, adjust the amount as noted in the recipe card; remember you cannot substitute psyllium husk with another ingredient for these gluten free dinner rolls as it’s essential for texture and structure). Mix the psyllium husk with the warm water until they are evenly combined. Stir well. Within about 30 to 45 seconds, you’ll notice the mixture thickening significantly and forming a gel-like consistency. This psyllium gel acts as a vital binder in gluten-free baking, mimicking some of the structure typically provided by gluten.
-
Combine Dry Ingredients
For best results, especially with gluten-free dough, we recommend using a stand mixer fitted with the dough hook attachment. This significantly simplifies the kneading process and helps achieve a smoother dough texture. If you don’t have a stand mixer, you can still make the dough by hand in a large bowl.
In the bowl of your stand mixer (or your large mixing bowl if working by hand), whisk together the tapioca starch, millet flour, sorghum flour, xanthan gum, salt, baking powder, and the remaining sugar. Whisking helps ensure these ingredients, including the important xanthan gum and baking powder that contribute to the soft texture of these gluten free dinner rolls, are evenly distributed.
Substitution Note: Ensure your gluten-free flours and starches are measured accurately, ideally using a digital food scale for precision, as volume measurements can vary widely with different flour blends. Check the recipe card or ingredient list for acceptable substitutions for tapioca starch, millet flour, and sorghum flour if needed, always using weight measurements for substitutions.
-
Add Wet Ingredients to Dry
Create a well in the center of your dry ingredients mixture. Pour in the whisked egg (ensure it’s at room temperature for better incorporation), the melted unsalted butter, the activated yeast mixture (or the milk if using instant yeast), and the psyllium gel you prepared in the previous step.
-
Knead the Dough for Structure
With the dough hook on your stand mixer, start kneading the dough on a low speed until all the ingredients are thoroughly combined and no dry pockets of flour remain. Once it looks mostly uniform, continue kneading for an additional 5 minutes. If you are kneading by hand, continue kneading vigorously for 8 to 10 minutes. Use a rubber spatula periodically to scrape down the sides and bottom of the bowl, ensuring everything gets incorporated into the dough.
Tip: This extra kneading time is key for developing the structure in gluten-free dough aided by the psyllium and xanthan gum. It results in an extra-smooth dough surface, which helps your finished gluten free dinner rolls have that beautiful, rounded, non-craggy appearance once baked.
-
Manage Dough Stickiness
Don’t be alarmed if the final dough feels slightly sticky to the touch – this is completely normal for this type of enriched gluten-free dough and helps keep the final rolls moist and soft. You’ll be working with it on a lightly floured surface, which will help manage the stickiness. It’s crucial to resist the urge to add extra flour directly into the dough, as this can weigh down the dough and result in dense, dry gluten free dinner rolls.
Troubleshooting Tip: If you find the dough excessively sticky and difficult to handle even with floured hands and a floured surface, you can wrap it tightly and chill it in the refrigerator for about 1 hour before proceeding. Chilling helps the flours hydrate further and firms up the butter, making the dough much easier to manage and shape.
-
Prepare Your Baking Tin
Get your 8-inch (20cm) square baking tin ready. You can either lightly grease the inside of the tin with a little unsalted butter or line it neatly with parchment paper or baking paper. This preparation ensures the delicate gluten free dinner rolls won’t stick to the pan after baking.
-
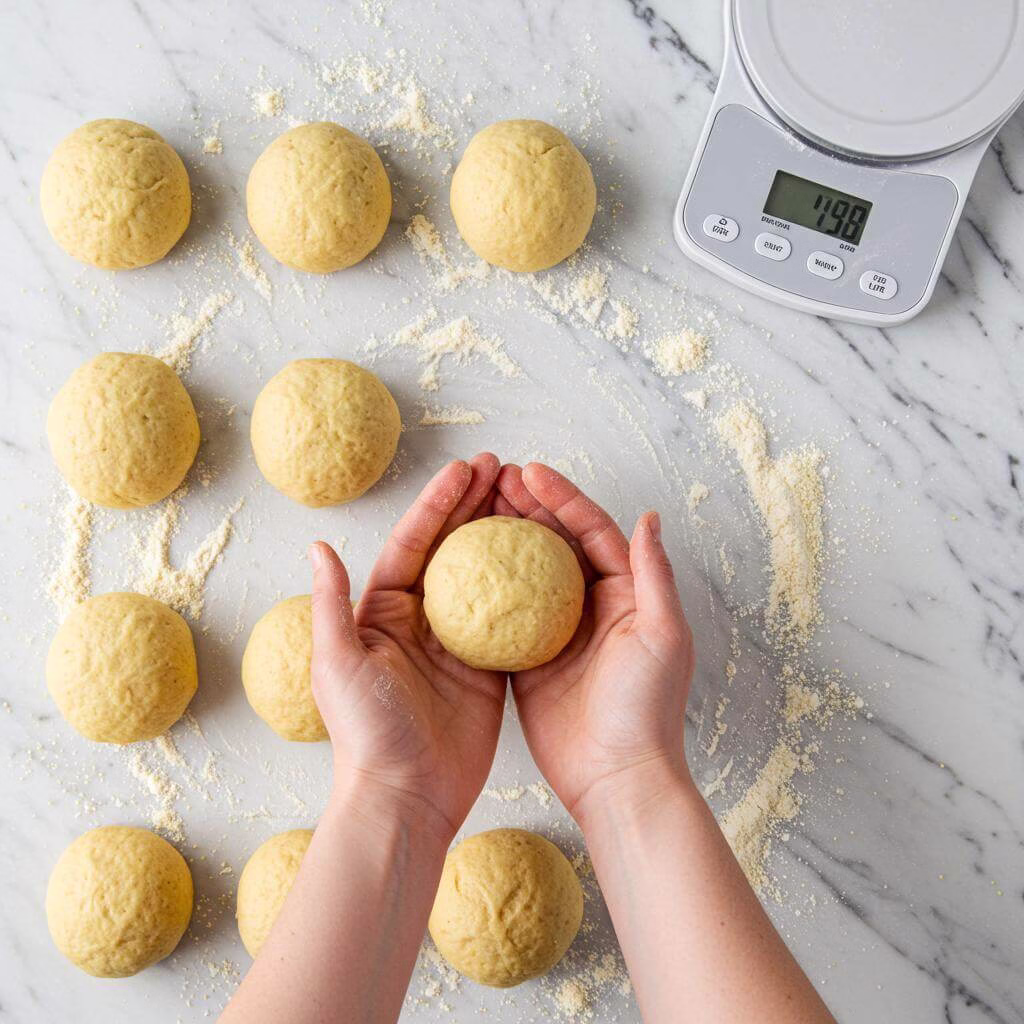
Divide the Dough
Lightly flour your work surface (using a gluten-free flour like millet flour is a good choice here, matching one of the flours in the recipe). Turn the dough out onto the floured surface. Divide the dough into 9 equal pieces. For consistent results and even baking, we highly recommend using a digital food scale to weigh each piece. Aim for each piece to weigh approximately 76g.
Tip: Dividing the dough by weight rather than just visually ensures that all your gluten free dinner rolls are the same size, guaranteeing they bake evenly and finish at the same time.
-
Shape Each Dinner Roll
Work on your lightly floured surface to shape each of the 9 dough pieces into a round ball. Here’s a precise method:
- Take one piece of dough and gently flatten it slightly.
- Imagine the dough is a square and grab the four “corners” or edges. Bring these corners in towards the center of the dough, almost as if you are creating a little pouch or bundle.
- Pinch the gathered ends tightly together at the bottom to seal the pouch.
- Turn the piece of dough seam-side down onto the clean, lightly floured surface.
- Cup your clean hand over the dough piece, forming a loose “claw” or dome shape.
- Keeping your hand cupped over the dough, move your hand in a small, quick circular motion on the surface. This action rotates the dough ball firmly in place against the counter. As it rotates, the tension created helps smooth the surface into a perfect round ball and further seals the seam securely underneath. Practice this motion a couple of times; it’s easier than it sounds!
Repeat this shaping process for all 9 pieces of dough.
-
Arrange Rolls for Proofing
Carefully transfer the shaped gluten free dinner rolls to the prepared 8-inch square baking tin. Arrange them in a 3×3 grid. At this stage, the rolls should just barely be touching each other. They will expand significantly during proofing and baking.
-
Proof the Gluten Free Dinner Rolls
Proofing is essential for light and airy gluten free dinner rolls. Place the baking tin holding the rolls in a warm place. An ideal proofing temperature is around 79ºF (26ºC). Let them proof for about 1 hour, or until they have roughly doubled in volume and are snuggled closely together in the tin.
To prevent a dry skin from forming on the dough’s surface during proofing (which can hinder rising), lightly cover the baking tin with a sheet of plastic wrap or a clean, damp tea towel. Avoid sealing it too tightly; the rolls need room to expand.
Tip: If your kitchen is cool, you can create a warm proofing environment by using your oven. Turn your oven on to the lowest setting (often around 150°F or 65°C) for just 1-2 minutes, then turn it OFF. Place the covered rolls inside the *turned-off*, warm oven to proof.
-
Prepare for Baking
While the rolls are finishing their proofing (typically during the last 15-20 minutes), preheat your oven. Adjust an oven rack to the middle position. Preheat your conventional/non-fan oven to 375°F (190°C).
Oven Adjustment: If you are using a convection or fan oven, reduce the temperature to 350°F (170°C), as fan ovens distribute heat more intensely.
-
Prepare the Egg Wash
In a small bowl, whisk together the remaining US large/UK medium egg with ¼ teaspoon of salt. Whisk until the egg is well-beaten and the salt is dissolved.
Tip: Adding a pinch of salt to the egg wash helps break down the egg’s viscosity, making it thinner and easier to brush onto the rolls smoothly without deflating them. This egg wash will give your gluten free dinner rolls a beautiful golden-brown color and a slightly glossy finish.
-
Apply the Egg Wash
Once the gluten free dinner rolls have doubled in volume after proofing, very gently brush the tops and visible sides of each roll with the prepared egg wash. Be delicate during this step to avoid deflating the airy dough.
-
Bake to Golden Perfection
Transfer the baking tin with the brushed gluten free dinner rolls to the preheated oven on the middle rack. Bake for approximately 20 to 22 minutes, or until the tops are a beautiful golden brown color.
To check for doneness, especially for the rolls in the center, you can carefully insert a toothpick or skewer into the middle of a center roll. If it comes out clean with no wet or raw dough attached, they are done.
Optional Tip for Extra Oven Spring: Some bakers like to give their rolls a boost of steam as they enter the oven. You can lightly spritz the rolls with water from a clean spray bottle (3-4 sprays) right as you place the tin in the oven. This can help achieve slightly better oven spring and a thinner crust.
-
Finish with Melted Butter
Immediately after taking the gluten free dinner rolls out of the oven, while they are still piping hot in the tin, generously brush the tops and sides with the melted salted butter. Use a pastry brush to ensure even coverage.
Tip: Brushing with melted butter while hot serves two crucial purposes: it helps keep the crust wonderfully soft as the rolls cool slightly and adds another layer of rich, buttery flavor that makes these gluten free dinner rolls irresistible.
-
Serve and Enjoy!
The absolute best way to enjoy these homemade gluten free dinner rolls is while they are still hot or warm! Unlike many other gluten-free bread recipes that require cooling to avoid a gummy texture, these are perfectly soft and delicious straight from the oven. Serve them warm with extra butter, jam, or alongside your meal.
-
Storage and Reheating
These gluten free dinner rolls are undeniably at their peak freshness and softness on the day they are baked. If you have leftovers, store them in a closed container at room temperature for up to 2 to 3 days. To bring them back to their fluffy glory, reheat them briefly before serving. A quick reheat in the microwave (15-20 seconds per roll) or warming them in a hot oven (if reheating several at once) works wonderfully. You can also slice and toast them or even fry them in a little butter for a different texture.

Tips for Achieving the Softest Gluten Free Dinner Rolls
Making delicious, pillowy-soft gluten free dinner rolls is absolutely achievable, and with a few key tips, you’ll consistently get fantastic results. These simple guidelines are tailored specifically for working with gluten-free doughs, helping you avoid common pitfalls and ensuring your gluten free dinner rolls are the star of any meal!
- Weigh Your Ingredients: This is perhaps the MOST critical tip in gluten-free baking, especially for something like enriched gluten free dinner rolls. Gluten-free flours vary significantly in weight by volume compared to wheat flour. Using a digital kitchen scale for the flour and binder amounts (psyllium husk, xanthan gum) ensures you have the precise ratios needed for the perfect dough consistency and structure. Measuring by cups can easily lead to too much or too little flour, resulting in dense or crumbly gluten free dinner rolls.
- Activate Your Yeast Properly: If using active dry yeast, don’t skip the activation step with warm milk and a pinch of sugar. This confirms your yeast is alive and ready to create that beautiful rise in your gluten free dinner rolls. If it doesn’t froth or bubble after 10-15 minutes, start over with a new packet of yeast. Happy yeast makes happy rolls!
- Understand Psyllium Gel: Psyllium husk is your gluten substitute hero in this recipe, providing structure and elasticity. Mixing it with water before adding to the dry ingredients allows it to form a gel. Make sure this gel has had a moment to thicken (30-45 seconds) before combining everything. This ensures the binder is properly hydrated and distributed, which is vital for shaping and the final texture of your gluten free dinner rolls.
- Don’t Skimp on Kneading: Even though there’s no gluten to develop, the kneading step is still important for gluten-free enriched doughs like these gluten free dinner rolls. Kneading, especially with a stand mixer, helps hydrate all the flours and binders evenly and creates a smoother dough. The extra 5 minutes recommended after initial mixing helps achieve that desirable smooth surface on your finished rolls.
- Handle Sticky Dough with Confidence (or Chill It!): Gluten-free doughs can often be stickier than their wheat counterparts. Resist the urge to simply dump in more flour, as excess flour leads to dry, dense gluten free dinner rolls. If the dough is truly too difficult to handle even with lightly floured hands and surface, the recipe’s tip to chill it for an hour is genius. The cold helps the flours hydrate further and firms up the butter, making shaping much easier.
- Create a Warm Proofing Environment: Yeast needs warmth to do its job efficiently. A warm place, ideally around 79°F (26°C), is perfect for proofing these gluten free dinner rolls. Covering them lightly prevents the surface from drying out. If your kitchen is cool, a slightly warmed (turned off!) oven is an excellent spot for proofing. Proper proofing is key to achieving fluffy gluten free dinner rolls.
- Check for Doneness: Gluten-free baked goods can sometimes look golden brown on the outside but still be slightly gummy inside. Using a toothpick or skewer inserted into the center of a middle roll is a great way to check. It should come out clean with no wet dough attached. This ensures your gluten free dinner rolls are perfectly baked all the way through.
- Brush with Butter Immediately After Baking: The recipe calls for brushing the hot gluten free dinner rolls with melted salted butter right out of the oven. This step is not just for extra flavor and richness; it helps keep the crust incredibly soft, contributing to that perfect texture you crave in gluten free dinner rolls.
Common Mistakes to Avoid When Baking Gluten Free Dinner Rolls
Even with the best recipe for gluten free dinner rolls, a few common errors can impact your results. Steer clear of these to ensure your rolls turn out beautifully every time:
- Using Volume Measurements (Cups) Instead of Weight (Grams): We mentioned this as a tip, but it’s so important it’s also a major mistake to avoid! Gluten-free flour blends, and individual flours like millet and sorghum, don’t weigh the same per cup as wheat flour, and consistency between batches is difficult. Relying on cups for these ingredients in gluten free dinner rolls can drastically alter the flour-to-liquid and flour-to-binder ratios, leading to unpredictable and often disappointing textures like gumminess or excessive crumbling.
- Substituting Psyllium Husk: The recipe explicitly states that psyllium husk cannot be substituted. It is a unique binder that provides the necessary structure and elasticity for shaping and proofing gluten free dinner rolls like these. Using flax meal, chia seeds, or other binders won’t yield the same results, and you’ll likely end up with rolls that don’t hold their shape or have the desired soft, slightly chewy texture.
- Adding Too Much Extra Flour: While some flour is needed for shaping on your work surface, adding spoonfuls of extra flour directly into the dough because it feels a bit sticky is a common mistake. Gluten-free dough is often stickier by nature. Adding too much flour will absorb excess moisture, resulting in dry, dense, and heavy gluten free dinner rolls instead of the light and fluffy ones you’re aiming for. Trust the recipe’s intended hydration level, using the chilling tip if needed for easier handling.
Frequently Asked Questions
Why does this recipe for gluten free dinner rolls call for both psyllium husk and xanthan gum? Aren’t they both binders?
That’s a great question! While both psyllium husk and xanthan gum act as gluten replacements and binders in gluten-free baking, they work in slightly different ways, especially in enriched doughs like these dinner rolls. Psyllium husk provides essential structure, allowing the dough to be handled and shaped, and contributes a lovely soft and slightly chewy texture to the final roll. Xanthan gum, on the other hand, helps create a softer, more delicate crumb structure. Using a combination of both binders results in a texture that is much closer to traditional wheat-based dinner rolls—pillowy-soft and not overly dense or chewy.
The recipe lists baking powder in addition to yeast. Is that standard for dinner rolls, and what does it do?
You’re right to notice that! While traditional dinner rolls rely solely on yeast for leavening, in the world of gluten-free baking, sometimes we use a little “cheat” to achieve that perfect texture. Adding baking powder to these yeasted gluten free dinner rolls provides an extra lift and helps make them significantly softer and fluffier. It’s a small trick, but it makes a huge difference in getting that wonderfully light crumb that’s hard to achieve with yeast alone in a gluten-free dough.
My dough feels quite sticky even after kneading. Did I do something wrong, or should it be like that?
Don’t worry, a slightly sticky dough is completely normal for this recipe! This stickiness helps ensure your gluten free dinner rolls stay moist and soft after baking. The key is to work on a lightly floured surface, which will help manage the stickiness as you shape the rolls. It’s important to resist the temptation to add more flour directly into the dough itself, as this can lead to dry and dense rolls. If you find the dough excessively difficult to handle even on a floured surface, a great tip is to cover it well and chill it in the refrigerator for about an hour before shaping. This helps the flours hydrate and firms up the butter, making the dough easier to work with.
Can I substitute the flours (tapioca starch, millet flour, sorghum flour) with other types of gluten-free flours?
Yes, the blog post includes tested substitution options! For the tapioca starch, you can use an equal weight of arrowroot starch, cornstarch, or potato starch. For the millet flour, finely milled brown rice flour can be used as a direct weight substitute, though your rolls might be slightly less fluffy. For the sorghum flour, you can substitute with an equal weight of light buckwheat flour, white teff flour, or certified gluten-free oat flour (if you are not sensitive to oats). Remember, it’s crucial to make substitutions by weight (using a kitchen scale) rather than volume for the most reliable results in gluten-free baking. Also, please note that the psyllium husk is essential for structure and cannot be substituted in this specific recipe.
The recipe mentions making these gluten free dinner rolls ahead of time. How far in advance can I prepare them, and what’s the best way to do it?
Absolutely! These rolls are great for prepping ahead. You have two main options: First, you can make the dough completely and store it in a covered container in the fridge overnight. The next day, you would take the dough out, shape the rolls, proof them until doubled, and then bake as directed. The second option is to make the dough, shape the rolls, place them in the baking tin, cover tightly, and refrigerate overnight. The following day, you’ll take the tin out, let the rolls come to room temperature, and if they haven’t fully doubled in size by then, give them a little extra proofing time before egg washing and baking. The post recommends not keeping the dough in the fridge for longer than one day for best results.
How long do these homemade gluten free dinner rolls stay fresh? What’s the best way to store and reheat leftovers?
These gluten free dinner rolls are definitely at their absolute best enjoyed warm, straight from the oven on the day they’re baked – you don’t even need to wait for them to cool like some other gluten-free bread recipes! If you happen to have any leftovers (which is unlikely, they’re that good!), you can store them in a closed container at room temperature for up to 2 to 3 days. To bring them back to that lovely soft texture, it’s recommended to reheat them. A quick 15-20 seconds in the microwave per roll usually does the trick, or you can pop several into a hot oven for a few minutes. They’re fluffiest and most delicious when served hot or warm after reheating.
Why is using a kitchen scale so strongly recommended over cup measurements for these gluten free dinner rolls?
Using a digital kitchen scale for measuring ingredients, especially flours, starches, and binders like psyllium husk and xanthan gum, is highly recommended in gluten-free baking because it provides much greater accuracy than volume measurements (cups and spoons). Gluten-free flours can vary significantly in weight depending on how they’re scooped or packed. Using a scale ensures you’re using the exact amount of each ingredient specified in the recipe by weight (grams), which is crucial for the precise balance needed to achieve the perfect soft, fluffy texture of these gluten free dinner rolls consistently every time. It leads to more reliable and delicious results!

4 Comments