Delicious Gluten Free Hot Cross Buns: A Must-Have Treat
Embrace the joy of the season with these truly exceptional **gluten free hot cross buns**. Wonderfully soft, incredibly rich, and bursting with flavour from generous amounts of dried fruit, these buns prove that you don’t have to miss out on classic treats just because you follow a gluten-free lifestyle. In fact, their deliciousness is so convincing, you might even forget they’re gluten free!
Creating bakery-quality baked goods can sometimes feel challenging when avoiding gluten, but this recipe simplifies the process without compromising on taste or texture. Just like perfecting The Best Gluten Free Banana Bread or fluffy Gluten Free Pancakes, understanding the nature of gluten-free dough is key. These hot cross buns have been specifically developed to be incredibly easy to make, featuring an optimised process that requires only a single proof, saving you time while still delivering outstanding results.
The Secrets to Soft & Chewy Gluten-Free Baking
Achieving that perfect brioche-like softness and satisfying bready chewiness in gluten-free baking often relies on the right blend of ingredients. In this recipe, the combination of psyllium husk and xanthan gum is crucial. Psyllium husk provides the necessary structure and chewiness, while xanthan gum helps give the dough elasticity and that desirable springy softness. This dynamic duo ensures the dough can properly rise and hold its shape, unlike traditional wheat-based doughs.
Beyond the base ingredients, special techniques enhance the final product. Soaking dried fruit beforehand, for instance, ensures plump, juicy additions that prevent the buns from drying out. Careful shaping techniques, even with a naturally less elastic gluten-free dough, help create beautifully rounded buns. And incorporating steam during the initial baking phase is a game-changer, promoting excellent oven spring and a smoother crust – a technique that can benefit many of your gluten-free baking projects.
Get ready to bake a batch of these irresistible gluten free hot cross buns and enjoy a truly special treat!

🎁 33 Gluten-Free Breakfasts
Start every day with a smile and flavor. Get our FREE recipe eBook!
Detailed Instructions for Gluten Free Hot Cross Buns
Ready to bake some absolutely delicious gluten free hot cross buns? Follow these simple step-by-step instructions for perfect results every time. We’ll walk you through making the dough, shaping the buns, preparing the crosses, and baking them to golden perfection.
Preparing the Ingredients
- Line a large baking sheet with baking/greaseproof paper.
- In a small bowl, pour boiling hot water over the sultanas or raisins until they are completely covered. Set them aside for approximately 10 minutes to plump up and re-hydrate.
- Drain the water from the sultanas/raisins, ensuring you squeeze out any excess moisture. Set them aside.
- In a separate small bowl, whisk together the psyllium husk and water. A gel-like consistency will form after about 15 seconds. Set this psyllium gel aside. Note: If using psyllium husk powder instead of whole husk, use only 85% of the weight specified in the recipe, as powder is more absorbent. Psyllium husk is crucial for structure in gluten-free baking and cannot be substituted with a different ingredient.
Mixing the Dough
- In a large bowl (or the bowl of a stand mixer, if using), whisk together the tapioca starch (or an equal weight of arrowroot starch, cornstarch/cornflour, or potato starch), millet flour (or an equal weight of finely milled brown rice flour), sorghum flour (or an equal weight of buckwheat, white teff, or gluten free oat flour), sugar, xanthan gum, salt, instant yeast (if using active dried yeast, use 10g and activate it first as noted below), and cinnamon.
- Make a well in the center of the dry ingredients and add the warmed milk, melted butter, room temperature egg, and the prepared psyllium gel.
- Tip for Active Dried Yeast: If using active dried yeast, activate it before adding by mixing it with the warm milk and about a teaspoon of the granulated sugar. Let stand for 5-10 minutes until bubbly or foamy, confirming it’s active. Then, add this mixture to the dry ingredients.
- Using a wooden spoon, mix everything well until the dough starts to come together. If using a stand mixer fitted with the dough hook, mix on medium speed, ensuring you scrape down the sides of the bowl to incorporate all dry spots.
Kneading and Adding Fruit
- Once the dough starts to come together, knead it by hand until it is homogeneous with no patches of un-mixed flour. Achieve this by squeezing the dough through your fingers, working around the bowl until all flour is incorporated. The dough will be quite soft and sticky but should pull away from the bowl’s sides. (Alternatively, continue using a stand mixer fitted with the dough hook until the dough is smooth and combined).
- Add the re-hydrated sultanas/raisins and the mixed candied peel. Gently knead them into the dough until they are evenly distributed throughout.
- Transfer the dough onto a generously floured surface and lightly knead it just until it forms a cohesive ball. Be cautious not to knead in excessive extra flour, which can make the buns dry.
Shaping the Buns
- Roll the dough into a long log shape and divide it into 8 equal pieces. For best results and uniform size, using a scale to weigh the pieces is recommended.
- Shape each piece into a ball. Here’s a good method: On a lightly floured surface, gently flatten one dough piece to about ½ inch (1-1.5cm) thickness into a rough circular shape.
- Gather the edges of the dough and fold them upwards and towards the center.
- Pinch the seams tightly together to seal, forming a pouch.
- Turn the dough ball seam-side down. Cup your hand over the ball like a claw and move your hand in a small circular motion on the surface to tighten and round the ball.
- Finally, use the heels of your palms to rotate the dough ball in place. This helps further seal the seams and creates a smoother, rounder shape. Repeat with the remaining dough pieces.
- Note on appearance: Due to the absence of gluten and the high content of dried fruit, the surface of these buns will not be as perfectly smooth as traditional wheat-based buns. Don’t worry; some of this will smooth out during baking due to “oven spring” (the final rise in the oven).
Proofing the Buns
- Transfer the shaped buns onto the prepared lined baking sheet, ensuring they are spaced at least ¾ inch (2cm) apart from each other. Arranging them in two rows of four works well.
- Important Spacing Tip: Proper spacing is crucial for gluten-free buns. Unlike wheat buns that are often baked touching, allowing space encourages moisture evaporation during baking, preventing a heavy or wet texture. It also promotes vertical rise rather than horizontal spread. For taller buns, increase the spacing even more so they don’t touch after proofing.
- Lightly cover the buns with cling film and allow them to proof in a warm location until they have approximately doubled in volume. This typically takes about 1 hour to 1 hour 15 minutes. After proofing, the buns may lightly touch at some points but should not be fully fused together.
- While the buns are proofing, prepare your oven for baking: Adjust an oven rack to the middle position and place a baking tray on the bottom rack of the oven. Preheat the oven to 430ºF (220ºC). Note: This temperature is for a conventional oven. If using a fan oven, reduce the temperature by 20ºC, though conventional heat is generally preferred for gluten-free baking if possible.
Preparing Egg Wash and Crosses
- For the egg wash, whisk together the egg and milk in a small bowl until well combined.
- For the crosses, whisk together the plain gluten free flour blend (ensure it’s plain; if your blend contains xanthan gum, omit the extra ¼ tsp), the xanthan gum (if needed), sunflower oil, and water until a smooth, slightly runny but viscous mixture forms.
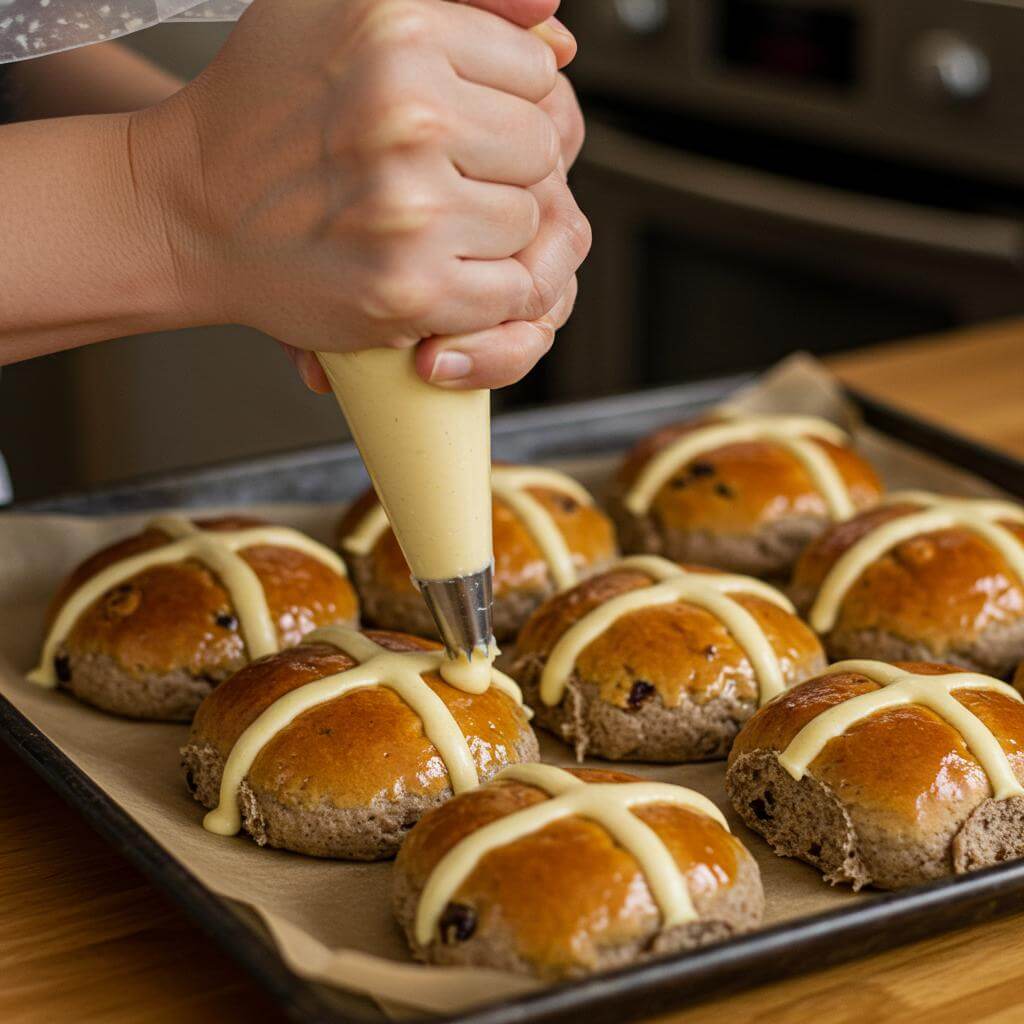
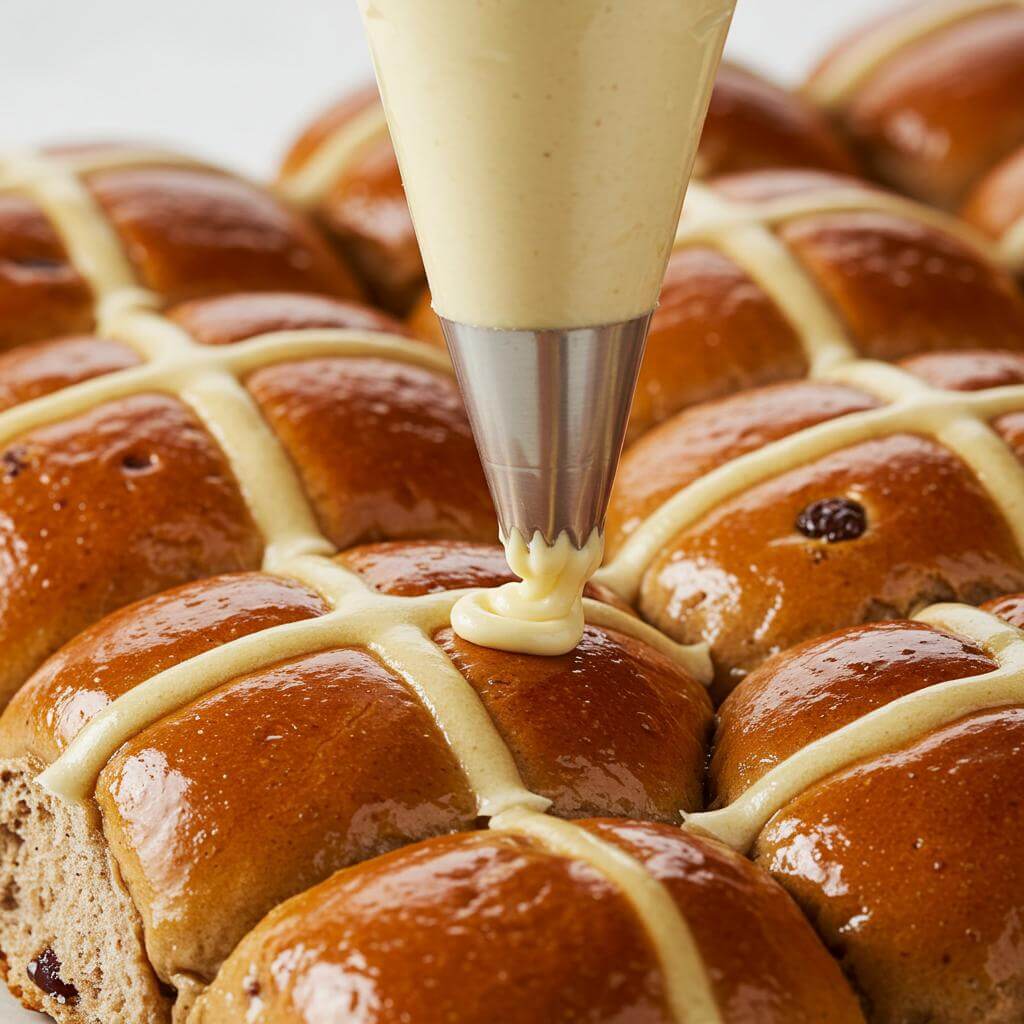
- Transfer the cross mixture into a piping bag fitted with a small round nozzle.
- Cross Mixture Consistency Tip: Adjust consistency by adding more water if too thick or a little more gluten-free flour if too runny. A slightly runnier mixture is preferred as it bakes up softer. Using water instead of milk helps the crosses retain an off-white color and prevents excessive browning.
- Once the buns are proofed, gently brush them all over with the egg wash.
- Pipe the cross mixture onto the tops of the buns. Pipe a continuous line along each row of buns horizontally, then pipe lines in the perpendicular direction across the rows to create the cross pattern on each bun.
Baking the Buns
- Place the baking sheet with the prepared buns into the pre-heated 430ºF (220ºC) oven on the middle rack.
- Quickly and carefully pour boiling hot water into the baking tray on the bottom rack. Immediately close the oven door and reduce the oven temperature to 400ºF (200ºC).
- Baking Tip: The initial high temperature combined with the steam from the water helps maximize oven spring and smooth the bun surfaces.
- Bake with steam for 10 minutes. After 10 minutes, carefully remove the baking tray with the hot water from the oven. Continuing to bake for too long with steam can result in heavy buns.
- Continue baking the buns in the dry oven environment for an additional 20-25 minutes, or until they are deep golden brown and cooked through.
- If the buns begin to brown too quickly before they are fully baked, loosely cover them with aluminum foil (shiny side up) and continue baking until done.
Finishing and Cooling
- Once baked, immediately slide the gluten free hot cross buns off the baking sheet and the parchment paper onto a wire cooling rack. This allows steam to escape, contributing to a soft crumb texture that isn’t wet or heavy.
- While the buns are still hot, prepare the apricot glaze: In a small saucepan on the stove or in a microwave-safe bowl, heat the apricot jam with the water, stirring occasionally, until it becomes a runny glaze.
- Brush the hot buns liberally with the warm, runny apricot jam glaze. This adds flavor, a beautiful shine, and further softens the crust.
- Allow the buns to cool on the wire cooling rack until they are warm or reach room temperature before serving.
Storage
These gluten free hot cross buns are best enjoyed slightly warm from the oven or on the day they are baked. Store any leftovers in an airtight container at room temperature for 2-3 days. To refresh them, briefly reheat in the microwave for about 20 seconds; they will regain their soft, delicious texture.
Ingredients for Your Gluten-Free Hot Cross Buns
Crafting delicious gluten-free hot cross buns requires a careful selection of naturally gluten-free ingredients. This list provides everything you need, ensuring you can bake these Easter treats without compromise. We’ve kept everything exactly as listed to make following the recipe simple.
- 85 g (½ cup) sultanas or raisins
- 16 g (3 tbsp) whole/rough psyllium husk (If using psyllium husk powder, use only 14g.)
- 260 g (1 cup + 1 ½ tbsp) warm water
- 230 g (2 cups) tapioca starch (You can also use an equal weight of arrowroot starch, cornstarch (US) or cornflour (UK), or potato starch.)
- 160 g (1 cup + 3 tbsp) millet flour, plus extra for flouring the surface (You can also use an equal weight of finely milled brown rice flour.)
- 70 g (⅓ cup + 3 ½ tbsp) sorghum flour (You can also use an equal weight of buckwheat, white teff or gluten free oat flour.)
- 50 g (¼ cup) granulated sugar
- 8 g (1 tbsp) xanthan gum
- 8 g (1 ¼ tsp) salt
- 8 g (2 ½ tsp) instant yeast (If using active dried yeast, use 10g.)
- 1 tsp ground cinnamon
- 140 g (½ cup + 1 ½ tbsp) whole milk, warmed
- 30 g (¼ stick) unsalted butter, melted
- 1 UK medium/US large egg, room temperature
- 90 g (about ½ cup, 3 oz) mixed candied lemon and orange peel
For egg wash:
- 1 UK medium/US large egg
- 15 g (1 tbsp) whole milk
For crosses:
- 50 g (⅓ cup + 1 tbsp) plain gluten free flour blend (I used Doves Farm Freee plain gluten free flour, which doesn’t contain xanthan gum.)
- ¼ tsp xanthan gum (Omit if your GF flour blend already contains xanthan gum.)
- 10 g (2 tsp) sunflower oil
- 60 g (¼ cup) water
You will also need:
- 50 g (2 ½ tbsp) apricot jam
- 8 g (½ tbsp) water
Nutritional Insights for Your Gluten-Free Hot Cross Buns
While specific calorie and macronutrient counts will vary based on the exact ingredients used and bun size, these gluten-free hot cross buns offer some valuable nutritional considerations, particularly for those following a gluten-free lifestyle.
Naturally Gluten-Free Goodness:
This recipe is inherently gluten-free, making it a safe and delicious option for individuals with Celiac disease or non-celiac gluten sensitivity. By using a blend of naturally gluten-free flours like millet and sorghum, along with tapioca starch, you avoid the digestive issues associated with gluten consumption for sensitive individuals.
Fiber Boost from Psyllium:
The inclusion of whole/rough psyllium husk is a fantastic addition, not just for structure in gluten-free baking, but also for dietary fiber. Fiber is crucial for digestive health, helping to regulate blood sugar levels and contributing to a feeling of fullness. Gluten-free baked goods can sometimes be lower in fiber, so adding psyllium helps bridge that gap.
Energy from Carbohydrates and Fats:
These buns provide energy primarily from the carbohydrates in the flours, starch, sugar, and dried fruit (sultanas/raisins, mixed candied peel). Butter and the egg contribute fats and some protein, adding richness and aiding in texture. The apricot jam glaze adds additional sugars.
Potential Micronutrients:
While not a primary source of vitamins and minerals, the dried fruits can contribute small amounts of iron and potassium. The flours may offer trace amounts of various nutrients depending on the type used.
Remember to consider portion sizes as these are a treat item. Enjoy your delicious and safe-to-eat gluten-free hot cross buns!
Tips, Substitutions, and Storage for Perfect Gluten-Free Hot Cross Buns
Making exceptional gluten-free baked goods is achievable by following a few key tips and understanding how substitutions work within this recipe. Here’s what you need to know:
Essential Baking Tips:
- Use a Kitchen Scale: For the most reliable results in gluten-free baking, using a digital kitchen scale to measure ingredients by weight (grams) is highly recommended over volume measurements (cups and spoons).
- Plump the Fruit: Soaking the sultanas or raisins in hot water before adding them ensures they are juicy and plump, enhancing the texture and flavor of the buns. Drain them thoroughly after soaking.
- Psyllium Gel is Key: Mixing the psyllium husk with water creates a gel, which is vital for providing structure and elasticity to gluten-free dough. Make sure to use the specified amount and let it sit briefly to thicken.
- Dough Consistency: Gluten-free dough will be softer and stickier than wheat dough. Don’t be tempted to add too much extra flour when kneading. It should still come away from the bowl sides.
- Shaping Technique: Achieving a nice round shape requires a specific technique of folding the edges towards the center and then rotating the ball seam-side down using your hand like a claw. This helps build tension and results in rounder buns after baking.
- Proper Spacing: Leave at least ¾ inch (2cm) between the buns on the baking sheet before proofing. Unlike wheat buns, you don’t want them packed tightly together, as adequate space allows for better moisture evaporation during baking, preventing a heavy or stodgy texture. It also encourages them to rise upwards rather than spread outwards.
- Cross Mixture: The cross mixture should be relatively runny to prevent it from becoming hard once baked. Using sunflower oil and water helps achieve this soft texture. Adjust consistency with a little extra gluten-free flour blend or water as needed for easy piping with a piping bag.
- Steam Baking: Starting the bake with steam (by pouring boiling water into a tray at the bottom of the oven) at a high temperature helps maximize oven spring and smoothes the crust. Remove the steam source after 10 minutes to prevent heavy buns.
- Cooling is Crucial: Transferring the hot buns onto a wire cooling rack immediately after baking allows steam to escape, contributing to a soft, light crumb.
- Apricot Glaze: Brushing the warm buns with heated apricot jam adds shine, flavor, and helps soften the crust further. Adjust the jam consistency by heating it with a little water.
Possible Substitutions (By Weight Only!):
While this recipe is quite specific in its flour blend for optimal results, some substitutions are possible. Always substitute by weight (grams) for accuracy.
- Yeast: If using active dried yeast instead of instant, activate 10g first in the warm milk with a teaspoon of sugar until foamy, then proceed with the recipe.
- Psyllium Husk: CANNOT BE SUBSTITUTED with a different ingredient. It is essential for the structure. If using psyllium husk powder, use 85% of the weight (14g instead of 16g).
- Xanthan Gum: CANNOT BE SUBSTITUTED with a different ingredient. It provides crucial elasticity and softness.
- Tapioca Starch: You can use an equal weight of arrowroot starch, cornstarch (US) / cornflour (UK), or potato starch.
- Millet Flour: Substitute with an equal weight of finely milled brown rice flour.
- Sorghum Flour: Use an equal weight of buckwheat, white teff, or gluten free oat flour.
Storage:
These gluten-free hot cross buns are truly best enjoyed warm from the oven on the day they are baked. However, they can be stored in an airtight container at room temperature for 2-3 days. To refresh them, a quick 20-second warm-up in the microwave will restore their lovely soft texture, making them taste just like freshly baked!
Essential Equipment for This Recipe
To prepare this delicious recipe, you’ll need the following kitchen tools:
- Mixing Bowls – A set of sturdy mixing bowls is essential for combining wet and dry ingredients.
Find Mixing Bowls on Amazon - Measuring Cups and Spoons – Accurate measurements are key for baking success!
Find Measuring Cups and Spoons on Amazon - Baking Sheets – Perfect for evenly baking your treats.
Find Baking Sheets on Amazon - Whisks – Use a whisk to incorporate air and combine ingredients smoothly.
Find Whisks on Amazon - Spatulas – Ideal for folding ingredients and scraping bowls clean.
Find Spatulas on Amazon - Food Processors – For quickly chopping or pureeing ingredients.
Find Food Processors on Amazon - Saucepans – Needed for cooking sauces or fillings.
Find Saucepans on Amazon - Chef’s Knives – A good chef’s knife makes chopping vegetables easier and safer.
Find Chef’s Knives on Amazon - Cutting Boards – Protect your countertops while you prep your ingredients.
Find Cutting Boards on Amazon