
The Ultimate Gluten Free Muffins: Your Go-To Recipe for Bakery-Style Goodness!
Is there anything more comforting than the aroma of freshly baked muffins wafting through your home? For those of us navigating a gluten-free lifestyle, finding that perfect muffin recipe – one that boasts a tender crumb, a delightful rise, and that elusive moistness – can sometimes feel like searching for a hidden treasure. But search no more! We’re thrilled to share what we believe is the ultimate easy recipe for gluten free muffins, designed to bring joy and simplicity back to your gluten-free baking adventures.
These aren’t just any gluten free muffins; they are the versatile champions of your breakfast table, snack time, or even a sweet treat. Imagine pulling a tray of perfectly domed, golden-brown muffins from your oven, ready to be customized with your favorite mix-ins. Whether you’re dreaming of classic blueberry, indulgent chocolate chip, or nutty banana, this foundational recipe is your canvas. They’re designed to be incredibly easy to make, proving that “gluten-free” and “effortlessly delicious” can absolutely go hand-in-hand. If you’re a fan of delightful morning bakes, you might also adore our moist Gluten-Free Banana Bread, which shares that same comforting appeal.
Embracing a gluten-free diet shouldn’t mean compromising on texture or taste, especially when it comes to beloved classics like muffins. This recipe for gluten free muffins is a testament to that, delivering a consistently soft, fluffy crumb that will have everyone reaching for a second. We understand the importance of reliable recipes that fit into a healthy and diverse diet. These muffins make a wonderful addition, offering a satisfying option that doesn’t skimp on flavor. For another delightful muffin variation, be sure to check out our zesty Gluten-Free Lemon Poppyseed Muffins.
One of the beauties of this particular gluten free muffin recipe is its adaptability and the practical insights it offers for successful gluten-free baking. We focus on achieving that coveted bakery-style dome and a texture that’s never dry or crumbly – common pitfalls we’ve all experienced. You’ll find that with a few key techniques and the right blend of ingredients, creating spectacular gluten free muffins is not just possible, but wonderfully straightforward. Get ready to rediscover the joy of home-baked muffins that are genuinely delightful, easy to whip up, and perfect for sharing (or keeping all to yourself!). And if you’re looking to expand your gluten-free breakfast repertoire further, our fluffy Gluten-Free Pancakes are another must-try.
Why These Gluten Free Muffins Stand Out
Let’s dive deep into the delicious science behind why this particular recipe creates truly exceptional gluten free muffins. Achieving that perfect bakery-style dome, soft crumb, and moist texture without gluten can feel like a culinary challenge, but this recipe masters it beautifully through a thoughtful combination of ingredients and technique. It’s designed not just to be “good for gluten free,” but simply *good*, period!
The Role of the Gluten-Free Flour Blend & The Mighty Xanthan Gum
The foundation of any great gluten-free bake is the flour blend, and this recipe works because it relies on a high-quality, all-purpose gluten-free blend. Unlike single flours, these blends combine various starches (like rice, potato, tapioca) and flours (sorghum, millet, etc.) to mimic the structure and absorption properties of wheat flour. Critically, this recipe emphasizes the essential addition of xanthan gum if your blend doesn’t already contain it. Why is xanthan gum so important, especially for gluten free muffins? Gluten in traditional baking forms a network that traps gases and provides structure, elasticity, and chew. Without it, baked goods can be dense and crumbly. Xanthan gum acts as a binder, creating viscosity and providing that much-needed structure and elasticity that gluten provides. It helps the batter hold together, allows the muffins to rise high without collapsing, and contributes to that desirable fluffy, non-crumbly texture – key to successful gluten free muffins.
Moisture Magic: Butter, Buttermilk, and Eggs
Moisture is paramount in gluten-free baking, as GF flours can absorb more liquid than wheat. This recipe expertly incorporates multiple sources of moisture and fat to prevent dryness. Melted butter distributes fat evenly throughout the batter, coating the starch particles and resulting in a tender crumb. The use of buttermilk (or the yogurt/milk substitute) is a stroke of genius. Buttermilk is acidic, which reacts with the baking soda to produce lift, contributing to that impressive dome. More importantly, the acid in buttermilk helps to tenderize the proteins in the eggs and flour blend, yielding an incredibly soft and moist texture that stays tender even after cooling. Using three whole eggs adds significant structure, richness, and helps create a stable emulsion, further preventing dryness and contributing to the tall rise and tender crumb of these delightful gluten free muffins.
Sweetness, Structure, and Rise: Sugars and Leavening
The combination of granulated and light brown sugar isn’t just for sweetness. Granulated sugar helps with spread and contributes to a crisp exterior (though less noticeable in muffins), while brown sugar adds moisture due to the molasses content, resulting in a softer, more tender interior crumb. The molasses also adds a subtle depth of flavor. The recipe employs both baking powder and baking soda. This dynamic duo provides lift: baking powder is a complete leavener reacting with liquid and heat, while baking soda requires an acid (like the buttermilk!) to activate and create carbon dioxide bubbles, ensuring a significant rise and light texture in these gluten free muffins.
Technique for Bakery-Style Glory
Beyond the ingredients, the method contributes significantly to the success of these gluten free muffins. Filling the muffin wells completely provides ample batter for that coveted dome to form. Using a light-colored muffin tin promotes even baking, preventing the bottoms and edges from browning too quickly before the center is cooked. And the instruction to cool the muffins quickly on a wire rack prevents steam buildup, avoiding a gummy exterior. Even the optional crumble topping is perfected by chilling, ensuring it retains its delightful clumpy texture rather than melting into the muffin top. All these details work together to guarantee a delicious, visually appealing batch of gluten free muffins every single time.
In essence, this recipe for gluten free muffins is a triumph because it thoughtfully addresses the unique challenges of baking without gluten by leveraging the power of alternative binders, strategic moisture sources, and precise leavening, resulting in a consistently successful and utterly delicious outcome.

🎁 33 Gluten-Free Breakfasts
Start every day with a smile and flavor. Get our FREE recipe eBook!
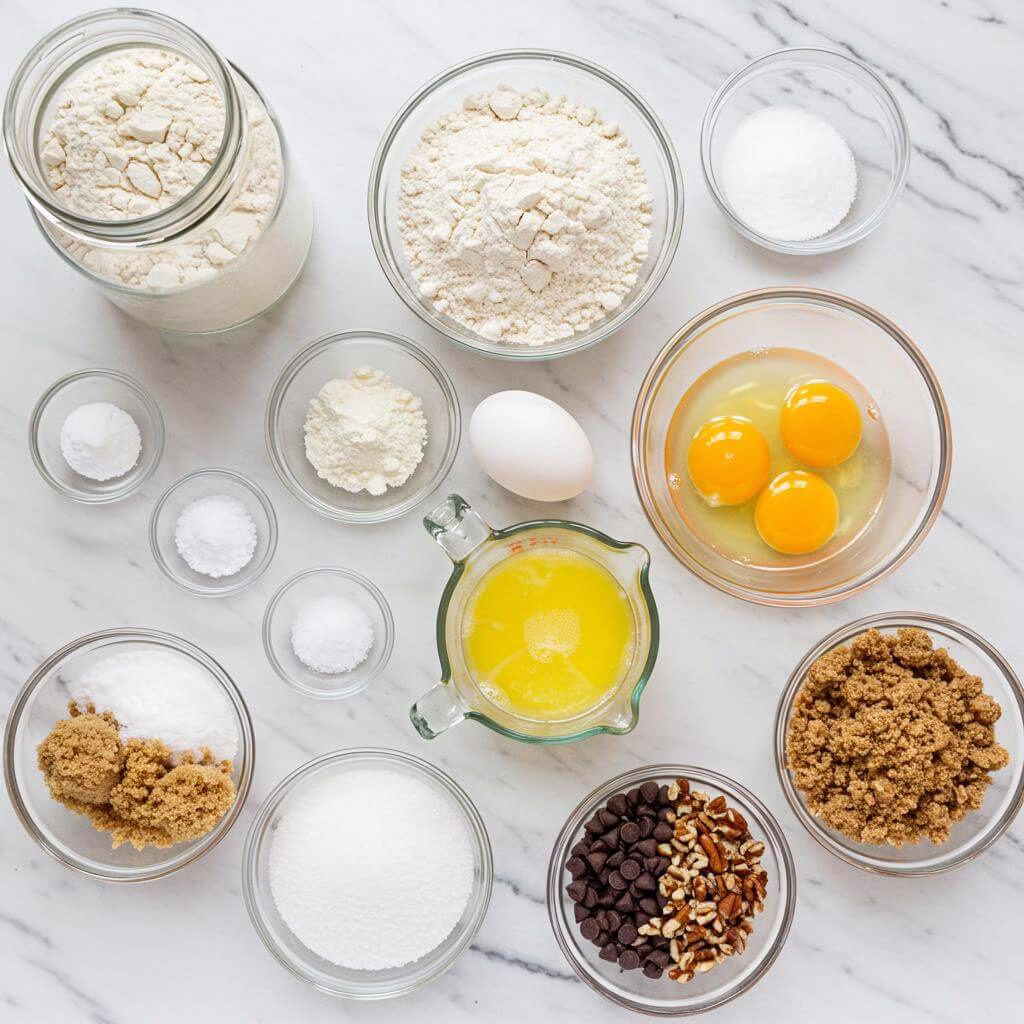
Ingredients for Perfect Gluten Free Muffins
Crafting tender, bakery-style gluten free muffins starts with understanding the role each ingredient plays. We’ve listed everything you need below, and for key gluten-free components, we’ll explain why they’re so important for achieving that ideal texture and rise.
For the (optional) Crumble Topping:
- 4 tablespoons (56 g) unsalted butter, melted
- ½ cup (109 g) packed light brown sugar
- ½ cup (70 g) all purpose gluten free flour blend – *Using a high-quality, versatile all purpose gluten free flour blend is crucial for structure and texture in gluten-free baking.*
- ¼ teaspoon xanthan gum – *This provides necessary elasticity and binding that gluten would typically offer, preventing your gluten free muffins from being crumbly.* Omit if your blend already contains it.
- ⅛ teaspoon kosher salt
For the Muffins:
- 3 (150 g, weighed out of shell) eggs, at room temperature, beaten
- ¾ cup (6 fluid ounces) buttermilk, at room temperature
- 8 tablespoons (112 g) unsalted butter, melted and cooled
- 1 teaspoon pure vanilla extract
- 2 cups (280 g) all purpose gluten free flour blend – *Again, your choice of gluten free flour blend significantly impacts the final result of these gluten free muffins. Ensure it’s a blend designed for baking.*
- 1 teaspoon xanthan gum – *Essential for giving your gluten free muffins structure and preventing crumbling. Use less or none if your chosen flour blend already contains it (check the packaging!).*
- 1 teaspoon baking powder
- ½ teaspoon baking soda
- ½ teaspoon kosher salt
- ½ cup (100 g) granulated sugar
- ¼ cup (55 g) packed light brown sugar
- Up to 1 cup of mix-in pieces, such as chocolate chips, raisins, or chopped nuts and/or crumble topping
Nutritional Information
Enjoying delicious gluten free muffins can also mean understanding their contribution to your diet. These muffins, made with a quality gluten-free blend, offer a delightful treat suitable for those avoiding gluten.
Based on approximate calculations per muffin (excluding the crumble topping and including chocolate chips), the nutritional breakdown is as follows:
- Serving: 1 muffin
- Calories: 302 kcal
- Carbohydrates: 42g
- Protein: 3g
- Fat: 13g
- Saturated Fat: 8g
- Polyunsaturated Fat: 1g
- Monounsaturated Fat: 2g
- Trans Fat: 0.3g
- Cholesterol: 63mg
- Sodium: 231mg
- Potassium: 88mg
- Fiber: 1g
- Sugar: 22g
- Vitamin A: 317IU
- Calcium: 60mg
- Iron: 0.3mg
These gluten free muffins provide a moderate source of carbohydrates and fat, perfect for a breakfast treat or snack. The numbers above are approximations based on standard ingredients; actual values may vary depending on specific brands used and any substitutions made. Always verify nutritional information based on your specific ingredients if dietary needs are critical.
Substitutions & Variations for Your Gluten Free Muffins
One of the best things about this recipe is its versatility! You can easily adapt these tender gluten free muffins to fit various dietary needs or simply change up the flavor profile.
Dietary Adaptations
- Dairy-Free: Replace the unsalted butter with a high-quality block-style vegan butter (plant-based butter sticks work well). Substitute the buttermilk with a mixture of half unsweetened, unflavored nondairy milk (like almond or soy) and half plain unsweetened nondairy yogurt (cashew or coconut based). For the crumble, shortening can be a good butter substitute. Ensure any mix-ins, like chocolate chips, are certified dairy-free.
- Egg-Free: For an egg-free version of these gluten free muffins, try using a “chia egg” for each chicken egg (so, three chia eggs total). To make one chia egg, simply mix 1 tablespoon of ground white chia seeds with 1 tablespoon of water and let it sit until gelled. While “flax eggs” also provide binding, they can sometimes impart an unwanted flavor or color. Commercial gluten-free egg replacers or liquid plant-based egg alternatives from the refrigerated section are also options to experiment with.
- Refined Sugar-Free: While not tested extensively, you might be able to swap the granulated and brown sugars with a 1:1 monkfruit alternative. Be aware that some sugar substitutes absorb more moisture, so you might need to add a little extra liquid (like water or nondairy milk) to the batter until it reaches the correct consistency.
- Gluten-Free Flour Blends: This recipe works best with a good all-purpose gluten-free blend that contains protein and starches for structure. As mentioned, ensure your blend either contains xanthan gum or you add the specified amount. Some blends may absorb liquids differently, so you might need very slight adjustments to the wet ingredients if your batter seems too thick or thin. Using blends specifically designed for gluten-free baking will yield the best results for moist, fluffy **gluten free muffins**.
Flavor Variations
The base recipe for these gluten free muffins is perfect for customization. Feel free to stir up to 1 cup of your favorite dry mix-ins into the finished batter before scooping:
- Chocolate Chip: Add your favorite variety of gluten-free chocolate chips (dark, milk, or white).
- Nutty Muffins: Stir in chopped walnuts, pecans, or almonds for added crunch and flavor.
- Dried Fruit: Raisins, dried cranberries, chopped dried apricots, or even chopped dried cherries work wonderfully.
- Spice Them Up: Add a teaspoon of ground cinnamon, nutmeg, or mixed spice along with the dry ingredients for a warm, spiced version of these gluten free muffins.
- Combine Flavors: Try chocolate chips with chopped walnuts, or dried cranberries with orange zest (add zest to the wet ingredients).
Remember, this versatile base makes creating your perfect batch of **gluten free muffins** easy and fun!
Essential Equipment for This Recipe
To prepare this delicious recipe, you’ll need the following kitchen tools:
- Mixing Bowls – A set of various sizes is essential for prepping and combining ingredients.
Find Mixing Bowls on Amazon - Measuring Cups and Spoons – Accurate measurements are key for baking success.
Find Measuring Cups and Spoons on Amazon - Baking Sheets – Perfect for evenly baking your treats.
Find Baking Sheets on Amazon - Whisks – For achieving smooth batters and emulsions.
Find Whisks on Amazon - Spatulas – Great for folding ingredients and scraping bowls clean.
Find Spatulas on Amazon - Food Processors – Speeds up chopping and pureeing tasks.
Find Food Processors on Amazon - Saucepans – Needed for heating liquids and making sauces.
Find Saucepans on Amazon - Chef’s Knives – A versatile knife for all your chopping needs.
Find Chef’s Knives on Amazon - Cutting Boards – Provides a safe surface for chopping and prepping.
Find Cutting Boards on Amazon
- Begin by getting your oven ready. Preheat your oven to 350°F (175°C). While the oven heats, prepare a standard 12-cup muffin tin. You can either generously grease the wells of a light-colored standard muffin tin (which helps with even baking for gluten free muffins) or line them with paper liners. Set the prepared tin aside for filling later.
- (Optional) Prepare the Delicious Crumble Topping: If you’re adding a crumble topping to your gluten free muffins, this is the time to make it. In a small bowl, combine the melted unsalted butter, packed light brown sugar, the all-purpose gluten-free flour blend (making sure to include the specified xanthan gum if your flour blend doesn’t already contain it, as this is key for gluten-free structure), and a dash of kosher salt. Mix these ingredients together until they are fully combined and the mixture looks thick and clumpy.
- Once the crumble mixture is ready, place the bowl directly into the refrigerator. It needs to chill thoroughly while you prepare the muffin batter. This chilling step is important because it helps the crumble maintain its shape and crispness while the gluten free muffins bake, preventing it from melting and spreading too much.
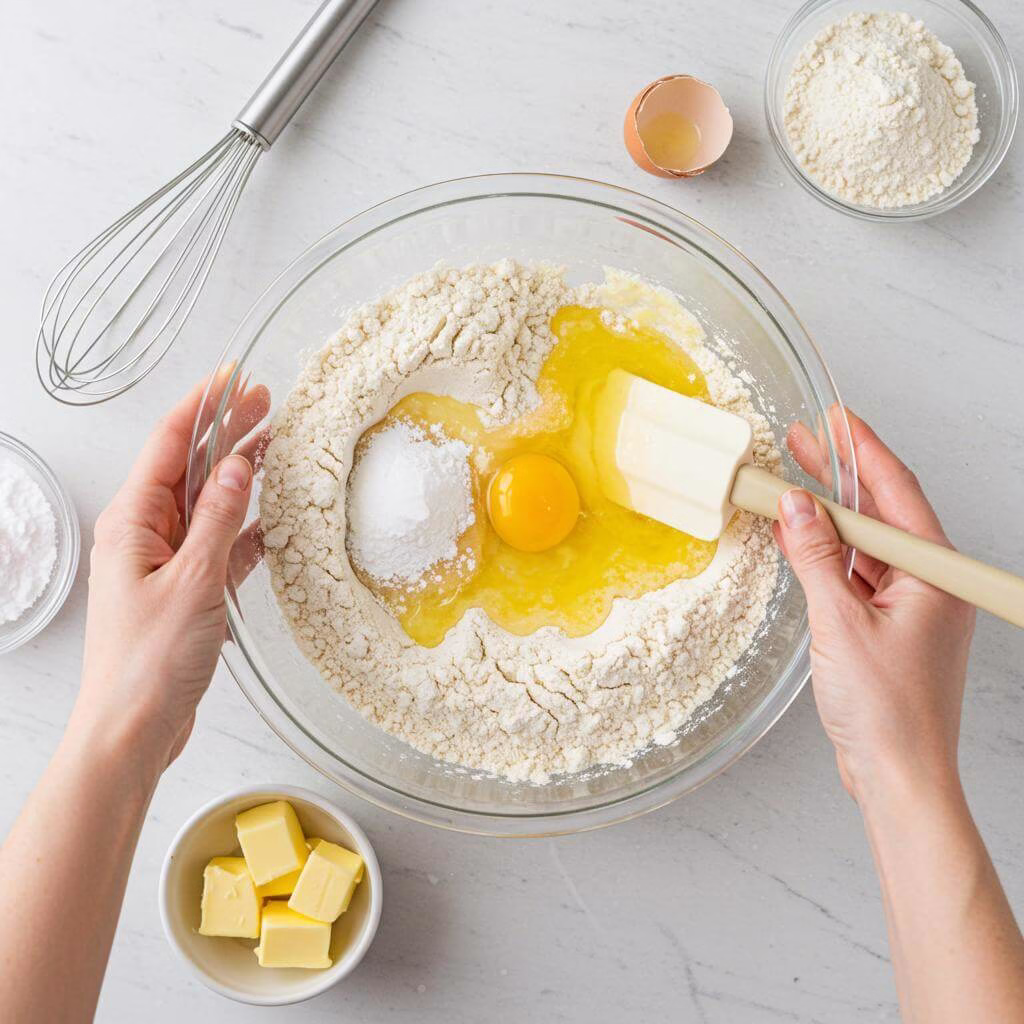
- Prepare the Muffin Batter – Wet Ingredients: Grab a medium-size mixing bowl or even a large measuring cup (at least 4 cups) for convenience. Crack the eggs into the bowl (ensure they are at room temperature), then add the buttermilk (also at room temperature), the melted unsalted butter (make sure it’s melted but not hot – let it cool slightly), and the pure vanilla extract. Using a whisk, mix these wet ingredients together until they are well combined and look smooth. Set this bowl aside momentarily.
- Prepare the Muffin Batter – Dry Ingredients: Now, in a larger mixing bowl, measure out the all-purpose gluten-free flour blend. Remember to add the specified xanthan gum if your chosen blend doesn’t already list it as an ingredient – this is critical for providing structure to your gluten free muffins. Add the baking powder, baking soda, kosher salt, granulated sugar, and packed light brown sugar to the bowl. Use a whisk to thoroughly combine all the dry ingredients, making sure to break up any lumps, especially in the brown sugar. Distributing these ingredients evenly is crucial for the leavening and texture of your gluten free muffins.
- Combine Wet and Dry Ingredients: Create a slight indentation, or “well,” in the center of the dry ingredients mixture in the large bowl. Pour the previously combined wet ingredients (the egg and buttermilk mixture) directly into this well. Using a rubber spatula or wooden spoon, gently stir the wet ingredients into the dry ingredients. Mix only until they are *just* combined and no pockets of dry flour are visible. It’s okay if there are a few small lumps; the most important thing is to *not overmix*. Overmixing gluten-free batters can lead to tough or crumbly gluten free muffins. Scrape down the sides of the bowl as needed to ensure everything is incorporated.
- Add Mix-ins (If Using): If you plan to include simple mix-ins like chocolate chips, chopped nuts, or dried fruit (ensure they are *dried*, as fresh fruit adds too much moisture), gently fold them into the batter now. Mix just enough to distribute them relatively evenly throughout the batter without further developing the gluten-free flour’s minor structure (which overmixing would do).
- Fill the Muffin Tin: Spoon the batter into the prepared wells of your muffin tin. For that beautiful, tall, bakery-style dome on your gluten free muffins, you want to fill the wells completely, right up to the top edge. You should get 12 muffins. If you have significantly deeper or shallower wells, your yield might differ. If you end up with any empty wells after filling the others completely, add about 1-2 tablespoons of lukewarm water to those empty wells – this helps the tin heat evenly during baking. For a neat finish, you can lightly wet your fingers with water and gently smooth the tops of the batter in each well.
- Add the Crumble Topping (If Using): If you made the optional crumble topping, retrieve the bowl from the refrigerator. Using a fork, break the chilled crumble mixture into irregular pieces. Aim for pieces that aren’t too large but are distinct clumps. Generously sprinkle these chilled crumble pieces over the top of the batter in each muffin well. Gently press the crumble pieces down onto the batter surface with your fingertips; this helps them adhere so they don’t fall off after baking. Keep the crumble cold until the moment you add it to the muffins before baking.
- Bake Your Gluten Free Muffins: Carefully place the filled muffin tin into the center of your preheated 350°F (175°C) oven. Bake for approximately 20 minutes. To check for doneness, gently press the top of the center muffin with your finger; it should spring back lightly. If it leaves an indentation, bake for another minute or two and test again. If you added the crumble topping, the muffins might require an extra minute or so of baking time.
- Cool the Muffins: Once baked, carefully remove the muffin tin from the oven. Allow the gluten free muffins to cool in the tin for about 10 minutes before you attempt to remove them. This initial cooling period helps them set up. After 10 minutes, carefully transfer the muffins from the tin to a wire cooling rack. Allowing them to cool completely on the rack ensures air circulates around them, preventing the bottoms and sides from steaming and becoming gummy or chewy. Ensure they are fully cooled before storing.
Expert tips for perfect gluten free muffins
Baking delicious, tall, and tender gluten free muffins is absolutely achievable with the right techniques! Here are my best tips to help you get bakery-style results every single time you bake these gluten free muffins:
- Use Ingredients at Room Temperature: This is especially important for the eggs and buttermilk. Room temperature ingredients emulsify better with melted butter and dry ingredients, creating a smoother batter and contributing to a better rise and lighter texture in your finished gluten free muffins. Plan ahead and take them out at least 30 minutes before mixing.
- Measure Your Flour Accurately: For consistent results with gluten free muffins, weighing your flour blend is always best. Gluten-free flour blends can vary significantly in how much they compact in a measuring cup. Using a kitchen scale ensures you have the exact amount specified in the recipe, preventing dry or heavy muffins.
- Don’t Overmix the Batter: Once you combine the wet and dry ingredients, mix only until *just* combined. A few small lumps are perfectly fine! Overmixing gluten-free batter can develop the starches and gums too much, leading to tough or gummy gluten free muffins instead of light and fluffy ones.
- Add Xanthan Gum (If Your Blend Needs It): This recipe specifically calls for adding xanthan gum if your gluten free flour blend doesn’t contain it. Do not skip this step! Xanthan gum acts as the binder that gluten provides, giving your gluten free muffins structure and preventing them from crumbling apart. Use the amount recommended in the recipe for the best texture.
- Fill Muffin Wells Completely: To get those beautiful, tall bakery domes on your gluten free muffins, fill each greased or lined muffin well all the way to the top. Don’t shortchange them! If you have fewer than 12 wells filled, add a little water to the empty ones to ensure even heat distribution during baking.
- Keep Crumble Topping Cold: If you’re adding the optional crumble topping, make it first and keep it chilling in the refrigerator until you’re ready to sprinkle it on top of the filled muffin cups. This helps the butter stay solid until the muffins start baking, allowing the crumble to hold its shape and get delightfully crisp instead of melting into the batter.
- Bake Until Just Done: Overbaking is a common culprit for dry gluten free muffins. Check for doneness by gently pressing the top of the center muffin – it should spring back lightly. A toothpick inserted into the center should come out with moist crumbs attached, not wet batter.
- Cool Muffins Promptly on a Wire Rack: As soon as your gluten free muffins are cool enough to handle (usually within 5-10 minutes after coming out of the oven), transfer them from the hot muffin tin to a wire cooling rack. Leaving them in the tin traps steam, which can make the bottom and sides of the muffins soft or even gummy. Complete cooling on a rack allows air circulation and prevents this.
Common Mistakes to Avoid When Baking Gluten Free Muffins
Even with a great recipe, a few simple errors can impact the texture and rise of your gluten free muffins. Watch out for these pitfalls:
- Skipping Xanthan Gum (Or Using the Wrong Amount): Gluten is the structural glue in traditional baking. In gluten-free baking, xanthan gum (or sometimes psyllium husk) acts as a binder. If your flour blend doesn’t have it and you don’t add it, or if you add too little, your gluten free muffins will likely be very crumbly and fall apart easily. Using too much can make them gummy or dense. Always follow the recipe’s guidance for xanthan gum based on your specific flour blend.
- Overmixing the Batter: Unlike wheat flour where you develop gluten, overmixing gluten-free batter develops the starches and gums excessively. This results in a tough, dense texture rather than the light, tender crumb you want in gluten free muffins. Mix only until the dry ingredients are just incorporated – stop as soon as you don’t see streaks of dry flour.
- Adding Wet Mix-ins (Like Fresh Berries) Without Adjusting: While this recipe is great for dry mix-ins like chocolate chips or nuts, adding fresh fruit like blueberries can introduce too much moisture. This extra liquid can weigh down the batter, prevent a proper rise, and lead to sunken or wet-bottomed gluten free muffins. If you want to add fresh fruit, you may need to slightly reduce the liquid content elsewhere in the recipe or toss the fruit in a bit of flour first.
Frequently Asked Questions
What kind of gluten-free flour blend should I use for these muffins?
Choosing the right flour blend is key to getting the best texture for your gluten free muffins! This recipe is designed to work well with good quality all purpose gluten-free flour blends that contain a mix of protein and starches. It’s really important to check if your blend already includes xanthan gum. If it doesn’t, you’ll need to add the amount specified in the recipe (1 teaspoon for the muffin batter and ¼ teaspoon for the crumble, if making). Xanthan gum provides necessary structure and prevents your gluten free muffins from being crumbly. Some blends might need slight adjustments to the liquid based on how much they absorb.
How do I get that tall, domed top on my gluten free muffins?
Achieving that beautiful bakery-style dome is easy! The key is to fill your muffin wells completely with batter, right up to the top edge. Don’t be shy – really fill them up! The recipe provides enough batter for 12 standard muffins when the wells are filled this way. If you end up with fewer muffins, it just means your tin might have deeper wells. If you have any empty wells after filling the others completely, add a little lukewarm water to them (1-2 tablespoons) to help the tin heat evenly during baking.
Can I make these gluten-free muffins dairy-free or egg-free?
Absolutely! This recipe is quite adaptable. For dairy-free gluten free muffins, substitute the unsalted butter with a block-style vegan butter and replace the buttermilk with a mix of half unsweetened, unflavored nondairy milk (like almond) and half plain unsweetened nondairy yogurt (like cashew or coconut based). For the crumble topping, shortening can work well instead of butter. If you need egg-free gluten free muffins, you can try using a “chia egg” (1 tbsp ground white chia seeds mixed with 1 tbsp water per egg) for each of the three eggs, or experiment with a commercial gluten-free egg replacer or liquid plant-based eggs from the refrigerated section.
What kind of mix-ins can I add to these gluten free muffins?
This base recipe is super versatile for adding flavor! You can stir in up to 1 cup of *dry* mix-ins into the finished batter before scooping. Think chocolate chips (dairy-free if needed), chopped nuts like walnuts or pecans, or dried fruits such as raisins, dried cranberries, or chopped dried apricots. The important part is that the mix-ins don’t add extra moisture, which is why dried fruit works better than fresh berries in this specific base recipe.
How should I store these gluten free muffins to keep them fresh?
These gluten free muffins store really well! Once they are completely cooled, you can keep them in a sealed container at room temperature for at least 2 days. If you want to keep them longer, they freeze beautifully. Just freeze them in a single layer on a baking sheet until solid, then transfer them to a freezer-safe bag. They’ll stay fresh in the freezer for up to 3 months. When you’re ready for one, you can defrost it at room temperature or microwave it briefly (about 20 seconds). For that just-baked texture, lightly sprinkle it with water and warm it in a toaster oven at 300°F for about 5 minutes.
Does the color of my muffin tin make a difference?
Yes, it can actually affect how your gluten free muffins bake! Light-colored cast aluminum muffin tins are generally preferred because they bake more evenly. Dark-colored metal tins, or glass and ceramic pans, tend to bake the outside of baked goods faster, which can sometimes lead to uneven results or tougher crusts. If you only have a dark pan, you can try a slight adjustment: bake at the recipe’s temperature (350°F) for the first 8 minutes, then reduce the oven temperature to 325°F for the remaining baking time (which might be about 12 minutes) to help the inside catch up.
Why do I need to cool the gluten free muffins on a wire rack right after they come out of the tin?
It’s a crucial step for the best texture! After the initial short cooling period in the tin (about 10 minutes), transferring the muffins to a wire rack allows air to circulate all around them. If you leave them in the hot pan for too long, the steam trapped underneath can make the bottoms and sides of your gluten free muffins get gummy or chewy. Cooling on the rack helps them set up properly and keeps that lovely tender crumb.

One Comment