Indulge in the Perfect Gluten Free Tiramisu (Dairy-Free Delight!)
Craving that iconic Italian dessert but need it to be gluten-free and dairy-free? Your search ends here! This incredible gluten free tiramisu recipe delivers all the rich, coffee-infused, creamy decadence you dream of, without any gluten or dairy. It’s surprisingly easy to make and is destined to become a new favorite, much like our popular Best Gluten-Free Cheesecake or the elegant Chocolate Espresso Roulade. Get ready to experience tiramisu perfection, tailored for your gluten-free lifestyle!
Why This Gluten Free Tiramisu Will Become Your Go-To Dessert
Navigating the world of desserts while eating gluten-free can sometimes feel limiting, especially when it comes to iconic treats. But imagine sinking your spoon into a lusciously creamy, coffee-kissed gluten free tiramisu that’s also completely dairy-free! This recipe is designed to bring back that joy, proving that you don’t have to compromise on taste or texture. Every element, from the perfectly soaked ladyfingers to the cloud-like cream, is crafted for pure indulgence.
The secret to this dream dessert lies in its thoughtful components. You’ll need gluten-free ladyfingers – and don’t worry, we guide you on how to make your own (check Note 1 in the recipe card below!) or you can opt for a good quality store-bought variety if that’s more your style. For the unbelievably rich and dairy-free cream, we turn to the magic of chilled coconut cream. Whipped with powdered sugar and a hint of vanilla, it transforms into a smooth, decadent filling that rivals any traditional version. If you love how versatile coconut cream can be in desserts, you might also enjoy its richness in our Flourless Chocolate Coconut Cake.
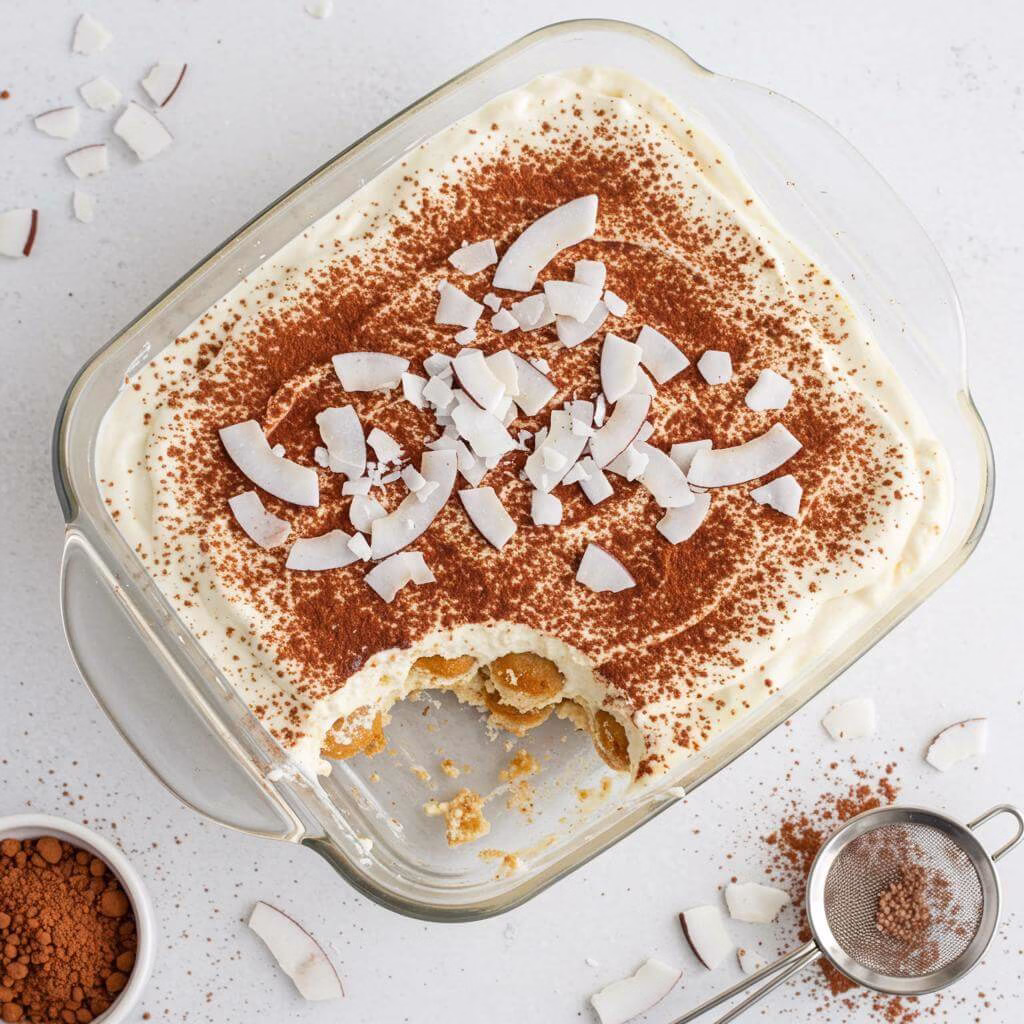
Assembling this gluten free tiramisu is a delightful culinary ritual. It’s all about layering those coffee-infused ladyfingers with generous spreads of the velvety cream, repeating until you have a dish full of promise. A final, beautiful dusting of cocoa powder adds that classic touch. Then comes the true test of patience: letting it chill. This crucial step allows the flavors to meld into tiramisu perfection. That first incredible bite will make any wait worthwhile, reaffirming that gluten-free and dairy-free desserts can be utterly spectacular.
Why This Gluten Free Tiramisu Works So Well
Creating a truly satisfying gluten free dessert can sometimes feel like a challenge, especially when aiming for a classic like tiramisu. Traditional tiramisu relies on specific textures and structures provided by wheat-based ladyfingers and a creamy, sometimes egg-based, dairy filling. However, this particular gluten free tiramisu recipe beautifully overcomes those hurdles, delivering a dessert that is rich, layered, and utterly decadent, proving that gluten-free living doesn’t mean sacrificing your favorite treats.
The magic starts with the foundation: the gluten free ladyfingers. While not detailed in this specific section, the success hinges on having a reliable gluten-free sponge finger that can mimic the original’s ability to absorb the coffee without turning instantly into mush. A well-made gluten-free ladyfinger provides the necessary spongy texture and structure. When soaked in cool coffee, it softens just enough to become tender layers that hold their shape, creating that essential contrast with the creamy filling.
The creamy filling is another star ingredient and a brilliant dairy-free swap. By using cold, solidified coconut cream whipped with powdered sugar and vanilla, the recipe achieves a luxurious, fluffy, and smooth texture remarkably similar to traditional mascarpone-based fillings. The high fat content of the coconut cream provides richness, while whipping incorporates air, resulting in that essential light and airy quality. Powdered sugar sweetens it perfectly, and vanilla enhances the overall flavor profile, creating a truly satisfying “cream” layer that complements the coffee-soaked ladyfingers beautifully. This plant-based alternative successfully replaces dairy without compromising on the creamy, melt-in-your-mouth experience that is central to tiramisu.
Layering these perfectly soaked gluten-free ladyfingers with the rich coconut cream filling allows the flavors to meld and the textures to harmonize as the dessert chills. The final dusting of cocoa powder adds a touch of bitterness that cuts through the sweetness and richness, completing the classic tiramisu experience. This recipe demonstrates how thoughtful ingredient selection and technique can replicate the beloved characteristics of traditional desserts, making a truly irresistible gluten free tiramisu that everyone can enjoy.

🎁 33 Gluten-Free Breakfasts
Start every day with a smile and flavor. Get our FREE recipe eBook!
Putting it All Together: Step-by-Step Guide
Creating this incredible gluten free tiramisu is simpler than you might think! Follow these easy steps to assemble your dream dessert.
- Prepare the Creamy Filling: In a large mixing bowl, combine the cold coconut cream, sifted powdered sugar, and vanilla paste (or vanilla extract if using). Whip the mixture until it becomes delightfully fluffy and soft peaks begin to form.
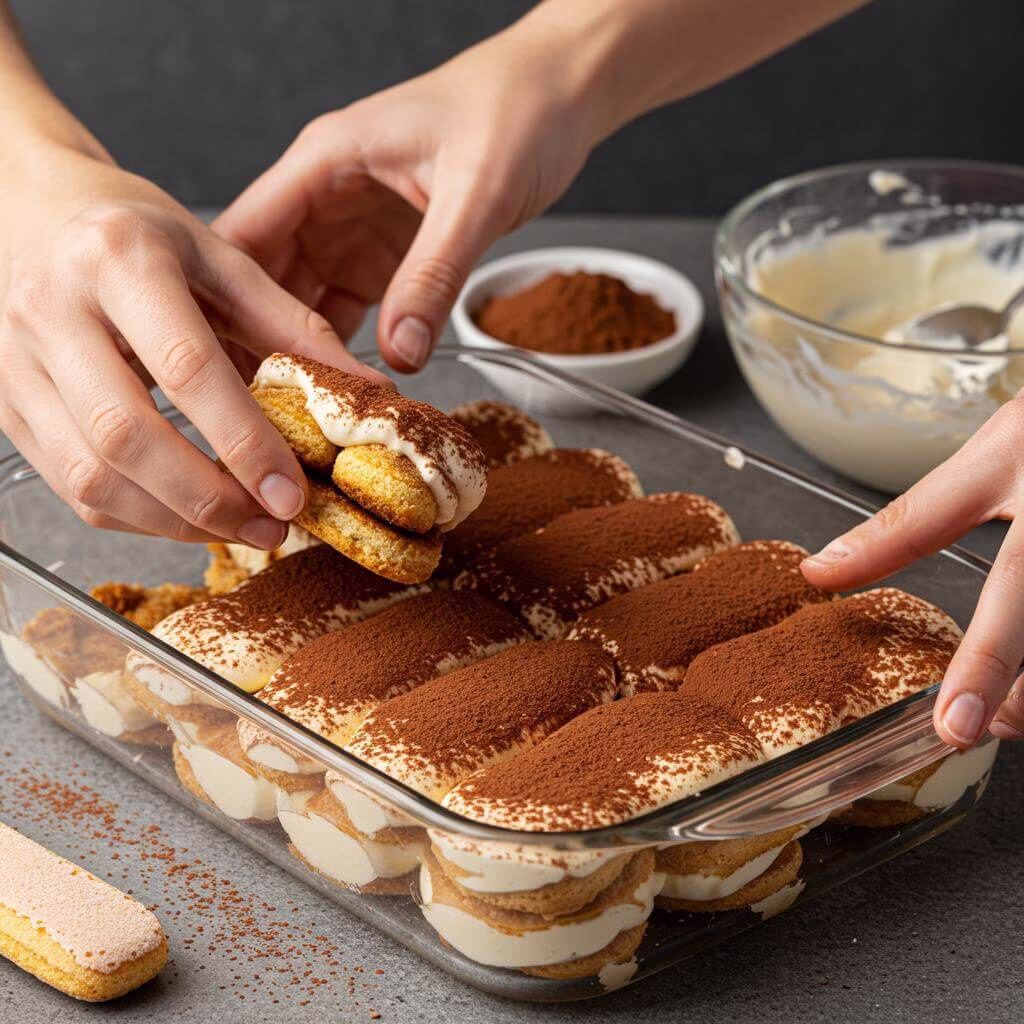
- Build the First Layer: Take your ready gluten free ladyfingers and quickly dip each one into the cooled unsweetened coffee. Arrange the soaked ladyfingers in a single, even layer on the bottom of your chosen serving dish. Ensure there are minimal gaps between them – you can break ladyfingers pieces as needed to fill in any small spaces before dipping and adding them. *Tip: Using cold coffee helps prevent the ladyfingers from becoming too fragile.*
- Add the First Cream Layer: Carefully spoon half of the prepared creamy filling over the layer of coffee-soaked ladyfingers. Gently spread and smooth the filling to create an even layer from edge to edge.
- Add the Second Layer of Ladyfingers: Create another layer by dipping more gluten free ladyfingers in the coffee and placing them directly on top of the first layer of creamy filling.
- Add the Final Cream Layer: Spoon the remaining half of the creamy filling on top of the second layer of ladyfingers. Smooth the top surface of the filling for a clean finish.
- Dust with Cocoa: Lightly dust the top layer of cream with cocoa powder.
- Chill Time: This is the hardest part! Place the assembled tiramisu in the refrigerator to chill for a minimum of 4 hours, or ideally, overnight. This allows the flavors to meld and the layers to set beautifully.
- Serve and Enjoy: Just before serving, give it another light dusting of cocoa powder if desired. Slice and savor your exquisite dairy and gluten free tiramisu!
Store any leftovers covered in the fridge for up to a week.
Tips for Perfect Results
Want to make sure your gluten and dairy-free tiramisu is absolutely perfect? Follow these simple tips for a dessert that tastes just like the real deal!
- Chill Your Coconut Cream: For the creamiest, fluffiest filling, make absolutely sure your coconut cream has been thoroughly chilled in the fridge overnight. This allows it to separate properly and gives you the thick cream needed for whipping.
- Perfect the Soak: Gluten-free ladyfingers can absorb liquid a little differently than traditional ones. Dip them quickly but fully into the *cooled* coffee. You want them soaked through but not disintegrating. Practice with one first if you’re unsure!
- Build Layers Efficiently: Arrange your soaked ladyfingers snugly in the dish, breaking pieces as needed to fill gaps. This prevents empty spaces and gives each bite that perfect balance of cake and cream.
- Chill, Chill, Chill: Patience is key! Refrigerating the tiramisu for at least 4 hours (and preferably overnight) is non-negotiable. This time allows the layers to meld together, the flavors to deepen, and the structure to set beautifully, making it easy to slice and serve.
Don’t rush the chilling process – it’s crucial for the texture and overall enjoyment of this delicious dessert!
Ingredients
Gather your ingredients to create this magical gluten and dairy-free tiramisu. Remember, using high-quality ingredients truly makes a difference in the final flavour and texture!
- 26 gluten free ladyfingers (Note 1)
- 2 cups (475 mL) unsweetened coffee, cooled (Note 2)
- 4 cups (800 g) coconut cream, cold straight out of the fridge (Note 3)
- 2 1/4 cups (275 g) powdered sugar, sifted
- 2 tsp vanilla paste (or 4 tsp vanilla extract)
- cocoa powder for dusting
Nutritional Insights (Gluten-Free Focus)
While exact nutritional values will vary based on the specific gluten free ladyfingers used, this dessert offers a delightful treat that fits a gluten-free lifestyle. By using gluten-free sponge fingers, you eliminate gluten, making it accessible for those with Celiac disease or gluten sensitivity. The primary components contribute carbohydrates from the powdered sugar and biscuits, providing energy. The coconut cream provides healthy fats. Since it’s dairy-free, it’s also suitable for those avoiding lactose or dairy proteins. Enjoy this dessert as a delicious part of your balanced eating plan, knowing you’re skipping the gluten without sacrificing flavour!
Tips & Variations for Your Gluten Free Tiramisu
Gluten Free Ladyfingers
The foundation of this incredible dessert lies in the gluten free ladyfingers. You can make your own following a trusted gluten-free recipe, or if you’re lucky, you might find commercially available gluten-free versions. Whichever route you take, ensure they have that classic ladyfinger texture – light and absorbent – perfect for soaking up the coffee without falling apart too quickly.
Choosing Your Coffee
The intensity of the coffee flavour is entirely up to you! Use your favorite unsweetened coffee blend and brew it to your preferred strength. A strong brew will yield a more pronounced coffee taste, characteristic of traditional tiramisu, while a lighter brew will be more subtle. Just ensure it’s completely cooled before you start dipping the ladyfingers to prevent them from disintegrating.
Working with Coconut Cream
For the best results with the creamy filling, you need the thick, solid part of canned coconut milk or dedicated coconut cream. To achieve this separation, place cans of full-fat coconut milk (with minimal additives) in the fridge overnight without shaking them. The solid cream will rise to the top. Scoop only the thick cream for whipping; reserve the liquid coconut water for other uses like smoothies. Ensure the cream is very cold before whipping with the powdered sugar and vanilla paste or vanilla extract until light and fluffy.
Sweetener Options
If you prefer not to use powdered sugar, you can experiment with powdered erythritol or xylitol for a lower-sugar alternative. Be aware that the texture and sweetness level might differ slightly, and some sugar substitutes can have a cooling effect. Always taste and adjust sweetness as needed.
Serving Dish Suggestions
Choose a serving dish that allows for at least two layers of ladyfingers and cream. A classic rectangular glass dish works perfectly, letting you see the beautiful layers. Individual ramekins or glasses also make for elegant single servings.
Dusting with Cocoa Powder
Don’t skip the cocoa powder dusting! It adds a crucial hint of bitterness that balances the sweetness and richness of the cream and coffee. For an extra smooth and even finish, use a fine-mesh sieve or tea strainer when dusting.
Storage
Your delicious gluten free tiramisu should be stored in the refrigerator. Keep it covered with a lid, cling film, or kitchen foil to maintain freshness. It will keep well for up to 1 week, although it’s often too tempting to last that long!
Essential Equipment for This Recipe
To prepare this delicious recipe, you’ll need the following kitchen tools:
- Mixing Bowls – A set of sturdy mixing bowls is essential for combining wet and dry ingredients.
Find Mixing Bowls on Amazon - Measuring Cups and Spoons – Accurate measurements are key to baking success!
Find Measuring Cups and Spoons on Amazon - Baking Sheets – Perfect for even baking and crisp results.
Find Baking Sheets on Amazon - Whisks – Needed for blending ingredients.
Find Whisks on Amazon - Spatulas – Ideal for folding and mixing without scratching your bowls.
Find Spatulas on Amazon - Food Processors – For chopping and mixing.
Find Food Processors on Amazon - Saucepans –For heating ingredients.
Find Saucepans on Amazon - Chef’s Knives – Needed for slicing.
Find Chef’s Knives on Amazon - Cutting Boards – To protect your counter
Find Cutting Boards on Amazon