
Stunning Gluten-Free Meringue Tower: A Showstopper Dessert
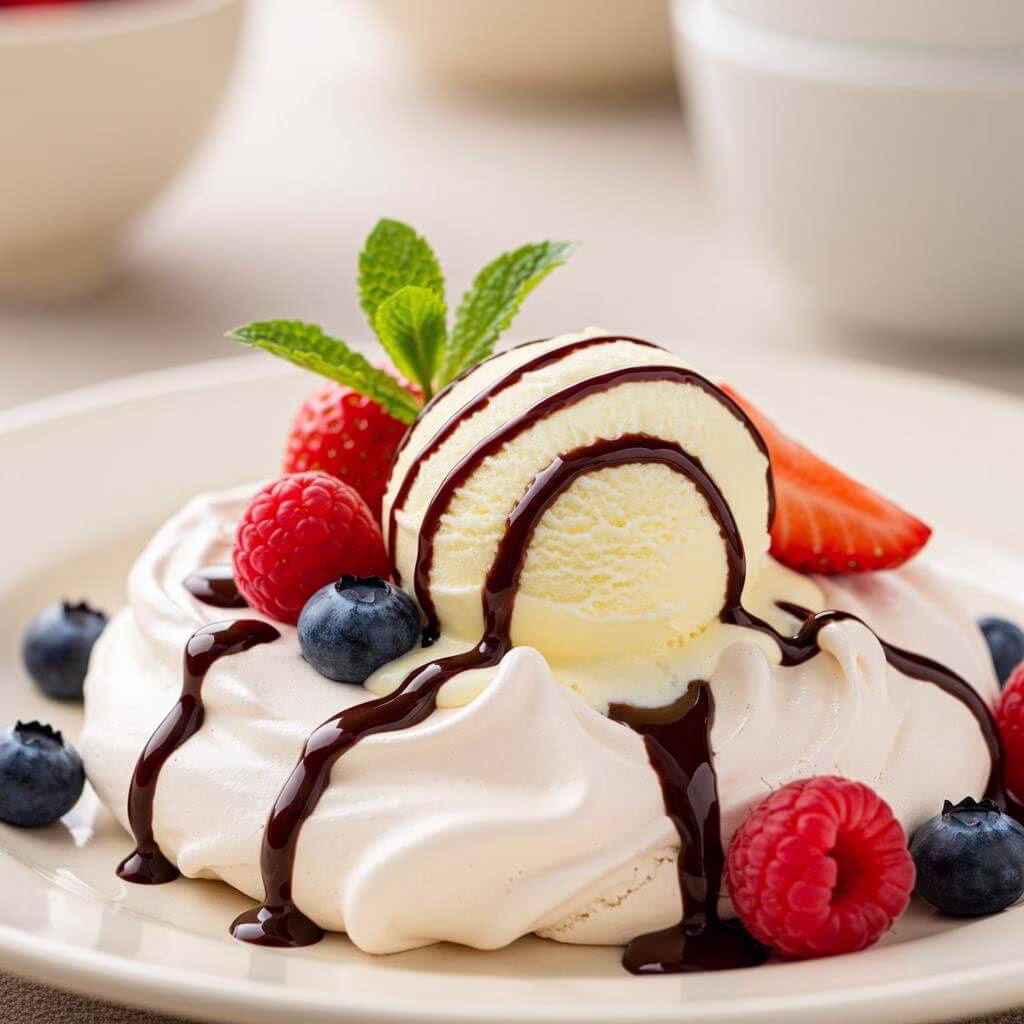
Looking for a truly spectacular dessert that’s naturally gluten-free and guaranteed to wow your guests? This Meringue Tower recipe is your answer! Imagine crisp, light meringue shells piled high, interspersed with creamy ice cream, and drizzled with a luscious chocolate sauce. It’s a masterpiece of textures and flavors, perfect for any celebration or special occasion. Plus, meringues are a fantastic gluten-free dessert option, relying on simple ingredients like egg whites and sugar. If you love impressive yet accessible gluten-free treats, you might also enjoy our Flourless Chocolate Coconut Cake or these delightful Sunny Side Up Meringues for a smaller, fun twist.
Why You’ll Love This Gluten-Free Meringue Tower Recipe
This meringue tower isn’t just visually stunning; it’s also a wonderfully satisfying dessert for everyone, especially those following a gluten-free diet. Here’s why this recipe is a must-try for your next gathering:
- Naturally Gluten-Free: The core components – meringue and ice cream (always double-check your ice cream is a gluten-free brand!) – are typically free from gluten, making it an easy and safe choice for inclusive entertaining.
- Impressive Presentation: Building this dessert tower creates an unforgettable centerpiece that looks far more complicated to make than it actually is. It’s all about the fun of assembly!
- Customizable Delight: Feel free to adapt it to your liking! Use different flavored ice creams, add a medley of fresh berries, or experiment with various toasted nut toppings. For a different take on crispy, sweet gluten-free treats, why not try our Light and Crispy Peppermint Meringues?
- Perfect for Any Celebration: Whether it’s birthdays, holidays, or any gathering that calls for an extra special dessert, this meringue tower recipe will elevate the occasion.
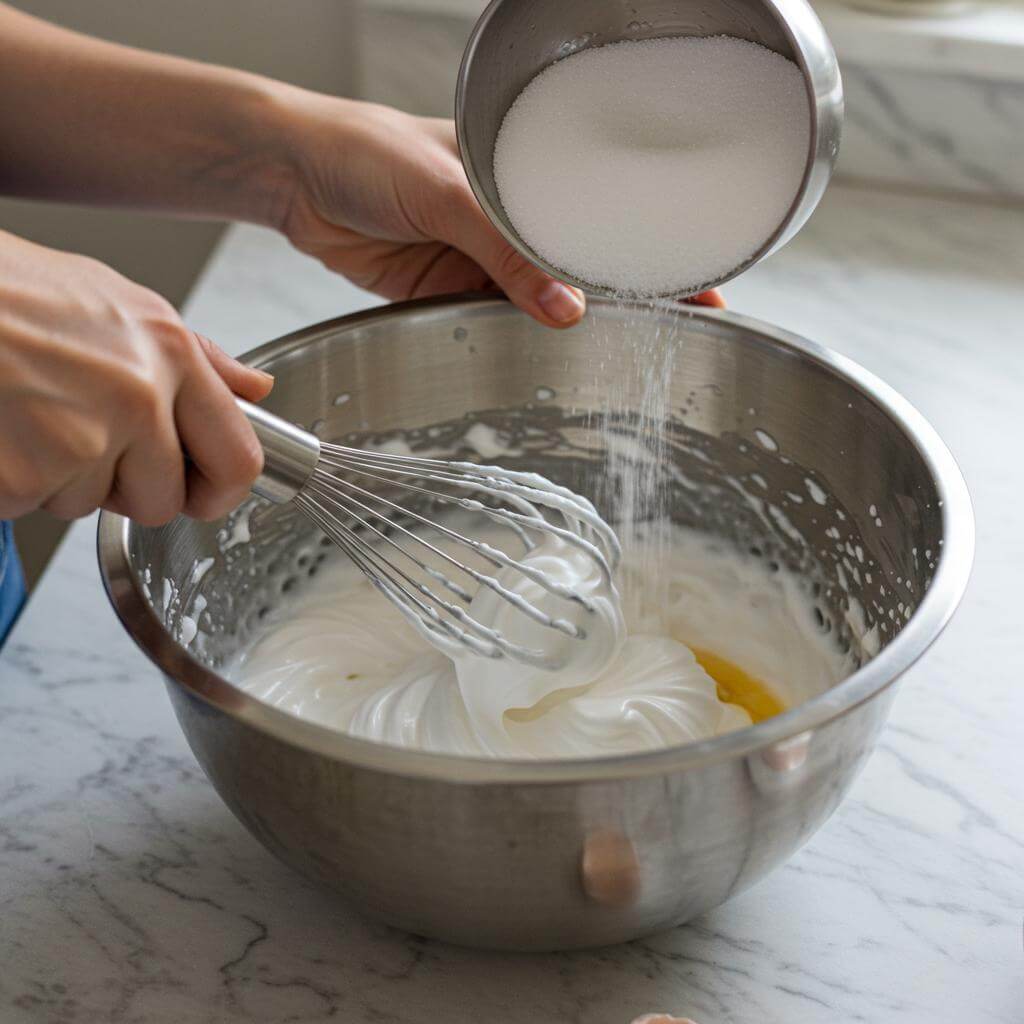
Crafting perfect meringues is the key to this dessert’s success. A crucial tip for those new to meringue making is to ensure your bowl and whisks are impeccably clean and completely free from any grease or fat. Even a tiny trace can prevent your egg whites from whipping up to their full, glorious, and glossy potential. With a little care, you’ll achieve those beautiful, stiff peaks that bake into light, airy, and perfectly crisp meringue shells, forming the foundation of your amazing meringue tower.
Why This Recipe Works So Well (Naturally Gluten-Free!)
One of the most wonderful things about this delightful dessert is that it is naturally and effortlessly gluten-free! Unlike many baked goods that require careful flour substitutions and binders, the magic of this meringue tower recipe relies entirely on ingredients that are already free from gluten.
The star of the show, the meringue itself, is simply a beautiful transformation of egg whites and sugar. When egg whites are whipped, air is incorporated, creating a stable foam. Adding sugar gradually strengthens this structure, leading to a glossy, thick mixture. Baking at a low temperature for an extended period dries out this sugar-egg matrix, resulting in the signature crisp shell and potentially a slightly chewy interior of a perfectly baked meringue. Gluten, which provides structure and elasticity in traditional baked goods like bread or cakes, is simply not needed here.
This means you don’t need to worry about complex gluten-free flour blends or gums like xanthan gum to achieve fantastic texture. The structure comes purely from the protein in the egg whites and the crystallization of the sugar during baking. The touch of vinegar helps to stabilize the egg whites, ensuring a robust meringue that holds its shape beautifully when baked and stacked into a gorgeous tower.
Furthermore, all the accompanying elements – the rich chocolate sauce made from chocolate, butter, sugar, and cream, the whipped cream, the vanilla ice cream, and the toasted hazelnuts – are also naturally free of gluten (always double-check labels on packaged goods like chocolate or ice cream just in case of additives, but the core ingredients are GF). This makes assembling this stunning dessert incredibly straightforward for anyone following a gluten-free diet.
This recipe is a fantastic example of how naturally gluten-free ingredients can create something truly showstopping and delicious, proving that you don’t need gluten to achieve incredible texture, structure, and flavor. It’s a reliable, impressive dessert perfect for any occasion, easily enjoyed by everyone, regardless of dietary needs.

🎁 33 Gluten-Free Breakfasts
Start every day with a smile and flavor. Get our FREE recipe eBook!
Instructions
Follow these simple steps to create a spectacular, naturally gluten-free meringue tower perfect for any special occasion on your Be Gluten Free journey:
- Prepare for Baking: Begin by preheating your oven to 130°C (260°F). If you are using a fan-assisted (convection) oven, lower the temperature setting to 110°C. Take two baking sheets and line both with baking parchment paper.
- Whip Egg Whites: In the bowl of a stand mixer fitted with the whisk attachment, or using a large mixing bowl with a hand-held electric whisk, beat the large egg whites until they achieve firm, stiff peaks.
- Add Sugar Gradually: While continuing to whisk, gradually add the caster (superfine) sugar into the egg whites, a small amount at a time. Ensure each addition is incorporated before adding more. Once all the sugar has been added, whisk in the white wine vinegar.
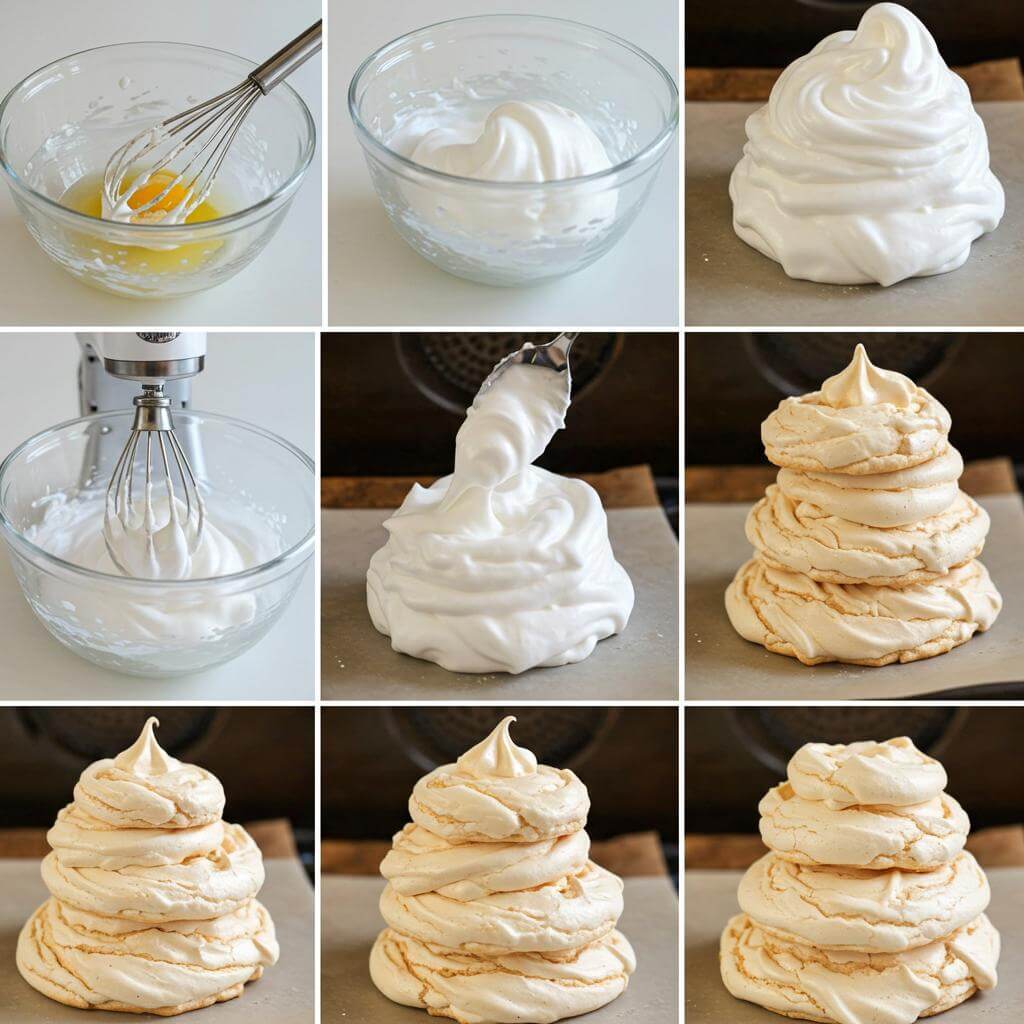
- Develop Glossy Meringue: Continue beating the mixture on a high speed for 4 to 5 minutes more. The goal is to achieve a smooth, thick, and beautifully glossy meringue consistency.
- Shape and Bake Meringues: Spoon large dollops of the prepared meringue mixture onto the lined baking sheets. Create generous, slightly free-form shapes resembling large quenelles (don’t worry about making them perfectly uniform). Bake in the preheated oven for approximately 2 to 2½ hours. The meringues are ready when they have formed a light, pale outer shell and can be easily lifted from the parchment paper.
- Allow to Cool: Once the baking is complete, turn off the oven. Leave the meringues inside the oven with the door propped slightly ajar. Allow them to cool down completely within the cooling oven. This crucial step can take between 1 to 2 hours.
- Prepare Chocolate Sauce: When you are ready for assembly and serving, prepare the chocolate sauce. Combine the dark chocolate and salted butter in a heatproof bowl set over a pan of gently simmering water. Stir the mixture until the chocolate and butter are fully melted and smooth. Remove the bowl from the heat source.
- Finish Sauce: Whisk the sifted icing (confectioners’) sugar and the double (heavy) cream into the melted chocolate mixture until everything is well blended and the sauce is smooth. Keep the chocolate sauce warm until you are ready to use it.
- Whip Serving Cream and Prep Ice Cream: Whip the remaining double (heavy) cream together with the vanilla extract or vanilla bean paste just until the cream holds its shape softly. Take the tub of vanilla ice cream out of the freezer briefly to allow it to soften slightly for easier scooping.
- Assemble the Tower Structure: Choose a large serving platter. Put a small dollop of the whipped cream onto the platter to act as an adhesive base, then place a baked meringue on top. Use additional whipped cream between layers as ‘glue’ to stack the remaining meringues on top of each other, building them upwards to form an impressive meringue tower. Scoop the slightly softened ice cream into balls and carefully tuck these into the natural spaces and openings within the meringue structure.
- Decorate and Serve Immediately: Just before serving, artfully and perhaps dramatically, drizzle the warm chocolate sauce generously all over the assembled meringue tower. Scatter the chopped and toasted hazelnuts over the top. For an extra touch of sparkle, you can decorate with edible gold glitter if desired. Serve this extraordinary dessert immediately to ensure the best contrast of textures and temperatures.
Tips for Perfect Results
Making beautiful, stable meringues for your tower is key! Follow these expert tips to ensure your meringues turn out light, crisp, and ready to stack:
- Start with Clean Equipment: Ensure your mixing bowl and whisk are absolutely grease-free. Any trace of fat can prevent the egg whites from whipping up properly into stiff, stable peaks. Wash them thoroughly and consider wiping with lemon juice or vinegar before beginning.
- Room Temperature Egg Whites: Use large eggs and allow the whites to come to room temperature before whipping. They will achieve greater volume and whip more easily to form those crucial stiff peaks needed for a sturdy meringue structure.
- Gradually Add Sugar: Don’t rush adding the sugar. Gradually whisk it in a tablespoon at a time once the egg whites have reached soft peaks. This allows the sugar to dissolve properly into the egg white mixture, creating a smooth, glossy, and stable meringue.
- Whip to Glossy Perfection: Continue whipping the meringue on high speed for the recommended 4-5 minutes after adding all the sugar. You’re looking for a mixture that is thick, smooth, very glossy, and holds stiff peaks beautifully. You shouldn’t feel any grainy sugar when you rub a tiny bit between your fingers.
- Low and Slow Baking is Key: The low oven temperature is essential for drying out the meringues slowly rather than cooking them. This process ensures they are crisp all the way through. The fan setting helps circulate the air for even drying. Don’t be tempted to turn up the heat!
- Cool Completely in the Oven: Leaving the meringues in the turned-off oven with the door ajar allows them to cool down gradually. This prevents sudden temperature changes that can cause them to crack or collapse, ensuring they maintain their shape and crispness.
A common mistake is not whipping the meringue long enough after adding all the sugar, resulting in a grainy or unstable mixture that can weep or collapse during baking.
“`html
Easy Meringue Tower Recipe
Ingredients
Meringue
- 6 large free-range egg whites
- 325 g (11 oz) caster (superfine) sugar
- 1 tsp white wine vinegar
Chocolate sauce
- 100 g (3½ oz) good-quality dark chocolate
- 30 g (1 oz) salted butter
- 50 g (2 oz) icing (confectioners’) sugar, sifted
- 75 ml (⅓ cup) double (heavy) cream
To serve
- 300 ml (1¼ cups) double (heavy) cream
- 1 tsp vanilla extract or vanilla bean paste
- 500 g (1 lb 2 oz) tub vanilla ice cream
- 50 g (2 oz) hazelnuts, chopped and toasted
- Edible gold glitter to decorate (optional)
Nutritional Insights for Your Meringue Tower
One of the fantastic aspects of a classic meringue tower recipe is its inherent gluten-free nature! Meringues are primarily made from simple ingredients like egg whites and sugar, both of which are naturally free from gluten. This makes them a perfect dessert option for those following a gluten-free lifestyle without needing special flour blends or substitutes for the base meringue component.
While meringues themselves are quite low in fat (primarily protein from the egg whites and high in carbohydrates from the sugar), the additions in this meringue tower recipe, such as the rich chocolate sauce, double cream, and vanilla ice cream, significantly increase the fat and calorie content. The hazelnuts add healthy fats and some fiber. Be mindful of portion sizes, as this is a decadent treat.
Always check the labels of packaged ingredients like dark chocolate, icing sugar, and vanilla ice cream to ensure they are certified gluten-free, especially if severe gluten intolerance or Celiac disease is a concern, as cross-contamination can occur during manufacturing. Pure vanilla extract and white wine vinegar are typically gluten-free.
Please note that nutritional information can vary based on specific brands and modifications. This information is intended as a general guide, and it’s always best to calculate precise values based on the products you use and consult with a registered dietitian for personalized dietary advice.
Expert Tips & Variations
Creating the perfect meringue tower recipe requires a few key techniques. Here are some tips and ways to adapt the recipe:
* **Meringue Mastery:** Ensure your egg whites are free from any trace of yolk or grease, as this will prevent them from whipping properly. Using a clean stand mixer or a large bowl with a hand-held electric whisk is essential. Gradually adding the caster sugar slowly allows it to dissolve fully, resulting in a stable, glossy meringue. The white wine vinegar helps stabilize the egg whites and contributes to a crisp shell.
* **Low and Slow Baking:** The low oven temperature is crucial for drying out the meringues rather than browning them. Leaving them to cool completely inside the turned-off oven with the door ajar prevents sudden temperature changes that can cause cracking. Line your baking sheets with baking parchment for easy removal.
* **Dairy-Free Delight:** To make this meringue tower recipe dairy-free, substitute the salted butter in the sauce with a block-style vegan butter. Replace the double cream with chilled full-fat coconut cream (scoop the thick part from a can left in the fridge overnight) or a commercially available dairy-free whipped topping. Use a dairy-free vanilla ice cream alternative. Ensure your dark chocolate and edible glitter are also dairy-free.
* **Flavor Variations:** Add a touch of almond extract, peppermint extract, or the zest of an orange or lemon to the meringue mixture before baking for extra flavor dimensions.
* **Chocolate Sauce Control:** When making the chocolate sauce, use a heatproof bowl set over but not touching simmering water to prevent the chocolate from seizing. If it thickens too much, stir in a little extra cream or milk (dairy or plant-based).
* **Nut Alternatives:** If hazelnuts aren’t your preference or due to allergies, try substituting them with toasted slivered almonds, chopped pistachios, or seeds like toasted pumpkin seeds for a different texture and flavor.
* **Assembly & Presentation:** Building the tower on a sturdy large serving platter using the whipped cream as ‘glue’ is key to stability. Scooping the ice cream and nestling it into the structure just before serving ensures it doesn’t melt prematurely. The dramatic drizzle of warm chocolate sauce at the table adds a touch of spectacle! Remember to serve immediately as meringues can soften quickly once assembled with cream and ice cream.
Enjoy creating and devouring this impressive, naturally gluten-free meringue tower!
Essential Equipment for This Recipe
To prepare this delicious recipe, you’ll need the following kitchen tools:
- Mixing Bowls – A set of various sizes is crucial for prep work.
Find Mixing Bowls on Amazon - Measuring Cups and Spoons – Precise measurements are key to baking success.
Find Measuring Cups and Spoons on Amazon - Baking Sheets – For evenly baked goods.
Find Baking Sheets on Amazon - Whisks – To ensure smooth batters and meringues.
Find Whisks on Amazon - Spatulas – Perfect for folding and mixing without scratching your bowls.
Find Spatulas on Amazon - Food Processors – Speeds up chopping and mixing tasks.
Find Food Processors on Amazon - Saucepans – Essential for making sauces and cooking ingredients.
Find Saucepans on Amazon - Chef’s Knives – A good quality knife is essential for any kitchen.
Find Chef’s Knives on Amazon - Cutting Boards – Protect your counters and provide a safe surface for chopping.
Find Cutting Boards on Amazon