Do you remember those days? The sudden, undeniable craving for something deeply, intensely chocolatey? Not just any chocolate, but that dense, almost fudgy richness that clings to your spoon and melts slowly in your mouth. It hits you without warning, usually late at night or after a long day, and for those of us living gluten-free, it’s often accompanied by a slight sigh of disappointment. Finding that perfect dessert that delivers on pure chocolate indulgence without the gluten can feel like searching for a unicorn.
We’ve all been there, right, my fellow gluten-free friends? You scour recipes, filled with hope, picturing that glorious first bite. But then comes the reality of gluten-free baking attempts. The cakes that turn out dry and crumbly, the textures that are just *off*, or the flavors that fall flat. There were so many times I tried to recreate that classic, decadent chocolate cake experience, only to end up with something that left me feeling less than satisfied. Especially when the goal was a truly rich, moist flourless chocolate cake – a dessert that relies entirely on the power of chocolate and eggs, with no flour to hide behind. It felt like a monumental challenge.
But I’m not one to give up easily, especially when chocolate is involved! I was determined to conquer the quest for the ultimate easy flourless chocolate cake. I experimented with different ratios, tried various types of chocolate, and played with baking times. There were some near misses and definite failures along the way, resulting in cakes that were too dry, too wet, or simply lacking that intense chocolate punch. Then, one baking day, it happened. The combination was just right. As it baked, the aroma filled the kitchen, promising something special. When it came out, cooled, and I poured that glossy ganache over the top, I knew I had finally found it – the flourless chocolate cake of my dreams.
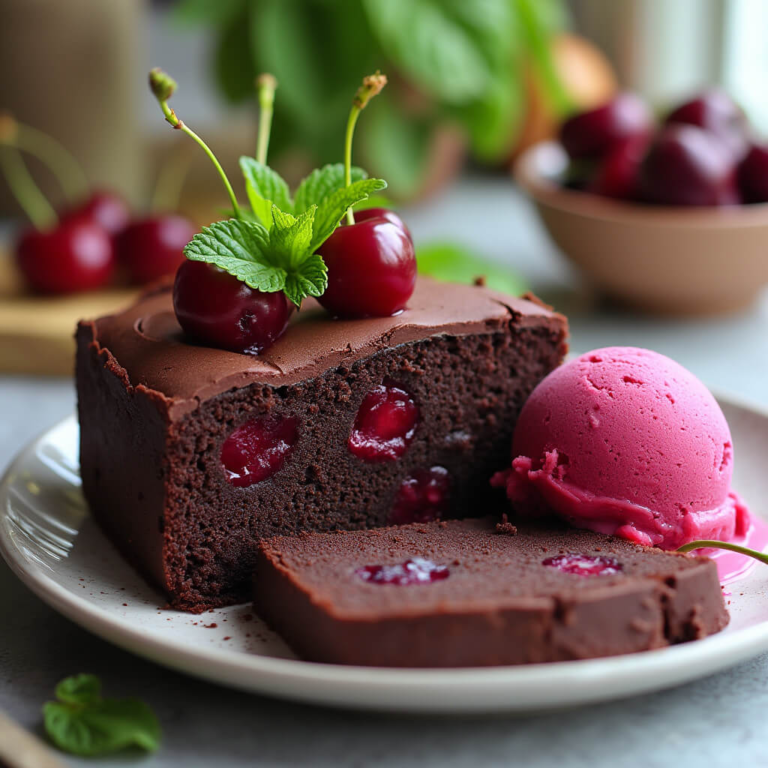
The real test, of course, was the taste test. The first slice was pure magic – rich, dense, and undeniably chocolatey, exactly what I had been craving. My family’s reactions confirmed it; this wasn’t just *good* for gluten-free, it was just plain *good*. Requests for “that amazing **flourless chocolate cake**” started rolling in, solidifying its status as a family favorite. This recipe is the culmination of that journey, a simple yet incredibly decadent flourless chocolate fudge cake that proves you don’t need gluten to achieve dessert perfection. If you’ve been searching for a reliable, show-stopping flourless chocolate cake that delivers on flavor and texture every single time, your quest ends here!
Love This Flourless Chocolate Cake? Want More Gluten-Free Baking Wins?
While this decadent flourless cake is naturally gluten-free and oh-so-easy, we know that mastering other gluten-free baked goods can sometimes feel like a tricky science experiment.
Unlock the Secrets with Our FREE Gluten-Free Baking Substitutions Cheat Sheet!
- ✓ Never wonder what to use instead of wheat flour, eggs, or dairy again – get perfect results!
- ✓ Transform your favorite traditional recipes into delicious, reliable gluten-free versions.
- ✓ Say goodbye to crumbly textures and hello to moist, flavorful gluten-free treats every time.
- ✓ Save time and money by avoiding baking fails and using ingredients effectively.
Dear fellow gluten-free friends, we understand the journey! This handy cheat sheet is packed with the essential swaps you need to bake with confidence and joy, just like with this amazing flourless chocolate cake.
Yes, I Want My FREE Baking Cheat Sheet!
We promise to only send you our best gluten-free tips, recipes, and support. No spam, ever.
Why This Flourless Chocolate Cake Recipe Works So Beautifully
Get ready to unlock the secrets behind this exceptionally moist and decadent flourless chocolate cake! While traditional cakes rely on gluten to create structure, this recipe achieves its perfect, fudgy texture through a brilliant combination of naturally gluten-free ingredients, making it incredibly simple and guaranteed to impress. Here’s the fascinating science happening in your kitchen:
It Starts with the Foundation: Chocolate and Butter
The magic of this **flourless chocolate cake** begins with the generous use of **semisweet chocolate chips** and **unsalted butter**. When these ingredients are melted together, they form a rich, stable base. What’s truly remarkable is how the fat from the butter and the cocoa butter in the chocolate coat the other ingredients, preventing dryness and creating that signature dense, fudgy consistency. Think of this fatty base as providing the bulk and tenderness that flour would typically provide.
Eggs: The Gluten-Free Structural Superstars
Since there’s no gluten network to trap air and provide structure, the **eggs** become the absolute heroes of this **flourless chocolate cake**. When whisked and then heated in the oven, the proteins in the eggs coagulate and set. This process creates a delicate internal structure, providing the cake with lift and stability. The high ratio of eggs to the other ingredients is the key to holding this beautiful **flourless chocolate cake** together and giving it that slightly springy, yet rich texture. It’s a different kind of structure than a traditional cake, resulting in that desirable dense, almost brownie-like interior.
The Sweet Science of Sugar
Beyond sweetness, the **granulated sugar** plays a crucial role in the texture of this **flourless chocolate cake**. Sugar is hygroscopic, meaning it attracts and holds onto moisture. This helps keep the cake incredibly moist over time. Furthermore, sugar interferes with the setting of egg proteins just enough to keep the cake tender, preventing it from becoming rubbery or tough, which can sometimes be a challenge in gluten-free baking.
Cocoa Powder: Flavor & Fudginess
Using **Dutch-processed cocoa powder** isn’t just about intense chocolate flavor (though it definitely delivers on that!). Dutch processing neutralizes some of the acidity found in natural cocoa, resulting in a smoother, mellower chocolate taste. This also changes how it interacts with other ingredients, contributing to the deep color and slightly smoother texture of the baked **flourless chocolate cake**. It enhances the overall richness that we expect from a truly decadent dessert like this **flourless chocolate cake**.
The Finishing Touch: Perfect Ganache
The **chocolate ganache** isn’t just a delicious topping; it perfectly complements the texture of the cake. The combination of melted **semisweet chocolate chips** and **heavy cream** creates a smooth, glossy, and rich glaze that sets up beautifully but remains soft enough to enhance the dense, fudgy nature of the **flourless chocolate cake**. It adds another layer of moisture and intense chocolate flavor, making each bite truly indulgent.
Why This Recipe is Foolproof
This **flourless chocolate cake** is actually *easier* than many traditional and even other gluten-free cake recipes because it eliminates the complexities of flour blends and binders. The structure is inherent in the main ingredients. Following the small but mighty tips, like using **room temperature ingredients** (which emulsify and mix more easily) and **not over-baking** (to preserve moisture and tenderness), ensures a perfect result every time. The parchment paper and greasing step, as highlighted, are essential for successfully releasing such a rich, dense cake from the pan.
The secret to this recipe’s success lies in its simplicity and the natural properties of chocolate, butter, and eggs. They work in harmony to create a cake that is not just gluten-free, but inherently rich, moist, and deeply chocolatey. Once you understand these principles, you’ll feel empowered to bake this glorious **flourless chocolate cake** with absolute confidence!
Making This Recipe Your Own
While this decadent flourless chocolate cake recipe is perfect as written, don’t be afraid to personalize it! Here are some easy swaps and exciting variations to make this gluten-free chocolate cake uniquely yours.
Easy Swaps
Need to make a quick change? No problem! These simple ingredient swaps will help you create a delicious gluten-free flourless chocolate cake even if you don’t have everything on hand.
- Butter: If you need to make this flourless chocolate cake dairy-free, simply swap the unsalted butter 1:1 with your favorite brand of dairy-free or vegan butter sticks. Look for sticks designed for baking for the best results. The texture and richness should be very similar!
- Semi-Sweet Chocolate Chips: Feel free to experiment with different types of chocolate! Swap the semisweet chips 1:1 with dark chocolate chips for a more intense, bittersweet flourless chocolate cake. You could also use milk chocolate for a sweeter cake, or dairy-free chocolate chips (check price on Amazon) for a dairy-free version of this rich chocolate cake. The melting properties might vary slightly, but the overall outcome will still be fantastic.
- Sugar: While granulated sugar works perfectly, you can swap ¾ cup of granulated sugar for ¾ cup packed light brown sugar in the cake batter. This will add a subtle caramel note and might result in a slightly moister, fudgier flourless chocolate cake.
- Dutch-Processed Cocoa Powder: As mentioned in the recipe, if you don’t have Dutch-processed cocoa powder, you can absolutely use regular unsweetened cocoa powder instead. The flavor of the flourless chocolate cake will be slightly different – regular cocoa is more acidic and has a sharper chocolate taste compared to the smoother, richer flavor of Dutch-processed cocoa. Use the same amount (½ cup) and proceed as directed.
- Heavy Cream (for Ganache): To make the luscious ganache dairy-free, swap the heavy cream 1:1 with full-fat canned coconut cream (scoop from the top of a chilled can of full-fat coconut milk) or a professional dairy-free heavy cream alternative (check price on Amazon). The ganache may take a little longer to set but will still be wonderfully rich and creamy.
Creative Variations
Get creative with your simple flourless chocolate cake! These ideas let you play with flavors, textures, and presentation, adding a fun twist to this already amazing gluten-free dessert.
- Mocha Magic: Add 1-2 teaspoons of instant espresso powder (check price on Amazon) to the melted chocolate and butter mixture in the cake batter. This enhances the chocolate flavor and adds a lovely coffee note to your rich chocolate cake.
- Citrus Zest Sensation: For a bright and sophisticated twist, add the finely grated zest of one orange or lemon to the cake batter along with the vanilla extract. Chocolate and orange is a classic pairing that works beautifully in this dense flourless chocolate cake.
- Spice It Up: Introduce warmth by whisking in ¼ teaspoon of cinnamon or a tiny pinch of cayenne pepper (check price on Amazon) to the dry cocoa powder before adding it to the wet ingredients. The cayenne adds a subtle heat that complements the rich chocolate without being overpowering.
- Nutty Crunch or Swirl: Gently fold in about ¼ cup of finely chopped toasted nuts (like pecans, walnuts, or almonds) into the batter just before pouring it into the pan. Alternatively, swirl in a few tablespoons of your favorite nut butter (like peanut butter or almond butter) into the batter in the pan for a marbled effect in your flourless chocolate cake.
- Vegan Adaptation: To make a completely vegan flourless chocolate cake, combine the dairy-free swaps mentioned above (butter, chocolate, cream) and replace the eggs with 3 “flax eggs” (mix 3 tablespoons ground flaxseed with 9 tablespoons water and let sit for 5-10 minutes until gelled) or your preferred commercial vegan egg replacer (check price on Amazon).
- Different Pan Sizes: Instead of one 8-inch cake, try baking this flourless chocolate cake batter in different pans! For mini cakes, use smaller cake rings or even muffin tins (lined with paper liners check price on Amazon) – baking time will be significantly reduced (start checking around 15-20 minutes for mini cakes).
- Elevated Toppings: Beyond the simple ganache or powdered sugar, top your cooled flourless chocolate cake with fresh whipped cream (dairy or coconut), a dollop of salted caramel sauce, a sprinkle of flaky sea salt, or a vibrant array of fresh berries for a stunning finish.
“`
Tips for Perfect Results
- Master the Pan Prep Secret: This one tip is critical for a clean release! For this rich flourless chocolate cake, you absolutely must grease the pan, add parchment paper cut to fit the bottom, and then grease the parchment again. This creates a non-stick barrier against the dense, fudgy batter, guaranteeing your beautiful cake comes out intact every single time.
- Gentle Chocolate Melting is Key: When melting the chocolate and butter, whether in the microwave or on the stovetop, go low and slow. Overheating can seize the chocolate, making your batter grainy instead of smooth and luxurious. Use short bursts in the microwave or very low heat on the stove, stirring constantly until just smooth. This preserves the chocolate’s integrity and flavor for your perfect flourless chocolate cake.
- Room Temperature Eggs are Non-Negotiable: Using eggs straight from the fridge can shock the melted chocolate mixture, causing it to stiffen or even break. Always use large eggs at room temperature. They incorporate seamlessly into the batter, contributing to a smoother texture and better rise (even in a dense flourless cake).
- Mix Smartly, Not Hard: Once you add the cocoa powder, mix only until *just* combined. Vigorously mixing after this point incorporates too much air, which can lead to a tougher texture in a cake that relies heavily on fat and eggs for its structure. A few gentle folds are all you need.
- Nail the Baking Doneness: This is arguably the MOST important tip for the ideal fudgy texture of your flourless chocolate cake. Bake *just* until the edges are set and a slight jiggle remains in the center. Using an instant-read thermometer to confirm the center reaches 200°F (93°C) is the foolproof method. Remember, the cake continues to cook slightly as it cools, and it will firm up significantly. Overbaking is the enemy of fudginess!
- The Inversion Technique for a Flat Top: Flipping the cake upside down onto the cooling rack (after the initial 10 minutes in the pan) ensures the bottom of the cake becomes the perfectly flat top for receiving your ganache. It allows gravity to work for you, preventing that domed top you often see in traditional cakes.
- Perfect Your Ganache Texture: For that glossy, smooth ganache glaze, heat the heavy cream until *hot*, but not boiling. Pour it over the chocolate chips and let it sit for a minute or two to allow the chocolate to soften. Then, start stirring gently from the center of the bowl, gradually working your way out. This helps the mixture emulsify properly, resulting in a beautiful, pourable ganache.
- Patience is a Virtue (for Setting): While it’s tempting to cut into your masterpiece right away, letting the ganache cool and set completely transforms the eating experience. It firm ups into a lovely fudge-like layer on top of the dense cake. Pop it in the fridge to speed this process up if needed.
Common Mistakes to Avoid
- Overbaking the Cake: The most common error with flourless chocolate cake is baking it for too long. This turns a potentially fudgy, rich dessert into a dry, crumbly one. Prevention: Use an instant-read thermometer to check for 200°F (93°C) or trust the *slight* center jiggle. It will continue setting as it cools.
- Not Preparing the Pan Properly: Skipping or skimping on the grease-parchment-grease step almost guarantees your beautiful cake will stick, leaving you with frustrating crumbs instead of a clean slice. Prevention: Follow the pan preparation instructions exactly as written – it’s there for a reason!
- Cutting the Cake Before the Ganache Sets: Attempting to slice the cake while the ganache is still warm and liquid will result in a messy presentation and the ganache running off the sides. Prevention: Allow ample time for the ganache to cool and firm up on the cake, using the refrigerator if you’re short on time.
Common Mistakes to Avoid
Making this flourless chocolate cake is straightforward, but like any baking project, a few common pitfalls can happen. Don’t worry, we’re here to help you identify and avoid them so your cake turns out perfectly rich and fudgy every time!
1. Overbaking Your Flourless Chocolate Cake
The Problem: This is probably the most common challenge with dense cakes like this. If the cake bakes too long, it loses its signature moist, fudgy texture and can become dry and crumbly around the edges or even throughout. This happens because the heat continues to cook the proteins (eggs) and evaporates moisture beyond the ideal point.
Prevention: Pay close attention to the baking time and visual cues, but most importantly, use an instant-read thermometer. The recipe calls for baking for 25 minutes until the center reaches 200°F. Check it a few minutes early, as oven temperatures can vary. The edges should look set, but the center should still have a slight jiggle before it comes out of the oven, as it will continue to cook slightly from residual heat as it cools.
Pro Tip: Err on the side of slightly *underbaking* rather than overbaking for a fudgier result. A little moistness in the center is preferable to a dry cake. You’ve got this!
2. Skipping or Skimping on Pan Preparation
The Problem: Your beautiful flourless chocolate cake releases poorly from the pan, sticking to the sides or bottom and potentially breaking when you try to invert it. Unlike cakes with gluten, this dense, buttery cake doesn’t have the same structure to hold itself together if it’s fighting the pan. Without proper preparation, it will stubbornly cling.
Prevention: Do exactly as the recipe instructs: grease the pan thoroughly with cooking spray, cut a piece of parchment paper to fit the bottom, place it in the pan, and then spray the parchment paper again. This creates two layers of non-stick protection, ensuring an easy release for this naturally gluten-free cake.
Pro Tip: Use both cooking spray (covering the sides well!) and a carefully cut parchment circle for the bottom. Make sure the parchment lies flat. This double-layer method is your best friend for successful unmolding. You can do it!
3. Burning or Seizing the Chocolate Mixture
The Problem: The chocolate and butter mixture becomes grainy, clumpy, or develops a weird, off-putting texture right at the beginning of the recipe. This ruins the base of your flourless chocolate cake batter before you even add the other ingredients. Chocolate and butter are sensitive to high heat and sudden temperature changes.
Prevention: If using the microwave, heat the chocolate and butter in short increments (as the recipe suggests, 1 minute initially, then 10-20 seconds) and stir thoroughly *between* each interval. Allow the residual heat to melt the last bits. If using a saucepan, use *very low* heat and stir constantly. Avoid getting any water into the chocolate, as this can cause it to seize.
Pro Tip: Quality chocolate melts more smoothly and is less likely to seize. Use good quality semi-sweet chocolate chips as recommended. If your chocolate *does* seize slightly, sometimes stirring in a tiny bit of hot oil or melted butter vigorously can help bring it back, but prevention is key! You’ll master this!
4. Unmolding the Cake While Still Too Warm
The Problem: When you try to flip the cake out of the pan after the initial cooling time, it’s still too soft and delicate, causing it to crack, tear, or completely fall apart. This dense, fudgy **flourless chocolate cake** needs time for its structure to set and firm up as it cools down after baking.
Prevention: Follow the cooling instructions precisely. Let the cake cool in the pan for the recommended 10 minutes before attempting to loosen the edges with a knife and invert it onto a cooling rack or plate. Once inverted, let it cool completely before adding the ganache. Rushing this step is a common pitfall.
Pro Tip: If your cake does break upon inverting, don’t despair! Carefully piece it back together on the serving plate. The rich ganache topping is forgiving and can often cover any imperfections, and the cake will still taste incredibly decadent. Don’t let a little crack stop you from enjoying this treat! You’ve got this!
Essential Equipment for This Recipe
To prepare this delicious recipe, you’ll need the following kitchen tools:
- Mixing Bowls – A set of various sizes is perfect for prepping different ingredients.
Find Mixing Bowls on Amazon - Measuring Cups and Spoons – Accurate measurements are key to successful baking and cooking.
Find Measuring Cups and Spoons on Amazon - Baking Sheets – Essential for baking cookies, roasting vegetables, and more.
Find Baking Sheets on Amazon - Whisks – Ideal for beating eggs, combining dry ingredients, and making sauces smooth.
Find Whisks on Amazon - Spatulas – Use for folding ingredients, scraping bowls, and spreading batter.
Find Spatulas on Amazon - Food Processors – Great for chopping vegetables, making dips, and creating doughs quickly.
Find Food Processors on Amazon - Saucepans – Perfect for cooking sauces, soups, and grains.
Find Saucepans on Amazon - Chef’s Knives – A versatile knife for chopping, dicing, and slicing.
Find Chef’s Knives on Amazon - Cutting Boards – Protect your countertops while you prep your ingredients.
Find Cutting Boards on Amazon
Frequently Asked Questions
Why is this cake called “flourless”? What gives it structure without flour?
Great question! This cake is naturally “flourless” because it relies entirely on the combination of high-quality chocolate, butter, and especially the eggs to provide structure and texture. The eggs act as the primary binder and leavener in this recipe. When they cook and coagulate, they create a stable structure that holds the rich ingredients together, resulting in that signature dense, fudgy consistency without needing any traditional gluten-containing flour. It’s a wonderful option for anyone needing a truly gluten-free treat!
My flourless chocolate cake stuck to the pan! What can I do to prevent this next time?
Oh no, that’s frustrating! This is a common issue with dense cakes like a flourless chocolate cake. The key to preventing sticking is all in the pan preparation. My recipe calls for a double layer of non-stick goodness: generously grease your pan first, then add a cut-out piece of parchment paper to the bottom, and then spray the parchment paper again. This creates a barrier that guarantees your beautiful, fudgy cake will release cleanly every single time. Don’t skip that parchment step!
How do I know when my flourless chocolate cake is perfectly baked and not overdone?
Getting the perfect texture for a flourless chocolate cake is crucial! You want it fudgy, not dry. Bake it just until the edges look set and are starting to pull away slightly from the pan. The very center should still have a slight jiggle when you gently shake the pan. For ultimate accuracy, use an instant-read thermometer inserted into the center – it should register around 200°F (93°C). Trust the thermometer and the visual cues; pulling it out right at this point ensures that glorious moist center as it cools.
Can I make this flourless chocolate cake recipe dairy-free?
Absolutely! While the recipe uses dairy butter and heavy cream, you can definitely make it dairy-free. Simply substitute the unsalted butter with your favorite plant-based stick butter alternative (ensure it’s formulated for baking). For the ganache, swap the heavy cream for full-fat canned coconut milk (only the thick cream from the top) or a dairy-free heavy cream substitute. You’ll also need to use dairy-free chocolate chips for both the cake and the ganache. The texture might differ slightly, but the rich chocolate flavor will still shine through!
Do I need to use Dutch process cocoa powder, or is regular cocoa okay for this cake?
Great question! The recipe recommends Dutch process cocoa powder because it has a smoother, less acidic flavor and creates a darker, richer color, which is wonderful in a deep flourless chocolate cake. However, you can absolutely use regular unsweetened cocoa powder if that’s what you have on hand. The flavor will be slightly different – a bit brighter and more intense – but it will still bake up into a delicious chocolate cake. Use what’s in your pantry!
What should the texture of this flourless chocolate cake actually be like? Is it like a regular cake?
This is key to setting expectations! A flourless chocolate cake is intentionally different from a traditional cake made with flour. It is meant to be very dense, fudgy, and incredibly rich, almost like a giant dark chocolate truffle or a very moist brownie. It won’t be light and airy like a sponge cake. That dense, melt-in-your-mouth texture is part of its charm and what makes it so decadent!
How should I store leftover flourless chocolate cake, and can I freeze it?
This cake keeps beautifully! Store any leftover flourless chocolate cake in an airtight container in the refrigerator for 3-4 days. For the best texture and flavor when serving leftovers, let the cake come to room temperature for about 15-20 minutes before enjoying a slice. And yes, you can freeze it! Wrap individual slices or the whole cooled cake tightly in plastic wrap, then again in foil, and freeze for up to 1-2 months. Thaw in the refrigerator overnight.
My chocolate ganache didn’t turn out smooth and glossy. What went wrong?
Don’t worry, ganache can sometimes be finicky! The most common reasons for lumpy or separated ganache are usually related to temperature or not stirring enough. Make sure the heavy cream is hot enough (just simmering around the edges is perfect) when you pour it over the chocolate chips. Let it sit for a moment to start melting the chocolate, then stir patiently and continuously from the center outwards until it becomes smooth and emulsified. If it looks split or lumpy, you can try gently warming it again in the microwave in very short bursts (5-10 seconds), stirring well after each, until it comes together. You’ve got this!
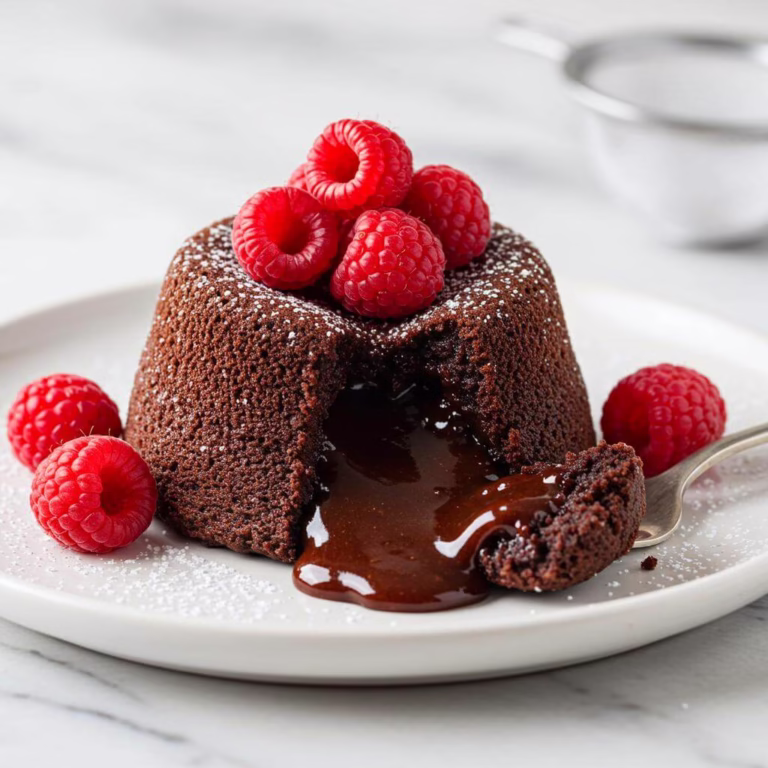
Flourless Chocolate Cake: Decadent, Easy Recipe [2024]
Flourless Chocolate Cake: Decadent, Easy Recipe [2024]
The quest for the ultimate easy Flourless Chocolate Cake ends here! This decadent recipe delivers a rich, dense, and intensely chocolatey dessert that’s naturally gluten-free. Topped with a glossy ganache, it’s the perfect fudgy indulgence for any occasion, proving you don’t need gluten for dessert perfection.
Ingredients
8
- For the Cake:
- 1 cup semisweet chocolate chips (ensure gluten-free)
- ½ cup unsalted butter
- ¾ cup granulated sugar
- ¼ teaspoon salt
- 1 teaspoon pure vanilla extract
- 3 large eggs, whisked
- ½ cup Dutch process cocoa powder
- For the Ganache:
- 1 cup semisweet chocolate chips
- ½ cup heavy cream
Equipment
- 8-inch round cake pan
- Parchment paper
- Large microwave-safe bowl
- Whisk
- Spatula
- Instant-read thermometer
- Medium microwave-safe bowl (for ganache)
- Offset spatula or spoon
Instructions
First, preheat your oven to 375°F (190°C). Prepare an 8-inch round cake pan by giving it a good coating of cooking oil spray.
Now, take a piece of parchment paper and cut it to fit perfectly into the bottom of your greased pan. Place the parchment circle in the bottom, and then spray the top of the parchment paper again with cooking spray.
In a large, microwave-safe bowl, combine the ½ cup unsalted butter and 1 cup semisweet chocolate chips. Heat them in the microwave for . The chocolate chips should look soft and mostly melted. Now, stir gently until the chocolate chips are fully melted and the mixture is beautifully smooth and glossy. If you still have a few stubborn unmelted chips, microwave for another at a time, stirring after each interval, until everything is perfectly smooth.
Into your melted chocolate mixture, add the ¾ cup granulated sugar, ¼ teaspoon salt, and 1 teaspoon pure vanilla extract. Stir everything together until the sugar and salt are combined.
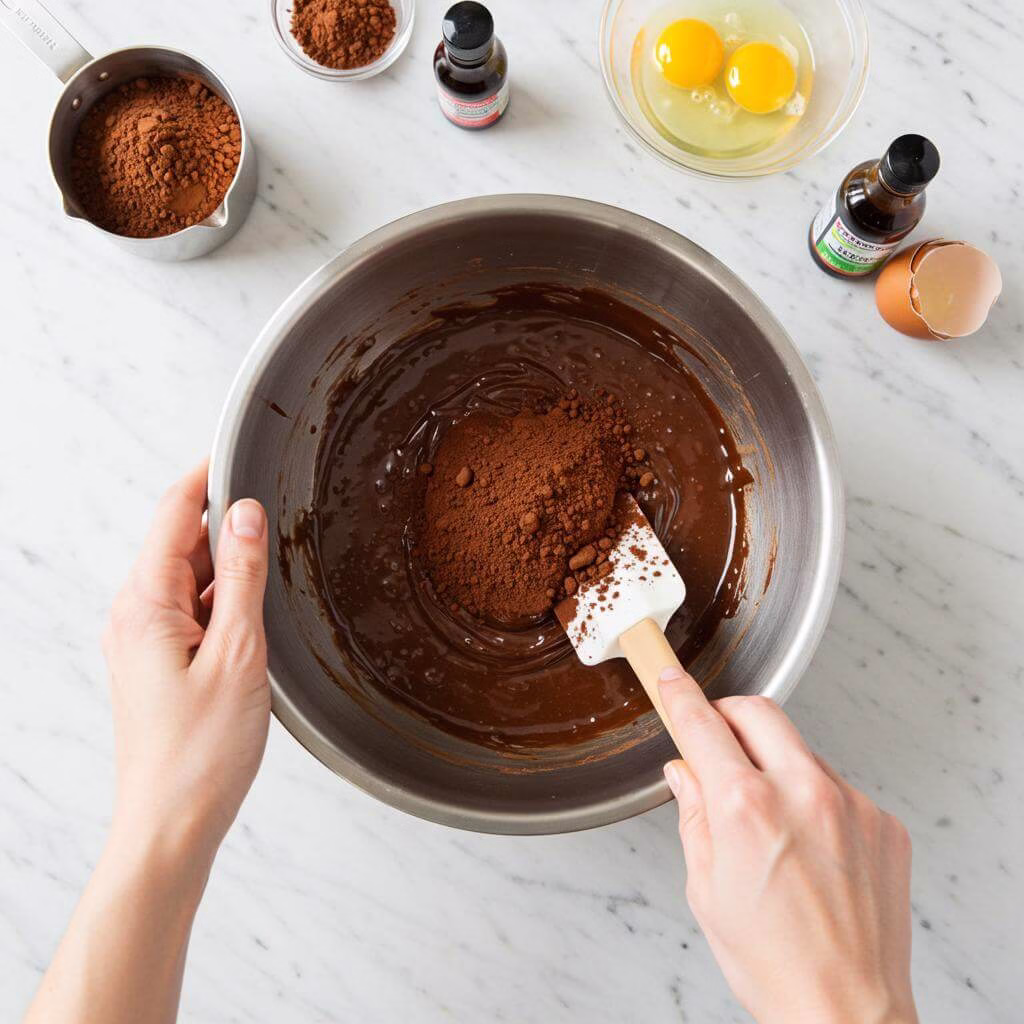
In a separate small bowl, lightly whisk your 3 large eggs. Now, pour the whisked eggs into the chocolate mixture. Stir gently until the eggs are fully incorporated and the mixture is smooth and uniform in color and texture.
Next, add the ½ cup Dutch process cocoa powder. Gently stir the cocoa in until *just* combined. Be careful not to over-mix here – once you don’t see any dry streaks of cocoa powder, stop stirring. The batter will be thick and luxurious.
Pour the thick, fudgy flourless chocolate cake batter into your prepared pan. Spread it out evenly. Place the pan in your preheated oven and bake for about . This cake is done when the edges look set and slightly pulled away from the pan, but the center still has a slight jiggle. For perfect results, use an instant-read thermometer inserted into the center – it should read around 200°F (93°C). Don’t overbake!
Once baked, carefully remove the cake from the oven. Let it cool in the pan for . After 10 minutes, gently run a butter knife around the edges of the pan to loosen the sides.
Now for the flip! Place your serving plate upside down over the cake pan. Holding the pan and plate together firmly, carefully flip the cake over onto the plate. Tap the bottom of the pan gently if needed. Lift the pan and peel off the parchment paper. Allow the flourless chocolate cake to cool completely on the plate while you prepare the ganache.
While your cake is cooling, let’s make the glorious ganache! In a medium microwave-safe bowl, combine the remaining 1 cup semisweet chocolate chips and ½ cup heavy cream. Heat in the microwave for about , or just until the cream looks hot around the edges.
Immediately begin stirring the chocolate and hot cream together. Keep stirring until the mixture is completely smooth, shiny, and emulsified into a luscious, pourable ganache.
Once your flourless chocolate cake is *fully* cooled, pour the warm ganache evenly over the top. Use an offset spatula or the back of a spoon to gently spread it edge-to-edge, letting some drip down the sides if desired.
Now comes the hardest part: waiting! Allow the ganache to cool and set completely. This can take a few hours at room temperature, or you can speed it up by carefully placing the cake in the refrigerator for about until the ganache is firm.
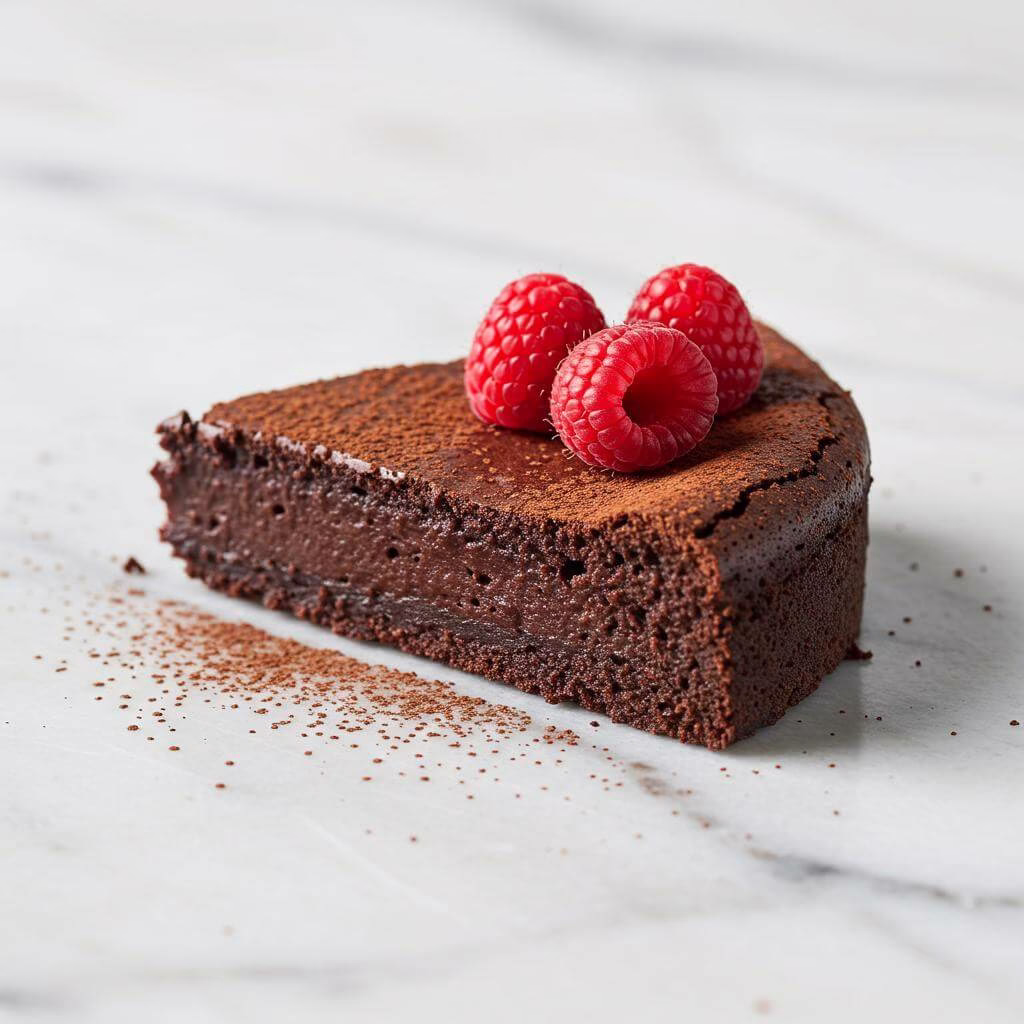
Slice into your amazing, rich, fudgy flourless chocolate cake! For an extra touch of elegance, dust the top with powdered sugar and serve with fresh raspberries. Leftovers store well in an airtight container in the refrigerator for 3-4 days.
Recipe Notes
- Dairy-Free Option: Use plant-based stick butter, full-fat canned coconut milk or dairy-free heavy cream for ganache, and dairy-free chocolate chips.
- Pan Prep is Key: Do NOT skip greasing the pan AND lining with parchment paper, then greasing the parchment for easy release.
- Don’t Overbake: For that perfect fudgy center, bake just until the edges look set and the very center has a slight jiggle (200°F internal temp).
- Mocha Twist: Dissolve 1-2 tsp instant espresso powder into the warm melted butter/chocolate mixture for a rich coffee flavor.
- Serving Suggestion: Dust with powdered sugar and serve with fresh raspberries or whipped cream.