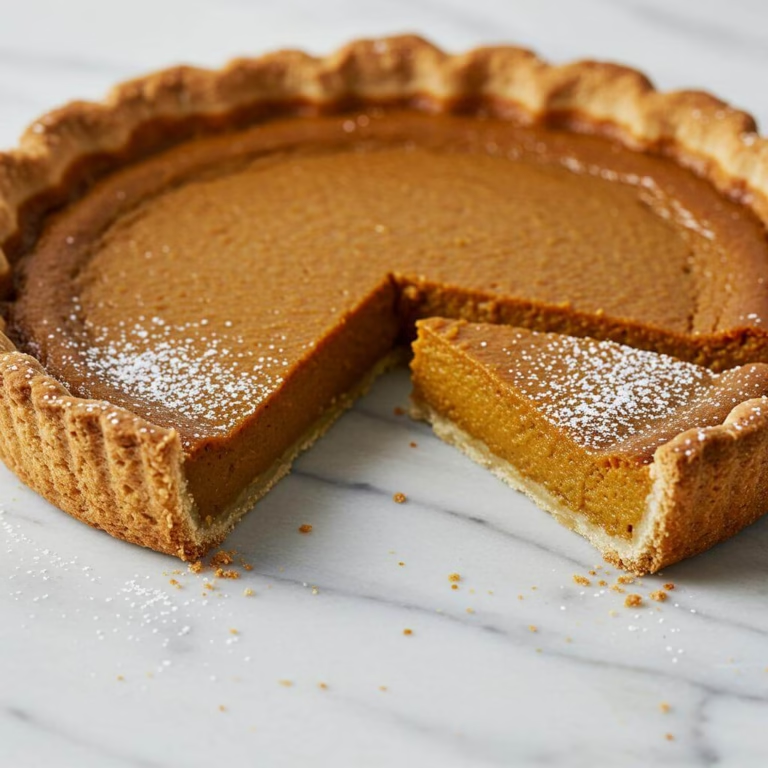
The Quest for Perfect Gluten-Free Bread Ends Here!
Welcome, fellow gluten-free food lovers! If you’ve been on the hunt for that elusive, perfect slice of gluten-free bread – you know, the kind that’s wonderfully soft, delightfully fluffy, and doesn’t crumble at first touch – then you’ve absolutely come to the right place. At Be Gluten Free, we passionately believe that living a gluten-free lifestyle shouldn’t mean sacrificing the simple, profound joy of a fantastic sandwich or a warm, comforting piece of toast. That’s precisely why we are bursting with excitement to share what we consider a truly game-changing gluten-free bread recipe with you today.
This isn’t just another bread recipe; it’s a carefully crafted solution born from a genuine desire for an easy, reliable, and utterly delicious gluten-free loaf that you can proudly bake right in your own oven. Say goodbye to complicated steps, expensive store-bought options, or those all-too-common disappointing, dense results. This particular gluten-free bread recipe is intentionally designed to bring the heart-warming aroma of freshly baked bread into your kitchen without any unnecessary fuss. What’s more, it’s completely dairy-free, making it a wonderfully inclusive option for many households and dietary needs. Just imagine pulling a beautifully golden-brown loaf from your oven, its texture just right, ready to be sliced thickly for your favorite avocado toast creation or lovingly packed into lunchboxes. This is the kind of versatile gluten-free bread recipe that effortlessly elevates everyday meals, making them feel a little more special and a lot more delicious.
We understand that baking gluten-free bread can sometimes feel a bit daunting. Variables like the type of gluten-free flour blend, the critical importance of proofing the dough in a consistently warm spot, and even the specific size of your loaf pan (we’ve found that a 9×4 inch Pullman loaf pan often works wonders for achieving that desirable, tall sandwich slice!) can all play significant roles in the final outcome. But please, fear not! We’ve meticulously fine-tuned this exceptional gluten-free bread recipe to be as straightforward and rewarding as possible, guiding you step-by-step towards a beautiful, versatile, and consistently successful loaf, every single time. It’s the kind of essential staple that, once you experience the delicious results, you’ll find yourself wanting to bake week after week. And if you’re looking to expand your gluten-free baking repertoire even further, why not also explore our popular recipe for fluffy gluten-free dinner rolls for another deeply satisfying baking adventure? Get ready to rediscover the pure joy and satisfaction of delicious homemade bread, all while embracing the gluten-free way!
Why This Gluten-Free Bread Recipe Works Like Magic
Discovering a truly exceptional gluten-free bread recipe that delivers on softness, structure, and sliceability can feel like striking gold! So many gluten-free loaves turn out dense, crumbly, or dry. But this particular recipe stands out, consistently yielding a beautiful loaf your family will devour. Let’s pull back the curtain and see exactly *why* this gluten-free bread recipe achieves such fantastic results.
The Dynamic Duo: Gluten-Free Flour & The Right Binder
At the heart of any successful gluten-free baking is the flour blend, and this recipe understands this deeply. It calls for a specific type of all-purpose gluten-free flour blend, emphasizing that not all blends are created equal, especially for yeast baking. A quality GF blend typically combines several different flours and starches like rice flour, potato starch, and tapioca starch. This combination provides a balance of protein (from flours like rice or sorghum in some blends), structure, and tenderness.
But without gluten – the protein network that gives traditional bread its elasticity and chew – something crucial is missing. That’s where **xanthan gum** comes in, and its inclusion here is key (or noted if already in your blend). Xanthan gum acts as a binder, mimicking the viscoelastic properties of gluten. It traps the gases produced by the yeast, allowing the dough to rise without collapsing, and gives the final loaf structure and prevents it from crumbling apart when sliced. Think of it as the invisible scaffolding holding your delicious gluten-free bread together!
Beyond Yeast: A Powerhouse of Leavening
Traditional yeast breads rely solely on yeast fermentation for rise. Gluten-free dough, lacking that strong protein network, often needs a little extra help. This gluten-free bread recipe wisely incorporates both **instant yeast** *and* **gluten-free baking powder**. The instant yeast provides that classic yeasty flavor and initial lift through carbon dioxide production, especially when activated with warm water (100-110°F is the sweet spot – crucial for yeast health!). The baking powder adds a secondary boost of leavening, reacting chemically to create more air pockets, resulting in a lighter, fluffier texture that prevents the bread from being heavy or brick-like. This combination ensures a reliable and airy crumb.
Moisture and Structure: The Role of Fats, Sugars, and Eggs
One common pitfall of gluten-free bread is dryness. This recipe tackles that head-on with ingredients that add and retain moisture, while also building structure:
- **Olive Oil:** This provides fat, which tenderizes the crumb and keeps the bread moist over time. Using oil instead of solid fat like butter also helps create a softer texture throughout the loaf. Plus, it’s a great dairy-free solution!
- **Honey:** More than just a sweetener, honey feeds the yeast for vigorous activity and contributes to the lovely golden-brown crust through caramelization during baking. It also helps retain moisture, keeping your gluten-free bread recipe soft longer.
- **Egg Whites:** The recipe specifically calls for egg whites. Egg whites are high in protein, which coagulates and provides structure as the bread bakes. They contribute to a stable crumb and add lightness compared to using whole eggs or yolks, which would add more fat and potentially richness but could also make the crumb denser. Using them at room temperature, as suggested, also helps them incorporate better and contribute more effectively to the dough’s structure and rise.
- **Apple Cider Vinegar:** This acidic ingredient can help tenderize the gluten-free flours and starches, improving the overall texture. It can also slightly boost yeast activity.
Handling the Dough: It’s Not Wheat!
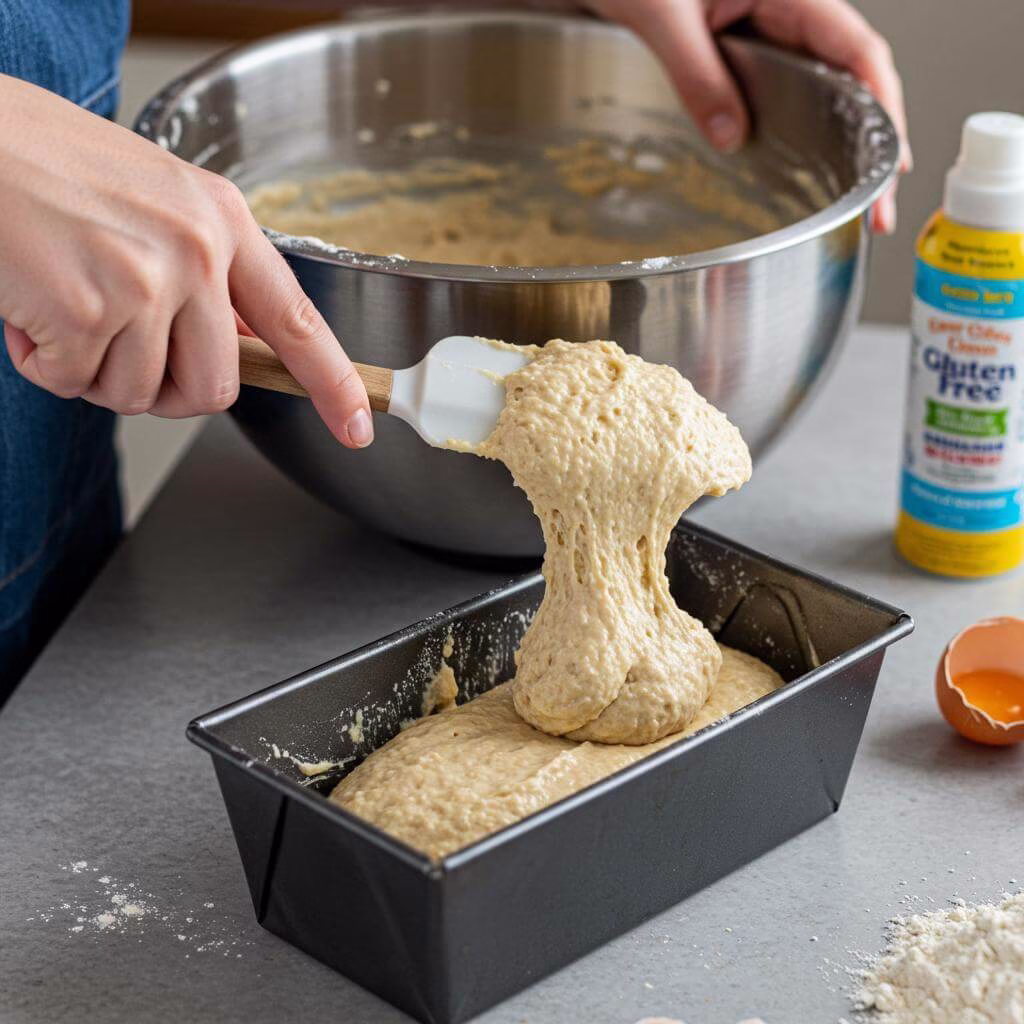
A key mindset shift for successful gluten-free bread recipe baking is understanding the dough consistency. This recipe accurately describes it as resembling “thick cake batter.” Because there’s no gluten network to develop through kneading, GF dough is typically more like a very thick batter or soft cookie dough than the elastic dough you’d punch down. Using a paddle attachment on a mixer, as recommended, gently combines ingredients without the need for strenuous kneading. This unique texture is perfectly normal for this type of bread and is designed to work with the binders and leaveners.
Proofing & Baking Smart: The Pullman Pan Advantage
The instructions highlight crucial details for rising and baking:
- **Short Proof:** Gluten-free dough doesn’t benefit from long proofing like wheat dough. It lacks the elastic structure to support extended gas production, and over-proofing can lead to collapse. The recommended 30-minute rise in a warm place is just right to get the yeast working and the baking powder activated before hitting the oven.
- **The Pullman Pan:** The strong recommendation for a gluten-free bread recipe using a 9×4-inch Small Pullman pan is brilliant. This taller, narrower pan (especially if using one with a lid, though not strictly necessary here) provides essential support for the rising dough. Gluten-free dough can sometimes spread outwards rather than upwards. The Pullman pan encourages vertical rise, resulting in a taller, more uniform slice – perfect for sandwiches! Even without a lid, the dimensions help the dough maintain structure during baking.
- **Proper Cooling:** Allowing the bread to cool partially in the pan before moving it to a rack, and then letting it cool *completely* on the rack, is vital. Hot bread is fragile, and slicing too early can cause it to collapse or squish. Cooling on a rack ensures air circulation all around the loaf, preventing steam from getting trapped at the bottom and making it soggy.
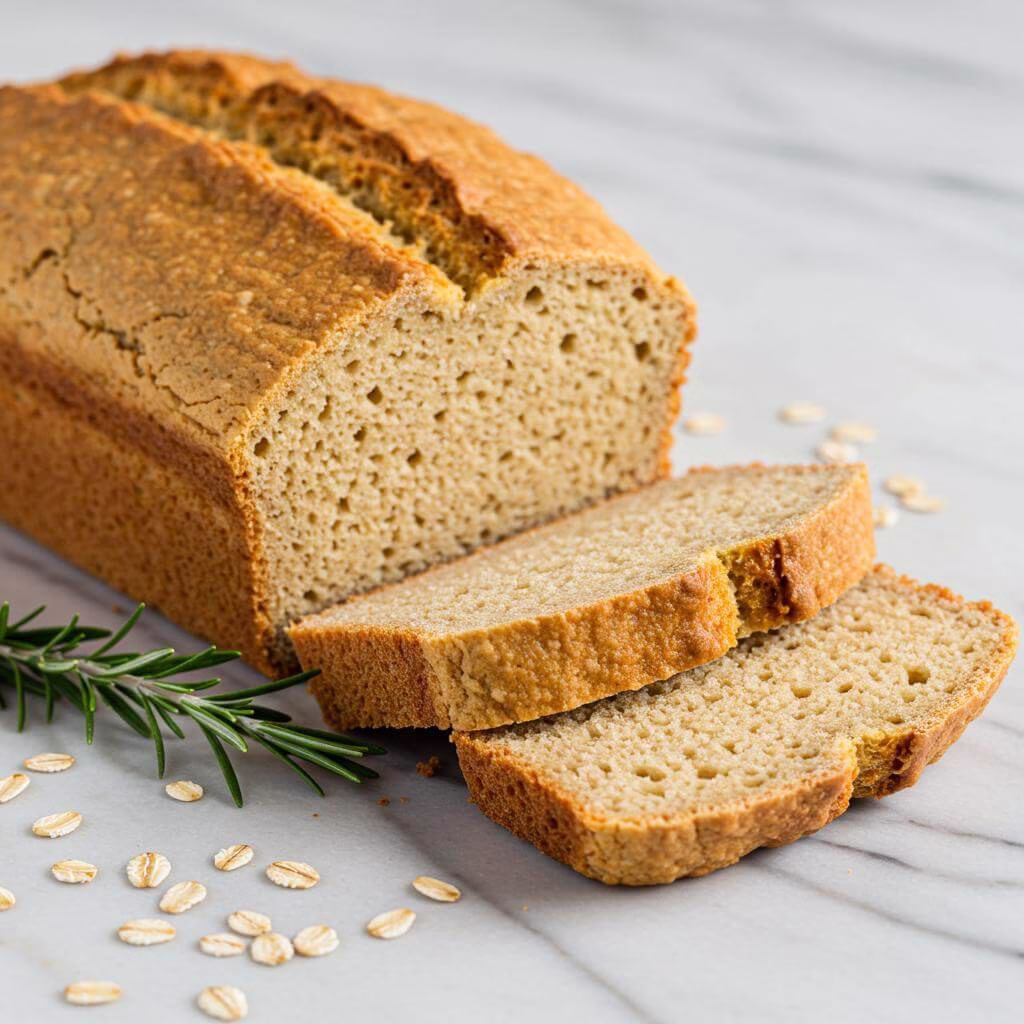
In summary, this gluten-free bread recipe succeeds by meticulously addressing the challenges of baking without gluten. It employs a strategic blend of flours, incorporates critical binders and leaveners, uses ingredients that enhance moisture and structure, and guides the baker through the specific handling and baking techniques required for a high-quality gluten-free loaf. It’s a testament to clever ingredient interactions and precise execution, making delicious, soft, and sliceable gluten-free bread an achievable reality for your home kitchen. Follow this recipe, and you’ll understand why it’s a favorite!
Transform Your Mornings with 33 FREE Gluten-Free Breakfasts!
Unlock delicious, easy-to-make recipes that will make you excited to start every single day. No more boring breakfasts, just pure flavor and joy!

Get Your FREE Breakfast Ebook Now!
(No credit card required. Instant download.)
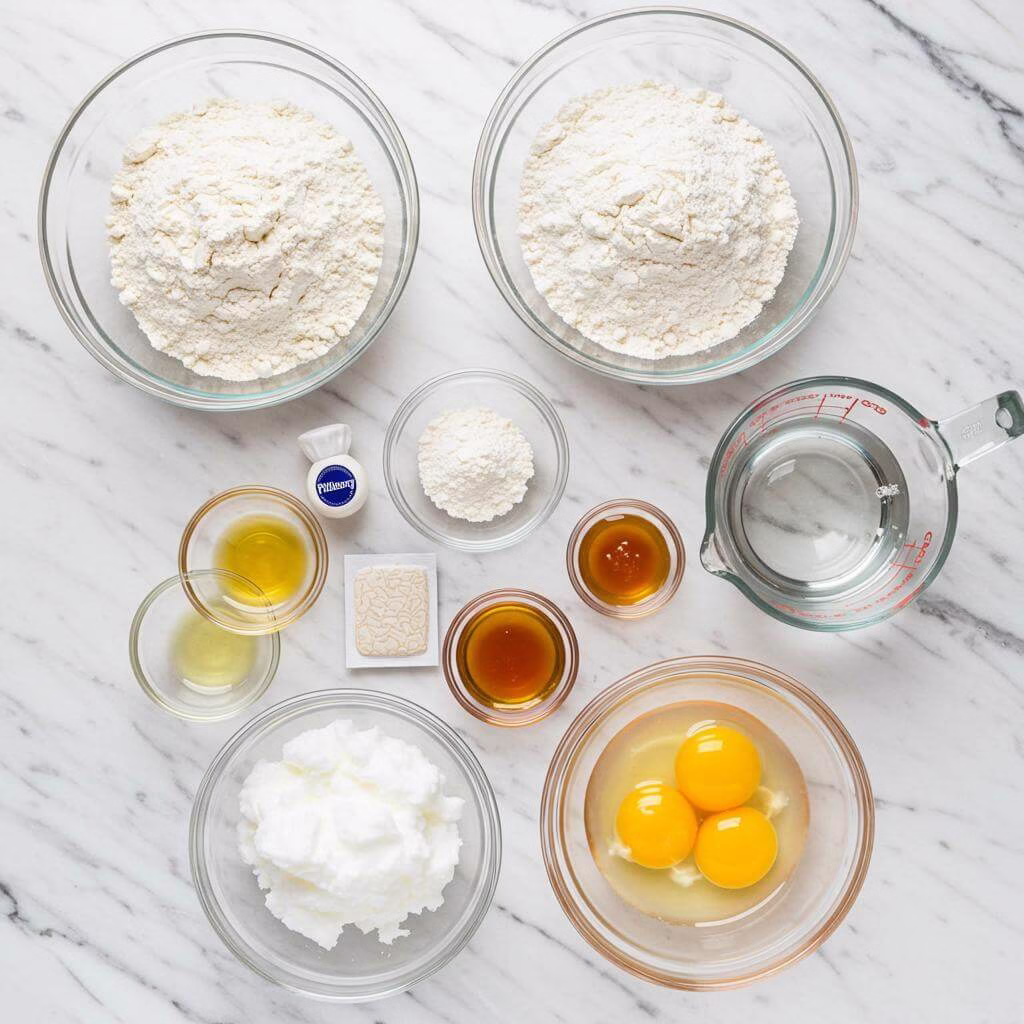
Ingredients
Creating a delicious, soft, and fluffy gluten-free bread requires a careful blend of ingredients that work together to mimic the structure traditionally provided by gluten. Here’s what you’ll need for this easy gluten-free bread recipe:
- 2 1/2 cups all-purpose gluten-free flour: This is the base of your loaf. The type of blend matters significantly in gluten-free baking. Flours like Pillsbury gluten-free flour are mentioned as suitable, while others like Bob’s Red Mill 1:1 or King Arthur Measure for Measure may not be recommended for yeast baking due to their specific composition. Choose a blend designed for yeast breads if possible, or be prepared for texture variations.
- 1 teaspoon xanthan gum: A vital binder in many gluten-free recipes. If your chosen gluten-free flour blend already contains xanthan gum, omit this ingredient. It provides elasticity and structure, preventing the bread from being crumbly. Find xanthan gum online.
- 1 teaspoon gluten-free baking powder: Provides an initial lift and helps create a tender crumb structure in the gluten-free bread.
- 1 packet rapid rise/instant yeast* (2 1/4 teaspoons): This type of yeast is convenient as it doesn’t require proofing beforehand and can be mixed directly with dry ingredients. It’s essential for the bread to rise and develop that airy texture. Ensure your instant yeast is fresh and stored correctly.
- 1/4 cup extra virgin olive oil: Adds moisture and tenderness to the dough, contributing to a soft crust and crumb.
- 1/4 cup honey: Provides sweetness and, importantly, acts as food for the yeast, helping it to activate and produce carbon dioxide for rising. Provides a lovely golden color.
- 1 teaspoon apple cider vinegar: Adds a touch of acidity that can help tenderize the dough and react with the baking powder to provide lift. It also positively impacts the yeast’s activity.
- 1 1/2 cups warm water (100-110°F): Crucial for activating the rapid rise yeast properly. The temperature is key – too hot will kill the yeast, too cold won’t activate it effectively.
- 3 egg whites: Contribute significant structure and protein to the gluten-free dough, helping it hold its shape and providing some of the ‘chew’ that gluten typically offers. Use large, room-temperature egg whites for best results.
- 1 teaspoon salt: Enhances the flavor of the bread and also helps to control the yeast’s activity, ensuring a steady rise.
Nutritional Information
Making your own gluten-free bread recipe at home offers several potential nutritional benefits compared to some store-bought options. While nutritional values can vary based on specific ingredients and brands used, the provided approximation offers a snapshot:
- Serving Size: 1 serving
- Calories: 114kcal
- Carbohydrates: 18g
- Protein: 3g
- Fat: 4g
- Saturated Fat: 0.5g
- Polyunsaturated Fat: 0.5g
- Monounsaturated Fat: 3g
- Sodium: 189mg
- Potassium: 18mg
- Fiber: 2g
- Sugar: 5g
- Vitamin C: 0.03mg
- Calcium: 29mg
- Iron: 1mg
Notably, this gluten-free bread recipe is also dairy-free, making it suitable for those with lactose intolerance or dairy allergies. The use of egg whites contributes protein, which is beneficial for satiety. The olive oil provides beneficial monounsaturated fats. Making your own gluten-free bread gives you control over added sugars and allows you to use high-quality ingredients.
Note: Nutritional information is an approximation and can vary based on specific ingredients and portion sizes.
Substitutions & Variations
One of the joys of baking your own gluten-free bread recipe is the ability to customize it to fit your dietary needs and flavor preferences. Here are some ideas for substitutions and variations:
Substitutions:
- Gluten-Free Flour Blend: As mentioned, the blend is key! While all-purpose gluten-free flour blends formulated for yeast baking are recommended, results will differ with different brands. If your blend lacks structure, you might need to slightly increase the xanthan gum (if not already present) or try adding 1-2 tablespoons of psyllium husk powder mixed with an equal amount of water and let it gel for a few minutes before adding to the wet ingredients – this can significantly improve structure in gluten-free bread dough.
- Xanthan Gum: If your flour blend doesn’t contain it and you can’t use xanthan gum, a common substitute is psyllium husk powder. Use about half the amount of psyllium husk powder (1/2 teaspoon in this case) mixed with 4 times the amount of water (2 teaspoons) and let it gel for 5-10 minutes before adding to the wet ingredients. Results may vary.
- Honey: The recipe notes you can substitute honey with agave nectar or maple syrup at the same 1:1 ratio. These are excellent liquid sweetener alternatives.
- Olive Oil: Another neutral-flavored oil like canola or melted refined coconut oil could likely be substituted, though olive oil provides a lovely richness and healthy fats to this gluten-free bread recipe. Melted dairy-free butter could also work for flavor.
- Egg Whites: Substituting eggs in gluten-free yeast bread is challenging as they provide significant structure. A common egg replacer for binding is flax eggs (1 tablespoon flax meal + 3 tablespoons water per egg, let sit until gelled), but for 3 egg whites, you might need to experiment. Commercial egg replacers designed for baking or a combination of aquafaba (whipped chickpea liquid) might be possibilities, but expect a different texture and rise. This recipe relies heavily on the protein in egg whites for structure.
- Dairy: This recipe is already dairy-free, using olive oil and water instead of milk or butter, which is a fantastic feature for those avoiding dairy.
Variations:
- Seed & Grain Bread: Add 1/4 cup of mixed seeds (like chia, flax, sunflower, pumpkin) or a tablespoon or two of rolled oats (ensure they are certified gluten-free oats) to the dry ingredients for added texture and fiber.
- Herbed Bread: Incorporate 1-2 tablespoons of finely chopped fresh herbs like rosemary, thyme, or chives, or 1-2 teaspoons of dried herbs, into the dry ingredients for a savory loaf perfect for meals.
- Garlic or Onion Bread: Add a teaspoon of garlic powder or dried onion flakes to the dry ingredients for a flavored gluten-free bread.
- Slightly Sweet Bread: Increase the honey slightly (e.g., to 1/3 cup) or add a teaspoon of vanilla extract for a bread that leans slightly sweeter, great for toast with jam.
- Different Pan Sizes: While the recipe highly recommends a 9×4 inch Small Pullman loaf pan for a taller loaf, you can use a 9×5 inch loaf pan. Be aware the loaf won’t rise as high, but the baking time and temperature should remain similar. An easy-release loaf pan or ensuring thorough greasing with gluten-free cooking spray is key.
Experimenting with different gluten-free bread recipe variations can be fun! Always ensure any additions or substitutions are also gluten-free and suitable for your specific dietary needs.
Essential Equipment for This Recipe
To prepare this delicious recipe, you’ll need the following kitchen tools:
- Mixing Bowls – A set of various sizes is essential for prep.
Find Mixing Bowls on Amazon - Measuring Cups and Spoons – Accurate measurements are key to baking success!
Find Measuring Cups and Spoons on Amazon - Baking Sheets – Perfect for baking cookies, roasting vegetables, and more.
Find Baking Sheets on Amazon - Whisks – Use for smoothly combining wet and dry ingredients.
Find Whisks on Amazon - Spatulas – Ideal for scraping bowls and folding ingredients gently.
Find Spatulas on Amazon - Food Processors – Great for quickly chopping vegetables or making sauces.
Find Food Processors on Amazon - Saucepans – A must-have for making sauces, heating liquids and more.
Find Saucepans on Amazon - Chef’s Knives – A high-quality knife will make food prep a breeze.
Find Chef’s Knives on Amazon - Cutting Boards – Protect your counters while you prep!
Find Cutting Boards on Amazon
- To begin creating your perfect gluten-free bread recipe, prepare your baking pan. Thoroughly grease your chosen pan. While a standard 9×5 inch bread pan will work, a 9×4 inch small Pullman loaf pan is highly recommended for a taller, more uniform loaf. Use a reliable gluten-free cooking spray to ensure easy release after baking. Next, adjust an oven rack to the middle position. This ensures even heat distribution around your bread during baking. Finally, preheat your oven to 350°F (175°C). Allowing the oven to fully preheat is essential for proper rising and baking of this gluten-free bread recipe.
- In a large mixing bowl, ideally the bowl of a stand mixer if you are using one, combine all your dry ingredients. Add 2 ½ cups of your preferred all-purpose gluten-free flour blend. Remember, not all blends perform the same in yeast baking; blends specifically noted as not recommended for yeast breads (like certain Bob’s Red Mill 1:1 or King Arthur Measure for Measure) should be avoided for best results with this gluten-free bread recipe. Stir in 1 teaspoon of gluten-free baking powder and one packet (about 2 ¼ teaspoons) of rapid rise or instant yeast. If your gluten-free flour blend does not contain xanthan gum, add 1 teaspoon of xanthan gum at this stage. Whisk these dry ingredients together briefly to ensure they are well distributed.
- Now, incorporate the initial wet ingredients into the dry mixture. Add ¼ cup of extra virgin olive oil, ¼ cup of honey (or your chosen liquid sweetener like agave nectar or maple syrup), 1 teaspoon of apple cider vinegar, and 1 ½ cups of warm water. The water temperature is critical for activating the yeast; aim for 100-110°F (38-43°C). Water that is too hot will kill the yeast, while water that is too cold won’t activate it effectively. Mix these ingredients together on low speed using a mixer fitted with a paddle attachment. Gluten-free dough doesn’t require the kneading action of a dough hook, and the paddle works best to combine the batter-like consistency. Mix for approximately 1 minute until just combined.
- Next, add the remaining wet ingredient and the salt needed for this gluten-free bread recipe. Introduce the 3 room-temperature large egg whites and 1 teaspoon of salt to the dough mixture. Increase the mixer speed to medium and continue mixing for another minute. During this step, the mixture will transform and develop a thicker consistency. Don’t expect a traditional bread dough; gluten-free yeast dough for this type of recipe is quite wet and will resemble a thick cake batter. This is the correct texture for a light and fluffy outcome.
- Carefully pour the prepared gluten-free dough into the greased baking pan you prepared earlier. Use a spatula to scrape down the sides of the bowl and ensure all the dough is transferred. Smooth the top of the dough in the pan if needed. Cut a piece of plastic wrap large enough to cover the pan, and spray one side of it with the gluten-free cooking spray. Place the plastic wrap, greased side down, directly onto the surface of the dough in the pan. Then, loosely cover the entire pan with a kitchen towel. This helps create a warm, slightly humid environment ideal for the gluten-free dough to rise.
- Allow the dough to proof (rise) in a warm location for approximately 30 minutes. Find a cozy spot in your kitchen, possibly on top of a preheating oven (not directly on the heat, but the warmth radiating up), or in an oven with a dedicated proofing function set to around 100°F. Be mindful not to over-proof gluten-free dough; unlike wheat dough, it doesn’t benefit from extended rising times and can sometimes collapse if left too long. The goal is for the dough to visibly increase in size, ideally about doubling.
- Once the proofing time is complete and the dough has risen, it’s time to bake your gluten-free bread recipe! Very gently remove the kitchen towel and plastic wrap from the pan. Place the pan horizontally on the middle rack of your preheated 350°F (175°C) oven. Bake for 30 minutes. The bread is done when the top is a beautiful golden brown and, most importantly, the internal temperature reaches between 205-210°F (96-99°C) when measured with a digital food thermometer inserted into the center of the loaf.
- After baking, carefully remove the pan from the oven. Allow the loaf to cool in the pan for 10 minutes. This brief cooling period helps the bread set sufficiently before handling. Then, using oven mitts and carefully tilting the pan, gently remove the loaf from the baking pan and immediately transfer it to a wire cooling rack. Cooling the bread outside the pan on a rack is crucial because it allows air circulation, preventing steam from getting trapped at the bottom and making the crust soggy.
- It’s essential to let your gluten-free bread loaf cool completely on the wire rack before you even think about slicing it. This can take a couple of hours. Slicing warm gluten-free bread often results in a gummy, dense texture or causes it to crumble. Patience here is key to achieving the perfect slice from your homemade gluten-free bread recipe.
- When you’re ready to slice your cooled loaf, reach for a serrated bread knife. A serrated edge cuts through the soft structure of gluten-free bread cleanly without squishing or compressing it, ensuring beautiful, intact slices.
- To store any uneaten portions of your delicious gluten-free bread recipe, ensure it has cooled completely before storing. Placing warm bread in a container traps moisture and can lead to mold or sogginess. Store the remaining loaf in an airtight container or bread bag at room temperature on your kitchen counter. For optimal freshness and moisture retention, it’s best to store the leftover portion of the loaf unsliced and only slice off what you need when you’re ready to eat it.
- This gluten-free bread recipe freezes beautifully if you want to save it for later. Once the loaf is completely cooled, wrap it tightly. Start with a layer of plastic wrap, ensuring no part is exposed, then follow with a layer of aluminum foil or freezer paper to prevent freezer burn. Place the double-wrapped loaf into a freezer bag for an extra layer of protection. It can be frozen for up to 3 months. To thaw, simply transfer the wrapped loaf to the refrigerator overnight. Once thawed, you can slice and enjoy your perfectly preserved gluten-free bread.
Tips for Achieving Perfect Gluten-Free Bread Every Time
Ready to bake the softest, fluffiest loaf of gluten-free bread? This recipe is designed for success, but gluten-free baking has its own unique quirks! Here are some expert tips to help you get perfect results from this easy gluten-free bread recipe, addressing common challenges specific to baking without gluten.
- Ensure All Cold Ingredients Are Truly Room Temperature: This recipe specifies using room-temperature egg whites and warm water (100-110°F). This isn’t just a suggestion – it’s crucial for yeast activity. Cold ingredients can shock the yeast, slowing down or even preventing the necessary rise. For a successful gluten-free bread recipe, you want the yeast to be happy and active from the get-go! Letting eggs and water sit out for at least 5-10 minutes before mixing makes a world of difference.
- Measure Gluten-Free Flour Using the Spoon & Level Method: This is highlighted in the recipe for a reason! Scooping flour directly from the bag packs it down, resulting in too much flour by weight. Too much flour means your dough will be too dry, leading to a dense, heavy gluten-free bread loaf. Spoon the flour lightly into your measuring cup and level it off with a straight edge for the most accurate measurement and consistent results with this gluten-free bread recipe.
- Choose Your Gluten-Free Flour Blend Wisely: Not all gluten-free flour blends are created equal, especially for yeast baking. Some contain binders like xanthan gum, while others don’t. Blends specifically formulated for yeast breads work best. The recipe mentions that some popular blends are *not* recommended for yeast baking, so pay attention to the package or manufacturer’s website. Using a blend suitable for yeast ensures your gluten-free dough has the right structure to rise properly.
- Use the Paddle Attachment on Your Stand Mixer: Unlike traditional wheat dough that develops gluten when kneaded (requiring a dough hook), gluten-free dough behaves more like a thick batter. A paddle attachment is designed to mix ingredients thoroughly and develop the necessary structure from the binders (like xanthan gum) without overworking. Using a dough hook can just push the sticky gluten-free dough around the bowl inefficiently.
- Proof in a Warm, Draft-Free Spot & Don’t Over-Proof: Yeast thrives in warmth (around 75-85°F is ideal, but 100°F in an oven proofing setting works too). However, gluten-free dough doesn’t have the strong elastic network of gluten. While it needs to rise, over-proofing can cause the structure to become too fragile. Once the dough doubles in size (which happens relatively quickly for this quick gluten-free bread recipe), it’s ready for the oven! Over-proofed gluten-free bread can collapse during baking or result in a crumbly texture.
- Embrace the Pullman Loaf Pan (or Equivalent): The recipe highly recommends a 9″x4″ Small Pullman loaf pan over a standard 9″x5″. The narrower, taller shape forces the gluten-free dough to rise upwards, providing crucial support for the structure and resulting in a lovely, tall loaf perfect for slicing for sandwiches. While a 9″x5″ works, the loaf will be flatter. If you don’t have a Pullman, consider doubling the recipe and baking in the 9×5 or finding a similar narrower pan if possible for a taller loaf from this gluten-free bread recipe.
- Always Cool on a Wire Rack Immediately After the Initial Pan Cool: Leaving the bread in the pan for the full cooling time traps steam, making the bottom and sides soggy – a common source of gumminess in gluten-free baking. After the initial 10 minutes in the pan to set slightly, transferring it to a wire rack allows air to circulate around the entire loaf, letting the steam escape and ensuring a proper texture throughout.
- Slice Only When Completely Cool with a Serrated Knife: Gluten-free bread often has a softer, more delicate crumb right after baking. Slicing while warm can cause it to compress or gum up. Patience here is key! Once fully cooled, use a serrated knife and a gentle sawing motion. A straight blade will likely squish your beautiful gluten-free bread, preventing neat slices.
Common Gluten-Free Bread Mistakes to Avoid
Even with a great gluten-free bread recipe, specific pitfalls can lead to less-than-perfect results. Steering clear of these common mistakes will significantly improve your loaf!
- Using Cold Ingredients: As mentioned above, cold dairy, eggs, or even water that isn’t warm enough (100-110°F) severely hinders yeast activity. This is detrimental to the rise and texture of a gluten-free loaf, which relies so heavily on yeast for its structure. Always bring perishable ingredients to room temperature and ensure your water is just right – not too hot, not too cold.
- Incorrectly Measuring Flour (Scooping): This is perhaps the most frequent cause of dense, dry gluten-free bread. Packing extra flour into your measuring cup adds excess dry ingredient, throwing off the balance with the liquids and binders. This gluten-free bread recipe requires precise measurement – always spoon and level!
- Over-Proofing the Dough: While proofing is essential, allowing gluten-free dough to rise *too* much can be problematic. It lacks the gluten network to support excessive expansion. Over-proofed dough might rise beautifully, then collapse in the oven, or bake into a loaf with large, fragile air pockets and a crumbly texture. Stick to the recommended proofing time and watch for the dough to double in size, then get it into the oven promptly.
By keeping these tips and potential pitfalls in mind, you’re well on your way to baking a truly delicious, soft, and fluffy loaf using this fantastic gluten-free bread recipe! Happy baking! “`html
Frequently Asked Questions
Why is the type of gluten-free flour blend so important for this gluten-free bread recipe?
Using the right all-purpose gluten-free flour blend is super important for success with this gluten-free bread recipe! Not all blends are created equal, especially when it comes to yeast baking. Some popular blends, while great for other things, aren’t recommended for yeast doughs on their packaging. These specific blends might cause your loaf to be dense or not rise properly. We recommend choosing a blend that is specifically formulated for or known to work well in yeast-based recipes for the best soft and fluffy results.
The dough for this bread looks more like batter than traditional wheat dough. Is that the correct consistency?
Absolutely! If your dough looks like a thick cake batter after mixing, you’ve done it exactly right! Unlike traditional wheat bread dough that requires kneading and develops gluten structure, gluten-free yeast doughs, particularly for recipes like this aiming for softness, tend to be much wetter and have a batter-like consistency. Using a stand mixer with a paddle attachment helps combine these ingredients effectively. This thick batter is what helps create that desired soft and fluffy texture in your finished gluten-free bread.
What’s the best way to make sure my gluten-free bread dough rises properly?
Yeast needs warmth to activate and do its job! The best way to ensure a good rise (proofing) for this gluten-free bread recipe is to place the covered pan in a warm, draft-free location for about 30 minutes. A few warm spots include on top of your pre-heating oven (not directly on a hot surface, but where warmth radiates), or inside an oven with a proofing function set to around 100°F. It’s crucial not to over-proof; gluten-free dough rises relatively quickly, and letting it go too long can sometimes cause it to collapse during baking. You’re looking for it to visibly increase in size, ideally about doubling.
The recipe highly recommends a Small Pullman loaf pan. Do I have to use that, or can I use a standard 9×5 inch bread pan?
While a standard 9×5 inch bread pan will certainly work for this gluten-free bread recipe, we highly recommend using a 9×4 inch Small Pullman loaf pan if you have one. The slightly narrower and taller shape of the Pullman pan helps the gluten-free dough rise upwards more effectively, resulting in a taller, more uniform loaf that’s perfect for slicing into sandwich bread. If you use a 9×5 inch pan, your loaf will likely just be a bit wider and not quite as tall, but it will still bake into delicious bread!
How do I know when the bread is perfectly baked, and how should I cool it?
You’ll know your gluten-free bread is perfectly baked when the top is a lovely golden brown and, most importantly, when its internal temperature reaches between 205-210°F (96-99°C) when checked with a digital thermometer inserted into the center. After baking, let the loaf cool in the pan for just 10 minutes before carefully removing it and placing it directly onto a wire cooling rack. It is absolutely essential to let the bread cool completely on the rack before slicing! Slicing warm gluten-free bread can make it gummy or cause it to crumble. Allowing it to cool fully lets the internal structure set properly.
How should I store my homemade gluten-free bread to keep it fresh? Can I freeze it?
Once your delicious homemade gluten-free bread recipe loaf is completely cooled (this is key!), store it in an airtight container or bread bag at room temperature on your counter. For the best freshness and texture, it’s always best to store the leftover portion of the loaf unsliced and just slice off what you need when you’re ready to use it. Yes, this bread also freezes beautifully! Wrap the completely cooled loaf tightly in plastic wrap, then in foil or freezer paper, and place it in a freezer bag. It will keep well in the freezer for up to 3 months. Just thaw it in the refrigerator overnight before slicing and enjoying.
Can I make substitutions for some of the ingredients in this gluten-free bread recipe?
Yes, you can! The recipe notes that honey can be substituted with agave nectar or maple syrup at a 1:1 ratio. For oils, another neutral-flavored oil or melted dairy-free butter could potentially work instead of olive oil, though the flavor might differ slightly. Substituting the egg whites is the most challenging, as they provide significant structure; while options like commercial egg replacers or aquafaba exist, they haven’t been tested with this specific gluten-free bread recipe and may result in a different texture or rise. You can also explore variations by adding seeds, herbs, or slightly adjusting the sweetness as suggested in the substitutions section.