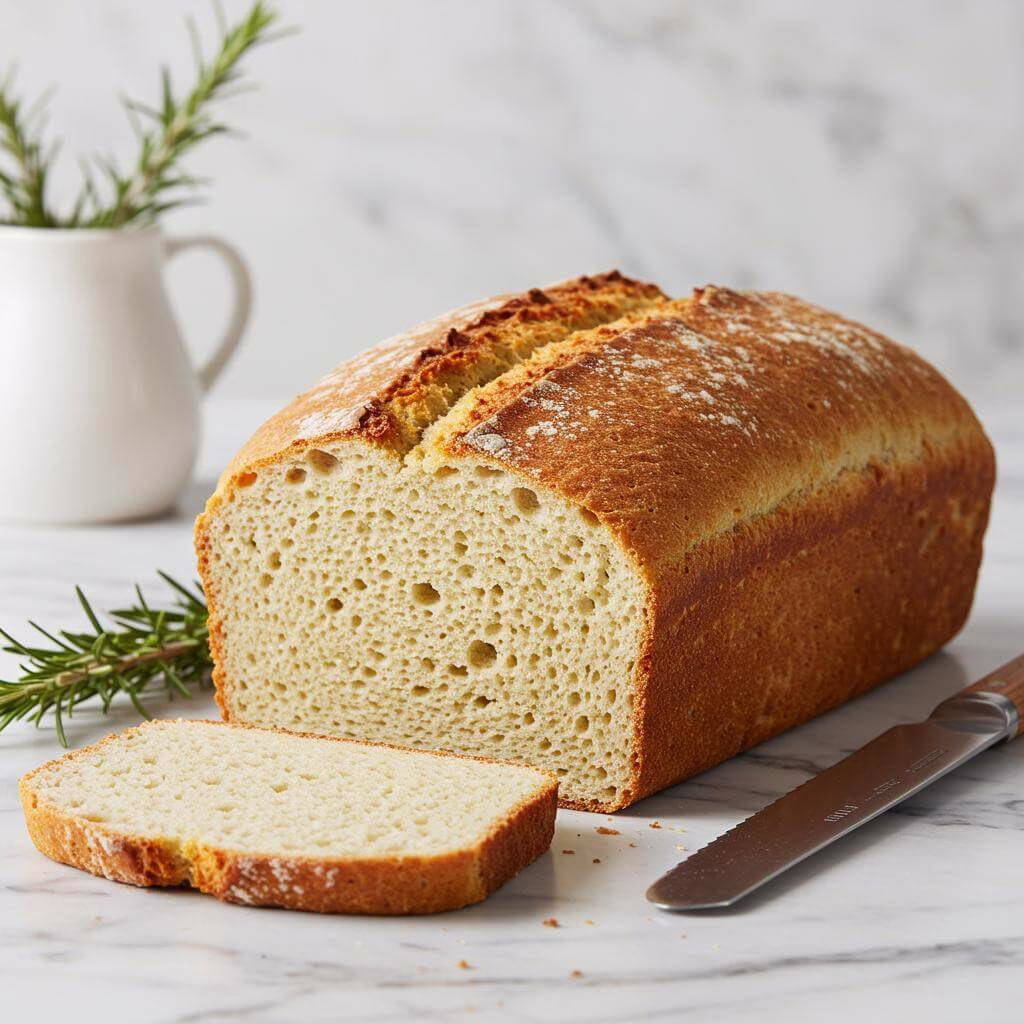
The Quest for Perfect Gluten-Free Bread Ends Here!
Welcome, fellow gluten-free food lovers, to a recipe that might just change your baking game forever! If you’ve been on that often-frustrating quest for the perfect loaf of gluten-free bread – one that’s soft, fluffy, holds together beautifully, and actually tastes incredible – then you’ve absolutely come to the right place. At Be Gluten Free, we understand the struggle! That’s why we’re bursting with excitement to share this truly special gluten-free bread recipe. Not only is it astonishingly easy to make, but it’s also completely dairy-free, making it a fantastic option for even more dietary needs.
Imagine the aroma of freshly baked bread wafting through your kitchen, a scent many of us thought was a thing of the past after going gluten-free. This gluten-free bread recipe is here to bring back that joy! We’re talking about a loaf so soft and versatile, it’s perfect for everything from your kids’ school sandwiches to a comforting slice of morning toast, or even as a base for creative appetizers. While this loaf offers classic sandwich bread perfection, if you’re ever in the mood for something different, why not try our amazing Gluten-Free Flatbread? This isn’t just another recipe; it’s your ticket to enjoying delicious, homemade bread that doesn’t crumble at first sight or taste like cardboard.
We know that embarking on a gluten-free bread recipe can sometimes feel like a daunting chemistry experiment. Questions about the right flour blend, proofing times, and achieving that perfect texture are common. But fear not! This recipe cuts through the complexity. We’ve focused on simple steps and readily available ingredients to ensure your baking experience is a pleasure, not a pain. We’ll guide you on little things, like ensuring your yeast has a cozy warm environment to work its magic, which makes all the difference in achieving that light, airy crumb. And once you’ve mastered this foundational loaf, you might even be inspired to try other gluten-free baked goodies, perhaps some delightful Gluten-Free Dinner Rolls for your next family meal!
This easy gluten-free bread recipe is more than just a way to get your sandwich fix; it’s about empowering you in your gluten-free kitchen. It’s about adding variety, satisfaction, and pure, unadulterated yumminess back onto your table. So, roll up your sleeves, preheat that oven, and get ready to be amazed by what you can create. Welcome to the world of hassle-free, delicious, homemade gluten-free bread!
Why This Gluten-Free Bread Recipe Works Like Magic
Ah, the quest for the perfect loaf of gluten-free bread! It’s a journey many embark on, often met with dense, dry, or crumbly results. But fear not! This particular gluten-free bread recipe stands out from the crowd, consistently delivering a soft, fluffy, and sliceable loaf that truly satisfies. Let’s dive into the delicious science behind why this gluten-free bread recipe is such a resounding success.
Building the Foundation: The Power of the Flour Blend and Binder
The first key to any excellent gluten-free bread recipe is the flour blend. This recipe smartly calls for a high-quality all-purpose gluten-free flour blend. Unlike single-ingredient flours (like just rice or corn), blends combine different flours and starches, each contributing unique properties. Rice flour might provide structure, while starches like tapioca or potato starch add lightness and help create a tender crumb. The choice of blend matters significantly, as noted in the recipe, highlighting blends *not* suitable for yeast baking – a crucial tip for anyone starting their gluten-free baking adventure. Using a recommended blend ensures you begin with the right balance for successful yeast-leavened baked goods.
But simply combining gluten-free flours isn’t enough to mimic the elasticity and structure that gluten provides. This is where xanthan gum comes in as a true hero of gluten-free baking. Gluten is a protein network that traps gases produced by yeast, allowing bread to rise and hold its shape. Without it, dough would collapse. Xanthan gum, a polysaccharide, acts as a binder that thickens the dough and provides that much-needed structure and elasticity. It helps trap those precious air bubbles, ensuring your gluten-free bread recipe yields a lofty loaf with a tender, non-crumbly texture. If your chosen flour blend already contains it, you can omit the extra, but its presence in some form is non-negotiable for achieving classic bread characteristics.
Leavening for Loft: Yeast and Baking Powder Working Together
Traditional wheat bread relies heavily on yeast to produce carbon dioxide, which gluten traps to create rise. In a gluten-free bread recipe, while yeast is still essential for flavor development and initial lift, the lack of a strong gluten network means the gas needs more support to build and maintain volume. This recipe uses rapid-rise/instant yeast, which is convenient as it doesn’t require prior proofing and can be mixed directly with dry ingredients. The warm water provides the perfect environment (100-110°F is critical – too hot kills the yeast, too cold keeps it dormant) for the yeast to become active and start its work.
However, relying solely on yeast in a gluten-free matrix can lead to a dense loaf. This recipe brilliantly incorporates baking powder alongside yeast. Baking powder is a chemical leavener that produces carbon dioxide when combined with liquid and heat. By including both yeast and baking powder, the recipe ensures a powerful lift during both the proofing stage (from the yeast) and the initial phase of baking (from the baking powder). This dual-action leavening system is key to achieving that desirable light and fluffy texture in this oven-baked gluten-free bread recipe.
Moisture, Structure, and Flavor Agents
This recipe opts for a dairy-free approach, using olive oil and warm water instead of milk or butter. Olive oil contributes essential moisture, tenderness, and a lovely subtle flavor to the finished loaf. Fats coat the starch molecules, preventing them from bonding too tightly and resulting in a softer crumb. This is particularly valuable in gluten-free baking, where dryness can be a common issue. The warm water is vital for activating the yeast and hydrating the flours and binder.
Egg whites play a significant role in contributing to the structure of this gluten-free bread recipe. When whipped or mixed, egg whites create a protein matrix that helps trap air and adds stability. As they bake, the proteins coagulate, providing additional structural support to the loaf, helping it hold its shape and contribute to a slightly chewy texture.
Honey or another liquid sweetener like agave or maple syrup serves multiple purposes. It provides food for the yeast, helping the fermentation process and ensuring a good rise. It also adds a touch of sweetness, enhances browning of the crust during baking, and contributes to moisture and a softer crumb. The teaspoon of apple cider vinegar might seem small, but acidity can help activate baking powder more effectively and can even contribute to a slightly softer texture by helping to break down starches during baking. Together, these ingredients create a harmonious balance that contributes to the overall excellent flavor and texture profile of this homemade gluten-free bread recipe.
Mastering the Method: Consistency and Cooling
A crucial note in this gluten-free bread recipe is the resulting dough consistency: “The dough will look like a thick cake batter.” This is perfectly normal and expected in many gluten-free yeast bread recipes. Unlike wheat doughs that require kneading to develop gluten, gluten-free doughs are often too wet to knead. The structure comes primarily from the binder (xanthan gum), egg whites, and leavening. This thick batter consistency is designed to hold the gases produced during rising and baking effectively.
The specific proofing time (30 minutes) and temperature (warm place, ideally 100°F) are optimized for rapid-rise yeast in a gluten-free environment. Over-proofing can lead to the fragile structure collapsing, so sticking to the recommended time is key. Baking in a Pullman loaf pan is recommended because its straight sides provide extra support for the gluten-free dough as it rises, encouraging a taller, more uniform loaf. Finally, the cooling method – 10 minutes in the pan, then complete cooling on a rack – is vital. Cooling on the rack allows steam to escape, preventing a soggy bottom and ensuring the internal structure sets properly, resulting in a perfectly sliceable gluten-free bread recipe outcome.
By carefully selecting and combining these ingredients and following the specific method designed for gluten-free baking, this recipe overcomes the common challenges and delivers a truly satisfying, soft, and reliable gluten-free bread recipe that’s perfect for sandwiches, toast, or simply enjoying fresh from the oven. It’s a testament to how understanding the roles of gluten-free ingredients can lead to baking success!
Transform Your Mornings with 33 FREE Gluten-Free Breakfasts!
Unlock delicious, easy-to-make recipes that will make you excited to start every single day. No more boring breakfasts, just pure flavor and joy!

Get Your FREE Breakfast Ebook Now!
(No credit card required. Instant download.)
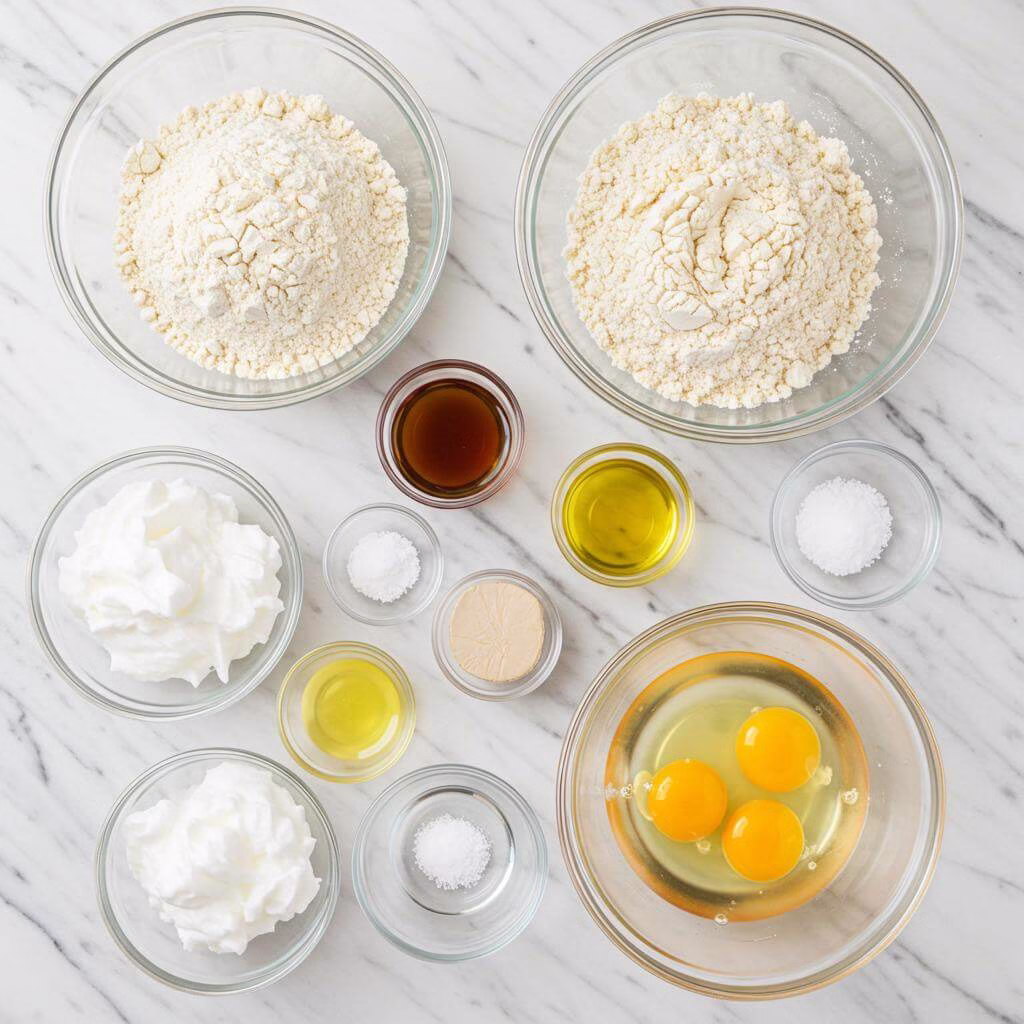
Ingredients
Crafting this simple gluten-free bread recipe starts with gathering your ingredients. Each component plays a vital role in achieving that perfect soft texture and structure we love in a good loaf. Here’s what you’ll need:
- **2 1/2 cups all-purpose gluten-free flour:** The base of our gluten-free bread recipe. Choosing the right blend is crucial! Not all gluten-free flours are formulated the same way, especially for yeast-based baking. Blends designed specifically for bread often contain a mix of rice flours, starches (like tapioca or potato), and sometimes sorghum or millet flour. Be aware that some popular cup-for-cup blends (like Bob’s Red Mill 1:1 or King Arthur Measure for Measure) state they are *not* recommended for yeast bread on their packaging or website. Using a blend designed for yeast dough or one you’ve had success with in gluten-free yeast baking is key for this homemade gluten-free bread. You can find various gluten-free flour blends on Amazon.
- **1 teaspoon xanthan gum:** This is a common binder in gluten-free baking that mimics the elasticity and structure provided by gluten. It helps hold the dough together and prevents crumbling. If your chosen gluten-free flour blend already contains xanthan gum, you can omit this extra amount. You can purchase xanthan gum on Amazon.
- **1 teaspoon gluten-free baking powder:** Works alongside the yeast to give the bread an extra lift and contributes to a lighter texture. Ensure your baking powder is certified gluten-free.
- **1 packet rapid rise/instant yeast (2 1/4 teaspoons):** This type of yeast is ideal for quick, easy bread recipes as it doesn’t require proofing in liquid beforehand and can be mixed directly with the dry ingredients. It’s what makes this gluten-free bread recipe so convenient. Ensure your yeast is fresh and active for the best rise. Find instant yeast on Amazon.
- **1/4 cup extra virgin olive oil:** Provides fat, which contributes to moisture, tenderness, and a pleasant flavor in this gluten-free bread.
- **1/4 cup honey:** Feeds the yeast, helping it activate and produce carbon dioxide gas for rising. It also adds a touch of sweetness and helps with browning. Agave nectar or maple syrup can also be used as alternatives.
- **1 teaspoon apple cider vinegar:** Acid that can react with baking powder for extra lift and potentially tenderize the crumb.
- **1 1/2 cups warm water, 100-110°F:** The crucial liquid for activating the yeast. The temperature is vital – too hot will kill the yeast, and too cold won’t activate it properly.
- **3 egg whites, from large eggs and room temperature:** Provide structure and contribute to the loaf’s rise and texture without adding yolks, which can sometimes make gluten-free bread too dense. Using room-temperature eggs is important for yeast doughs as cold ingredients can shock the yeast and slow down the rising process.
- **1 teaspoon salt:** Enhances the flavor of the bread and helps regulate yeast activity, ensuring a controlled rise.
Nutritional Information
Understanding the nutritional profile of this gluten-free bread recipe can be helpful for managing dietary needs. Based on an approximation per serving (assuming a loaf yields about 12-16 slices), here’s a general breakdown:
- Calories: 114 kcal
- Carbohydrates: 18g
- Protein: 3g
- Fat: 4g
- Saturated Fat: 0.5g
- Polyunsaturated Fat: 0.5g
- Monounsaturated Fat: 3g
- Sodium: 189mg
- Potassium: 18mg
- Fiber: 2g
- Sugar: 5g
- Vitamin C: 0.03mg
- Calcium: 29mg
- Iron: 1mg
Please note that nutritional information is an estimate and can vary based on specific ingredients used (like the exact gluten-free flour blend or type of oil). However, this homemade gluten-free bread offers several benefits:
- **Gluten-Free:** Naturally free from wheat, barley, and rye, making it suitable for individuals with celiac disease or non-celiac gluten sensitivity.
- **Dairy-Free:** This recipe is intentionally formulated without any dairy products, using olive oil and water instead of milk, which is great for those with dairy allergies or lactose intolerance.
- **Source of Fiber:** At 2g per serving, it contributes to your daily fiber intake, which is important for digestive health. (Note: Fiber content can vary significantly depending on the fiber sources in your gluten-free flour blend).
- **Moderate Protein:** Provides a decent amount of protein per slice, contributing to satiety.
Making your own gluten-free bread recipe allows you to control the ingredients, avoiding preservatives and additives often found in commercial gluten-free bread.
Substitutions, Variations, and Additional Tips
Making homemade gluten-free bread can be a rewarding experience, and this easy gluten-free bread recipe is quite forgiving. Here are some ways to adapt the recipe and ensure baking success:
Ingredient Substitutions
- **Gluten-Free Flour Blend:** As mentioned, the blend matters! If using a different blend than recommended, you might need slight adjustments. Some blends absorb more liquid than others. If your dough seems too thick like a brick or too thin like pancake batter (it should resemble thick cake batter), gently add a tiny bit more liquid (warm water) or flour (spooned and leveled) until the correct consistency is achieved. Stick to blends recommended for yeast baking for best results with this gluten-free bread recipe.
- **Xanthan Gum:** If your blend contains it, omit the extra teaspoon. If your blend *doesn’t* contain it and you don’t have xanthan gum, you could experiment with psyllium husk powder. Start with 1 teaspoon of psyllium husk powder mixed with an extra 2-3 tablespoons of water added with the wet ingredients. Psyllium husk creates a different texture than xanthan gum, often resulting in a slightly chewier crumb. Always purchase psyllium husk powder on Amazon certified gluten-free.
- **Honey:** You can successfully substitute with other liquid sweeteners like agave nectar, maple syrup, or brown rice syrup in equal amounts. Granulated sugar or coconut sugar could also work, but they may affect the moisture slightly; use 1/4 cup plus 1-2 teaspoons water if substituting granulated sugar.
- **Extra Virgin Olive Oil:** Any neutral-flavored oil like melted vegan butter, avocado oil, or grapeseed oil can be used. The olive oil does lend a lovely flavor, but others will still provide the necessary fat and moisture for your gluten-free bread.
- **Egg Whites:** Substituting egg whites in gluten-free yeast bread can be tricky as they provide crucial structure and lift. While general egg replacers or a “flax egg” (1 tbsp flax meal + 3 tbsp water per egg) work in some baked goods, they may result in a denser loaf in a yeast bread like this. Commercially available egg white replacers designed for baking might yield better results, but significant testing may be required.
Recipe Variations
- **Add Seeds:** Stir 1-2 tablespoons of seeds like chia seeds, poppy seeds, sesame seeds, or sunflower seeds into the dough with the dry ingredients for added texture and nutrition in your homemade gluten-free bread. You can also sprinkle seeds on top before baking.
- **Herbed Bread:** Mix in 1-2 teaspoons of dried herbs like rosemary, thyme, or Italian seasoning into the dry ingredients for a savory loaf.
- **Slightly Sweet Bread:** Increase the honey slightly (up to 1/3 cup) and add 1 teaspoon of ground cinnamon to the dry ingredients for a subtly sweet bread perfect for toast.
Additional Baking Tips for Your Gluten-Free Bread Recipe
- **Measuring Flour:** Always use the “spoon & level” method for measuring gluten-free flour blends. Spoon the flour into the measuring cup and level off the excess with a straight edge. Scooping directly from the bag can compact the flour, leading to too much flour and a dry, dense loaf.
- **Room Temperature Ingredients:** Yeast is sensitive to temperature. Ensure your egg whites and water are truly warm (between 100-110°F for the water). Cold ingredients can prevent the yeast from activating properly, impacting the rise of your gluten-free bread dough.
- **Proofing Location:** Gluten-free dough loves warmth for rising. A slightly warm oven (like using a “proof” setting if you have one, usually around 100°F) or simply placing the covered pan in a warm spot in your kitchen works well. Don’t over-proof; once the dough has roughly doubled in size (usually around 30 minutes for this recipe), it’s ready to bake. Over-proofing can cause the loaf to collapse during baking.
- **The Loaf Pan:** While a standard 9×5 inch loaf pan will work, using a smaller 9×4 inch Pullman loaf pan (even without the lid) is highly recommended for a taller, more uniform loaf shape, typical of sandwich bread. If you use a 9×5 pan, expect a slightly flatter loaf. You can find both 9×5 inch and small Pullman loaf pans on Amazon.
- **Mixing:** Gluten-free bread dough does not behave like wheat dough. It will be a thick, sticky batter consistency, not kneadable. A stand mixer with a paddle attachment works best to ensure everything is well combined.
- **Cooling is Crucial:** Allow the loaf to cool in the pan for 10 minutes before transferring it to a wire cooling rack to cool completely. Cooling completely on the rack is essential. If it cools in the pan, steam gets trapped, leading to a gummy or soggy bottom.
- **Slicing:** Wait until the bread is *completely* cool before slicing. Warm gluten-free bread can be gummy and difficult to slice cleanly. Use a serrated knife for the cleanest slices without squishing your beautiful loaf.
- **Storage:** Store leftover, completely cooled gluten-free bread in an airtight container at room temperature. For longer storage, wrap tightly and freeze for up to 3 months. Don’t pre-slice the entire loaf before storing, as this can dry it out faster. Thaw frozen bread in the refrigerator.
Enjoy making this delicious and easy gluten-free bread recipe right in your own oven!
Essential Equipment for This Recipe
To prepare this delicious gluten-free recipe, you’ll need the following kitchen tools:
- Mixing Bowls – A sturdy set of mixing bowls is essential for combining wet and dry ingredients.
Find Mixing Bowls on Amazon - Measuring Cups and Spoons – Accurate measuring is key for baking success!
Find Measuring Cups and Spoons on Amazon - Baking Sheets – Perfect for even baking and crisp results.
Find Baking Sheets on Amazon - Whisks – Used to whip ingredients and make them fluffy.
Find Whisks on Amazon - Spatulas – Ideal for folding and mixing without scratching your bowls.
Find Spatulas on Amazon - Food Processors – Perfect for processing ingredients quickly
Find Food Processors on Amazon - Saucepans – Great for heating up sauces
Find Sauce Pans on Amazon - Chef’s Knives – For perfect cuts
Find Chef’s Knives on Amazon - Cutting Boards – Protect your work surfaces
Find Cutting Boards on Amazon

- Prepare Your Workspace and Pan: Begin by gathering all the ingredients listed for your gluten-free bread recipe, ensuring they are measured and ready. It’s particularly helpful if cold ingredients, such as egg whites, are at room temperature; letting them sit out for about 5-10 minutes can make a difference in the dough’s consistency and rise. Preheat your oven to 350°F (175°C) and adjust one of the oven racks to the middle position. Prepare your loaf pan by lightly greasing it with gluten-free cooking spray. While a standard 9-inch x 5-inch loaf pan will work, for a taller, more traditional sandwich bread shape, a 9-inch x 4-inch Small Pullman loaf pan is highly recommended. Make sure the pan is thoroughly coated to prevent sticking.
- Combine Dry Ingredients: In a large mixing bowl (ideally from a stand mixer if you’re using one), add your dry ingredients: the all-purpose gluten-free flour blend, gluten-free baking powder, and the single packet of rapid rise or instant yeast (which is typically 2 1/4 teaspoons). It’s crucial to use a gluten-free flour blend suitable for yeast baking; some blends are not designed for this purpose and can lead to poor results in a gluten-free bread recipe. If your chosen flour blend does not already contain xanthan gum (check the ingredient list on your flour packaging), add 1 teaspoon of xanthan gum now. Stir these dry ingredients together thoroughly with a whisk or spoon to ensure they are well combined before moving on. Remember the “spoon and level” method when measuring your flour: gently spoon flour into the measuring cup and level off the excess with the back of a knife, rather than scooping directly from the bag, which can pack the flour and result in using too much.
- Add Wet Ingredients and Mix: Carefully add the liquid components to the dry mix in your bowl: the extra virgin olive oil, honey (or an alternative liquid sweetener like agave nectar or maple syrup), apple cider vinegar, and the warm water. The temperature of the water is very important for activating the rapid rise yeast correctly – it should be between 100°F and 110°F (38°C to 43°C). If the water is too hot, it can kill the yeast, and if it’s too cold, the yeast won’t activate properly, affecting the rise of your gluten-free bread recipe. If using a stand mixer, make sure the paddle attachment is fitted, NOT the dough hook, as gluten-free dough does not require kneading in the traditional sense. Mix the ingredients on a low speed for approximately 1 minute, just until everything is incorporated.
- Incorporate Egg Whites and Salt: Now, add the room-temperature egg whites and the salt to the bowl with the partially mixed dough. Increase the mixer speed to medium and continue to mix for exactly 1 minute. During this final mixing phase, the dough will come together and should have the consistency of a very thick cake batter. It will be loose and sticky, not a traditional kneadable dough. Be careful not to overmix, as prolonged mixing doesn’t benefit gluten-free dough’s structure and can sometimes lead to a crumbly texture.
- Transfer Dough to Pan: Carefully spoon or pour the thick, batter-like gluten-free bread dough into the prepared, greased loaf pan. Use a spatula to gently spread and smooth the top of the dough evenly within the pan. To prepare for the rising stage, take a sheet of plastic wrap and lightly spray one side with gluten-free cooking spray. Loosely cover the top of the pan with the plastic wrap, making sure the greased side is facing down towards the dough to prevent it from sticking as it rises. For extra warmth and insulation during proofing, drape a clean kitchen towel over the covered pan.
- Proof the Dough: Place the covered loaf pan in a warm, draft-free spot to allow the dough to rise. Ideal locations include a sunny corner, a slightly warmed-then-turned-off oven, or an oven with a dedicated “proof” setting (usually around 100°F or 38°C). Let the dough proof for about 30 minutes. Keep an eye on it; the dough should visibly increase in size, roughly doubling from its original level in the pan. Gluten-free dough doesn’t require extensive rising time like traditional bread; once it has significantly risen, it’s ready. Over-proofing can sometimes collapse the structure before baking.
- Bake Your Gluten-Free Bread: Once the dough has proofed and expanded, carefully place the loaf pan horizontally on the middle rack in your preheated 350°F (175°C) oven. Bake for a total of 30 minutes. You’ll know your gluten-free bread is perfectly baked when the top is a beautiful golden brown color and when an instant-read thermometer inserted into the center of the loaf registers an internal temperature between 205°F and 210°F (96°C to 99°C). Checking the internal temperature is the most reliable way to ensure the loaf is cooked all the way through without being underdone in the center. This is key for a successful gluten-free bread recipe.
- Cool the Loaf Properly: After the 30 minutes of baking, carefully remove the loaf pan from the oven. Allow the bread to sit in the pan for 10 minutes to begin the cooling process and let the structure set. Then, gently remove the loaf from the pan and transfer it directly onto a wire cooling rack. Allow the loaf to cool completely to room temperature on the rack before attempting to slice it. This step is extremely important for the texture of your gluten-free bread recipe; if it cools fully in the pan, trapped steam can make the bottom and sides of the loaf dense and soggy. Patience during this cooling period is essential for the best possible texture!
- Slice with Care: Once the loaf is completely cool (it should be at room temperature, not warm at all, which can take an hour or more), it’s ready to be sliced. Always use a serrated bread knife for slicing gluten-free bread. The serrated edge cuts through the soft crumb easily without compressing or squishing the loaf, ensuring clean, even slices perfect for sandwiches or toast.
- Store Leftovers (Short Term): If you have leftover gluten-free bread that won’t be used immediately but will be eaten within a couple of days, store the remaining portion of the loaf in an airtight container or a reusable bread bag on the kitchen counter at room temperature. It’s best practice not to pre-slice the entire loaf before storing, as keeping it whole helps maintain moisture and freshness more effectively than storing individual slices. This simple gluten-free bread recipe makes delicious bread that you’ll want to store properly!
- Store Leftovers (Long Term – Freezing): This gluten-free bread recipe is excellent for making ahead and freezing! If you want to store the bread for longer than a few days, freezing is the best option. Ensure the loaf is completely cool. Wrap the desired portion or the whole loaf snugly in plastic wrap, then follow with a second layer of wrapping using aluminum foil or freezer paper to protect against freezer burn. Place the double-wrapped loaf into a freezer bag, removing as much air as possible before sealing. Label the bag with the date. The bread can be safely frozen for up to 3 months. To thaw, simply remove the loaf from the freezer bag and place the wrapped loaf in the refrigerator to thaw overnight. This is a fantastic way to always have delicious gluten-free bread ready when you need it!
Tips for Perfect Gluten-Free Bread
Achieving a soft, fluffy loaf of gluten-free bread is absolutely possible with this wonderful recipe! Gluten-free baking has its own unique quirks, but with these expert tips, you’ll be well on your way to success with your very own gluten-free bread recipe.
- Measure Your Flour Correctly: Always use the “spoon and level” method for measuring your gluten-free flour blend. Don’t scoop directly from the bag, as this compacts the flour and can lead to adding too much, resulting in a dense loaf. Spoon the flour lightly into your measuring cup and level off the excess with a straight edge. This precision with your gluten-free bread recipe ingredients matters!
- Ensure Ingredients are Room Temperature: Yeast is happiest and most active when cozy! Make sure your egg whites and water are at room temperature (around 100-110°F for the water). Cold ingredients can slow down or even halt yeast activity, impacting the essential rise for your gluten-free bread.
- Check Your Yeast Activity (Optional but Recommended): Even with instant yeast, a quick check can save disappointment. Before mixing everything, dissolve the honey in the warm water, stir in the yeast, and let it sit for 5 minutes. If it gets foamy and bubbly, your yeast is active and ready to make beautiful gluten-free bread. If not, grab a fresh packet.
- Mind the Mixing: Unlike traditional wheat doughs that require extensive kneading, gluten-free bread dough is more like a thick batter. Use the paddle attachment on your stand mixer and mix only for the time specified. Overmixing gluten-free dough won’t develop gluten (because there isn’t any!) and can actually negatively impact the texture.
- Choose the Right Pan: The recipe specifically recommends a 9×4 inch Small Pullman loaf pan for the best height. Using a standard 9×5 inch pan will still yield delicious bread, but it won’t rise quite as tall or have that classic square sandwich shape. The pan size is key to the structure of this gluten-free bread recipe.
- Create a Warm Proofing Environment: Yeast needs warmth to thrive and help your gluten-free bread rise. A slightly warm oven (like the 100°F proofing setting) is ideal. If your oven doesn’t have one, find a draft-free spot in your kitchen. The goal is for the dough to double within the specified time.
- Don’t Over-Proof: Gluten-free dough doesn’t have the same elastic structure as wheat dough. Over-proofing can cause it to collapse in the oven. Watch for the dough to double in size, and then bake it. Sticking to the recommended 30-minute proofing time in a warm spot is usually perfect for this gluten-free bread recipe.
- Bake to Internal Temperature: Relying solely on visual cues or bake time can be tricky. Use an instant-read thermometer to check the internal temperature of your loaf. It should reach 205-210°F (96-99°C) to ensure it’s fully baked through with a good crust for this gluten-free bread.
- Cool Properly and Completely: Cooling is crucial! Let the loaf cool in the pan for the recommended 10 minutes, then *immediately* transfer it to a wire rack to cool completely. Letting it cool entirely in the pan traps steam, which can make the bottom crust soggy – nobody wants soggy gluten-free bread! Ensure it’s totally cool before slicing.
- Slice with a Serrated Knife: Once fully cooled, a serrated knife is your best friend for slicing soft gluten-free bread without squishing or tearing it.
Common Gluten-Free Bread Mistakes to Avoid
Baking gluten-free bread doesn’t have to be intimidating! Being aware of these common pitfalls will help you achieve fantastic results every time you use this gluten-free bread recipe.
- Over-Proofing: As mentioned, gluten-free dough lacks the strong protein network (gluten) that provides structure in traditional bread. If you let it rise for too long, the delicate structure built by the yeast can’t support itself, and the loaf can fall or become dense during baking. Stick to the recommended rising time and look for the dough to double, not triple, in size.
- Slicing While Warm: This is perhaps one of the most common mistakes! Gluten-free bread continues to set and firm up as it cools. Slicing into a warm loaf will result in a gummy, sticky texture because the starches haven’t fully stabilized. Patience is key! Allow the loaf to cool completely on a wire rack before slicing into your beautiful gluten-free bread.
- Using the Wrong Type or Temperature of Liquid: Yeast requires warm, but not hot, liquid to activate. Water that is too cold won’t wake the yeast up, leading to no rise, while water that is too hot will kill the yeast, also resulting in no rise. Ensure your water is between 100-110°F (38-43°C). Also, make sure all wet ingredients, including egg whites, are at room temperature for optimal yeast activity in your gluten-free bread recipe.
Frequently Asked Questions
Why is this gluten-free bread recipe considered so easy or different?
This gluten-free bread recipe was specifically developed for baking right in your oven! While many homemade gluten-free loaves require special equipment like a bread machine with a gluten-free setting, this one uses simple steps and a stand mixer (or even a bowl and spoon if you’re feeling strong!) to create a wonderful loaf without complicated kneading or shaping. It’s designed to be straightforward and accessible for home bakers.
The recipe mentions using a specific gluten-free flour blend and warns about others. What kind should I use?
Choosing the right all-purpose gluten-free flour blend is really important for the success of this gluten-free bread recipe! Not all blends are created equal, and some are not designed for yeast baking. The post specifically mentions that blends like Bob’s Red Mill 1:1 and King Arthur Measure for Measure are not recommended for yeast bread according to their packaging/website. For this homemade gluten-free bread, look for a blend that is formulated for or explicitly states it works well in yeast-leavened recipes. Using a suitable blend is key to getting the right texture and rise.
My dough looks more like thick cake batter than kneadable dough. Is that right?
Yes, absolutely! Gluten-free bread dough for this recipe is quite different from traditional wheat dough. It will be a thick, sticky batter-like consistency after mixing, not a firm dough that you can knead. Using a stand mixer with a paddle attachment is recommended to ensure everything is well combined. Just mix as directed; that thick ‘cake batter’ consistency is exactly what you’re aiming for!
The recipe suggests using a different pan size – does it really make a difference?
Great question! While a standard 9×5 inch loaf pan will work and you’ll still get delicious bread, using a smaller 9×4 inch Small Pullman loaf pan is highly recommended in the post. The smaller pan helps the dough rise higher and creates a taller, more uniform slice, which is often preferred for sandwich bread. If you use a 9×5 pan, your loaf will likely be a bit flatter, but still tasty!
How do I know my gluten-free bread is fully baked in the center?
The best and most reliable way to check for doneness with this gluten-free bread recipe is by temperature. Bake the bread at 350°F for about 30 minutes. It should look golden brown on top. To be sure it’s cooked all the way through, insert an instant-read thermometer into the center of the loaf. The bread is done when the internal temperature registers between 205°F and 210°F (96°C to 99°C).
Why is letting the loaf cool completely on a rack so important?
Patience during cooling is crucial for the texture of your homemade gluten-free bread! After initially cooling in the pan for 10 minutes, it’s vital to remove the loaf and let it cool completely on a wire rack. If the bread cools entirely in the pan, steam gets trapped underneath and around the loaf, which can lead to a soggy or gummy bottom and sides. Cooling on a rack allows air to circulate, releasing steam and ensuring a better texture throughout the loaf.
How should I properly store leftover gluten-free bread, especially if I want to freeze it?
Once your gluten-free bread has cooled completely, store any leftovers at room temperature in an airtight container or a reusable bread bag. It’s best to avoid pre-slicing the whole loaf before storing, as slicing exposes more surface area and can cause it to dry out faster. For longer storage, this gluten-free bread recipe freezes wonderfully! Wrap the completely cooled loaf tightly in plastic wrap, then wrap again in foil or freezer paper. Place the double-wrapped loaf in a freezer bag and it can be frozen for up to 3 months. To thaw, just put the wrapped loaf in the refrigerator overnight.
2 Comments