Do you remember those days when a sudden craving for a slice of rich, decadent chocolate cake could be satisfied by just grabbing a box mix or heading to your favorite bakery? Ah, the simplicity! Then, the gluten-free journey began, and suddenly, that simple pleasure felt like a distant, bittersweet memory. The intense, undeniable desire for a moist, fluffy slice of pure chocolate bliss didn’t disappear, but finding a **gluten free chocolate cake** that actually delivers on that promise? Well, that became the quest.
Like many of my fellow gluten-free friends, I embarked on countless kitchen experiments. There were the valiant attempts that resulted in dry, crumbly disasters that fell apart before they even reached the plate. Then came the gummy, dense bricks masquerading as cake, leaving that tell-tale, slightly chewy texture that screams “gluten-free failure.” We’ve all been there, right? Taking that first bite, hoping against hope, only to be met with that slight sigh of disappointment. Baking a proper, crave-worthy **gluten free chocolate cake** felt like chasing a culinary unicorn.
But persistence, as they say, pays off. After tweaking, testing, and refuseing to settle for “just okay,” there was an “aha!” moment. A combination of ingredients and techniques clicked into place, transforming frustrating failures into pure magic. The aroma that filled the kitchen wasn’t just chocolate; it was the smell of *success*. Slicing into the cooled cake finally revealed the tender, moist crumb I’d been dreaming of. This wasn’t just *a* **gluten free chocolate cake**; it was *the* one.
The real validation came when I shared this creation. Friends and family, both gluten-free and not, couldn’t believe it wasn’t made with traditional flour. The smiles, the wide eyes, and the requests for seconds were all the proof I needed. This isn’t a compromise or a stand-in; it’s a celebration of what gluten-free baking can truly be. Whether it’s for a birthday, a holiday, or just because you deserve it, this **gluten free chocolate cake** is your new go-to. Forget the dry, forget the gummy, forget the disappointment. Your quest for the perfect **gluten free chocolate cake** ends here! And once you nail this, maybe try your hand at gluten free vanilla cupcakes, a gluten free strawberry cake, or even classic gluten free chocolate chip cookies!
Love This Gluten-Free Chocolate Cake? Bake More Masterpieces!
Enjoyed making (and eating!) this delicious gluten-free chocolate cake? If you’re ready to conquer more gluten-free baking challenges and expand your repertoire, we’ve got just the thing to help you succeed every time.
Unlock the Secrets to Perfect Gluten-Free Baking!
Download your FREE Gluten-Free Baking Substitutions Cheat Sheet and say goodbye to crumbly cakes and baking fails!
- ✔ Master Substitutions: Easily swap ingredients to make any recipe gluten-free, just like this chocolate cake.
- ✔ Achieve Perfect Textures: Learn how to get that moist, fluffy result in all your gluten-free bakes.
- ✔ Bake with Confidence: No more guesswork or wasted ingredients – just delicious results!
- ✔ Save Time & Money: Get it right the first time and enjoy your baking journey.
This comprehensive guide is your secret weapon for delicious gluten-free treats. Join our wonderful Be Gluten Free community for more tips, recipes, and support. We’re all in this together!
Get Your FREE Cheat Sheet Now!
We value your privacy. Expect only helpful gluten-free goodness, no spam ever!
Why This Gluten Free Chocolate Cake Recipe Works
Forget everything you thought you knew about gluten-free baking limitations! This isn’t just *a* gluten free chocolate cake; it’s a masterclass in how innovative ingredient combinations and smart techniques unlock incredible texture and flavor without relying on gluten. Here’s the brilliant chemistry and artistry happening in your kitchen every time you make this cake:
The Foundation: Binding Without Gluten
The secret to a fantastic gluten-free cake starts with the right flour blend. This recipe champions Bob’s Red Mill 1:1 Baking Flour, and for good reason. Reputable blends like this are carefully formulated with a mix of rice flours, starches (like potato or tapioca), and crucial binders. The key player here is xanthan gum. In traditional baking, gluten strands form a network that traps air and gives structure. Since gluten is absent, xanthan gum steps in! When hydrated, it creates a viscous, gel-like substance that mimics gluten’s binding power, helping the cake hold together beautifully, preventing that crumbly, dry texture often associated with gluten-free baking. This is why using a blend *with* xanthan gum is explicitly recommended for the success of this specific gluten free chocolate cake.
Texture Mastery: Eggs, Aeration, and Moisture
Achieving that perfect fluffy, yet spongy, texture in a gluten free chocolate cake involves a few clever moves. Firstly, the generous use of three large eggs is vital. Eggs provide essential structure, richness, and act as primary binders, working alongside the xanthan gum to ensure the cake doesn’t fall apart. Beyond binding, eggs contribute significantly to the overall rise and tenderness.
Secondly, the mixing technique is surprisingly powerful. The recipe geniusly calls for a whisk instead of an electric mixer or wooden spoon for combining the wet and dry ingredients (before the hot liquid). What’s truly remarkable about this is finding the perfect balance. An electric mixer can incorporate too much air, leading to potential collapse, while a wooden spoon might not incorporate enough, resulting in a dense cake. A simple whisk allows for just the right amount of gentle aeration and ensures ingredients are combined without overworking the batter – a common pitfall in both conventional and gluten-free baking.
Flavor & Moisture Boosters: The Power of Liquids and Hot Coffee/Water
This gluten free chocolate cake is anything but dry, thanks to a thoughtful combination of liquid ingredients: milk, oil, and hot brewed coffee (or boiling water). Using oil instead of solid butter contributes to moisture because oil remains liquid at room temperature, giving the cake a consistently moist crumb. The blend of white and brown sugar not only sweetens but also adds depth of flavor (from the molasses in brown sugar) and helps retain moisture.
Here’s where the magic happens for intense chocolate flavor and ultimate moisture: the addition of hot coffee or boiling water at the end. Hot liquid doesn’t just hydrate the dry ingredients; it “blooms” the cocoa powder. This process releases powerful flavor compounds, intensifying the chocolate taste dramatically. It also ensures the cocoa is fully dissolved and dispersed, preventing dry pockets and contributing to the cake’s wonderfully moist, rich texture. This is a classic technique used in many great chocolate cakes, and it works wonders in this gluten-free adaptation.
The Lift Team: Leavening Agents
For that essential rise and airy structure, the recipe employs a dynamic duo: baking powder and baking soda. Baking powder provides initial lift when mixed with liquid and then again with heat in the oven. Baking soda, on the other hand, is activated by acid. While not explicitly called out in the “Why it Works” section of the original text, the ingredient list includes vinegar. This is likely the acid component that reacts with the baking soda, creating carbon dioxide gas that helps the cake rise beautifully and evenly, preventing a flat or overly dense result, which can sometimes challenge gluten-free structures.
Empowering Takeaways
This gluten free chocolate cake recipe reveals the secrets to successful gluten-free baking: understanding how alternative flours and binders function, using fats that enhance moisture, leveraging liquids to boost flavor and hydration, and employing careful techniques to achieve the perfect texture. By seeing how ingredients like xanthan gum, eggs, oil, hot liquid, and strategic leaveners work together, you gain the confidence to tackle other gluten-free recipes and truly master baking without gluten!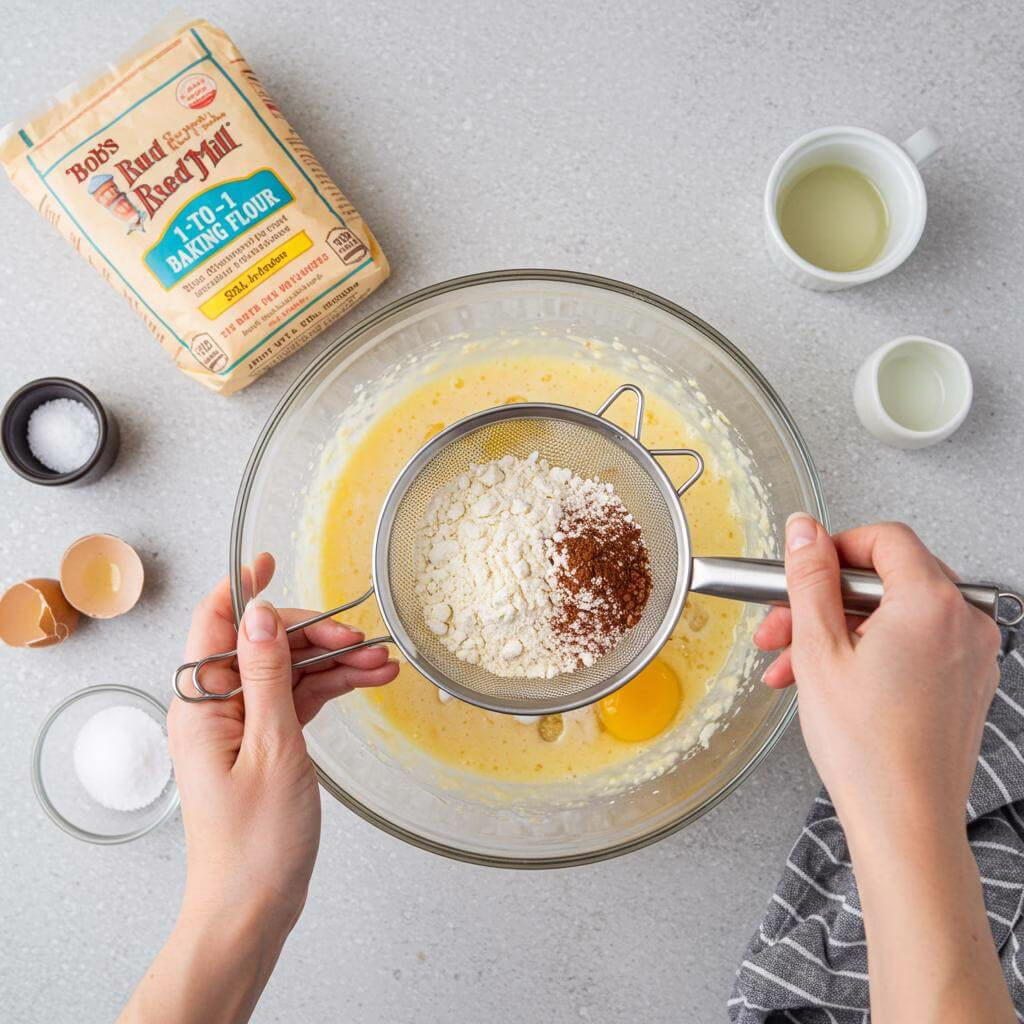
Making This Recipe Your Own
One of the best things about baking at home is the freedom to customize! This easy gluten free chocolate cake recipe is incredibly versatile. Feel empowered to make simple swaps based on what you have on hand or get creative with fun additions and flavor twists. You can easily adapt this moist and delicious gluten free chocolate cake to suit your taste buds and dietary needs.
Easy Swaps
Don’t have an ingredient? No worries! Here are some simple substitutions you can make without sacrificing the perfect texture and rich flavor of this gluten free chocolate cake:
- Gluten-Free Flour Blend: While the recipe strongly recommends Bob’s Red Mill 1:1 Baking Flour for consistent results, you can use another reliable gluten-free all-purpose baking flour blend that contains xanthan gum. Results may vary slightly depending on the blend’s composition, but stick to a good quality 1:1 ratio blend for the most similar outcome to the original gluten free chocolate cake.
- Cocoa Powder: For the best rich dark chocolate flavor, use a good quality unsweetened cocoa powder (not Dutch process unless specified). If you only have Dutch process, the reaction with the baking soda/powder might be slightly different, but it will generally still work. Just avoid low-quality or very mild cocoa powders as mentioned in the recipe notes for the best gluten free chocolate cake.
- Milk: The recipe is naturally dairy-free friendly! Feel free to use any dairy or non-dairy milk you have. Almond milk, soy milk, oat milk, or regular cow’s milk all work beautifully in this gluten free chocolate cake recipe. Use a 1:1 swap ratio.
- Oil: Any neutral-flavored oil will work here, like canola, safflower, sunflower, or refined avocado oil. Melted coconut oil can also work but might add a subtle coconut flavor. Use the same ⅔ cup measurement.
- Hot Coffee: No coffee? No problem! As the recipe states, hot boiling water works perfectly to activate the cocoa powder and bring out that deep chocolate flavor. Use a 1:1 swap with hot water.
- Vinegar: The vinegar reacts with the baking soda to help with leavening and contributes to the cake’s moistness. White vinegar or apple cider vinegar are interchangeable here, use the same 1 teaspoon. You can technically omit it in a pinch, but the crumb may be slightly less tender.
Creative Variations
Ready to take your gluten free chocolate cake to the next level? Here are some fun ways to experiment with flavors, textures, and presentation:
- Make it Mocha: Replace half or all of the hot brewed coffee with hot brewed espresso for an extra punch of coffee flavor that pairs wonderfully with the chocolate in this gluten free chocolate cake. Increase the coffee flavor slightly in the buttercream too if you like!
- Add Chocolate Chips: Fold 1 cup of your favorite dairy-free or regular chocolate chips into the batter just before pouring into the pan for pockets of melted chocolate goodness in every slice of your gluten free chocolate cake.
- Mint Chocolate Twist: For a festive or refreshing variation, add ½ teaspoon of peppermint extract to the cake batter along with the vanilla. You can also add a drop or two to the buttercream. Perfect for turning your gluten free chocolate cake into a holiday treat!
- Nutty Swirl: Swirl ⅓ cup of peanut butter, almond butter, or even a dairy-free caramel sauce (dairy-free caramel sauce affiliate link) through the batter after pouring it into the pan using a knife or skewer before baking.
- Bake as Cupcakes or Bundt: Easily turn this recipe for a gluten free chocolate cake into gluten-free chocolate cupcakes! Fill lined cupcake tins about ⅔ full and bake for 18-25 minutes, or until a toothpick comes out clean. You could also bake this in a greased and floured Bundt pan, extending the baking time to 50-60 minutes, checking with a toothpick.
- Garnish & Presentation: Decorate your finished gluten free chocolate cake! Top the buttercream with chocolate shavings, fresh berries (strawberries or raspberries pair beautifully), edible flowers, or a drizzle of ganache. A simple dusting of cocoa powder or powdered sugar over a stencil can also create an elegant look.
Tips for Perfect Results
- The Single Most Important Tip: Trust the Flour! This recipe is specifically developed for Bob’s Red Mill 1:1 Baking Flour. While other blends exist, they behave *very* differently because the ratio and type of flours and starches vary. Using the recommended blend is your guarantee for the perfect moist, fluffy texture this gluten free chocolate cake is known for. If you use a different blend, double-check that it contains xanthan gum – it’s vital for structure in gluten-free baking!
- Embrace the Hot Liquid (and the Thin Batter): Don’t be alarmed by how thin the batter is after adding the hot coffee or boiling water. This is intentional! The hot liquid “blooms” the cocoa powder, intensifying the chocolate flavor dramatically and contributing significantly to the cake’s incredible moisture. This thin consistency is **correct** for this specific gluten free chocolate cake recipe and helps create that tender crumb.
- Master the Whisking Technique: The recipe specifically calls for whisking, not using an electric mixer for the cake batter (though it’s essential for the buttercream!). This is a pro secret for gluten-free cakes. Over-mixing gluten-free batter, especially with xanthan gum, can lead to a gummy or dense texture. Whisking by hand incorporates *just enough* air for lift and structure without overdeveloping the gum, ensuring a light, spongey result.
- Temperature Matters (Ingredients and Oven!): Ensure your milk, eggs, and oil are at room temperature for the cake batter. This helps them emulsify smoothly, creating a more uniform batter and promoting even rising. For the buttercream, your butter *must* be softened, but not melted, for that smooth, creamy consistency. Also, always preheat your oven fully and consider using an oven thermometer to verify accuracy – inconsistent oven temps are a common cause of baking failures.
- Proper Pan Prep is Non-Negotiable: Simply greasing the pan isn’t enough for a delicate gluten free chocolate cake. Always spray the bottom and sides, then line the bottom with parchment paper. This creates a non-stick barrier that ensures your cake layers (or sheet cake) release beautifully and intact, preventing frustration and broken cakes.
- Cooling is as Crucial as Baking: Don’t rush the cooling process. Leaving the cake in the pan for the recommended 10-20 minutes allows the internal structure to set further after baking. Flipping it onto a wire rack immediately afterwards allows air to circulate around the entire cake, preventing condensation and ensuring it cools completely before frosting. Attempting to frost a warm cake will result in melted buttercream and a potentially crumbling mess.
- Sift, Sift, Sift!: The recipe instructs you to sift the dry ingredients (flour and cocoa). Do not skip this step! Sifting removes lumps, aerates the flour, and ensures that the baking powder, baking soda, and salt are evenly distributed throughout the mix. This leads to a finer, more consistent crumb texture in your finished gluten free cake.
- Measure with Precision: In gluten-free baking, accurate measurements are paramount. Ideally, use a kitchen scale for the flour and sugar. If using measuring cups, spoon the flour lightly into the cup and level with a straight edge – never scoop directly from the bag, as this compacts the flour and results in too much dry ingredient, leading to a dry cake. This precision is key for consistent results with this and any gluten-free baking recipe.
Common Mistakes to Avoid
- Over-Mixing the Batter: As mentioned, aggressive mixing with an electric mixer or overworking the batter with a whisk after adding dry ingredients can overdevelop the xanthan gum, resulting in a tough, gummy, or dense texture.
Prevention: Use a whisk as directed and mix only until the dry ingredients are *just* combined and no streaks of flour remain. The batter will be thin – this is okay! - Substituting GF Flour Without Xanthan Gum: Using a gluten-free flour blend that does not contain xanthan gum in a recipe designed for one that does (like Bob’s Red Mill 1:1) will lead to a cake that crumbles easily and lacks structure.
Prevention: Always use a GF all-purpose blend that explicitly states it contains xanthan gum, or add the appropriate amount of xanthan gum yourself if using a blend without it (typically ½ to 1 teaspoon per cup of flour, but check recommendations for your specific blend). - Frosting a Warm or Partially Cooled Cake: The delicate structure of a gluten-free cake needs ample time to cool and firm up. Applying frosting too early will cause it to melt, slide off, and potentially tear the warm cake layers.
Prevention: Be patient and ensure the cake layers are completely cool to the touch before attempting to frost, ideally cooling fully on a wire rack. This step is critical for a beautiful and stable finished gluten free chocolate cake.
Common Mistakes to Avoid
Making a beautiful, moist, fluffy **gluten free chocolate cake** is absolutely achievable (and this recipe is designed to make it easy!), but like any baking project, especially gluten-free baking, there are a few common pitfalls that can trip you up. Don’t worry, we’ve got you covered! Understanding these mistakes and how to avoid them will ensure your **gluten free chocolate cake** turns out perfectly every time.
Using the Wrong Gluten-Free Flour Blend
The Problem: This is probably the most common challenge in gluten-free baking! Your cake might end up crumbly, dense, or even gummy instead of having that lovely tender crumb. This happens because not all gluten-free flour blends are created equal.
Why it Happens: Gluten-free flours lack the binding structure that gluten provides. Most successful gluten-free baking relies on binders like xanthan gum or guar gum to mimic this structure. If your flour blend doesn’t contain one of these binders, your ingredients won’t hold together properly.
Prevention: Always, always check your gluten-free all-purpose flour blend! This recipe was specifically tested and developed with **Bob’s Red Mill 1:1 Baking Flour**, which contains xanthan gum. If you use a different blend, **make absolutely sure it lists xanthan gum** in the ingredients. If it doesn’t, you’d typically need to add a small amount yourself (though sticking to a blend with it included is easier!).
Pro Tip: Even blends *with* xanthan gum can perform slightly differently depending on the mix of flours. While others might work, using the recommended blend gives you the best chance for success the first time around with this specific **gluten free chocolate cake** recipe.
Over or Under-Mixing the Batter
The Problem: You followed the recipe, but your cake came out dense and heavy, or maybe it rose beautifully in the oven only to sink dramatically in the middle. This is often a mixing issue.
Why it Happens: Unlike wheat flour where you develop gluten by mixing, gluten-free flours don’t need this. However, you still need to properly integrate your ingredients and activate your leaveners (baking powder and soda). Over-mixing can incorporate too much air initially or overwork the xanthan gum, leading to a cake that collapses. Under-mixing leaves dry pockets of flour and doesn’t create enough initial structure for the cake to hold its shape as it rises.
Prevention: The recipe specifically calls for using a whisk, and this is key! **Whisk the wet ingredients first, then whisk in the sifted dry ingredients.** Finally, pour in the hot liquid and **whisk just until everything is combined and no dry streaks remain.** The batter *will* be thin, as noted in the recipe – this is exactly what you want!
Pro Tip: Avoid the temptation to use an electric mixer on high speed once the dry ingredients are added. A hand whisk gives you better control to stop mixing as soon as it’s combined.
Recovery: If your cake sunk, you can trim the flat portions and stack them with extra frosting, or turn it into trifle layers or cake pops. A dense cake is still edible! Serve it warm with sauce or ice cream to enhance moisture.
Skipping the Hot Coffee or Boiling Water
The Problem: Your chocolate flavor isn’t as rich or intense as you expected, and the cake might seem a little less moist.
Why it Happens: The hot liquid (coffee or boiling water) isn’t just for adding moisture; it performs a crucial step called “blooming.” When hot liquid hits cocoa powder, it helps to dissolve the cocoa particles and activate them, releasing their full chocolate flavor potential. This also ensures the cocoa is evenly distributed throughout the batter, preventing dry pockets of unincorporated powder.
Prevention: **Do not skip this step!** And make sure the liquid is genuinely hot (freshly brewed hot coffee or boiling water). Measure the full cup accurately. Add it last, as directed, and whisk it in until just combined.
Pro Tip: Using hot coffee instead of water adds an extra layer of complexity and depth that truly enhances the chocolate flavor without making the cake taste like coffee.
Recovery: Unfortunately, you can’t add the hot liquid after the cake is baked. If you forgot and the cake seems less flavorful or moist, compensate with a richer frosting, a chocolate ganache drizzled over the top, or serve with a warm chocolate sauce.
Impatient Baking or Cooling
The Problem: Your cake is gummy or underbaked in the middle, dry on the edges, stuck to the pan, or it breaks when you try to flip it out.
Why it Happens: Pulling the cake too soon means the internal structure hasn’t fully set. Baking at the wrong temperature or in the wrong oven position can lead to uneven cooking (dry outside, wet inside) or a rapid rise that causes cracking or doming. Not letting the cake cool properly in the pan before attempting to remove it means it’s too fragile and likely to stick or break. Flipping too early onto the rack can also cause it to fall apart if it hasn’t stabilized.
Prevention: **Preheat your oven fully** (use an oven thermometer if you’re unsure about accuracy). Bake in the **center of the oven** for the most even heat distribution. **Check for doneness with a toothpick inserted into the center** – it should come out clean or with a few moist crumbs. Follow the cooling instructions precisely: **let the cake cool in the pan for the specified 10-20 minutes** before attempting to flip it. This allows the cake to firm up slightly. Then, **carefully flip it onto a cooling rack** and **let it cool completely** before frosting.
Pro Tip: Cooling completely on the rack is vital for the cake’s structure and crucial before frosting. Applying frosting to a warm cake will cause it to melt off!
Recovery: If it’s slightly underbaked, you *might* be able to put it back in for a few minutes if it hasn’t completely cooled. If it stuck, gently loosen edges with an offset spatula. If it broke during flipping, don’t despair! Frosting is a great spackle, or you can embrace it and make a rustic-looking cake, trifle, or cake pops. You’ve got this!
Essential Equipment for This Recipe
To prepare this delicious recipe, you’ll need the following kitchen tools:
- Mixing Bowls – A set of good mixing bowls is essential for combining wet and dry ingredients.
Find Mixing Bowls on Amazon - Measuring Cups and Spoons – Precise measurements are key for baking success.
Find Measuring Cups and Spoons on Amazon - Baking Sheets – Perfect for baking cookies, roasting vegetables, and more.
Find Baking Sheets on Amazon - Whisks – For beating eggs, cream, and batters.
Find Whisks on Amazon - Spatulas – Use for folding, mixing, and scraping bowls.
Find Spatulas on Amazon - Food Processors – Great for chopping and puréeing ingredients quickly.
Find Food Processors on Amazon - Saucepans – For cooking sauces, melting butter, and more.
Find Saucepans on Amazon - Chef’s Knives – A sharp knife is essential for any kitchen.
Find Chef’s Knives on Amazon - Cutting Boards – Protect your countertops and make chopping easier.
Find Cutting Boards on Amazon
“`
Frequently Asked Questions about this Gluten Free Chocolate Cake
Why is the batter for this chocolate cake so thin after adding the hot liquid?
Great question! It might seem counterintuitive to add hot coffee or boiling water to a cake batter, and yes, it makes the batter quite thin. This is completely normal and actually a fantastic trick! The hot liquid doesn’t just add moisture; it helps “bloom” or activate the cocoa powder, intensifying the rich chocolate flavor significantly. It also contributes to the incredibly moist and tender crumb of this gluten free chocolate cake without making it heavy or oily. Trust the process – it works like magic!
Can I use a different gluten-free all-purpose flour blend instead of Bob’s Red Mill 1:1?
We highly recommend sticking with Bob’s Red Mill 1:1 for the most consistent and reliable results, as this recipe was developed using that specific blend. However, if you need to use a different brand, the most important thing is to ensure your blend contains xanthan gum. Gluten-free flour blends absorb liquid differently, so if you use another blend, you might need minor adjustments to the liquid amount. Just make sure it’s a cup-for-cup or 1:1 type blend designed for baking, and that it has xanthan gum for structure!
The recipe uses 3 eggs. Can I make this gluten free chocolate cake egg-free or vegan?
For this specific gluten free chocolate cake recipe, the three eggs are really crucial for structure, lift, and achieving that perfect spongy texture. Egg substitutes won’t behave quite the same way and might result in a denser or less stable cake. While the cake is naturally dairy-free (just use non-dairy milk and oil!), we don’t recommend substituting the eggs here for the best outcome. If you need a fully vegan option, we suggest looking for a recipe specifically developed as a vegan and gluten-free chocolate cake, as the ingredient ratios and techniques will be different.
My cake turned out a bit dry or dense. What could have gone wrong?
This is a common challenge in gluten-free baking, but you’ve got this! A few things could cause this:
- Mixing Method: Did you use a whisk instead of an electric mixer or wooden spoon? Using a whisk is key to incorporating just the right amount of air for a spongy texture. Over-mixing (especially with an electric mixer) can add too much air initially causing it to collapse and become dense, while under-mixing (like with a wooden spoon) might not create enough lift.
- Flour Blend: Using a blend without xanthan gum or a blend that absorbs liquid differently might affect the texture.
- Over-baking: Even a few extra minutes in the oven can dry out a gluten-free cake quickly. Make sure you use the toothpick test and start checking early.
- Ingredient Accuracy: Ensure measuring cups and spoons were accurate, especially for the flour and liquids.
Focusing on the recommended whisking technique and not over-baking are your best bets for success!
How do I know exactly when the cake is perfectly baked?
The best way to tell your gluten free chocolate cake is done is with the tried-and-true toothpick test! Insert a toothpick or a thin cake tester into the center of the cake. It should come out clean or with just a few moist crumbs attached. If you see wet batter, it needs more time. Also, the top of the cake should look set and spring back slightly when you gently touch it. Since all ovens vary, start checking at the lower end of the recommended baking time (around 35 minutes for a sheet cake, 32 for layers) and add a few minutes at a time until it passes the test.
How should I store this gluten free chocolate cake, and can I make it ahead of time?
This gluten free chocolate cake is wonderfully moist and stays fresh for a while! Store it at room temperature in an airtight container or under a cake dome for 3-4 days. If you need it to last longer, it will keep well in the refrigerator for up to a week.
Yes, you can definitely bake the cake layers ahead of time! Let them cool completely on the wire rack, then wrap each layer tightly in plastic wrap and freeze. When you’re ready to decorate, just thaw the layers at room temperature before frosting.
Why do I add vinegar to the cake batter?
The vinegar, whether white or apple cider, acts as an acidic component that reacts with the baking soda in the recipe. This reaction creates carbon dioxide gas bubbles, which helps the cake rise and contributes to a lighter, more tender crumb. Don’t worry, you won’t taste the vinegar in the finished gluten free chocolate cake – its work is purely scientific!

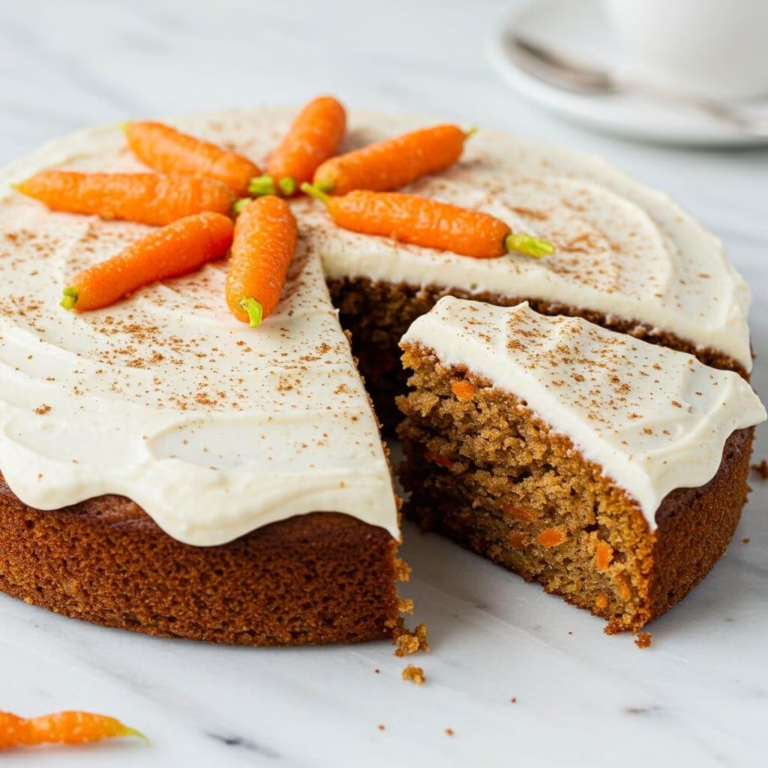
Gluten Free Chocolate Cake: The Only Recipe You Need!
Vegetarian
Gluten-Free
Forget dry, gummy disappointments; this is THE moist, decadent gluten free chocolate cake you’ve been searching for.
25 MinsPrep
40 MinsCook
16 ServingsServings
EasyLevel
Nutrition per serving
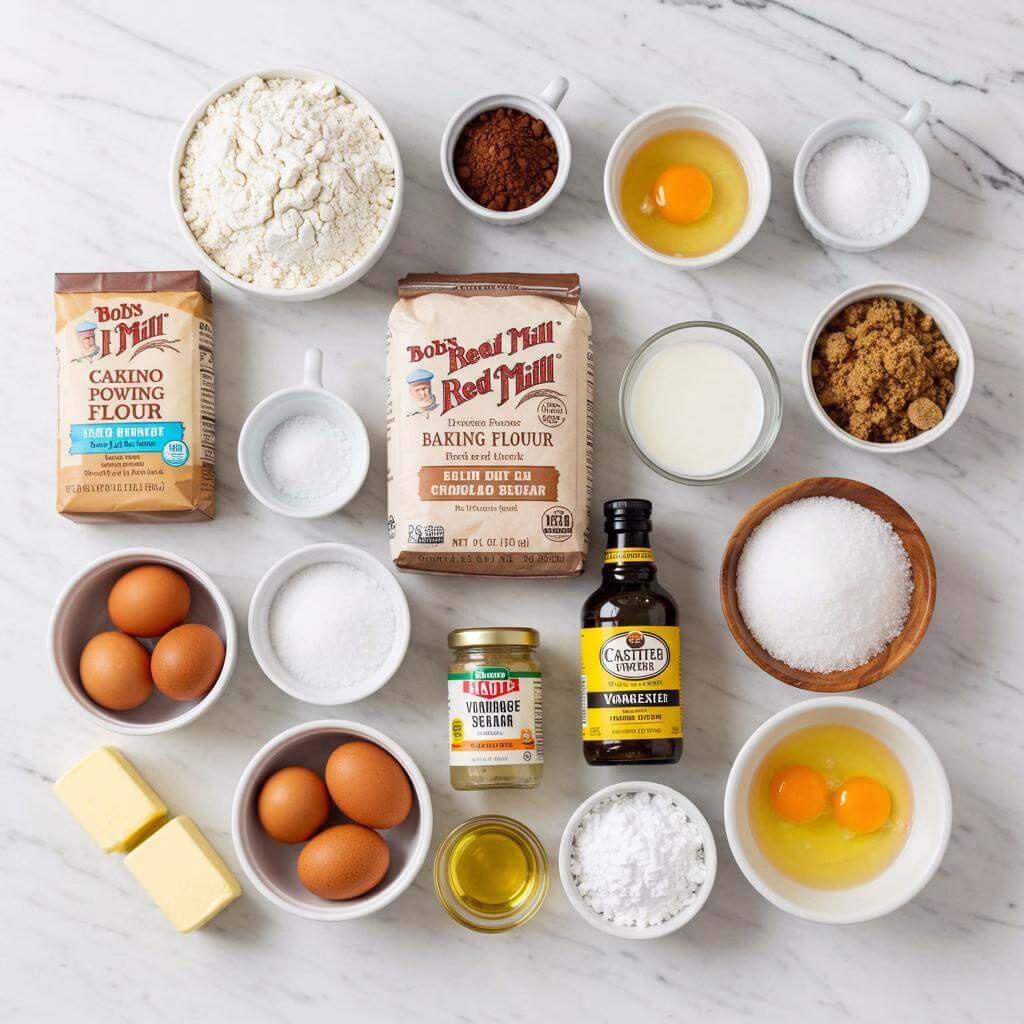
Ingredients
- For the Gluten Free Chocolate Cake:
- 2 ⅔ cups sifted Gluten Free All Purpose baking Flour (with xanthan gum, Bob’s Red Mill 1:1 recommended)
- 1 cup sifted cocoa powder
- 1 ½ teaspoon baking powder
- 1 teaspoon baking soda
- ½ teaspoon salt
- 1 cup milk (dairy or non-dairy)
- 1 cup white sugar
- ¾ cup light brown sugar
- 3 large eggs
- 1 teaspoon vinegar (white or apple cider)
- 1 tablespoon vanilla extract
- ⅔ cup oil (safflower, canola, or refined avocado oil)
- 1 cup hot brewed coffee or boiling water
- For the Chocolate Buttercream Frosting:
- ¾ cup (1 ½ sticks) unsalted butter, softened
- ½ cup sifted cocoa powder
- 3-5 cups sifted powdered sugar (adjust to consistency)
- 2-4 tbsp milk (dairy or non-dairy, adjust to consistency)
- 2 tsp vanilla extract
Directions
1. Get Oven Ready: Preheat oven to 350°F (175°C).
2. Prepare Pan(s): Grease and line one 9×13 inch pan OR two 8-inch round cake pans with parchment paper.
3. Mix Wet Ingredients: In a large bowl, whisk together milk, white sugar, light brown sugar, eggs, vinegar, vanilla extract, and oil until smooth.
4. Add Dry Ingredients: Add sifted gluten-free flour, sifted cocoa powder, baking powder, baking soda, and salt to the wet ingredients. Whisk gently until just combined (do not overmix).
5. Stir in Hot Liquid: Pour in the hot brewed coffee or boiling water. Whisk gently until incorporated. Batter will be thin.
6. Pour into Pan(s): Pour batter evenly into the prepared pan(s).
7. Bake: Bake 9×13 pan for 35-45 minutes, or two 8-inch pans for 32-37 minutes, until a toothpick inserted into the center comes out clean.
8. Cool Cakes: Let cake(s) cool in the pan(s) on a wire rack for 10-20 minutes.
9. Transfer to Rack: Invert cake(s) onto the wire rack, remove parchment paper, then flip right-side up to cool completely before frosting.
10. Make Buttercream: While cake cools, beat softened butter in a large bowl (or stand mixer) until smooth and creamy.
11. Add Cocoa & Sugar: Beat in sifted cocoa powder. Gradually add sifted powdered sugar, one cup at a time, beating well after each addition, until desired sweetness and thickness.
12. Finish Buttercream: Beat in milk and vanilla extract until buttercream is smooth, light, and fluffy. Adjust milk/sugar for consistency.
13. Frost and Enjoy: Once cake(s) are completely cool, frost as desired. Slice and serve your delicious gluten free chocolate cake!
Recipe Notes
- Use a gluten-free all-purpose flour blend that contains xanthan gum for best results (e.g., Bob’s Red Mill 1:1).
- Hot coffee or boiling water is key to blooming the cocoa powder for a richer chocolate flavor.
- Do not overmix the batter; whisk gently until just combined to maintain a light, spongy texture.
- Ensure cake layers are completely cool before frosting to prevent the buttercream from melting.
- Store leftover cake in an airtight container at room temperature for 3-4 days, or in the fridge for up to a week.
Share This Recipe
About This Gluten Free Chocolate Cake
Discover the ultimate gluten free chocolate cake recipe that will end your search for a moist, rich, and decadent dessert. This easy-to-follow guide uses simple ingredients, including a quality gluten free all purpose flour and cocoa powder, activated by hot coffee or water, to create a perfectly textured cake. Say goodbye to dry or gummy results; this gluten free chocolate cake delivers pure chocolate bliss with every bite, perfect for birthdays, celebrations, or any time you crave a truly satisfying treat.
Mastering a homemade gluten free chocolate cake is now within reach. This recipe not only provides a tender, flavorful crumb but also includes a luscious chocolate buttercream frosting to complete your masterpiece. With tips for ingredient substitutions and achieving the ideal consistency, you’ll confidently bake a stunning gluten free chocolate cake that even gluten-eaters will adore. Impress your friends and family with this foolproof recipe, proving that gluten-free baking can be incredibly delicious and rewarding.

4 Comments