The Ultimate Gluten Free Cinnamon Raisin Bread Experience!
Is there anything more comforting than the aroma of freshly baked bread, especially when it’s studded with plump raisins and swirled with fragrant cinnamon? For those of us navigating a gluten-free lifestyle, the thought of a perfect slice of gluten free cinnamon raisin bread might feel like a distant dream. Perhaps you remember walking past bakeries or down supermarket aisles, that tantalizing scent of yeasty, cinnamony goodness hanging in the air – a scent that often felt like a delicious, unattainable temptation. Well, dream no more! Here at Be Gluten Free, we believe that living gluten-free should never mean missing out on your favorite treats, and this recipe is here to prove it.
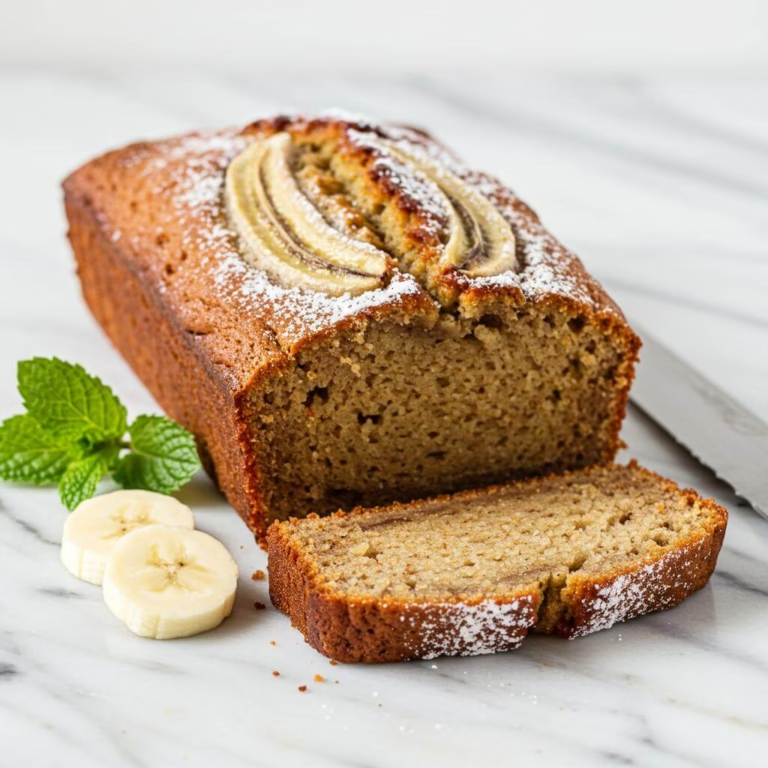
We’re thrilled to share what we truly believe is the BEST gluten free cinnamon raisin bread recipe you’ll ever try. Forget those dense, crumbly gluten-free breads of the past. This loaf is wonderfully soft, delightfully pillowy, and packed with juicy raisins in every bite. The beautiful cinnamon swirl isn’t just for show; it delivers that classic, heartwarming flavor we all adore. Imagine pulling this golden-brown beauty from your oven, your kitchen filled with the most incredible baking aroma. Slicing into it reveals a tender crumb that’s perfect for toasting and slathering with your favorite butter or spread. It’s the kind of bread that brings back cherished memories and helps create new ones, whether it’s for a cozy weekend breakfast or a satisfying afternoon snack.
Making your own gluten free cinnamon raisin bread is not only incredibly rewarding but also a fantastic way to ensure you’re enjoying wholesome ingredients. With a few key gluten-free baking insights, which we’ll guide you through, achieving a perfect loaf is easier than you think. This contributes to a healthy, satisfying, and wonderfully diverse gluten-free diet. If you’re on a roll (pun intended!) with gluten-free baking, why not also explore our fantastic general Gluten Free Bread Recipe for everyday enjoyment, or indulge in the similar sweet spice of our Gluten-Free Cinnamon Swirl Coffee Cake? This recipe for gluten free cinnamon raisin bread truly exemplifies the joy and ease that gluten-free home cooking can bring, proving that you don’t need gluten to achieve baking perfection. Get ready to be amazed!
Creating truly exceptional gluten-free bread, especially a rich, tender loaf like gluten free cinnamon raisin bread, is a culinary puzzle. It requires a deep understanding of how gluten works and how to effectively replace its unique functions. This recipe stands out because it doesn’t just swap gluten-free flours; it employs a strategic combination of ingredients and techniques that build structure, retain moisture, and deliver that coveted soft, pillowy texture we all love in a classic cinnamon raisin bread.
The Power of the Right Gluten-Free Flour Blend
The foundation of this successful gluten free cinnamon raisin bread lies in using the right flour blend. Gluten, a protein network developed through kneading wheat flour and water, provides elasticity, structure, and the ability to trap gases produced by yeast, allowing bread to rise. Without gluten, you need a carefully balanced mix of alternative flours and starches. A generic all-purpose gluten-free blend often won’t cut it for enriched yeasted breads like this. A specific “bread flour blend” is crucial here because it’s likely formulated with a specific ratio of starchy flours (like tapioca, potato, or cornstarch for tenderness and lightness) and potentially more protein-rich flours (like brown rice, sorghum, or even a bit of almond flour) to provide some structural support where gluten would. This specific blend ensures the dough has the right balance of absorbency and structure needed to perform well in a yeasted application, preventing a dense, crumbly loaf and instead yielding a tender gluten free cinnamon raisin bread.
Binders: The Gluten Mimics
Since there’s no gluten network to hold everything together, effective binders are non-negotiable. This recipe intelligently incorporates both **eggs and egg whites** as well as **psyllium husks**. Eggs add richness and moisture, but their proteins also coagulate during baking, contributing significantly to the loaf’s structure. The extra egg whites boost this structural support without adding excess fat (which can make things too tender or crumbly). Psyllium husks are another superstar binder in gluten-free baking. When hydrated, psyllium forms a gel-like substance that mimics the viscoelastic properties of gluten. It helps hold the dough together, makes it more pliable and less prone to cracking, and contributes to a pleasantly “chewy” texture often missing in gluten-free bread. Using whole psyllium husks can even add a subtle fibrous texture that feels more like traditional bread. The note about adjusting liquid if omitting psyllium highlights just how much moisture it absorbs and how critical it is for the dough’s hydration balance.
Sweetness Does More Than Taste Good
It might be tempting to reduce the sugar, but this recipe emphasizes its importance, and for good reason. In yeasted gluten-free baking, sugar isn’t just for sweetness in gluten free cinnamon raisin bread. It serves as crucial food for the yeast, activating it and providing the energy needed for a robust rise. Furthermore, sugar acts as a tenderizer by interfering with starch gelatinization and protein coagulation during baking, resulting in a softer crumb. Without enough sugar, the bread would likely be dense and dry rather than wonderfully soft and moist.
The Role of Enrichment (Butter)
The generous amount of butter and eggs classifies this dough as “enriched.” Enrichment is key to the desirable texture of this gluten free cinnamon raisin bread. Fats and proteins from the butter and eggs coat the flour particles and inhibit the formation of a tough structure. This leads to a softer, more tender crumb that stays moist longer, counteracting the tendency of gluten-free baked goods to dry out quickly.
Double Leavening Power
Notice the inclusion of both **instant yeast** and **baking powder**. Yeast provides the primary leavening, creating airy pockets and developing flavor over a longer proofing time. Baking powder, a chemical leavener, gives an extra boost of lift, particularly during the initial stages of baking. This combination ensures a good rise in a dough that lacks the inherent lifting power of gluten, contributing to the light texture of this gluten free cinnamon raisin bread.
Technique Matters
Beyond the ingredients, the techniques are vital. The initial high-speed kneading helps to fully hydrate the flour blend and activate the binders, creating a cohesive dough. The long proofing time allows the yeast to work effectively and flavors to develop before the cold fermentation. The cold refrigeration step is brilliant – it makes the enriched dough easier to handle for shaping and further improves flavor and texture as the flours and binders fully hydrate and stabilize the dough structure. The shaping method and the specific baking temperatures (high initial heat for oven spring, then lower for thorough cooking) ensure the loaf bakes through evenly while developing a beautiful crust without burning the sweet filling and raisins. Using an egg wash before adding the filling is a clever, simple trick to ensure the cinnamon sugar and raisins adhere properly, preventing them from falling out or creating large gaps in the swirl of your gorgeous gluten free cinnamon raisin bread.
A True Gluten-Free Success Story
By combining a tailored flour blend with powerful binders like psyllium and eggs, incorporating essential tenderizers and leaveners, and utilizing smart techniques like cold fermentation and strategic baking temperatures, this gluten free cinnamon raisin bread recipe overcomes the challenges of baking without gluten. It delivers a bread that is incredibly soft, moist, flavorful, and structurally sound enough to slice, toast, and slather with butter – just like the traditional version you might miss. This recipe is a testament to the fact that with the right approach, you can achieve spectacular results in gluten-free baking, making delicious gluten free cinnamon raisin bread a staple in your kitchen.
Transform Your Mornings with 33 FREE Gluten-Free Breakfasts!
Unlock delicious, easy-to-make recipes that will make you excited to start every single day. No more boring breakfasts, just pure flavor and joy!

Get Your FREE Breakfast Ebook Now!
(No credit card required. Instant download.)
Ingredients, Nutritional Information, and Additional Tips
Making delicious gluten free cinnamon raisin bread is a rewarding experience! The right ingredients are key to achieving that perfect texture and flavor. Here’s a breakdown of what you’ll need, the nutritional value, and how you can customize this recipe.
Ingredients You’ll Need
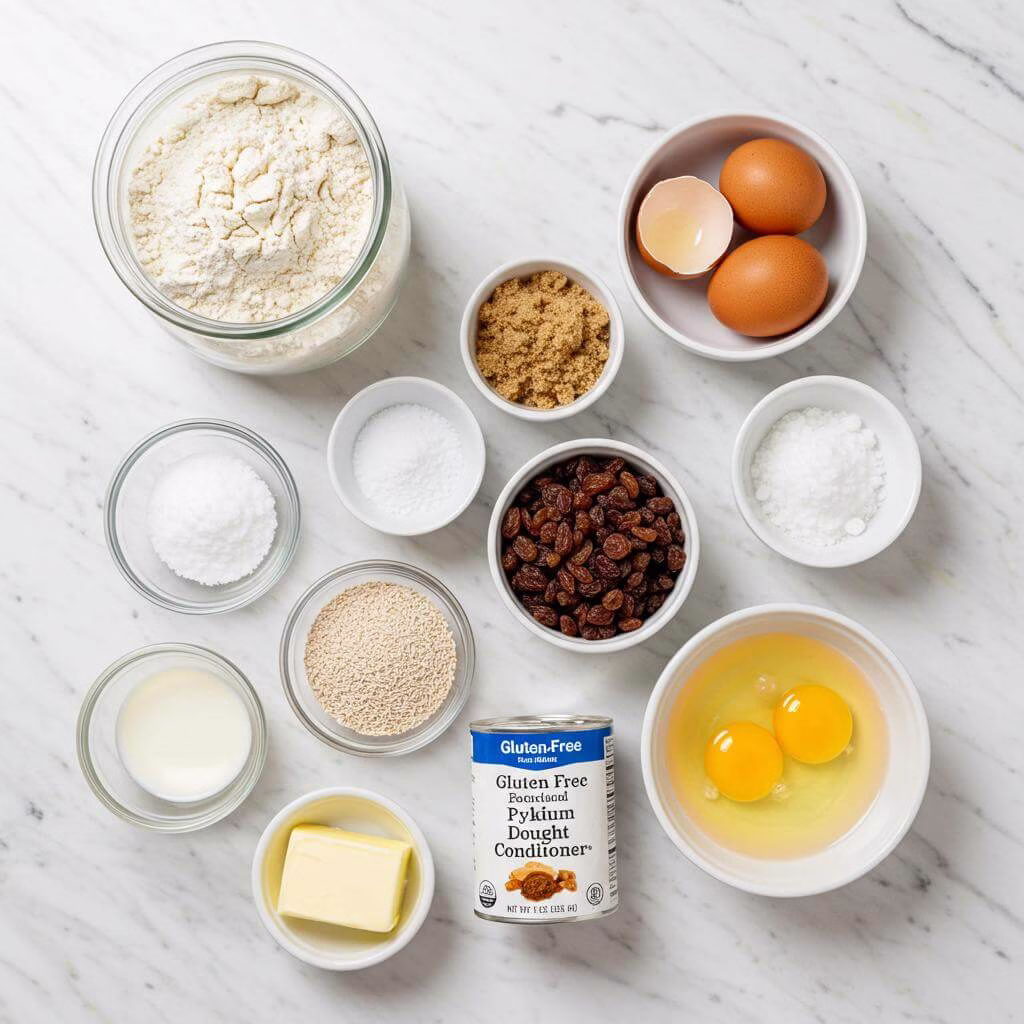
For this delightful gluten free cinnamon raisin bread, you will need the following ingredients, measured precisely:
* Enriched Dough:
* 1¼ cups (300ml) whole milk
* 2 large eggs, at room temperature
* 2 large (60ml) egg whites, at room temperature
* 1 cup (200g) granulated sugar
* 2 tbsp plus 1½ teaspoon (24g) instant yeast – *This is the leavening agent that helps the dough rise, giving the bread its light and airy texture.*
* 2 tbsp (10g) whole psyllium husks (optional) – *Psyllium husks act as a binder and provide structure in gluten-free baking, mimicking some properties of gluten. They also add fiber.* You can find whole psyllium husks on Amazon.
* 1 tablespoon gluten free dough conditioner (optional) – *Dough conditioners can help improve the texture, volume, and shelf life of gluten-free bread.* Look for gluten free dough conditioner available online.
* 3½ cups (490g) Kim’s gluten free bread flour blend – *Using a specifically formulated gluten-free bread flour blend is crucial for the success of this recipe. These blends are designed to mimic the properties of wheat flour in bread making.* Ensure you are using a reliable high-quality gluten free bread flour blend.
* 1¾ teaspoon baking powder – *Provides an additional lift to the dough, contributing to a lighter crumb.*
* 1 teaspoon salt – *Enhances flavor and helps control yeast activity.*
* ¾ cup (1½ sticks or 169g) butter, very soft or melted – *Adds richness, tenderness, and flavor.*
* 1 large egg, mixed with 1 tablespoon water for egg wash – *Used to create a beautiful, glossy brown crust and help the cinnamon-sugar mixture adhere.*
* Brown Sugar Cinnamon Filling:
* ½ cup (100g) light brown sugar – *Provides moisture and a rich, caramelized sweetness to the filling.*
* 4 teaspoon cinnamon – *The star spice that gives this bread its classic cozy flavor.* Keep your spice rack stocked with fresh ground cinnamon.
* 1 cup (160g) raisins – *Adds bursts of sweetness and chewiness throughout the bread.* Find your favorite raisins for baking.
Having the correct ingredients, especially a good gluten-free flour blend and psyllium husks, is fundamental for achieving the wonderful texture of this gluten free cinnamon raisin bread.
Nutritional Information & Benefits
While exact nutritional counts can vary based on specific ingredients and portion sizes, this gluten free cinnamon raisin bread offers several benefits within a gluten-free diet:
* **Gluten-Free:** The primary benefit is that this recipe is completely free from gluten, making it safe for individuals with Celiac disease or gluten sensitivity to enjoy freshly baked bread.
* **Fiber:** Ingredients like psyllium husks (if used) and certain gluten-free flour blends contribute dietary fiber. Fiber is essential for digestive health and can help you feel fuller for longer.
* **Protein:** Eggs provide a source of protein, which is important for building and repairing tissues.
* **Energy:** Carbohydrates from the flour, sugar, and raisins provide energy.
* **A Delicious Option:** Beyond specific numbers, the ability to bake and enjoy a classic like gluten free cinnamon raisin bread is a significant benefit, offering comfort food that can be challenging to find ready-made and gluten-free.
This recipe allows you to control the quality of ingredients, providing a wholesome alternative to store-bought options.
Substitutions, Variations & Tips
Here are some ways to adapt this gluten free cinnamon raisin bread recipe and helpful tips for success:
* Dairy-Free Option: To make this bread dairy-free, simply substitute the whole milk with a dairy-free alternative such as almond milk or soy milk. Similarly, replace the butter with a high-quality vegan butter substitute. These swaps should work well without significantly altering the bread’s structure.
* Psyllium Husks: Psyllium husks are recommended for their binding properties, but the recipe includes instructions for omitting them. If you choose to leave them out, you must reduce the milk content to 1 cup (240ml). If you have psyllium husk powder instead of whole husks, use 1 ½ tablespoon of the powder form. Note that results may vary slightly.
* Egg Substitutes: The original recipe notes state that eggs and extra egg whites are crucial for the texture and that egg substitutes may not work the same way. While common egg substitutes for baking include flax eggs (1 tbsp flax meal + 3 tbsp water per egg) or commercial egg replacers, using them in this enriched dough recipe may not yield the desired soft, pillowy texture. Proceed with caution if attempting this substitution.
* Flour Blend: This recipe specifically calls for “Kim’s gluten free bread flour blend.” Using a different blend, especially an all-purpose gluten-free blend, may drastically change the outcome as different blends have different compositions and hydration needs. For best results with this specific gluten free cinnamon raisin bread, it is strongly recommended to use the specified blend.
* Stand Mixer Alternatives: A stand mixer with a dough hook is ideal due to the thick nature of the dough. However, you might be able to make the dough with a heavy-duty handheld mixer using dough hook attachments or even a Danish dough whisk, though these will require significant manual effort to ensure the dough is smooth and lump-free. Explore your options for stand mixers or Danish dough whisks.
* Adding Nuts: For a textural contrast, consider adding chopped nuts like walnuts or pecans to the brown sugar and raisin filling. About ½ cup would be a good starting point.
* Other Dried Fruits: While classic cinnamon raisin bread uses raisins, feel free to experiment with other dried fruits like dried cranberries, chopped dried apricots, or dried blueberries.
* Chocolate Swirl: For a more decadent treat, you could add mini chocolate chips along with or instead of the raisins.
* Egg Wash Alternative: If you cannot use eggs, you could try brushing the loaf with melted vegan butter or a plant-based milk alternative mixed with a touch of maple syrup before baking for a slightly different finish and color.
* Baking with Confidence: Use a digital thermometer to check the internal temperature of the bread; 190-200°F (88-93°C) is the target to ensure it is fully baked through. A reliable digital food thermometer is a game-changer in baking.
* Proper Cooling: Allow the bread to cool completely on a wire cooling rack in the pan before slicing. This allows the internal structure to set properly, preventing a gummy texture.
* Storage: Store the cooled gluten free cinnamon raisin bread at room temperature in a zip-top bag for 2-3 days. For longer storage, slice the loaf, flash freeze the slices on a baking sheet, then transfer them to a freezer-safe bag or wrap them individually. It freezes beautifully for up to three months.
Enjoy the process of making this fantastic gluten free cinnamon raisin bread and savor every gluten-free bite!
Essential Equipment for This Recipe
To prepare this delicious recipe, you’ll need the following kitchen tools:
- Mixing Bowls – A set of good quality mixing bowls is essential for combining your ingredients.
Find Mixing Bowls on Amazon - Measuring Cups and Spoons – Precise measurements are key for baking success.
Find Measuring Cups and Spoons on Amazon - Baking Sheets – For even baking and perfect results.
Find Baking Sheets on Amazon - Whisks – Perfect for mixing and blending ingredients
Find Whisks on Amazon - Spatulas – Essential for folding and scraping bowls clean
Find Spatulas on Amazon - Food Processors – To easily blend ingredients for a smooth texture.
Find Food Processors on Amazon - Saucepans – To cook ingredients in a saucepan
Find Saucepans on Amazon - Chef’s Knives – A high-quality knife is essential for all your chopping needs.
Find Chef’s Knives on Amazon - Cutting Boards – Protect your countertops while you prep your ingredients.
Find Cutting Boards on Amazon
- Begin by Preparing the Dough: In the bowl of your stand mixer (or a large bowl if mixing by hand with a hand mixer with dough hooks or Danish dough whisk), add the measured milk, followed by the eggs, egg whites, yeast, optional whole psyllium husks (adjusting milk if omitting or using powder per recipe notes), and sugar. Sugar is crucial here not just for sweetness, but also as food for the yeast and a tenderizer for this specific gluten-free dough, so avoid reducing it. Next, add the optional dough conditioner (if using), your specific gluten-free bread flour blend, baking powder, and salt.
- Mix and Knead the Dough: Attach the dough hook to your stand mixer. Turn the mixer to low speed and gradually add the soft or melted butter. Once the butter is incorporated, increase the speed to medium and let the mixer knead the dough for a full 5 minutes. This helps develop the structure needed for a soft gluten free cinnamon raisin bread loaf. If mixing by hand, ensure all ingredients are thoroughly combined until you have a smooth dough with no dry pockets or lumps.
- First Proofing (Bulk Fermentation): Cover the mixing bowl loosely, perhaps with plastic wrap or a clean kitchen towel. Place the covered bowl in a warm, draft-free area. Let the dough rise (“proof”) for 2 hours, or until it has noticeably doubled in volume. This initial rise is important for flavor and texture development in gluten-free yeast breads.
- Chill the Dough: After the first proofing, place the covered bowl of dough into the refrigerator. Chill the dough for at least 6 hours, and ideally, leave it overnight. Refrigerating the dough makes it much easier to handle and shape, which is especially helpful for successfully creating the swirl in this ultimate gluten free cinnamon raisin bread.
- Prepare the Filling and Raisins: While the dough is chilling or just before you retrieve it, combine the measured light brown sugar and cinnamon in a small bowl. Give it a good stir to ensure the cinnamon is evenly distributed throughout the sugar. Set this luscious filling mixture aside. Measure out the raisins into another small bowl, ready for assembly. Do not soak the raisins; they will soften during baking within the dough.
- Prepare the Dough for Shaping: Remove the chilled dough from the refrigerator. Turn it out onto a well-floured surface. Knead the dough gently for a minute or two until it becomes smooth and any large air bubbles from the chilling process are pushed out. If making two loaves, divide the dough cleanly in half using a sharp knife or a bench scraper. Keep one half covered while you work with the other, especially if you don’t have a large workspace.
- Roll Out the Dough: Take one half of the dough (or both, if you have space) and roll it out using a rolling pin. Aim to create a large rectangle that is roughly ¼-inch thick. The precise dimensions of the rectangle aren’t as critical as the thickness; just make it large enough to spread the filling and roll up.
- Apply the Egg Wash: In a separate small bowl, whisk together one large egg with one tablespoon of water and a tiny pinch of salt. This creates the egg wash. Using a pastry brush, generously brush this egg wash all over the surface of the rolled-out dough rectangle. This wash acts as the “glue” that helps the filling adhere beautifully.
- Sprinkle with Filling and Raisins: Evenly sprinkle the brown sugar and cinnamon mixture you prepared earlier over the entire surface of the dough, right on top of the egg wash. You can lightly press the mixture down onto the wet surface to help it stick better. Follow by scattering the raisins evenly over the cinnamon-sugar layer.
- Roll Up the Loaf: Starting from one of the longer edges of the rectangle, begin to tightly roll the dough up, much like you would a jelly roll. Roll it as tightly as you possibly can. Once rolled into a log shape, pinch the seam along the bottom to seal it securely. This tight rolling is key to getting a nice swirl in your final gluten free cinnamon raisin bread loaf.
- Cut and Shape the Loaf: Place the rolled log seam-side down. Using a sharp knife, carefully cut the log in half horizontally (widthwise) so you now have two equal-sized shorter rolls. Arrange these two rolls on your clean counter or a baking mat in a large “X” shape, with one roll crossing over the other in the center. Carefully pick up the ends where they cross and gently twist them together a couple of times. You should now have a twisted loaf shape. Repeat steps 6-10 with the second half of your dough if making two loaves.
- Second Proofing (Final Rise): Line your loaf pan(s) with parchment paper for easy removal. Carefully lift your twisted loaf and place it into the prepared loaf pan. Cover the pan loosely with plastic wrap to prevent a skin from forming. Place the covered loaf in a warm, draft-free area to rise again. This final rise usually takes about an hour, but could take longer depending on the temperature and humidity in your kitchen. Let it rise until it has nearly doubled in size and has risen visibly over the top of the pan, indicating it’s ready for baking.
- Prepare for Baking: Just before placing the loaf in the oven, brush the top and sides lightly with any leftover egg wash from step 7. This helps create a beautiful golden crust.
- Initial Baking: Preheat your oven to 400°F (200°C). Place the loaf pan(s) in the preheated oven and bake for 15 minutes at this higher temperature. This initial blast of heat helps the loaf set and achieve a nice lift.
- Finish Baking: After the initial 15 minutes, carefully remove the loaf pan(s) from the oven and loosely tent the top(s) with aluminum foil. This prevents the crust from getting too dark. Reduce the oven temperature to 350°F (175°C). Return the pan(s) to the oven and continue baking for another 45 to 60 minutes. To confirm the bread is fully baked, insert a digital instant-read thermometer directly into the center of the loaf. It should register between 190°F and 200°F (88°C-93°C) when done.
- Cooling and Storage: Once baked, remove the loaf pan(s) from the oven and place them on a wire cooling rack. Allow the bread to cool completely in the pan(s) before attempting to slice it. Slicing warm gluten-free bread can result in a gummy texture inside. Once cooled, this delicious gluten free cinnamon raisin bread can be stored well-wrapped at room temperature for 2-3 days. For longer storage, slice the cooled bread, flash freeze the slices on a baking sheet until firm (to prevent sticking), and then transfer them to a freezer bag or wrap them tightly for up to three months. Enjoy your homemade gluten free cinnamon raisin bread!
Expert Tips for Your Perfect Gluten Free Cinnamon Raisin Bread
Ready to bake a truly spectacular loaf of gluten free cinnamon raisin bread? Gluten-free baking can sometimes feel tricky, but with a few specific techniques and insights, you can achieve results that rival any traditional loaf. Here are my top tips to ensure your gluten free cinnamon raisin bread turns out soft, delicious, and perfectly swirled every single time. Think of these as your secret weapons for success!
- Use the Specified Flour Blend and Measure Accurately: This recipe relies on a specific gluten-free bread flour blend designed for structure and texture. Using a different blend or a general all-purpose gluten-free flour will likely yield different results, potentially a crumbly or dense loaf. Weighing your flour (490g) is the most accurate way to ensure you have the correct amount, as scooping can pack flour and result in too much. This is crucial for the hydration balance in gluten-free doughs.
- Mind Your Ingredient Temperatures: Eggs, egg whites, and milk should ideally be at room temperature. This helps them emulsify better with the other ingredients and creates a more hospitable environment for the yeast to become active and work its magic, leading to a better rise in your gluten free cinnamon raisin bread dough.
- Don’t Skimp on the Kneading Time: While gluten-free dough doesn’t develop gluten like traditional dough, the 5 minutes of kneading with the stand mixer hook is essential. This process helps distribute the hydration evenly, fully activates the psyllium (if using) and other binders, and develops the structure provided by the flour blend and eggs. The dough should become cohesive and smooth.
- The Cold Proof is Your Friend: Refrigerating the dough for at least 6 hours (or overnight) after the initial proof is key for managing sticky gluten-free dough. Cold dough is much easier to handle, roll out, and shape into that beautiful swirl for your gluten free cinnamon raisin bread. It also deepens the flavor profile.
- Flour Your Surface Liberally (But Wisely): When it comes time to roll out the dough, don’t be afraid to flour your surface and your hands well. Gluten-free dough tends to be stickier than wheat dough. However, try not to incorporate too much extra flour into the dough itself, as this can dry out the final loaf. Use a bench scraper to help lift and manipulate the dough if needed.
- Press That Filling In: The egg wash helps the cinnamon-sugar mixture and raisins adhere, but gently pressing them into the dough surface after sprinkling helps even more. This prevents most of the filling from falling out when you roll the loaf, ensuring deliciousness in every slice of your gluten free cinnamon raisin bread.
- Roll Tightly, Twist Gently: When forming the loaf, roll the rectangle up tightly like a jelly roll. This creates distinct cinnamon swirls. The twisting step is for creating that beautiful babka-like appearance; twist just enough to intertwine the two halves without tearing the dough excessively.
- Patience During the Second Rise (Proof): The final rise in the pan is crucial for a light texture. Place the loaf in a warm, draft-free spot. Warmth helps yeast activity in gluten-free dough, but avoid overly hot places, which can kill the yeast. The time given is an estimate; watch the dough itself – it should nearly double in size and rise visibly above the rim of the pan.
- Embrace the Foil Tent: Baking initially at a higher temperature gives the loaf a good oven spring, while covering with foil and reducing the heat prevents the top from over-browning before the inside is cooked through. This two-stage baking is excellent for ensuring a moist interior in your gluten free cinnamon raisin bread.
- Cool COMPLETELY Before Slicing: This might be the hardest part, but it’s non-negotiable for most gluten-free breads, especially enriched ones like this gluten free cinnamon raisin bread. As the bread cools, starches set, and steam trapped inside is released. Slicing too early will result in a gummy, dense texture. Patience is rewarded with a clean slice and perfect texture!
Common Mistakes to Avoid When Baking Gluten Free Cinnamon Raisin Bread
Even experienced bakers can sometimes make small errors that significantly impact gluten-free results. Being aware of these common pitfalls will help you get the best loaf of gluten free cinnamon raisin bread possible.
- Substituting the Flour Blend: As mentioned above, the specific blend matters hugely. Gluten-free flours have different absorption rates and protein levels. Using a general mix not formulated for enriched bread can lead to a flat, dense, or crumbly loaf instead of the desired soft texture of this gluten free cinnamon raisin bread. Prevention: Stick to the recommended flour blend for guaranteed results.
- Not Cooling the Bread Completely: This is a classic gluten-free mistake. The bread continues to cook and set as it cools. Slicing while warm collapses the internal structure and releases steam too quickly, resulting in a gummy, unpleasant texture. Prevention: Allow the loaf to cool on a wire rack in its pan for at least 2-3 hours, or until completely cool to the touch, before slicing.
- Skipping the Psyllium Husk (Without Adjusting Liquid): Psyllium husk acts as a crucial binder and structure provider in many gluten-free bread recipes, mimicking some of the properties of gluten itself. If you omit it without reducing the liquid as specified in the recipe notes, your dough will be too wet and difficult to handle, and the final bread may lack structure and have a poor texture. Prevention: Either use the psyllium husk or ensure you follow the specific liquid reduction noted in the recipe if omitting it.
Frequently Asked Questions
Why is using the specific gluten free bread flour blend so important for this recipe?
That’s a great question! The blog post emphasizes that using the recommended gluten free bread flour blend is crucial for getting the best results with this gluten free cinnamon raisin bread. Different gluten-free flour blends have varying compositions, especially in terms of the starches and binders they use. These differences significantly impact how the dough absorbs liquid, behaves during mixing and rising, and the final texture of the baked bread. Using a different blend, particularly an all-purpose gluten-free blend which might not be formulated for yeast breads, could lead to drastically different results, and likely not the soft, pillowy texture described here.
I noticed the recipe requires chilling the dough for a long time. Why is this step needed?
Yes, the recipe calls for chilling the dough for at least 6 hours, or preferably overnight, after the first rise. This step is really helpful because it makes the gluten-free dough much firmer and easier to handle. Gluten-free doughs can sometimes be stickier or softer than traditional wheat doughs. Chilling allows the ingredients to hydrate further and solidifies the fats, making it significantly easier to roll out into the rectangle shape, spread the filling, and create that beautiful swirl for your gluten free cinnamon raisin bread without it becoming messy or tearing.
Can I make this gluten free cinnamon raisin bread if I need it to be dairy-free or egg-free?
Good news if you need a dairy-free option! The blog post notes that you can successfully make this gluten free cinnamon raisin bread dairy-free by using a dairy-free milk alternative (like almond or soy milk) and substituting the butter with a high-quality vegan butter substitute. For egg substitutes, the recipe is less optimistic. It specifically states that the eggs and extra egg whites are very important for the texture of this enriched dough, and egg substitutes may not work the same way to achieve the desired soft, pillowy crumb. The recommendation is to proceed with caution if attempting to substitute the eggs.
The recipe mentions psyllium husks but says they’re optional. Do I really need them, and what if I have powder instead of whole husks?
Psyllium husks act as a binder in gluten-free baking, adding structure and a bit of fiber, sometimes even a ‘wheaty’ taste as mentioned. While they are optional in this gluten free cinnamon raisin bread, the recipe does provide instructions depending on whether you use them or not. If you choose to omit the psyllium husks entirely, you’ll need to slightly reduce the milk amount to 1 cup (240ml). If you have psyllium husk powder instead of whole husks, you should use 1 ½ tablespoons of the powder form. Just be aware that results might vary slightly if you make a substitution or omission here.
Why do I brush the dough with egg wash before adding the cinnamon mixture and raisins?
The egg wash (a mix of egg, water, and salt) is used specifically to help the brown sugar-cinnamon mixture and the raisins stick to the rolled-out dough. When you brush the dough with this wash, it creates a slightly sticky surface. Sprinkling the dry filling ingredients onto this wet surface helps them
adhere firmly, preventing them from falling out when you roll up the dough and ensuring your gluten free cinnamon raisin bread has a nice, even distribution of filling throughout the swirl.
How should I store this delicious bread, and can I freeze slices for later?
Once your gluten free cinnamon raisin bread has cooled completely (which is important for the texture!), you can store it at room temperature. The blog post suggests keeping it well-wrapped in a zip-top bag, where it should stay fresh for about 2-3 days thanks to the enrichment in the dough. For longer storage, absolutely! The recipe recommends slicing the cooled bread first. To prevent the slices from sticking together, flash freeze them in a single layer on a baking sheet until firm. Once frozen, transfer the slices to a freezer bag or wrap them tightly. It freezes beautifully and can be stored this way for up to three months, ready for toasting whenever you like!
The recipe notes say not to soak the raisins. Isn’t soaking usually recommended?
It might seem counterintuitive, as soaking raisins is common in some baking applications to plump them up. However, for this specific gluten free cinnamon raisin bread recipe, the post advises against soaking the raisins. The reason given is that soaking the raisins will make the bread soggy in the areas where the wet raisins touch the dough. The moisture from the dough and the baking process will naturally soften the raisins as the bread bakes, so soaking is unnecessary and could actually be detrimental to the final texture.