Gluten-Free Protein Cookies: Your New Go-To Healthy Treat!
Hello, fellow gluten-free foodies! Are you on the hunt for a truly satisfying snack that packs a protein punch without tasting like cardboard? We’ve all been there, right? Trying countless store-bought protein bars and cookies, only to be met with a dry, crumbly texture or that unmistakable, overpowering protein powder taste. Well, get ready to say goodbye to disappointment because these gluten free protein cookies are about to change your snacking game forever!
Here at Be Gluten Free, we believe that living a gluten-free lifestyle shouldn’t mean sacrificing taste or texture, especially when it comes to much-loved treats like cookies. That’s why we were so excited to perfect this recipe for gluten free protein cookies. Our goal was simple: to create a cookie that’s not only loaded with protein but is also irresistibly delicious – think soft, chewy, and packed with flavor. These aren’t just “good for gluten-free” cookies; they’re genuinely amazing cookies, period! Whether you need a post-workout refuel, a healthy afternoon pick-me-up, or a guilt-free dessert, these cookies are your answer. They prove that you can absolutely have a nutritious treat that supports your healthy lifestyle and tastes incredible. If you’re a fan of classic baked goods, you might also love our moist gluten-free banana bread for another comforting treat.
Crafting the perfect gluten free protein cookie takes a little know-how, especially when it comes to achieving that ideal texture. We’ve experimented to find the best balance, ensuring they have a delightful chewiness without being too dense or too cakey – they’re even fantastic for making homemade gluten-free ice cream sandwiches! The secret often lies in the choice of protein powder and your nut butter – we’ll dive into tips for picking the best ones to ensure your cookies turn out fantastic every time. These are more than just cookies; they’re a delightful way to add extra protein to your diet without feeling like you’re compromising. For those days when you need a quick, no-bake option, our coconut date energy balls are another fantastic gluten-free snack. But when a warm, freshly baked cookie is calling your name, this gluten free protein cookies recipe is the one you’ll turn to again and again. Forget those disappointing store-bought options; homemade is where the heart (and the best flavor) is, just like with our ever-popular chewy gluten-free chocolate chip cookies – though these add that fantastic protein boost!
Why These Gluten-Free Protein Cookies Are Uniquely Wonderful
Let’s dive deep into the magic that makes these particular gluten free protein cookies stand out from the crowd. Crafting delicious gluten-free baked goods, especially when adding a significant amount of protein powder, can be a delicate dance. Protein powder is notorious for absorbing moisture and potentially leading to dry, crumbly, or tough results. Gluten-free flours, lacking gluten’s elastic network, often present their own set of structural challenges. So, how does this recipe manage to create delightful gluten free protein cookies that are chewy, flavorful, and satisfying?
The Symphony of Ingredients: Building Structure and Moisture
The success of these gluten free protein cookies lies in the careful selection and balance of ingredients. It’s a masterclass in using alternative components to build the desired cookie architecture and ensure ample moisture:
- The Power of Protein Powder (Specifically Whey): The recipe wisely calls for a *fine* vanilla whey protein powder. Whey protein, particularly when finely milled, integrates smoothly into the dough without creating a gritty texture. While protein powder absorbs liquid, the high fat content from butter and peanut butter, combined with the liquid sweetener and egg, provides enough moisture to counteract potential dryness. The protein itself also contributes to the cookie’s structure, offering a different kind of ‘scaffolding’ in the absence of gluten, helping the cookies hold their shape and giving them a satisfying chew. Choosing a vanilla flavor also adds a layer of deliciousness that complements the other ingredients.
- The Role of the 1:1 Gluten-Free Flour Blend: A good 1:1 gluten-free flour blend is engineered to mimic the behavior of wheat flour. These blends typically contain a mix of starches (like rice, potato, tapioca) for tenderness and structure, and sometimes other flours (like sorghum or millet) for flavor and nutrition. Crucially, most 1:1 blends contain a binder like xanthan gum or psyllium husk. This binder is essential in gluten-free baking to provide the necessary cohesion and elasticity that gluten would normally offer. In these gluten free protein cookies, the blend works alongside the protein powder and egg to create a dough that doesn’t crumble and holds together beautifully during baking, resulting in a nicely formed cookie.
- Fats for Flavor, Texture, and Moisture: The combination of unsalted butter and protein-added peanut butter is key. Butter provides richness and helps with spread and tenderness. Peanut butter adds incredible flavor, but also contributes fat and protein, further aiding in structure and preventing dryness. Using a “protein-added” or smooth, well-mixed natural peanut butter ensures a consistent fat-to-solids ratio, which is vital for predictable results and preventing a dry outcome. These fats coat the starch and protein particles, inhibiting excessive structure development and keeping the cookies tender.
- Sweeteners Doing Double Duty: The recipe uses both a liquid sweetener (allulose, honey, or maple syrup) and a granular one (coconut sugar). Liquid sweeteners contribute moisture and promote chewiness, while granular sugars help with spread, tenderness, and provide those lovely caramelized edges. Coconut sugar not only adds a warm, slightly Estadística flavor but also retains moisture effectively compared to white sugar. This combination is superior to using just one type of sweetener for achieving the desired texture in gluten free protein cookies.
- The Essential Egg: A large egg acts as a primary binder, bringing all the ingredients together. It adds richness, moisture, and contributes to the cookie’s structure through protein coagulation as it bakes. It also helps incorporate air during the creaming process, contributing to a lighter (but still chewy) texture.
Method Matters: Hydration and Perfect Baking
Beyond the ingredients, the method plays a significant role in the success of these gluten free protein cookies:
- Creaming the Wet Ingredients: Starting by creaming butter, peanut butter, and sugars incorporates air into the mix. This trapped air expands during baking, contributing to the cookie’s lift and texture, which is especially important when gluten isn’t there to provide structure.
- Resting the Dough: The instruction to set the dough aside while the oven preheats is simple but crucial. This resting time allows the gluten-free flour blend and the protein powder ample opportunity to hydrate fully from the liquid ingredients. Proper hydration prevents a gritty texture and allows the starches and binders to begin their work, resulting in a smoother, more cohesive dough that bakes into a better cookie.
- Precise Baking Time and Temperature: Baking at 350°F for a short duration (8-9 minutes) and rotating the trays ensures the cookies bake evenly and are removed from the oven when they are “just set.” This prevents over-baking, which is the enemy of moisture and tenderness, particularly in cookies containing protein powder. The goal is a cookie that finishes setting as it cools, resulting in that coveted soft, chewy interior and slightly firm edge.
Why These Gluten Free Protein Cookies Excel
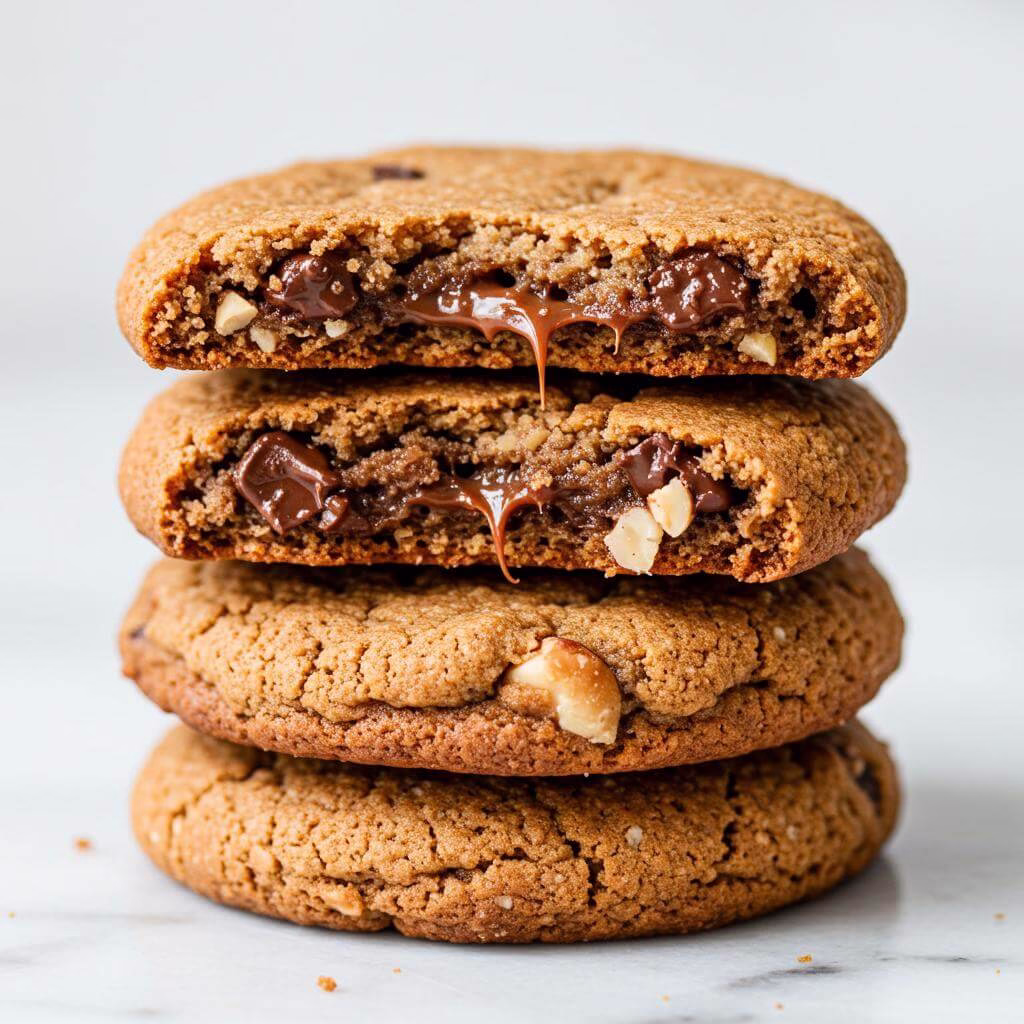
This recipe isn’t just functional; it’s designed for exceptional enjoyment. By combining a fine protein powder with a quality 1:1 gluten-free blend and ample fats and moisture-retaining sugars, it cleverly sidesteps the common pitfalls of both gluten-free baking (dryness, crumbling) and protein baking (chalkiness, toughness). The result is a batch of gluten free protein cookies that are deeply flavorful thanks to the peanut butter, chocolate, and coconut sugar, perfectly textured with a satisfying chew, and structurally sound. They prove that following a gluten-free lifestyle and boosting your protein intake doesn’t require sacrificing taste or texture, making these gluten free protein cookies a truly winning recipe.
Transform Your Mornings with 33 FREE Gluten-Free Breakfasts!
Unlock delicious, easy-to-make recipes that will make you excited to start every single day. No more boring breakfasts, just pure flavor and joy!

Get Your FREE Breakfast Ebook Now!
(No credit card required. Instant download.)
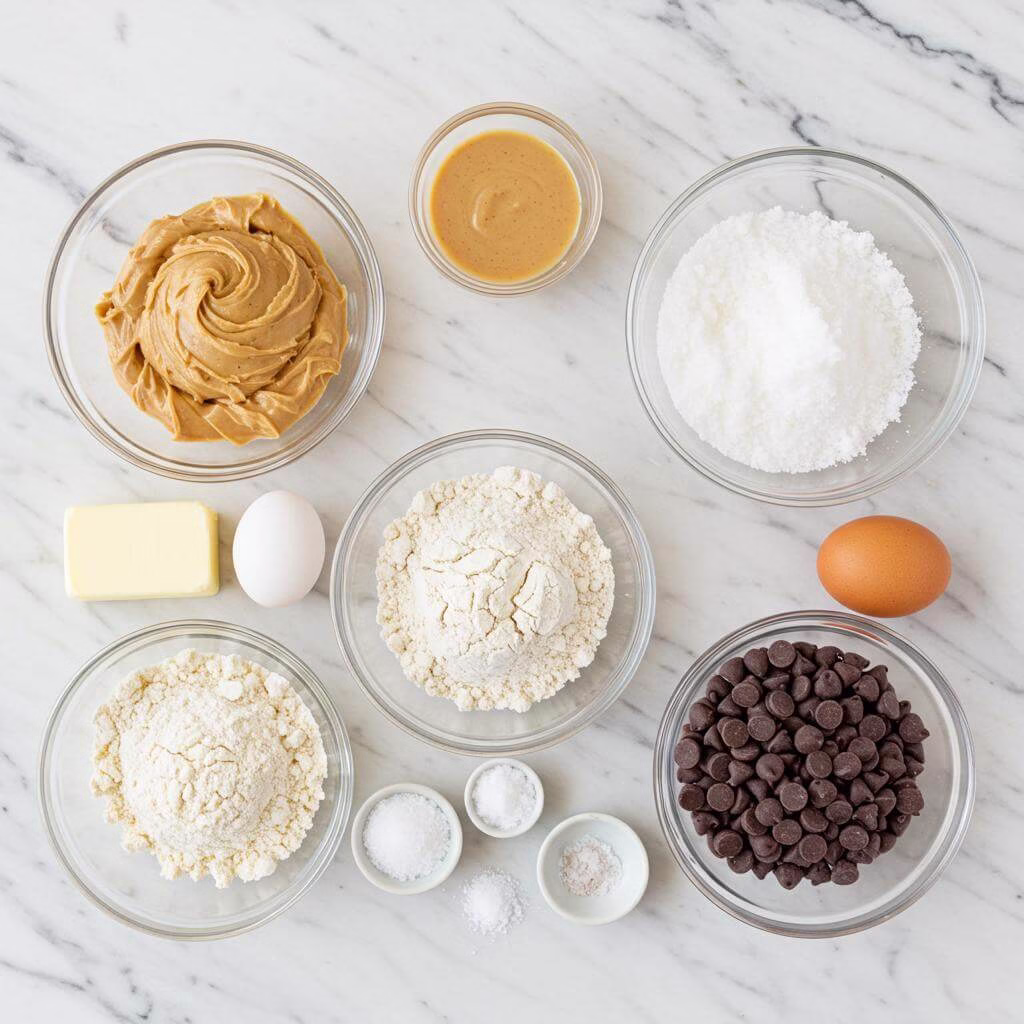
Ingredients
Crafting delicious gluten-free protein cookies starts with selecting the right ingredients. Each component plays a vital role in achieving the perfect texture, flavor, and nutritional profile. Here’s exactly what you’ll need:
- 80 grams unsalted butter: Provides richness and helps create a tender texture.
- 80 grams protein-added peanut butter: Adds flavor, moisture, healthy fats, and, of course, extra protein! Any smooth peanut butter or nut butter will work, but ensure natural types are well-mixed. For a great selection, check out smooth peanut butter options on Amazon.
- 45 grams liquid allulose, honey or maple syrup: Acts as a primary liquid sweetener, contributing to moisture and binding. Use whichever aligns with your dietary preference; allulose is a calorie-free option, while honey and maple syrup offer distinct flavors. Find various liquid sweeteners on Amazon.
- 100 grams coconut sugar: A less refined sugar option that provides sweetness and contributes to the browning and chewy texture of the cookies. It has a slight caramel note.
- 1 large egg: Acts as a binder, helping to hold the cookies together and adding structure.
- 85 grams vanilla whey protein powder: This is the star ingredient for boosting protein content. Using a fine vanilla whey powder is recommended as it blends seamlessly into the dough and adds flavor without grittiness. High-quality vanilla whey protein powders specifically for baking are excellent choices.
- 85 grams 1:1 gluten-free flour blend: This blend is specifically formulated to replace wheat flour cup-for-cup in recipes. It typically includes a mix of rice flours, starches (like potato or tapioca), and sometimes a binder like xanthan or guar gum (though you’ll notice this recipe doesn’t call for straight xanthan gum, relying on the blend and other ingredients for structure). Using a reliable 1:1 gluten-free flour blend is crucial for the success of these gluten free protein cookies.
- ½ teaspoon baking powder: A leavening agent that helps the cookies rise slightly and spread.
- ½ teaspoon baking soda: Another leavening agent that reacts with acidic ingredients (like brown sugar or peanut butter) to aid in lift and spread, also contributing to browning.
- ¼ teaspoon salt: Enhances the overall flavor profile and balances the sweetness.
- 60 grams Lily’s chocolate chips or chunks: Adds classic cookie flavor and texture. Using a lower-sugar option like Lily’s keeps the overall sugar content down while still providing delightful chocolatey goodness. Explore gluten free sugar free chocolate chips on Amazon.
Nutritional Information
These gluten free protein cookies aren’t just delicious; they also offer some fantastic nutritional benefits, especially for those seeking higher protein options while avoiding gluten. Based on the provided information, each serving offers:
- Calories: 195 kcal
- Carbohydrates: 22g
- Protein: 10g
- Fat: 10g
- Saturated Fat: 4g
- Polyunsaturated Fat: 0.2g
- Monounsaturated Fat: 1g
- Trans Fat: 0.2g
- Cholesterol: 15mg
- Sodium: 111mg
- Potassium: 19mg
- Fiber: 2g
- Sugar: 6g
- Vitamin A: 167IU
- Calcium: 13mg
- Iron: 0.5mg
These gluten free protein cookies stand out due to their significant protein content (10g per cookie!), making them a much more satisfying snack than traditional cookies. They are naturally gluten-free, making them safe for individuals with celiac disease or non-celiac gluten sensitivity. The inclusion of fiber also contributes to digestive health. The use of alternatives like coconut sugar and lower-sugar chocolate chips helps keep the overall sugar content relatively low compared to many store-bought or conventional cookies.
Substitutions, Variations & Additional Tips
One of the best things about making your own gluten free protein cookies is the flexibility! Feel free to experiment based on your dietary needs and taste preferences. Here are some ideas:
Ingredient Swaps & Substitutions:
- Protein Powder: While whey is recommended for texture here, you *can* try using a high-quality plant-based protein powder (like pea or brown rice protein). Be aware that plant-based proteins absorb liquid differently and can sometimes result in a drier or denser cookie. You might need to slightly increase the liquid sweetener or add a splash of plant milk to achieve the right dough consistency. Explore plant based protein powders for baking on Amazon.
- Nut Butter: Almond butter, cashew butter, or even sunflower seed butter (for nut allergies) can be substituted for peanut butter. The flavor will change, but the texture should be similar, provided you use a smooth, well-mixed variety. Find various alternative nut and seed butters on Amazon.
- Sweetener: For liquid sweeteners, agave nectar or sugar-free syrups could potentially work, but may alter the texture or sweetness level. For the coconut sugar, you could try brown sugar (if not concerned about it being less refined) or a granular sugar substitute blend (like erythritol/stevia blends), though this might affect the chewiness and spread.
- Butter: For a dairy-free option, use a 1:1 dairy-free butter substitute. This swap should work well in most cookie recipes like these gluten free protein cookies. Look for dairy free butter substitutes for baking on Amazon.
- Egg: A flax egg (1 tbsp flaxseed meal + 3 tbsp water, mixed and left to gel) can often substitute for an egg in cookies. This may slightly change the texture, making the cookies a bit denser.
- Chocolate Chips: Swap Lily’s for regular chocolate chips (dairy or dairy-free), white chocolate chips, or even peanut butter chips for different flavor combinations.
Creative Variations:
- Add Spices: Stir in ½ teaspoon of cinnamon or a pinch of nutmeg with the dry ingredients for a warmer flavor profile.
- Extracts: A few drops of almond extract or a swirl of peppermint extract can create exciting new flavors.
- Mix-ins: Fold in chopped nuts (pecans, walnuts), shredded coconut, or dried cranberries along with the chocolate chips.
- Roll in Sugar: For extra sparkle and a slightly crispier edge, roll the scooped dough balls in granulated sugar or coconut sugar before flattening.
- Make Them ‘Kiss’ Cookies: Press a sugar-free chocolate kiss or a square of your favorite chocolate onto the center of each cookie immediately after they come out of the oven.
Additional Tips:
- Measure Accurately: Especially in gluten-free and protein baking, using a kitchen scale for dry ingredients (like flour and protein powder) is highly recommended for best results. Precision is key to getting the right texture for your gluten free protein cookies. Find a reliable kitchen scale on Amazon.
- Don’t Overmix: Once you add the dry ingredients, mix only until just combined to avoid developing toughness (though less of an issue with GF flour, still a good habit).
- Chilling Dough: While this recipe includes a resting time while the oven preheats, a longer chill time (30-60 minutes in the fridge) can sometimes improve the texture and reduce spread, especially if using very soft peanut butter or butter alternatives.
- Perfect for Ice Cream Sandwiches: As mentioned, the final texture of these gluten free protein cookies makes them absolutely perfect for creating homemade ice cream sandwiches. Just cool completely before adding your favorite gluten-free ice cream!
- Storage: Store baked cookies in an airtight container at room temperature for a few days, or in the refrigerator for up to a week. They also freeze well.
Enjoy baking and personalizing your batch of delicious gluten free protein cookies!
Essential Equipment for This Recipe
To prepare this delicious recipe, you’ll need the following kitchen tools:
- Mixing Bowls – A set of various sizes is perfect for different stages of prep.
Find Mixing Bowls on Amazon - Measuring Cups and Spoons – Precise measurements are key for consistent results.
Find Measuring Cups and Spoons on Amazon - Baking Sheets – Essential for baking and roasting.
Find Baking Sheets on Amazon - Whisks – Perfect for beating eggs and incorporating air into mixtures.
Find Whisks on Amazon - Spatulas – Ideal for folding and mixing ingredients gently.
Find Spatulas on Amazon - Food Processors – Speeds up chopping and blending ingredients.
Find Food Processors on Amazon - Saucepans – Necessary for heating liquids and making sauces.
Find Saucepans on Amazon - Chef’s Knives – A versatile tool for chopping, slicing, and dicing.
Find Chef’s Knives on Amazon - Cutting Boards – Protect your countertops while preparing ingredients.
Find Cutting Boards on Amazon
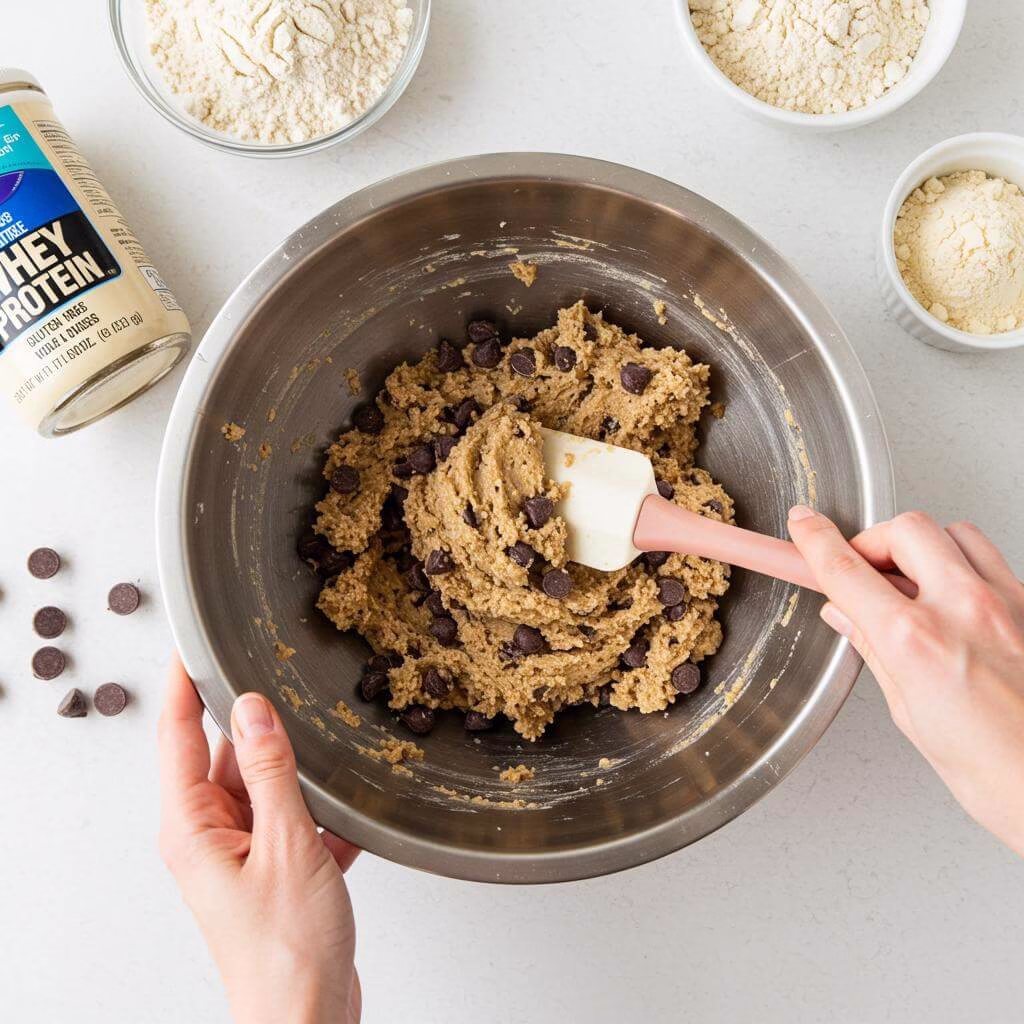
- Begin by combining all of your dry ingredients in a medium bowl. This includes the vanilla whey protein powder, the 1:1 gluten-free flour blend, baking powder, baking soda, and salt. It’s a good idea to whisk or sift these ingredients together thoroughly to ensure they are evenly distributed. This prevents clumps of leavening agent or salt and guarantees your gluten free protein cookies rise properly and have consistent flavor. Using a good quality vanilla whey protein powder that is finely milled is recommended for the best texture and flavor in your gluten free protein cookies. You can find durable whisk sets for baking online.
- In a separate, larger bowl, combine the wet ingredients: the softened unsalted butter, protein-added peanut butter (or your chosen smooth peanut/nut butter – remember to stir natural nut butters very well!), liquid allulose, honey or maple syrup, and coconut sugar. Use an electric mixer or a strong whisk to cream these ingredients together. Beat until the mixture is light, fluffy, and well-combined. Ensure your butter is at room temperature for easier creaming. This creaming step is vital for incorporating air and creating a tender crumb in your finished gluten free protein cookies. A reliable electric hand mixer can make this process much easier.
- Add the large egg to the creamed mixture. Continue mixing until the egg is fully incorporated and the mixture is smooth and homogenous. Scrape down the sides of the bowl as needed to ensure everything is thoroughly combined. The egg acts as a binder, adding structure and richness to your cookie dough.
- Now, gradually add the previously combined dry ingredients (from Step 1) to the wet mixture. Add about half of the chocolate chips or chunks at this stage as well. Mix on low speed, or use a spatula, until the dry ingredients are just incorporated into the wet ingredients. It’s extremely important not to overmix once the flour is added, especially with gluten-free blends, as this can lead to tough or crumbly gluten free protein cookies. Stop mixing as soon as you no longer see streaks of dry flour. This is a critical step for achieving the desirable texture in your gluten free protein cookies. High-quality silicone spatulas are great for this.
- Once the dough is mixed, set it aside while you prepare your baking environment. Allowing the dough to rest briefly helps the gluten-free flour absorb moisture, which can improve the final texture of your cookies. You can just let it sit in the mixing bowl, lightly covered.
- While the dough rests, preheat your oven to 350°F (175°C). Ensure the oven rack is positioned in the center of the oven for optimal heat circulation and even baking of your gluten free protein cookies. Using an oven thermometer can help verify your oven’s accuracy.
- Line baking sheets with parchment paper. Using a cookie scoop (about 1.5 to 2 tablespoons in size) is highly recommended for portioning the dough. This ensures that all your gluten free protein cookies are the same size, leading to more consistent baking times. Scoop the dough balls onto the prepared baking sheets, leaving about 2 inches of space between them to allow for spreading. Cookie scoop sets are readily available.
- Gently flatten each cookie dough ball slightly with the palm of your hand or the bottom of a glass. Then, take the remaining half of the chocolate chips or chunks and divide them evenly among the tops of the flattened cookies. Gently press the chocolate pieces into the surface of each cookie. This not only makes your gluten free protein cookies look beautiful but also guarantees plenty of melty chocolate on top after baking.
- Place the baking sheet on the center rack in your preheated oven. Bake for an initial 5 minutes. After 5 minutes, carefully rotate the baking sheet 180 degrees to ensure even baking. Continue baking for another 3 to 4 minutes. Watch the edges closely – they should be just starting to turn a light golden brown. The centers may still look a little soft, but the cookies should appear set. Remember, these gluten free protein cookies will continue to set up as they cool on the baking sheet. Do not overbake if you want a slightly softer cookie texture. Once baked, remove the sheets from the oven and let the gluten free protein cookies cool on the baking sheet for several minutes before transferring them to a wire rack to cool completely. Enjoy your delicious, protein-packed gluten free protein cookies!
Tips for Perfect Results
Making delicious gluten free protein cookies is absolutely achievable with a few pro tips! These insights will help you navigate the nuances of working with gluten-free flours and protein powders to get that perfect texture and taste every time. Follow these suggestions to elevate your gluten free protein cookies:
- Weigh Your Ingredients: For the most consistent results, especially with gluten-free flours and protein powders, using a kitchen scale to weigh ingredients (as the recipe provides gram measurements) is crucial. Volume measurements can be inaccurate with varying densities, leading to dry or crumbly gluten free protein cookies.
- Choose Your Protein Powder Wisely: The recipe specifically mentions that fine whey protein powders like those from The Dr. & The Chef, Quest, or FitCrunch work best. Using a coarse or gritty protein powder (like some plant-based options) or one with added fibers/gums can significantly alter the texture and moisture absorption, potentially leading to drier or less pleasant gluten free protein cookies. Stick to the recommended types for the intended result.
- Peanut Butter Consistency Matters: If using natural peanut butter that separates, be sure to stir it vigorously until it’s completely homogeneous. Using only the thick part at the bottom or the oily part at the top will throw off the fat-to-solids ratio, impacting the cookie’s moisture and spread. A well-mixed, creamy peanut butter is key for these gluten free protein cookies.
- Don’t Overmix the Dough: Once you add the gluten-free flour blend and protein powder, mix *just until combined*. Overmixing can develop the starches in the gluten-free flour, leading to a tougher texture. Gentle mixing keeps your gluten free protein cookies tender.
- Allow Proper Resting Time: The recipe calls for a 20-minute resting time. Don’t skip this! This allows the liquids to properly hydrate the gluten-free flours and protein powder, improving the texture and preventing a gritty mouthfeel. It also helps the dough firm up slightly, making it easier to handle.
- Scoop and Shape Consistently: Use a cookie scoop to ensure uniform size. Gluten-free doughs often don’t spread as much as traditional doughs, so slightly flattening the cookies before baking, as instructed, is important for even cooking and the right shape for your gluten free protein cookies.
- Bake Until *Just* Set: Keep a close eye on the cookies during the final few minutes of baking. They are ready when the edges are just starting to turn golden brown and the centers look set, not wet. Overbaking is a common cause of dryness in gluten-free baked goods, including these gluten free protein cookies. They will continue to set as they cool.
- Cool on the Tray Briefly: Let the cookies cool on the hot baking sheet for 5-10 minutes before transferring them to a wire rack. Gluten-free cookies can be delicate when hot, and this allows them to firm up further, preventing breakage when you move them.
Common Gluten-Free Mistakes to Avoid When Making These Cookies
Even with the best recipe for gluten free protein cookies, there are specific pitfalls common to gluten-free baking that can derail your efforts. Be mindful of these:
- Using the Wrong Flour Blend: Not all “1:1 gluten-free flour blends” are created equal! Some contain different ratios of rice flour, tapioca starch, potato starch, and binders like xanthan gum. While this recipe is likely forgiving, using a blend with too much starchy flour or insufficient binder can result in crumbly or dry gluten free protein cookies. If you have issues, try a different reputable 1:1 blend.
- Incorrect Sweetener Consistency: The recipe specifies “liquid allulose, honey or maple syrup.” Using a grantulated sweetener (other than the coconut sugar) or a liquid sweetener with a different viscosity could impact the moisture balance and texture. Stick to the recommended liquid sweeteners to maintain the right consistency for the dough and prevent dryness in your baked gluten free protein cookies.
- Baking Too Long: As mentioned in the tips, overbaking is the enemy of tender gluten free protein cookies. Without the gluten structure to hold moisture, they dry out very quickly. Err on the side of slightly underbaked; they will finish cooking from the residual heat as they cool on the pan.
Frequently Asked Questions
What kind of protein powder works best for these gluten free protein cookies?
For the absolute best texture and flavor in these gluten free protein cookies, using a fine vanilla whey protein powder is highly recommended. The recipe specifically mentions The Dr. & The Chef brand (which is grass-fed whey) as a first choice due to its fine texture perfect for baking. Other good store-bought options mentioned are Quest Nutrition and FitCrunch, which are also fine whey powders, although they might not be grass-fed or contain artificial ingredients. While the recipe *can* work with other brands or even plant-based protein powders, the texture and flavor might be different. If using plant-based, you might need a little extra liquid.
Can I use natural peanut butter or a different nut butter?
Yes, you can use any smooth peanut butter or nut butter you like in these gluten free protein cookies! The recipe mentions PBFit protein-added peanut butter and Skippy protein peanut butter as first and second choices respectively. If you opt for a natural peanut butter that separates, it’s crucial to mix it extremely well before measuring. Using only the thick part at the bottom of the jar can result in drier cookies.
How should I store these gluten free protein cookies?
Once your delicious gluten free protein cookies have cooled completely, you can store them in an airtight container. They will keep well at room temperature for a few days, or you can pop them in the refrigerator for up to a week. These cookies also freeze nicely if you want to make a batch ahead of time or save some for later!
Can I make these gluten free protein cookies dairy-free or egg-free?
Based on the substitution suggestions, you can definitely make swaps! For a dairy-free option, using a 1:1 dairy-free butter substitute should work well in place of the unsalted butter. To make them egg-free, a flax egg (1 tbsp flaxseed meal mixed with 3 tbsp water and left to gel) can often be used as a substitute for the large egg, though this might lead to a slightly denser cookie texture.
How do I know when the gluten free protein cookies are done baking?
Keep a close eye on them as they bake! After the initial 5 minutes and rotation, continue baking for another 3 to 4 minutes. You’re looking for the edges to be just beginning to turn a light golden brown. The centers might still look a little soft when you take them out, but that’s okay! They will continue to set up as they cool on the baking sheet. Avoid overbaking if you want a slightly softer texture.
What if my cookie dough seems dry or crumbly?
The texture of your dough can sometimes depend on the specific protein powder or nut butter used. If your dough feels too dry, especially after adding the dry ingredients, double-check if you used a very fine protein powder or if your natural peanut butter wasn’t thoroughly mixed (using only the solid part can absorb too much liquid). Ensure you mix the dry ingredients in *just* until combined and avoid overmixing, which can sometimes affect gluten-free doughs. Using accurate measurements, preferably with a kitchen scale for dry ingredients, is also key to getting the right consistency for these gluten free protein cookies.
Can these gluten free protein cookies be used for anything else besides eating them plain?
Absolutely! The recipe specifically mentions that the final texture of these gluten free protein cookies makes them absolutely perfect for homemade ice cream sandwiches. Once cooled completely, just add your favorite gluten-free ice cream between two cookies for a fantastic treat!