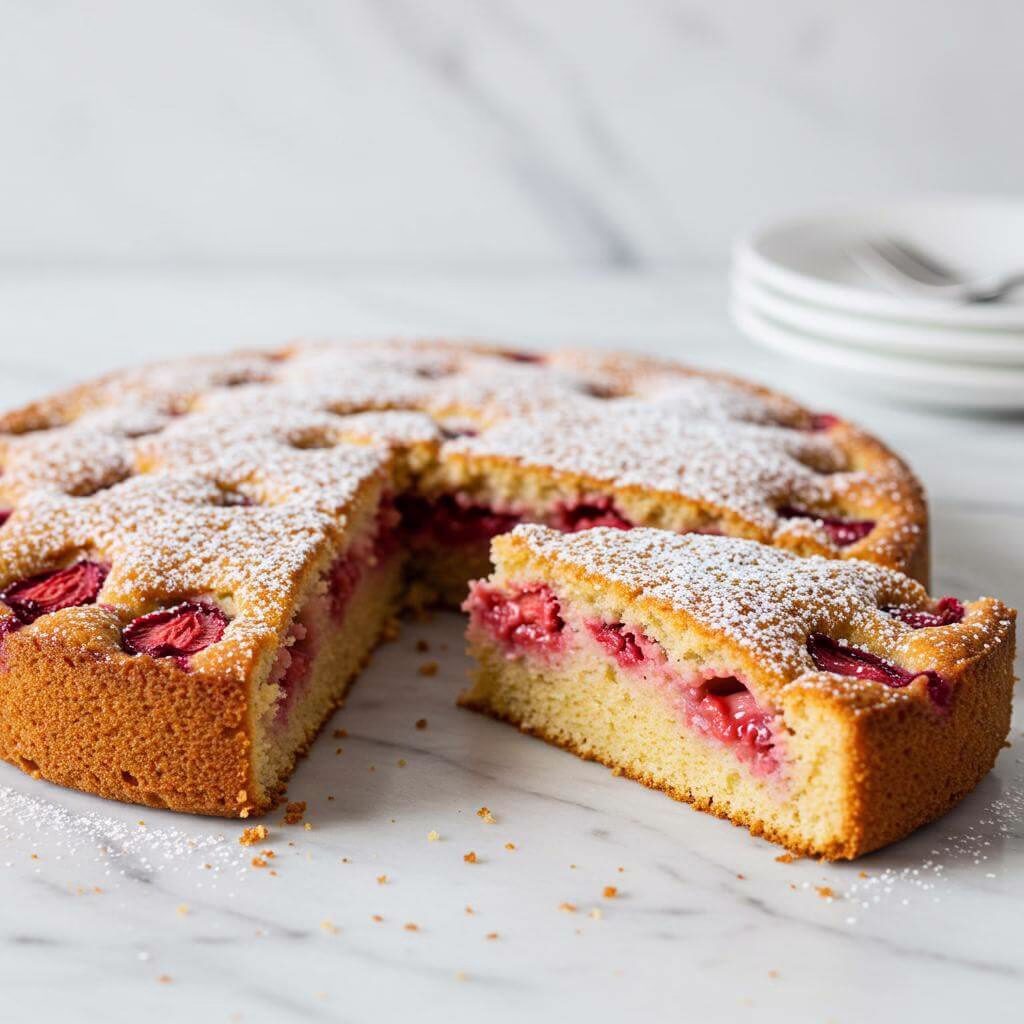
Gluten-Free Strawberry Cake: The Ultimate Recipe!
Oh, fellow gluten-free friends, do you remember that feeling? The one when summer rolls around, the strawberries are ripe for the picking, and all you crave is a slice of moist, tender, unbelievably *strawberry-flavored* cake? For years after going gluten-free, that was a craving that felt impossible to satisfy. I’d see those beautiful pink cakes everywhere and feel a familiar pang of longing. Every attempt I made resulted in something dry, crumbly, or tasting vaguely artificial, never like the real deal bursting with fresh berry goodness. The dream of a truly delectable **gluten-free strawberry cake** seemed just that – a dream.
I tried *everything*. Adding extra moisture in every form imaginable, tweaking flour blends, adjusting baking times. So many sad, sunken cakes ended up in the compost bin. It was frustrating! It felt like finding a truly moist and flavorful gluten-free baked good was the holy grail. You know that feeling, right? We’ve all been there, searching for that one recipe that just *works*. I refused to give up on my perfect **gluten-free strawberry cake**.
Then came the breakthrough. The magic touch wasn’t just adding strawberries; it was about concentrating their essence. By creating a rich, thick strawberry reduction and incorporating it directly into the batter, everything changed. The first time I pulled this **gluten-free strawberry cake** out of the oven, the aroma alone told me I was onto something special. And the taste? Pure, unadulterated strawberry heaven. It was moist, tender, and packed with genuine fruit flavor, not just sweetness. This wasn’t just *a* cake; it was *the* **gluten-free strawberry cake** I had been dreaming of.
Sharing this **gluten-free strawberry cake** with friends and family, watching their surprise when they learned it was gluten-free, was the ultimate reward. It’s become a staple for birthdays, potlucks, and simply celebrating the joy of fresh summer berries. It reminds me of the successes we *can* have in gluten-free baking, like finally perfecting a gluten-free carrot cake or a simple, perfect gluten-free banana bread. This **gluten-free strawberry cake** is proof that beautiful, flavorful, and perfectly textured cakes are absolutely within reach. Get ready to experience the best **gluten-free strawberry cake** you’ve ever had!
Why This Gluten-Free Strawberry Cake Recipe Works
The secret to this heavenly gluten-free strawberry cake lies in a brilliant combination of ingredients and techniques that perfectly replace the structure and texture typically provided by gluten. Here’s the fascinating chemistry happening in your kitchen:
What’s truly remarkable is the use of a strawberry reduction. By simmering the fresh strawberries, you concentrate their vibrant flavor and natural sweetness dramatically. More importantly for gluten-free baking, this process removes excess water content while preserving moisture. This allows you to incorporate a significant amount of real strawberry flavor into the batter without making it too wet or causing that gummy texture often feared in gluten-free cakes.
The success of any gluten-free strawberry cake hinges on its structure. Since gluten is absent, this recipe relies on a quality gluten-free all-purpose flour blend specifically containing xanthan gum. The xanthan gum acts as a binder, mimicking gluten’s ability to hold ingredients together and trap air. It’s critical for providing elasticity and stability to the batter, preventing your beautiful cake from crumbling once baked.
Getting the right lift and tender crumb is achieved through a classic reaction. The recipe calls for creating homemade buttermilk by adding vinegar to milk. This introduces acid into the batter. When this acid combines with baking soda (a base) and baking powder, it creates carbon dioxide gas bubbles. This leavening action is powerful and crucial for helping the cake rise in the absence of gluten’s robust network to support air pockets.
The intense burst of flavor in the frosting comes from a clever trick: freeze-dried strawberries. Unlike fresh or frozen strawberries, which contain a lot of water and can make frosting runny or icy, freeze-dried strawberries are essentially pure, concentrated strawberry flavor and color in solid form. Pulverizing them into a powder allows you to infuse the buttercream with authentic taste and a lovely pink hue without compromising the frosting’s smooth, creamy texture. This technique is a game-changer for flavoring frostings and is a secret weapon for making a delicious gluten-free strawberry cake buttercream.
While the recipe notes this cake might be slightly denser than a traditional vanilla cake, this is actually a positive outcome! The combination of the fruit reduction providing moisture and the binder providing structure results in a rich, substantial crumb that holds together beautifully and is incredibly moist – a common challenge in gluten-free baking that this gluten-free strawberry cake elegantly overcomes.
By understanding how the strawberry reduction adds concentrated flavor and controlled moisture, how the gluten-free flour with xanthan gum provides structure, and how the buttermilk and leaveners work together for lift, you can confidently bake this delicious gluten-free strawberry cake. These principles aren’t just magic; they’re the science of making gluten-free baking work beautifully, allowing you to create moist, flavorful, and perfectly structured cakes like this delightful gluten-free strawberry cake.
Newly Diagnosed? Start Every Morning Right!
Start your gluten-free journey with 33 handpicked breakfast recipes that are safe, simple, and full of flavor.
Whether you’re struggling with what to eat or just want new ideas, this guide is made for you.
Feel confident. Eat happily. Live healthier.

No spam. No credit card. Just delicious gluten-free breakfasts—delivered instantly.
Ingredients, Nutrition & Tips for Your Perfect Gluten-Free Strawberry Cake
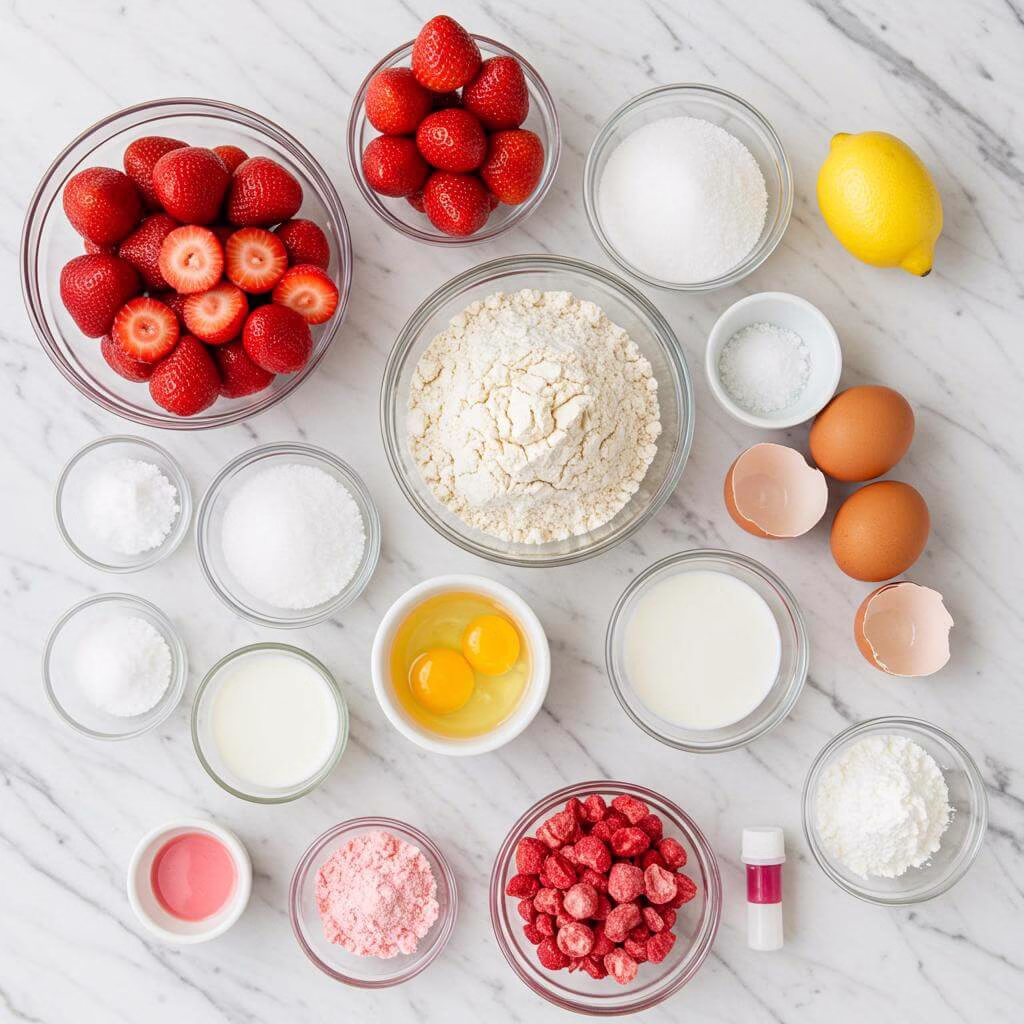
Essential Ingredients
Let’s gather everything you need to bake this delightful gluten-free strawberry cake. Using precise measurements ensures the best results!
For the Strawberry Reduction:
- 2 lbs fresh strawberries: The star of our show! Fresh strawberries create that vibrant, natural flavor and moisture.
- 4 tbsp granulated sugar: To sweeten the reduction and help break down the strawberries.
- 1 tbsp lemon juice, optional: A touch of acidity brightens the strawberry flavor.
For the Gluten-Free Strawberry Cake:
- 1/2 cup unsalted butter: Provides richness and tender texture. For dairy-free: Use Smart Balance butter or your favorite dairy-free stick butter alternative.
- 1 3/4 cup granulated sugar: Sweetens the cake and keeps it moist.
- 1 teaspoon pure vanilla extract: Enhances all the other flavors.
- 3 large eggs, at room temperature: Eggs bind the ingredients and add structure and richness. Using them at room temperature helps them incorporate better into the batter.
- 2 1/2 cups gluten-free all-purpose flour with xanthan gum: This is the foundation of our gluten-free cake! A good gluten-free all-purpose flour blend that includes xanthan gum provides the necessary structure and texture missing without gluten. As the recipe creator notes, not all blends are equal; results can vary.
- 2 teaspoons gluten-free baking powder: A leavening agent that helps the cake rise and become light.
- 1 teaspoon baking soda: Works with the acidity in the “buttermilk” and strawberry reduction for extra lift and tender crumb.
- 1/2 teaspoon salt: Balances the sweetness and enhances the overall flavor.
- 1/2 cup milk: Adds moisture and helps create a tender crumb. For dairy-free: Use unsweetened almond milk or your preferred plant-based milk.
- 2 teaspoons white vinegar: When added to milk, this creates a quick “homemade buttermilk” which tenderizes the cake and helps activate the baking soda. Lemon juice works too!
- 1 1/2 cups strawberry reduction: Our flavorful secret weapon for intense strawberry taste and moistness in this homemade gluten-free strawberry cake. Make sure it’s completely cooled!
- 2 drops pink or red gel food coloring, Optional: If you desire a more vibrant pink color in your cake batter. Use gluten-free gel food coloring for best results.
For the Strawberry Buttercream Frosting:
- 1 cup unsalted butter, softened: Creates a creamy, rich frosting base. For dairy-free: Use Smart Balance butter or dairy-free stick butter. Softened is key for easy creaming!
- 1 cup freeze-dried strawberries: Grinding these into a powder is how we get that amazing, intense strawberry flavor and natural pink color in the frosting! Freeze-dried strawberries work differently than regular dried ones – they’re essential for this frosting’s texture and taste.
- 1 teaspoon pure vanilla extract: Pairs beautifully with the strawberry flavor.
- 2-4 tablespoons milk: Adjusts the frosting consistency to your liking. For dairy-free: Use unsweetened almond milk. Start with less and add until it’s perfectly spreadable.
- 4 cups powdered sugar: Provides the sweetness and structure for the buttercream.
- 1/8 teaspoon salt: Cuts the sweetness slightly and enhances the other flavors.
Nutrition Highlights of this Wholesome Gluten-Free Strawberry Cake
Enjoying a delicious treat like this gluten-free strawberry cake can also come with some wonderful benefits! By choosing to bake at home with fresh ingredients, you’re creating a dessert you can feel great about.
- Packed with Vitamin C: Fresh strawberries are an excellent source of Vitamin C, supporting your immune system and skin health.
- Source of Fiber: Strawberries contribute fiber, which aids in digestion and helps you feel satisfied.
- Naturally Gluten-Free Goodness: This recipe is specifically crafted for those avoiding gluten, allowing everyone to enjoy a classic cake without worry.
- Antioxidant Boost: Strawberries are rich in antioxidants, compounds that help protect your cells from damage.
While this is a dessert and contains sugar, celebrating with real, wholesome ingredients like fresh strawberries makes it a nourishing choice for a special occasion. (Approximate nutrition per serving is provided, but remember this is a guideline!)
Smart Substitutions & Creative Variations for Your Gluten-Free Strawberry Cake
Feeling confident in the kitchen means knowing you have options! Here are some practical swaps and fun ideas to make this gluten-free strawberry cake uniquely yours.
Easy Swaps:
- Dairy-Free? No Problem! As noted in the ingredients, easily swap unsalted butter for a dairy-free stick butter alternative (like Smart Balance) and dairy milk for unsweetened almond milk or your favorite plant-based milk. This recipe is designed to work seamlessly with these swaps.
- No White Vinegar? Use lemon juice instead to create your quick homemade buttermilk.
- Different GF Flour Blend? While Pillsbury is recommended, feel empowered to use your preferred certified gluten-free all-purpose flour blend that contains xanthan gum. Insider Tip: Different blends absorb liquid differently, so you might need slight adjustments. Get to know your favorite blend!
Creative Twists:
- Lemon-Kissed Strawberry: Add the zest of one lemon to the cake batter along with the vanilla for an extra bright, citrusy note that complements the strawberries beautifully.
- Berry Medley: Try swapping half or all of the strawberries in the reduction with other berries like raspberries or mixed berries for a different flavor profile. Ensure they reduce to the same thick consistency.
- Chocolate Chip Delight: Gently fold in a half cup of mini gluten-free chocolate chips into the cake batter just before pouring into the pans for a fun texture and flavor contrast.
- Seasonal Variations: In the fall, consider a strawberry-apple reduction. In the summer, lean into the fresh berry flavor!
Insider Tips for Baking Success:
- Pro Tip: Make the Reduction Ahead! Preparing the strawberry reduction several hours or even the day before is highly recommended. It *must* be completely cool before adding it to the cake batter to prevent issues with texture and leavening.
- Freeze-Dried is KEY for Frosting: Do not substitute regular dried strawberries for the freeze-dried ones in the buttercream. Freeze-dried strawberries crush into a fine powder that dissolves and provides intense flavor without adding excess liquid, which is crucial for frosting consistency.
- Measuring Flour Matters: Use the “spoon and level” method for measuring your gluten-free flour. Gently spoon the flour into your measuring cup until overflowing, then level it off with a straight knife or spatula. Scooping directly from the bag can compact the flour, resulting in too much dry ingredient and a dense cake.
- Prevent Sticking: Always trace and cut parchment paper rounds for the bottom of your cake pans and spray the pans (including the paper) with gluten-free cooking spray. This ensures your beautiful cakes release easily.
- Patience is a Virtue! Let the cakes cool completely on a wire rack before attempting to frost them. Frosting warm cakes will result in melted, sliding frosting – nobody wants that!
By understanding these ingredients, embracing substitutions, and trying out variations, you’ll master this delightful gluten-free strawberry cake and bake with confidence every time!
Essential Equipment for This Recipe
To prepare this delicious recipe, you’ll need the following kitchen tools:
- Mixing Bowls – A set of various sizes is essential for prepping and combining ingredients.
Find Mixing Bowls on Amazon - Measuring Cups and Spoons – Accurate measurements are key for baking success.
Find Measuring Cups and Spoons on Amazon - Baking Sheets – For evenly baked goods and roasting.
Find Baking Sheets on Amazon - Whisks – Ideal for mixing lighter ingredients and aerating mixtures.
Find Whisks on Amazon - Spatulas – Perfect for folding ingredients and scraping bowls clean.
Find Spatulas on Amazon - Food Processors – Great for chopping vegetables and creating sauces.
Find Food Processors on Amazon - Saucepans – Needed for heating liquids and making sauces.
Find Saucepans on Amazon - Chef’s Knives – A sharp knife is a must-have for any kitchen.
Find Chef’s Knives on Amazon - Cutting Boards – Protect your countertops while prepping.
Find Cutting Boards on Amazon

- Gather Your Ingredients: Start by gathering all the ingredients for your amazing **gluten-free strawberry cake** and frosting! It always helps to have everything measured and ready to go. Make sure your eggs are at room temperature – this helps them incorporate better into the batter for a smoother cake.
- Prepare the Strawberries: Hull and halve 2 pounds of fresh strawberries. Now, take those prepped strawberries and put them into a food processor or blender. Blend until they are completely smooth – you want a lovely, vibrant strawberry puree with no chunks.
- Make the Strawberry Reduction: Pour the strawberry puree into a small saucepan. Stir in the 4 tablespoons of granulated sugar and the optional 1 tablespoon of lemon juice (this brightens the flavor!). Place the saucepan over medium heat and stir until everything is combined. Bring the mixture to a gentle simmer, where you’ll see small bubbles. Once simmering, reduce the heat to low. Let the strawberries gently reduce, stirring occasionally, for about 30 minutes. You’ll know it’s ready when it has thickened to a consistency similar to a tomato sauce. This concentrated strawberry flavor is key to your delicious **gluten-free strawberry cake**!
- Cool the Reduction Completely: This is a crucial step! The strawberry reduction *must* be completely cooled before adding it to the cake batter. Using warm or hot reduction will negatively affect the batter texture. Once thickened, remove the saucepan from the heat and let it cool fully at room temperature. You can speed this up by transferring it to a bowl. Once cool, cover and refrigerate until you’re ready to mix the cake – ideally several hours or even overnight.
- Get Ready to Bake the Cake: Preheat your oven to 350°F (175°C). Prepare two 9-inch round cake pans. To prevent sticking (especially important for gluten-free cakes!), trace and cut out circles of parchment paper to fit the bottom of each pan. Place the paper circles in the bottom of the pans and then lightly spray the entire inside surface of both pans (sides and bottom) with gluten-free cooking spray or grease them with butter/dairy-free spread and flour (using some of your gluten-free flour blend).
- Make the Homemade “Buttermilk”: In a measuring cup or small bowl, stir together the ½ cup of milk (or unsweetened almond milk for dairy-free) and 2 teaspoons of white vinegar (or lemon juice). Stir gently and then place it in the refrigerator for 5 minutes. You’ll notice it starts to curdle slightly – don’t worry, this is exactly what you want! This creates a tangy, tenderizing buttermilk substitute crucial for a moist cake crumb. Keeping it cold helps with batter texture later.
- Cream Butter and Sugar: In a large mixing bowl, using a stand mixer or hand mixer, beat together the ½ cup of softened unsalted butter (or dairy-free alternative) and 1¾ cups of granulated sugar. Cream on medium speed until the mixture is light, fluffy, and pale in color. This usually takes about 2-3 minutes. You’re doing great – this is the foundation for your lovely **gluten-free strawberry cake**!
- Add Vanilla and Eggs: Beat in the 1 teaspoon of pure vanilla extract until just combined. Now, add the 3 room-temperature large eggs, one at a time, beating well after each addition. Make sure each egg is fully incorporated into the butter mixture before adding the next. Scrape down the sides of the bowl as needed to ensure everything is mixing evenly.
- Combine the Dry Ingredients: In a separate medium bowl, whisk together the 2½ cups of gluten-free all-purpose flour with xanthan gum, 2 teaspoons of gluten-free baking powder, 1 teaspoon of baking soda, and ½ teaspoon of salt. Whisking ensures the leavening agents are evenly distributed throughout the flour, which is key for a good rise in gluten-free baking. Remember to measure your flour using the spoon-and-level method (gently spoon flour into the measuring cup and level off with a knife) to avoid packing too much flour.
- Mix Dry and Wet: With your mixer on low speed, gradually add the dry ingredient mixture to the wet butter mixture. Add about one-third of the dry ingredients at a time, mixing until just combined after each addition. The batter will look thick. Be sure to scrape down the sides and bottom of the bowl with a rubber spatula to ensure everything is incorporated. Don’t overmix gluten-free batter!
- Add the “Buttermilk”: Pour in the prepared cold buttermilk substitute. Mix on low speed until the liquid is just incorporated into the batter. The batter will loosen up and look more like traditional cake batter now.
- Fold in the Strawberry Reduction: Now for the star! Add the 1½ cups of *completely cooled* strawberry reduction to the batter. Gently mix or fold it in until the vibrant pink color is evenly distributed throughout the batter. If you want an even brighter pink **gluten-free strawberry cake**, you can mix in 2 drops of pink or red gel food coloring at this stage. This is where the magic happens!
- Fill the Cake Pans: Carefully divide the beautiful pink batter evenly between your two prepared cake pans. Use a spatula to smooth the tops gently. You’re almost ready to bake this gorgeous **gluten-free strawberry cake**!
- Bake the Cakes: Place the pans in the preheated 350°F (175°C) oven. Bake for 30-32 minutes. Baking times can vary depending on your oven, so start checking around 30 minutes. The cakes are done when a toothpick inserted into the center comes out clean, and the edges of the cake are starting to pull away slightly from the sides of the pan.
- Cool Completely: Once baked, remove the cakes from the oven and let them cool in their pans on a wire cooling rack for about 10-15 minutes. Then, carefully invert the cakes onto the wire rack to cool completely. It is essential that the cakes are *fully cooled* before you even think about frosting them! Frosting a warm cake will result in a melty mess. This cake might feel a little denser than traditional cakes, which is totally normal for a delicious **gluten-free strawberry cake** using real fruit reduction.
- Make the Strawberry Frosting Powder: While the cakes cool, let’s make the frosting! Take 1 cup of freeze-dried strawberries (make sure they are freeze-dried, not just dried!) and place them in a food processor or blender. Process until they turn into a fine, vibrant pink powder. This gives the frosting amazing natural strawberry flavor and color!
- Cream the Butter for Frosting: In a large bowl, using your mixer, cream the 1 cup of softened unsalted butter (or dairy-free alternative) until it is smooth and fluffy. This helps make the frosting light and airy.
- Add Vanilla and Salt: Mix in the 1 teaspoon of pure vanilla extract and ⅛ teaspoon of salt until just combined. Give the sides of the bowl a good scrape down with a spatula before adding the powdered sugar.
- Incorporate the Powdered Sugar: Add the 4 cups of powdered sugar, one cup at a time, mixing on low speed after each addition until it’s mostly incorporated. Once all the sugar is added, increase the speed slightly and mix until the frosting comes together and looks thick and firm.
- Add Strawberry Powder and Adjust Consistency: Add the prepared strawberry powder to the frosting. Mix until the powder is fully incorporated and the frosting is a lovely pink color with strawberry speckles. Now, add 2-4 tablespoons of milk (or unsweetened almond milk for dairy-free), *one tablespoon at a time*, mixing well after each addition. This step allows you to control the frosting’s consistency – add just enough until it’s smooth and easily spreadable (or pipeable!).
- Assemble and Frost Your Cake: Place the first completely cooled cake layer onto your cake plate or stand. Spread a generous layer of the delicious strawberry buttercream over the top of this layer – this forms the perfect filling. Carefully place the second cake layer on top of the first. Use the remaining frosting to cover the top and sides of the entire cake. You can smooth it for a rustic look or use a decorating tip like a Wilton 1M tip to create swirls on top like a bakery cake! You have successfully made a show-stopping **gluten-free strawberry cake**!
- Serve and Store: Your beautiful **gluten-free strawberry cake** is ready to be enjoyed! Slice it up and serve. Any leftovers can be stored in an airtight container or covered tightly with plastic wrap. Keep the cake refrigerated to maintain freshness and frosting texture.
Tips for Perfect Results
- Master the Reduction Cooling: Your Secret Weapon for a Moist Gluten-Free Strawberry Cake. This is perhaps the single most critical step! The recipe specifically calls for the strawberry reduction to be *completely* cooled before adding it to the batter. Why? Because adding warm or hot liquid can melt the butter prematurely, affect the leavening agents (baking powder and soda) by starting the reaction too early, and ultimately throw off the delicate balance needed for a tender gluten-free crumb. Plan ahead and make it hours in advance or the night before. Patience here pays off exponentially in texture.
- Perfect Your GF Flour Measurement: The Spoon & Level Technique is Non-Negotiable. Skip scooping directly from the bag! Gluten-free flour blends are often lighter and can compact easily, leading you to use significantly more flour than the recipe calls for. This excess flour results in a dry, dense, or gummy cake – a common GF challenge. Always gently spoon the flour into your measuring cup and level off the excess with a straight edge (like a knife). This ensures you add the correct amount for optimal rise and texture in your gluten-free strawberry cake.
- Understand Your Buttermilk & Eggs: Temperature Matters for Lift. The recipe correctly instructs you to make homemade buttermilk and keep it cold, while eggs should be at room temperature. The cold buttermilk reacts with the baking soda in the oven’s heat, providing crucial lift. Room temperature eggs emulsify better with the butter and sugar, creating a smoother batter that helps distribute air evenly. Don’t skip these temperature guidelines; they directly impact your cake’s rise and overall structure.
- Mindful Mixing After Adding Dry Ingredients. Once you add the gluten-free flour mixture, mix only until *just* combined. Overmixing develops any potential structure provided by the small amount of protein in gluten-free flours or the xanthan gum, which can lead to a tougher cake. Mix on low speed and stop as soon as the dry streaks disappear. A few small lumps are okay!
- Trust Your Oven (But Also Your Eyes & Toothpick). Baking times are always approximate because every oven thermostat varies. Start checking your cake around the 28-minute mark. Look for visual cues: the sides of the cake pulling slightly away from the pan and the surface looking set. Use the toothpick test *in the center* – it should come out with a few moist crumbs, but not wet batter. Slightly underbaking is often better than overbaking for gluten-free cakes, which can dry out quickly.
- Achieve Silky Smooth Strawberry Buttercream Frosting. The key is the freeze-dried strawberry powder. Ensure it’s powdered very finely in your food processor or blender – no large chunks! Cream your softened butter *thoroughly* before adding powdered sugar. Add the powdered sugar gradually, mixing well after each addition. Add the milk one tablespoon at a time *at the very end* to fine-tune the consistency. You want it spreadable but stable enough to hold its shape, perfect for frosting your cooled gluten-free strawberry cake.
- Cool Your Cakes Completely – Inside and Out. Resist the urge to frost warm cakes! Warm cakes are fragile and prone to breaking, and the heat will instantly melt the buttercream, creating a messy, unstable layer. Transfer cakes to a wire rack after removing them from the oven within 10-15 minutes. Let them cool *entirely* on the rack before even thinking about frosting. This crucial cooling time allows the cake’s structure to set properly.
Common Mistakes to Avoid
Even experienced bakers make mistakes! Here are a few critical errors to watch out for when making your gluten-free strawberry cake:
- Mistake 1: Using Warm or Hot Strawberry Reduction.Why it’s a problem: As mentioned above, this negatively impacts texture, leavening, and overall structure.
How to prevent it: Make the reduction well in advance (several hours or the day before) and ensure it is *completely* chilled before incorporating it into the cake batter. Think cold to the touch, straight from the fridge.
- Mistake 2: Scooping Flour Directly from the Bag.Why it’s a problem: This packs too much flour into your cup, leading to a dry, dense, or gummy cake crumb.
How to prevent it: Always use the “spoon and level” method for measuring your gluten-free flour blend. Dip a spoon into the flour bag, gently spoon it into your dry measuring cup until it’s overflowing, and then level off the excess with a straight knife or spatula. No tapping or packing!
- Mistake 3: Frosting Cakes That Aren’t Fully Cooled.Why it’s a problem: Warm cake + buttercream = melted, sliding disaster. It also makes the cake fragile and difficult to handle.
How to prevent it: Allow cakes to cool in the pans for 10-15 minutes, then transfer them to a wire rack and let them cool for several hours, or until they are completely cool to the touch, before frosting. Patience is key for a clean, beautiful finish.
Armed with these expert tips and insights into common pitfalls, you’re now ready to bake a truly show-stopping gluten-free strawberry cake! Go forth and bake with confidence!
Frequently Asked Questions
Why do I need to make the strawberry reduction ahead of time and cool it completely?
Great question! Planning ahead for the strawberry reduction is absolutely key to the success of your delicious gluten-free strawberry cake. Adding warm or hot reduction to the cake batter can negatively impact the delicate balance of ingredients. It can affect how the leavening agents (baking powder and soda) react and can change the overall texture of the cake, potentially making it dense or greasy. Allowing it to cool completely, ideally overnight or for several hours in the fridge, ensures it incorporates smoothly and contributes just moisture and intense flavor without disrupting the batter’s structure. It’s a simple step that makes a big difference!
Can I use a different brand of gluten-free all-purpose flour than the one recommended?
Yes, you absolutely can use your preferred certified gluten-free all-purpose flour blend. Just be sure that your blend *includes* xanthan gum, as this is crucial for providing structure in gluten-free baking. Not all blends absorb liquid the same way, so you might notice slight differences in batter consistency or final cake texture compared to the photos. Pro Tip: Always measure your gluten-free flour using the “spoon and level” method (gently spoon flour into the cup, then level off with a knife) to avoid adding too much, which is a common reason for dry gluten-free cakes. Getting to know how your favorite blend behaves is part of the fun!
The recipe mentions this gluten-free strawberry cake is a little denser. Is that normal?
Yes, totally normal! This particular gluten-free strawberry cake intentionally uses a significant amount of real, thick strawberry reduction directly in the batter. While some gluten-free cakes aim for an airy, sponge-like texture, the reduction in *this* recipe adds wonderful moisture and intense fruit flavor, which naturally results in a cake that is slightly denser than a plain vanilla cake. It’s what gives this cake its incredible moistness and rich strawberry taste, so don’t worry – it’s supposed to be that way!
Why do I need freeze-dried strawberries for the frosting? Can’t I just use fresh or regular dried ones?
This is a super important question for frosting success! You *must* use freeze-dried strawberries for the frosting, not fresh or regular dried ones. Here’s why: Freeze-dried fruit grinds into a fine powder that packs incredible, concentrated strawberry flavor and vibrant color without adding excess water. Regular dried strawberries are soft and chewy and won’t powder properly, while fresh strawberries contain too much liquid and will make your buttercream runny and unstable. Using freeze-dried is the secret to that perfect, naturally flavored, and colored strawberry buttercream!
My frosting seems too thin/too thick. How can I fix the consistency?
Don’t worry, this happens sometimes with buttercream! It’s easy to adjust. If your frosting is too thick or stiff after adding the powdered sugar and strawberry powder, add the milk (or dairy-free milk) one tablespoon at a time, mixing well after each addition, until it reaches a smooth, spreadable consistency. If your frosting seems too thin, you likely added a little too much liquid. Gradually add more powdered sugar, about 1/4 cup at a time, mixing after each addition until it thickens up to your desired consistency. You’ve got this!
Can I make this gluten-free strawberry cake dairy-free?
Absolutely! This recipe is designed with easy dairy-free swaps in mind. Simply use a dairy-free stick butter alternative (like Smart Balance or your preferred brand) in place of the butter for both the cake and the frosting. For the milk in the cake batter and frosting, swap it out for unsweetened almond milk or your favorite plant-based milk. Follow the recipe steps exactly, using the dairy-free alternatives in the same quantities, and you’ll have a delicious, moist, and flavorful dairy-free gluten-free strawberry cake!
How should I store leftover cake, and can I freeze it?
To keep your leftover gluten-free strawberry cake fresh and delicious, store it in an airtight container or cover it tightly with plastic wrap. It’s best kept refrigerated due to the fresh fruit reduction and buttercream frosting. It will stay moist and enjoyable for 3-4 days. You can also freeze individual slices or even whole layers (unfrosted is best for layers, but frosted works too!) by wrapping them tightly in plastic wrap, then aluminum foil, and placing them in a freezer-safe bag or container. Thaw in the refrigerator overnight before serving. This cake freezes beautifully!
One Comment