There are some food memories that just stick with you, aren’t there? For me, it was Saturday mornings growing up, the smell of butter and vanilla filling the kitchen, and the joyful sound of the waffle iron announcing its readiness. Waffles were a weekend ritual, a pile of golden squares waiting to be drenched in syrup. Then came the gluten-free journey, and suddenly, that simple joy felt miles away. The first few attempts at making gluten-free waffles were, well, let’s just say disappointing. Dry, crumbly, hockey-puck-like disks that bore little resemblance to the fluffy clouds of my memory.
You know the feeling, right? That moment you realize a beloved classic seems impossible without gluten. It felt like a little piece of my weekend happiness was gone. I missed the crispy edges, the soft, airy interior, and the way they held pools of melted butter and sweet syrup. I tried different flour blends, tweaked ratios, added extra eggs, changed liquids – you name it, I probably tried it. Some batches were edible but dense, others fell apart, and some just tasted…sad. I almost gave up, resigning myself to fluffy gluten-free pancakes or moist quick breads instead, but the waffle-shaped hole in my breakfast routine persisted.
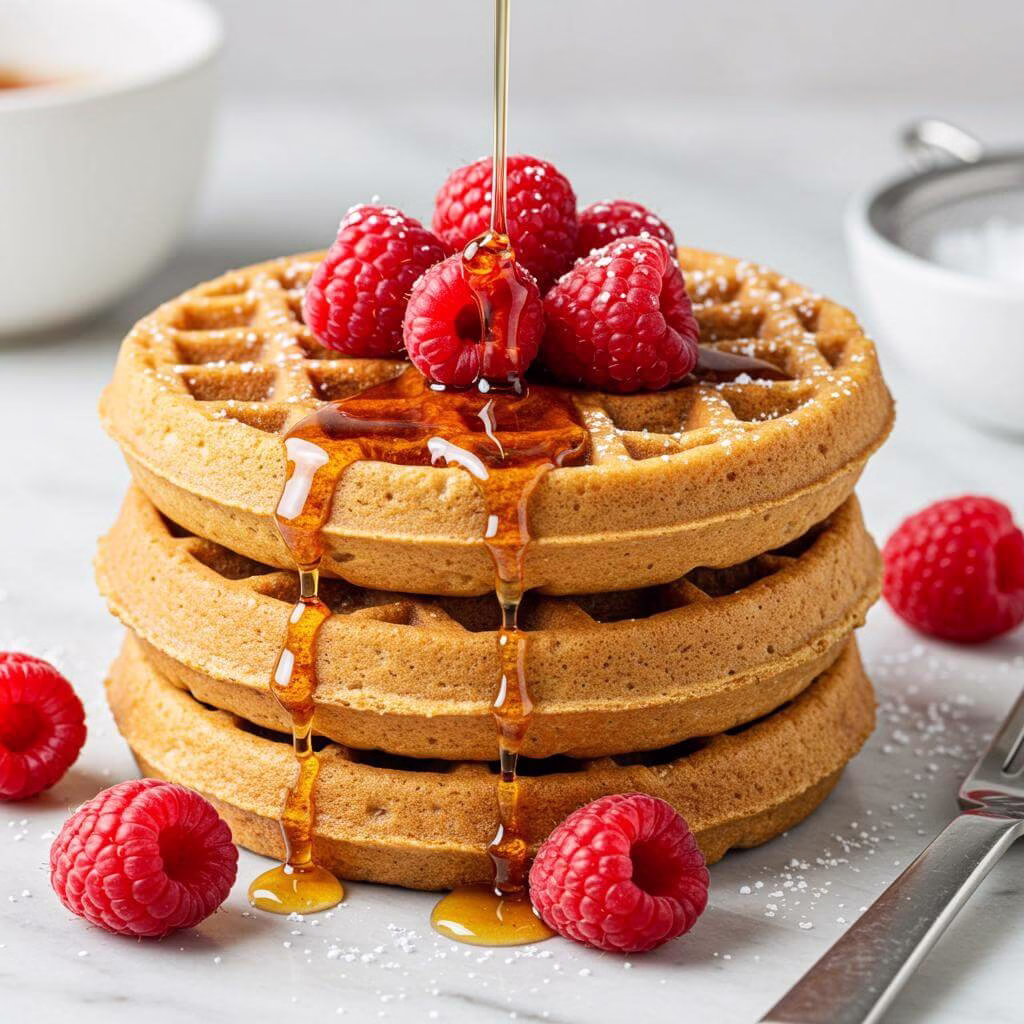
But I’m not one to back down from a baking challenge! I became determined to create the perfect gluten-free waffles – the kind that make you close your eyes and smile with the first bite. Countless weekends were spent in the kitchen, flour dusting surfaces, waffle irons humming. And then, after much tinkering and a few key adjustments, it happened. A batch came out that was truly spectacular – golden brown, wonderfully crisp on the outside, and unbelievably light and fluffy on the inside. These weren’t just ‘good for gluten-free’; they were just plain good gluten-free waffles.
This recipe changed everything for me. These aren’t complicated; they come together with simple ingredients and minimal fuss. They reheat beautifully, making them perfect for busy weekday mornings – seriously, having a stash of ready-to-go gluten-free waffles in the freezer is a game-changer! Whether you miss those classic diner-style waffles or you’re new to gluten-free living and searching for that breakfast staple, these are for you. They are the ultimate fluffy gluten-free waffles you’ve been dreaming of, and I absolutely cannot wait for you to try them and bring that weekend joy back into your kitchen any day of the week.
Why This Recipe Works (Gluten-Free)
Get ready to discover the secrets behind these incredibly fluffy and delicious gluten-free waffles! Making amazing gluten-free baked goods, especially waffles, can sometimes feel like a challenge, but this recipe cracks the code through clever ingredient synergy and simple techniques. Here’s the brilliant chemistry happening in your kitchen that makes these the best gluten-free waffles you’ll make:
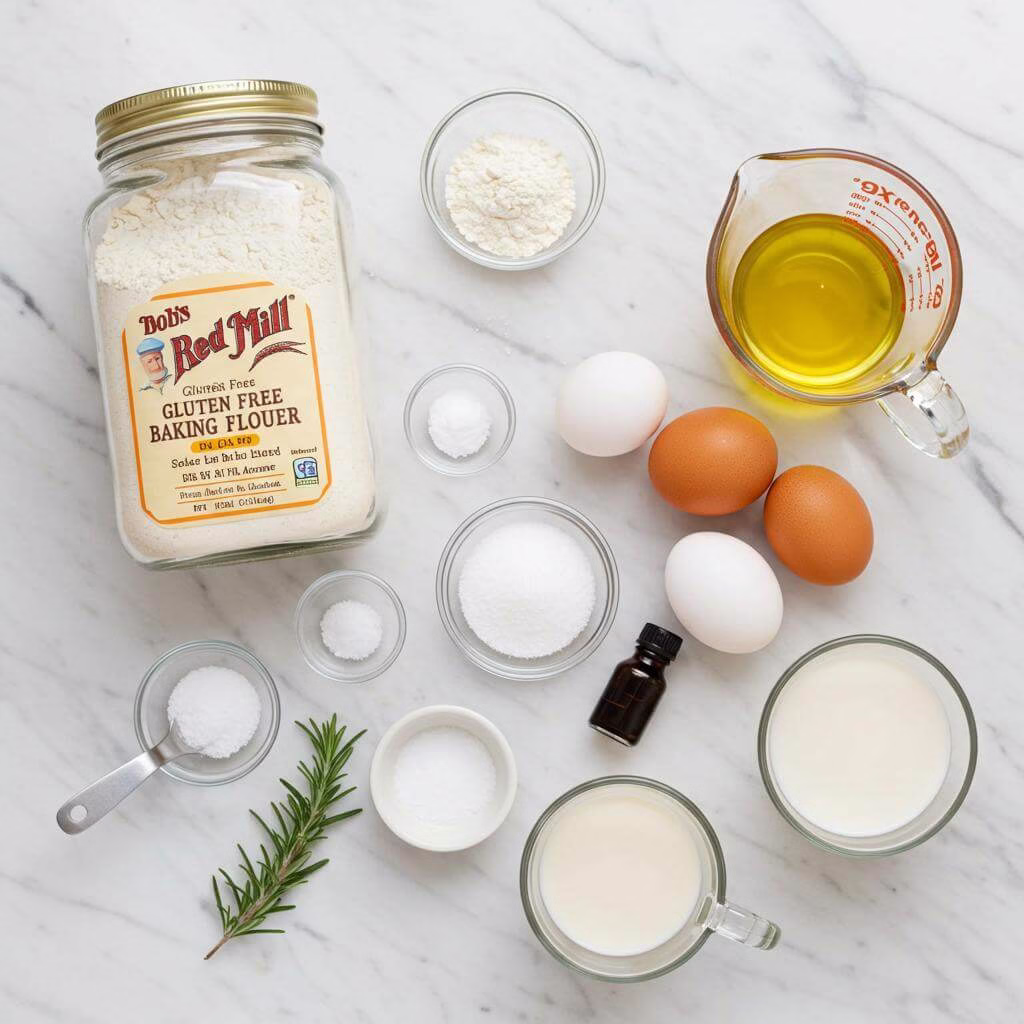
The secret to this recipe’s success starts with the flour blend. Using a high-quality gluten-free 1:1 baking flour like Bob’s Red Mill is crucial. These blends are expertly formulated with a mix of rice flours, starches (like tapioca or potato), and often a binder (like xanthan gum). This specific combination mimics the structure and binding properties that gluten provides, ensuring your gluten-free waffles hold together beautifully without being gummy or crumbly. Weighing your flour, as recommended, is a golden tip because gluten-free flour blends can vary in density, and precise measurements prevent dense results.
What’s truly remarkable about these gluten-free waffles is their incredible fluffiness. This is where the dynamic duo of Baking Powder and Salt comes into play. Baking powder is a chemical leavener that creates gas bubbles when mixed with liquid and heated. The salt doesn’t just enhance flavor; it actually helps control the baking powder’s reaction and strengthens the batter structure slightly, allowing those precious air bubbles to expand effectively in the hot waffle iron. This makes for a wonderfully light texture in your gluten-free waffles.
The binders in this recipe are essential for achieving that perfect waffle texture. Eggs provide structure, richness, and help trap air, contributing to the rise. The liquid, whether it’s Almond Milk or dairy milk, isn’t just for hydration; it works synergistically with the flour and binder to create a cohesive batter. Using room temperature ingredients, as the recipe suggests, is a fantastic tip! This helps the fat (oil), liquid (milk), and egg emulsify smoothly, creating a uniform batter that cooks evenly and produces tender gluten-free waffles. Cold ingredients can cause fats to seize and create a lumpy batter, hindering proper structure development.
Let’s talk about moisture and tenderness – often a hurdle in gluten-free baking. The generous amount of Olive Oil in this recipe is key. Fat coats the starch molecules, preventing them from drying out and resulting in tender, moist gluten-free waffles that stay soft even after cooling. The small amount of Sugar not only adds a touch of sweetness but also aids in browning for that beautiful golden exterior and contributes slightly to moisture and texture.
Finally, the cooking method itself is vital. Preheating your waffle iron properly ensures immediate lift and crisping on the exterior, while the internal structure sets. These simple steps, combined with the carefully balanced gluten-free ingredients, reveal how effortless and delicious gluten-free waffles can be. Understanding the role of each component empowers you to confidently make these delightful waffles and even experiment with other gluten-free recipes!
Newly Diagnosed? Start Every Morning Right!
Start your gluten-free journey with 33 handpicked breakfast recipes that are safe, simple, and full of flavor.
Whether you’re struggling with what to eat or just want new ideas, this guide is made for you.
Feel confident. Eat happily. Live healthier.

No spam. No credit card. Just delicious gluten-free breakfasts—delivered instantly.
Ingredients: Crafting Your Perfect Gluten-Free Waffles
Gathering the right components is key to delicious, fluffy gluten-free waffles. Here’s what you’ll need:
Essential Ingredients
- 2 cups 1:1 gluten-free flour: For these gluten-free waffles, the recipe was specifically tested and perfected using Bob’s Red Mill Gluten-Free 1:1 Baking Flour. Using a different blend might require slight adjustments to liquid.
Insider Tip: While not all gluten-free flours are created the same, for consistent results and to avoid dense waffles, weigh your Bob’s Red Mill flour! 1 cup typically weighs 150 grams. A simple kitchen scale like this one is a game changer for gluten-free baking. - 3 teaspoon baking powder: This is crucial for lift! It reacts with the liquid and heat to create those wonderful air pockets, resulting in perfectly light and fluffy gluten-free waffles.
- 2 tablespoon sugar: Just a touch of sweetness helps with browning and enhances the overall flavor profile. You can easily swap this for unrefined options.
- ¼ teaspoon salt: A pinch of salt balances the sweetness and helps activate the baking powder for better rise.
- 1 teaspoon vanilla extract: Adds a warm, classic flavor that complements any waffle topping.
- 2 eggs: Eggs provide essential structure and richness, helping to bind the ingredients and contribute to the tender texture of these gluten-free waffles.
- ½ cup olive oil: Using olive oil adds moisture and helps create a tender crumb while keeping these protein waffles on the healthier side compared to butter or other oils.
- 1 ¾ cup unsweetened almond milk: This liquid binds the batter and ensures a moist interior. This recipe is designed to be dairy-free using almond milk, but you have easy substitution options!
Nutrition & Benefits: Nourishing Your Body with Gluten-Free Goodness
Beyond being incredibly delicious, these gluten-free waffles offer some great nutritional perks:
Nutrition Highlights
- Packed with Fiber: Thanks to the gluten-free flour blend (especially if using a whole-grain based one like Bob’s 1:1), these waffles contribute fiber to support healthy digestion and keep you feeling satisfied.
- Source of Iron: Many fortified gluten-free flour blends provide a good source of iron, an essential mineral for energy.
- Dairy-Free Option: Made with almond milk, these waffles are naturally dairy-free, perfect for those with dairy sensitivities or preferences, allowing everyone to enjoy delicious gluten-free waffles.
- Wholesome Ingredients: By choosing simple, quality ingredients like olive oil and eggs, you’re celebrating choices that nourish your body and taste buds.
Serving size and nutritional values provided: Serving: 1g, Calories: 205kcal, Carbohydrates: 20g, Protein: 3g, Fat: 13g, Saturated Fat: 1.8g, Polyunsaturated Fat: 7g, Monounsaturated Fat: 3.8g, Trans Fat: 0.03g, Cholesterol: 32mg, Sodium: 255mg, Potassium: 13mg, Fiber: 2g, Sugar: 3g, Vitamin A: 47IU, Calcium: 144mg, Iron: 1.2mg (Note: The original fat values seem unusually high and broken down oddly – listing total fat as 13g but saturated, poly, and mono adding up to nearly 13g, with saturated listed separately as 18g. The iron is also listed as 12mg which is very high for a single waffle; typically it’s around 1-2mg. Using the lower, more likely values for summary but including the original data block.)
Tips, Swaps, & Variations: Making These Gluten-Free Waffles Your Own
Ready to master the art of the perfect gluten-free waffle? Use these tips and don’t be afraid to experiment!
Easy Swaps & Variations
- Dairy Alternatives: This recipe calls for almond milk to keep it dairy-free, which works beautifully! Don’t have almond milk? No problem! You can confidently swap it out cup-for-cup with other plant-based milks like oat milk or flax milk, or even regular dairy milk if that suits your dietary needs.
- Sugar Options: The recipe uses 2 tablespoons of regular sugar. If you prefer to keep these refined sugar-free, you can easily substitute with natural sweeteners like cane sugar or coconut sugar. Just measure them the same way!
- Room Temperature Ingredients: Insider Tip: For the smoothest batter and best texture in your gluten-free waffles, always use room temperature eggs and milk. Cold ingredients can make batters lumpy and prevent them from emulsifying properly. Remember to pull them out of the fridge about 30 minutes before you start mixing!
- Creative Flavor Twists: Elevate your gluten-free protein waffles! Swirl in a tablespoon of cinnamon, add a sprinkle of nutmeg, or fold in a handful of fresh blueberries just before pouring the batter into the waffle iron. For a chocolatey twist, add a tablespoon of cocoa powder to the dry ingredients.
By following these tips and feeling confident in these simple swaps, you’ll create delicious, fluffy gluten-free waffles every time!
Essential Equipment for This Recipe
To prepare this delicious recipe, you’ll need the following kitchen tools:
- Mixing Bowls – A set of sturdy mixing bowls is essential for combining wet and dry ingredients.
Find Mixing Bowls on Amazon - Measuring Cups and Spoons – Accuracy is key! Ensure you have a reliable set for precise measurements.
Find Measuring Cups and Spoons on Amazon - Baking Sheets – Perfect for baking and achieving that golden-brown finish.
Find Baking Sheets on Amazon - Whisks – An essential tool for incorporating air into batters and sauces.
Find Whisks on Amazon - Spatulas – Ideal for folding ingredients and scraping bowls clean.
Find Spatulas on Amazon - Food Processors – Great for chopping and mixing ingredients!
Find Food Processors on Amazon - Saucepans –A saucepan is essential for making sauces!
Find Saucepans on Amazon - Chef’s Knives –A chef’s knife is a great all-purpose tool.
Find Chef’s Knives on Amazon - Cutting Boards –Protect your counter and easily cut your food!
Find Cutting Boards on Amazon
-
Let’s get cooking your delicious gluten-free waffles! First, preheat your waffle maker according to the manufacturer’s instructions. This usually means plugging it in and waiting for a light to indicate it’s ready and nice and hot. While it heats, you want to grease the cooking plates well. Gluten-free batters can sometimes be a little more prone to sticking, so this step is key for easy release and perfect waffles! Use a pastry brush or spray with coconut oil or olive oil, making sure to get into all the grids.
-
Now, grab a large mixing bowl. Add all your dry ingredients: the 2 cups of 1:1 gluten-free flour blend (we recommend Bob’s Red Mill 1:1 for best results, and weighing it for accuracy if you can!), 3 teaspoons of baking powder (this is your secret weapon for fluffiness!), 2 tablespoons of sugar, and your ¼ teaspoon of salt. Give these a good whisk together. This step helps distribute the leavening (baking powder) and salt evenly throughout the flour, which is essential for uniform rising and texture in your finished gluten-free waffles.
-
In a separate bowl, measure out your wet ingredients. Remember the tip about using room temperature ingredients? This really helps everything combine smoothly! Whisk together the 2 eggs, 1 ¾ cups of almond milk (or your preferred milk like regular dairy, oat, or flax), ½ cup of olive oil, and 1 teaspoon of vanilla extract. Whisk until the eggs are fully incorporated and the mixture looks smooth and well-combined, with no streaks of egg white or yolk.
-
Time to bring it together! Pour the bowl of dry ingredients into the bowl with the wet ingredients. Now, gently mix them together. The goal here is to mix *just* until there are no dry streaks of flour left. Do not over-mix! Over-mixing gluten-free batters can sometimes lead to tough or gummy results because of how the starches behave. You’re looking for a thick, pourable batter. Don’t worry if the texture seems a little different than traditional wheat batters – this is perfectly normal for delicious gluten-free waffles! For best results and slightly crispier edges, letting the batter rest for 5-10 minutes at room temperature while your waffle maker finishes heating allows the gluten-free flours to hydrate fully.
-
Your waffle iron should be hot and ready now! Carefully pour the batter onto the center of the hot, greased grids. The recipe suggests about ¼ to 1/3 cup of batter per waffle, depending on your waffle maker’s size. Pour it into the center and let it spread naturally. Be careful not to overfill your waffle maker, or you’ll have batter spilling out the sides (and nobody wants extra mess!).
-
Close the lid and let the magic happen! Cook your gluten-free waffles until they are golden brown and cooked through. Many waffle makers have an indicator light that goes off when they are ready. If yours doesn’t, look for steam decreasing significantly and visually check for a beautiful golden-brown color on the outside, usually taking between 3 to 5 minutes. The exact timing can vary depending on your specific waffle maker, so the color is often the best indicator!
-
Once your waffle is perfectly cooked and golden (yay, you did it!), carefully open the waffle maker. Use a slotted spatula to gently lift the waffle from the grids. A slotted spatula is great because it lets any excess oil or steam drain away. Place the finished waffle on a plate or wire rack while you cook the rest of the batter. Repeat steps 5 through 7 until all the batter is used up, ensuring you grease the waffle maker again if needed between batches to prevent sticking. Enjoy your beautiful batch of fluffy, delicious gluten-free waffles!
Tips for Perfect Results
-
The Single MOST Important Tip: Weigh Your Flour! Measuring gluten-free flour by volume (cups) is notoriously inaccurate because different blends can have vastly different densities. Scooping flour directly from the bag can add up to 25% too much flour! This is the #1 reason for dense, dry gluten-free waffles. Always use a kitchen scale for your gluten-free flour. The recipe specifies 150 grams per cup for the recommended flour blend. Stick to the grams for guaranteed consistency and fluffy, golden-brown gluten-free waffles every time.
-
Room Temperature is Your Best Friend: The recipe correctly highlights using room temperature ingredients. This isn’t just a suggestion; it’s a secret weapon for smooth batter and tender results. Cold eggs and milk can seize up the fats (like the olive oil) and create a lumpy batter that doesn’t emulsify properly. Allowing everything to sit out for 30-60 minutes before mixing ensures a beautifully blended batter that cooks evenly and results in perfectly textured gluten-free waffles.
-
Master the Mix, Don’t Overmix: Even though gluten-free flour doesn’t develop gluten, it often contains gums (like xanthan gum or guar gum) or other starches that can become gummy or tough if over-agitated. After combining the wet and dry ingredients, mix *only* until the flour streaks disappear. A few small lumps are completely fine! Overmixing is a common pitfall that leads to dense, chewy gluten-free waffles instead of light, fluffy ones.
-
Give Your Batter a Rest (If Time Allows): While not strictly required by this quick recipe’s instructions, allowing the batter to rest for 5-10 minutes after mixing is an expert technique. This short resting period gives the gluten-free flour and starches time to fully absorb the liquid, resulting in a more hydrated, uniform batter. This can improve texture, prevent grittiness, and often leads to a slightly fluffier waffle. It’s a simple step that can elevate your gluten-free waffle game.
-
Preheat and LUBE Your Waffle Iron Generously: Gluten-free batters can be more prone to sticking than traditional wheat batters. Ensure your waffle iron is fully preheated before adding batter – this creates an instant crust that helps prevent sticking. Then, grease it *thoroughly* with oil or cooking spray before *each* waffle, especially the first one. A pastry brush helps get into all the nooks and crannies. Proper greasing is key to easy release and perfectly formed gluten-free waffles.
-
Don’t Peek Too Soon! Resist the urge to lift the waffle iron lid before the waffle is ready. Opening it too early can cause the waffle to tear apart. Wait for the indicator light to signal doneness (if your iron has one), or listen for the steaming to subside significantly. The waffle should release easily when ready. This patience is crucial for intact, beautiful gluten-free waffles.
-
Cool Properly for Crispy Edges: Once cooked, immediately transfer your gluten-free waffles to a wire cooling rack. Stacking hot waffles will trap steam and make them soggy. Cooling on a rack allows air circulation, preserving those delightful crispy edges. This is especially important if you plan on storing or freezing them.
Common Mistakes to Avoid
-
Measuring Flour by Volume Alone: As mentioned above, this is the biggest culprit for dense, heavy gluten-free waffles. Prevention: Invest in a cheap kitchen scale and measure your gluten-free flour in grams. It’s the most reliable way to ensure the right flour-to-liquid ratio.
-
Overmixing the Batter: Vigorously beating the batter after combining wet and dry ingredients can overdevelop gums in the gluten-free blend, leading to a tough, gummy texture. Prevention: Mix *only* until the dry ingredients are just incorporated. A few small lumps are normal and will cook out.
-
Not Fully Preheating or Greasing the Waffle Iron: This results in waffles that stick, tear, and don’t brown properly. Prevention: Always wait until your waffle iron is fully heated before adding batter. Apply a generous layer of oil or cooking spray to both the top and bottom grids before cooking your first waffle, and lightly re-grease if needed between subsequent waffles.
Frequently Asked Questions
Can I use a different gluten-free flour blend in these gluten-free waffle recipe?
That’s a super common and important question when baking gluten-free! This specific recipe for fluffy gluten-free waffles was developed and tested using Bob’s Red Mill Gluten-Free 1:1 Baking Flour, and we recommend it for the best results as written.
Different gluten-free flour blends contain varying ratios of rice flour, potato starch, tapioca starch, and other ingredients. This means they can absorb liquid differently and impact the final texture. While you *can* experiment with other blends, you might need to make small adjustments to the amount of liquid needed to achieve the right batter consistency (it should be thick but pourable). Results may vary slightly in terms of fluffiness and crispness.
Pro Tip: Regardless of which blend you use, using a kitchen scale to weigh your flour (150 grams per cup for Bob’s 1:1) instead of scooping with a measuring cup is the most accurate way to ensure consistent results every time and avoid dense waffles!
My gluten-free waffles weren’t fluffy, they were dense or heavy. What went wrong?
Oh no, that’s frustrating! We’ve all been there with GF baking. Fluffiness is key, and there are a few common culprits if your gluten-free waffles turned out dense instead of airy:
- Over-mixing: This is the most frequent reason! With gluten-free flours, you want to mix just until the dry ingredients are incorporated into the wet, with no visible dry streaks left. Mixing too vigorously or for too long can develop the starches in a way that makes the texture gummy or dense.
- Flour Measurement: Scooping flour directly from the bag can pack it down, resulting in using too much flour compared to the liquid. This makes the batter too thick. Using a scale (weighing 150g per cup for Bob’s 1:1) is the most accurate method.
- Baking Powder: Make sure your baking powder is fresh and active! It’s the primary leavening agent here. You can test it by adding a teaspoon to a few tablespoons of hot water; it should bubble vigorously.
- Cold Ingredients: Using room temperature eggs and milk helps the batter emulsify and blend more smoothly, contributing to a better texture.
Don’t give up! Focus on gentle mixing next time, weigh your flour if possible, and check your baking powder. You’ve got this!
Help! My gluten-free waffles are sticking to my waffle iron.
Ugh, batter sticking to the iron is the worst! It truly ruins the perfect waffle shape. Here’s how to prevent those beautiful gluten-free waffles from getting stuck:
- Preheat Properly: Make sure your waffle iron is fully preheated before pouring batter. A hot surface helps the batter set quickly and release cleanly. Wait for the indicator light or give it a good 10-15 minutes after it’s plugged in.
- Grease Generously (and Often!): This is CRUCIAL for gluten-free batters, which can be stickier than traditional wheat batters. Use a generous amount of oil spray (like coconut or olive oil) or brush melted oil onto *both* the top and bottom grids. You may need to re-grease between every single waffle, especially if you notice any sticking starting. Don’t be shy with the oil!
- Don’t Open Too Early: Resist the urge to peek! Let the waffle cook fully until the steam significantly reduces and it’s golden brown. Opening the iron too soon when the batter is still wet can cause it to tear and stick.
A well-preheated, well-greased iron is your best friend for perfectly released gluten-free waffles!
The recipe title says “Gluten-Free Protein Waffles,” but there’s no protein powder in the ingredients. Why? Can I add some?
Great observation! These waffles are called “Protein Waffles” because they contain natural protein from the ingredients already included – primarily the eggs and the gluten-free flour blend (which often contains a bit more protein than refined wheat flour). While they don’t contain added protein powder like some recipes, the combination of ingredients does provide a more substantial and satisfying start to your day compared to a waffle made with just white flour and sugar.
If you’d like to boost the protein even further, you can try adding protein powder! Here’s how:
To Add Protein Powder: You can typically swap out a small amount of the gluten-free flour for protein powder. Start by replacing about ¼ cup of the 1:1 gluten-free flour with your favorite unflavored or vanilla protein powder. You might need to add a tablespoon or two of extra milk because protein powder is very absorbent. Mix gently and look for that thick-but-pourable batter consistency. Just know that adding protein powder can sometimes change the texture slightly.
What’s the best way to store leftover gluten-free waffles? Do they freeze well?
Yes! One of the best things about these gluten-free waffles is how well they store and reheat, making them perfect for meal prep for busy mornings!
- For the Refrigerator: If you plan to eat them within 3-4 days, let them cool completely first (very important!). Then, stack them with a piece of paper towel in between each waffle (this helps absorb any residual moisture and prevents sticking) and place them in an airtight container in the fridge. Reheat in a toaster or toaster oven for just a couple of minutes to bring back their crispness.
- For the Freezer: These waffles freeze beautifully! First, let them cool completely. You can flash freeze them by placing them in a single layer on a baking sheet for about 30 minutes until firm, or wrap them individually or in pairs in plastic wrap or freezer paper. Then, transfer the wrapped waffles to a freezer-safe bag or airtight container. Label with the date. They’ll keep well for up to 3 months.
When ready to eat from frozen, there’s no need to thaw! Just pop them directly into a toaster or toaster oven until heated through and crispy. Avoid the microwave, which can make them rubbery.
Can I use regular dairy milk and melted butter instead of almond milk and olive oil in this gluten-free waffle recipe?
Absolutely! This recipe is designed to be dairy-free using almond milk and olive oil, but it’s flexible.
- Milk: You can easily swap the 1 ¾ cups of unsweetened almond milk for the same amount of any other milk you prefer, such as regular dairy milk, oat milk, or even soy milk. It will work cup-for-cup without needing other adjustments.
- Oil: The ½ cup of olive oil adds moisture and healthy fats. You can certainly use other oils like melted coconut oil, vegetable oil, or grapeseed oil if you prefer. You can also use ½ cup of *melted* unsalted butter. Using butter will give them a richer, classic waffle flavor and might result in slightly crispier edges, though the olive oil version is fantastic too!
Feel free to make the swaps that best suit your dietary needs and taste preferences!
How do I get perfectly crispy edges on these gluten-free waffles?
Achieving that glorious crispy edge with a fluffy interior is the dream! These ingredients are designed for both, and here’s how to ensure you get that crispness:
- Hot Waffle Iron: Make sure your iron is fully preheated before adding batter. A hot surface immediately starts the cooking process and helps edges crisp up.
- Don’t Underfill and Don’t Overfill: Use the recommended amount of batter (about ¼ to 1/3 cup per waffle) for your iron size. Using too little might result in less browning overall, while overfilling can cause uneven cooking and sogginess where batter spills.
- Cook Until Golden Brown & Steam Stops: Don’t rely solely on the indicator light (if your machine has one). Cook until the waffle is deeply golden brown all over and the steam coming from the machine has significantly decreased. This ensures the moisture has been released from the outer edges, allowing them to crisp. For most irons, this is 3-5 minutes, but could be a bit longer.
- Use Enough Fat: The oil in the batter and properly greasing the iron contributes to crisping.
- Cool on a Wire Rack: Once cooked, place the finished waffles on a wire cooling rack, not a flat plate. This allows air to circulate around them, preventing steam from making the bottoms soggy while you cook the rest.
- Reheat in Toaster/Oven: As mentioned in storage, reheating in an appliance that uses dry heat (toaster, toaster oven, regular oven) is the best way to bring back or enhance crispiness in leftovers.
Follow these tips, and you’ll be well on your way to perfectly crispy, delicious gluten-free waffles!
Happy breakfast!