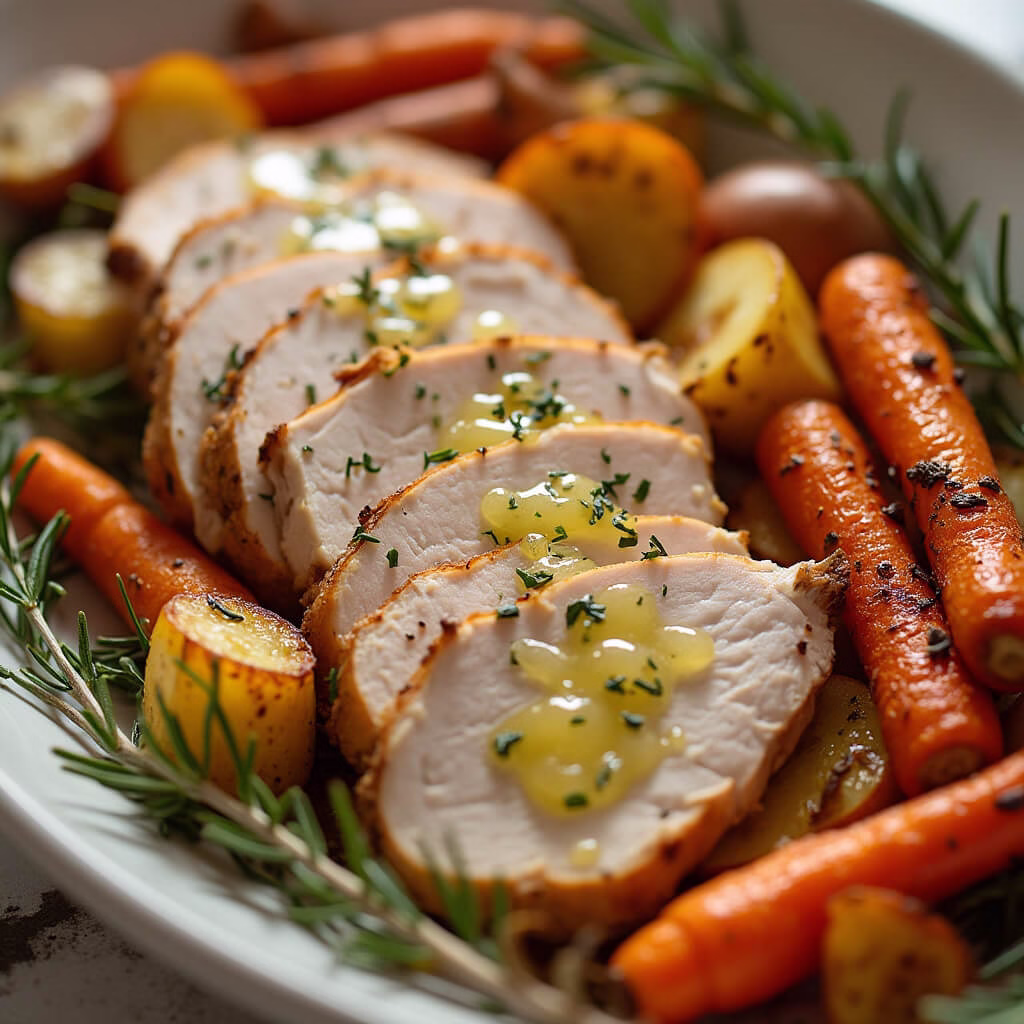

The Ultimate Gluten-Free Herb Roasted Turkey Recipe
Looking for the centerpiece of your holiday meal? This gluten-free herb-roasted turkey is a showstopper, guaranteed to impress! Made with a blend of fresh herbs and dairy-free butter, this recipe uses a special cheesecloth method to ensure a moist and flavorful bird every time. If you’re looking for another impressive gluten-free dish for the holidays, why not try our Gluten-Free Artichoke Dip as an appetizer?
This recipe is perfect for anyone following a gluten-free diet who doesn’t want to compromise on taste. We understand the importance of safe and delicious meals, especially during the holidays. Speaking of delicious and safe, ensure you’re using gluten-free ingredients, just as you would when preparing our BLT Chicken Salad.
Not sure where to start? Let’s begin with thawing and prepping your turkey to perfection.
Thawing and Prepping Your Turkey
The safest way to thaw your turkey is in the refrigerator. Place it on a tray with sides to catch any drippings. This process can take several days, so plan accordingly. For a quick and easy gluten-free side, consider serving our Mediterranean Chickpea Salad alongside your herb-roasted turkey. It’s always a big hit!
Prepare the turkey: Take the turkey out of the refrigerator one hour before cooking. Remove the neck and giblets and any ice chunks. Rinse and pat dry. Place the turkey breast side up in a large roasting pan (with or without a roasting rack—I use one, but it isn’t absolutely necessary).
How to Make the Perfect Gluten-Free Herb Roasted Turkey
Follow these simple steps to create a delicious and impressive gluten-free herb roasted turkey that your family will love!
Step 1: Thawing and Preparing Your Turkey
Proper thawing is crucial for even cooking. Here’s how to do it:
- Place your frozen turkey in the refrigerator on a tray with sides several days before you plan to cook it. This will catch any drippings as it thaws.
- Allow ample time for thawing. A 16-pound turkey can take up to 5 days in the refrigerator. Ensure it’s fully thawed, with no ice remaining in the cavity.
- One hour before cooking, remove the turkey from the refrigerator. Take out the neck and giblets from both ends of the cavity and discard or save for another use. Check for any remaining ice and remove it.
- Rinse the turkey inside and out with cold water and pat it dry with paper towels.
- Place the turkey breast side up in a large roasting pan, using a roasting rack if desired (but not required).
Step 2: Preparing the Herb Mixture
The fresh herb mixture infuses the turkey with incredible flavor. Here’s how to prepare it:
- Finely chop 3 tablespoons of fresh parsley and 2 tablespoons of fresh sage with a large knife.
- For the 2 tablespoons of thyme, slide your fingers along the stems to remove the leaves. You won’t need to chop the thyme since the leaves are so little.
- Zest one lemon and lightly chop the zest into smaller pieces (approximately 1 tablespoon).
Step 3: Creating the Herbed Butter
- In a bowl, combine 1 cup of softened dairy-free butter, the chopped parsley, sage, thyme, lemon zest, 1 teaspoon of Himalayan pink salt, and 1 teaspoon of black pepper. Mix until everything is thoroughly combined into a smooth spread.
Step 4: Seasoning the Turkey
Get ready to infuse your turkey with flavor!
- Place the halved onions, lemons, sliced garlic head, and any remaining whole herbs (parsley, sage, thyme) inside the turkey’s cavity.
- Carefully lift the skin of the turkey and rub a generous amount of the herbed buttery spread underneath, directly onto the meat.
- Rub the remaining herbed buttery spread all over the outside of the turkey skin.
Step 5: Cheesecloth Application
To ensure your turkey stays moist and flavorful during roasting, follow this method:
- Heat the remaining herbed buttery spread in a saucepan until almost melted.
- Wet a piece of cheesecloth with water and wring it out thoroughly. The cheesecloth should be doubled or quadrupled, slightly larger than the turkey.
- Place the dampened cheesecloth in the saucepan with the herbed buttery spread, soaking it completely.
- Carefully remove the saturated cheesecloth and lay it over the turkey, ensuring it covers the breast and legs. Smear any remaining herbed buttery spread onto the cheesecloth.
Step 6: Roasting the Turkey
Time to bake your masterpiece!
- Position the oven rack in the lower third of the oven and preheat to 450°F (232°C).
- Pour 4 cups of gluten-free, low-sodium chicken broth into the bottom of the roasting pan.
- Place the roasting pan with the turkey into the preheated oven and bake for 45 minutes.
- After 45 minutes, remove the turkey from the oven and baste it with the chicken broth from the bottom of the pan, directly over the cheesecloth.
- Reduce the oven temperature to 350°F (175°C) and continue baking for approximately 2 hours, or until a meat thermometer inserted into the thickest part of the thigh registers 165°F (74°C).
- Baste the turkey with pan juices 2-3 more times during the remaining cooking time. Rotate the turkey when you baste it to ensure even cooking, especially if your oven has hot spots.
- The cheesecloth will turn brown during baking. Once the turkey is done, remove it from the oven and carefully peel off the cheesecloth to reveal your beautifully roasted turkey.
Step 7: Resting and Carving
Allowing the turkey to rest ensures a juicy and flavorful result.
- Carefully transfer the cooked turkey from the roasting pan to another pan or platter. Use large spatulas or medium-sized plates to support the turkey while lifting it.
- Loosely tent the turkey with aluminum foil and let it rest for 30 minutes before carving. This allows the juices to redistribute, resulting in a more tender and flavorful turkey.
Step 8: Making the Gravy (Gluten-Free)
No Thanksgiving is complete without gravy! This recipe uses cornstarch to keep it gluten-free.
- Carefully pour all the broth and drippings from the roasting pan into a heat-safe container.
- In a large skillet or Dutch oven, melt 4 tablespoons of dairy-free butter over medium heat. Add any small pieces of turkey (drippings) that were left in the roasting pan. Stir, breaking up the drippings.
- Once the butter is melted, pour in 4 cups of the reserved hot broth from the roasting pan and stir to combine.
- In a separate bowl, whisk together ¼ cup of cornstarch and 1 cup of cold water until the cornstarch is completely dissolved.
- Pour the cornstarch mixture into the skillet with the broth and butter, stirring constantly while heating.
- Season with salt and pepper to taste. Continue stirring for about 6-9 minutes, or until the gravy reaches your desired thickness.
- Remove from heat and serve warm with the turkey and the rest of your gluten-free Thanksgiving feast.
Ingredients for Herb Roasted Turkey
- 1 14-16 lb. turkey, thawed, giblets and neck removed, (labeled gluten-free) (see notes below)
- 1 cup dairy-free butter
- 3 tablespoons fresh parsley, plus a little more left whole
- 2 tablespoons fresh sage, plus a little more left whole
- 2 tablespoons fresh thyme, plus a little more left whole
- zest of 1 lemon
- 1 teaspoon Himalayan pink salt
- 1 teaspoon black pepper
- 2 lemons, halved
- 2 medium onions, halved
- 1 garlic head, top sliced off, excess papery peel removed
- 4 cups low-sodium chicken broth, gluten-free
- 1 piece of cheesecloth, doubled or quadrupled- just a bit larger than the turkey
Gluten-Free Gravy Ingredients:
- 4 tablespoons dairy-free butter
- ¼ cup cornstarch
- 1 cup cold water
- 4 cups of reserved broth from the turkey
- drippings or small pieces of turkey that was left in the roasting pan
- salt and pepper to taste
Nutritional Benefits of Gluten-Free Herb Roasted Turkey
Our Herb Roasted Turkey recipe is naturally gluten-free, offering a delicious and safe option for those with celiac disease or gluten intolerance. Here’s a breakdown of the key nutritional benefits:
- Lean Protein: Turkey is an excellent source of lean protein, crucial for muscle repair, growth, and overall body function.
- Essential Nutrients: Packed with vitamins and minerals, including B vitamins, selenium, and zinc, supporting immune function and energy production.
- Dairy-Free: By using dairy-free butter, this recipe is suitable for individuals with lactose intolerance or dairy allergies.
- Fresh Herbs: The abundance of fresh herbs like parsley, sage, and thyme not only enhances flavor but also provides antioxidants and anti-inflammatory properties.
- Low-Sodium Option: Using low-sodium chicken broth helps control sodium intake, making it a heart-healthy choice.
Tips and Variations for the Perfect Herb Roasted Turkey
Achieving the perfect Herb Roasted Turkey is easier than you think! Here are some tips and variations to ensure your turkey is a success:
Essential Tips for Herb Roasted Turkey
- Safe Thawing: Always thaw your turkey in the refrigerator to prevent bacterial growth. Allow ample time – about 24 hours for every 5 pounds of turkey.
- Gluten-Free Assurance: Double-check that your turkey and chicken broth are labeled gluten-free to avoid cross-contamination.
- Herb Preparation: Finely chop your herbs to maximize flavor infusion.
- Cheesecloth Technique: Soaking the cheesecloth in herbed dairy-free butter ensures a moist and flavorful bird. Make sure to wet and wring out the cheesecloth before soaking in the butter mixture.
- Temperature Monitoring: Use a meat thermometer to ensure the turkey reaches an internal temperature of 165°F (74°C) for safe consumption.
- Resting Time: Allowing the turkey to rest for 30 minutes before carving helps the juices redistribute, resulting in a more tender and flavorful meat.
Substitutions and Variations
- Vegan Option: For a vegan alternative, consider using a large butternut squash or a commercially available plant-based turkey roast, adjusting cooking times accordingly and basting with vegetable broth and herbs.
- Herb Variations: Feel free to experiment with different herbs like rosemary, oregano, or marjoram to customize the flavor profile.
- Citrus Alternatives: Use oranges or grapefruits instead of lemons for a different citrusy note.
- Fat Substitutions: If you don’t have dairy-free butter, olive oil or coconut oil can be used as a substitute, although the flavor will vary slightly.
- Lower Sodium: Reduce the amount of salt or use a salt substitute to further lower the sodium content.
Making Gluten-Free Gravy
- Broth Quality: The quality of the reserved broth significantly impacts the gravy’s flavor. Ensure it’s rich and well-seasoned.
- Cornstarch Slurry: Mix cornstarch with cold water to prevent lumps when adding it to the hot broth.
- Seasoning: Taste and adjust seasoning as needed. A dash of Worcestershire sauce (ensure it’s gluten-free) can add depth of flavor.
- Texture: For a smoother gravy, strain it through a fine-mesh sieve before serving.
Additional Tips
- Prepare in Advance: The herbed dairy-free butter can be made up to a week in advance and stored in the refrigerator. Bring to room temperature before using.
- Special Equipment: A turkey baster and meat thermometer are essential for achieving a perfectly cooked turkey.
- Roasting Pan: A roasting pan with a rack can make it easier to lift the turkey out of the pan after cooking.
Essential Equipment for This Recipe
To prepare this delicious recipe, you’ll need the following kitchen tools:
- Mixing Bowls – A set of various sizes is essential for prepping and combining ingredients.
Find Mixing Bowls on Amazon - Measuring Cups and Spoons – Precise measurements are key to successful baking.
Find Measuring Cups and Spoons on Amazon - Baking Sheets – For evenly baked goods.
Find Baking Sheets on Amazon - Whisks – Perfect for whipping air into eggs and batters.
Find Whisks on Amazon - Spatulas – Ideal for folding and mixing without scratching your bowls.
Find Spatulas on Amazon - Food Processors – Great for chopping vegetables quickly.
Find Food Processors on Amazon - Saucepans – Needed for cooking ingredients .
Find Saucepans on Amazon - Chef’s Knives – A sharp knife makes all the difference in the kitchen.
Find Chef’s Knives on Amazon - Cutting Boards – Protect your counters and make chopping easier.
Find Cutting Boards on Amazon